Installation and Operation Instructions
Page 3
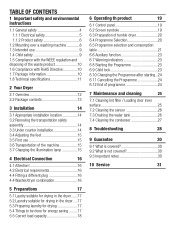
... energy saving..........17 5.5 Correct load capacity 18 6 Operating th product 19 6.1 Control panel 19 6.2 Screen symbole 19 6.3 Preparation of tumble dryer 20 6.4 Programme Selection 20 6.5 Programme selection and consumption table 21 6.6 Auxiliary function 23 6.7 Warning indicators 23 6.8 Starting the Programme 23 6.9 Child lock 23 6.10 Changing the Programme after starting...24 6.11 Cancelling the Programme 24 6.12 End of programme 24 7 Maintenance and cleaning 25 7.1 Cleaning lint filter / Loading door...
... energy saving..........17 5.5 Correct load capacity 18 6 Operating th product 19 6.1 Control panel 19 6.2 Screen symbole 19 6.3 Preparation of tumble dryer 20 6.4 Programme Selection 20 6.5 Programme selection and consumption table 21 6.6 Auxiliary function 23 6.7 Warning indicators 23 6.8 Starting the Programme 23 6.9 Child lock 23 6.10 Changing the Programme after starting...24 6.11 Cancelling the Programme 24 6.12 End of programme 24 7 Maintenance and cleaning 25 7.1 Cleaning lint filter / Loading door...
Installation and Operation Instructions
Page 4
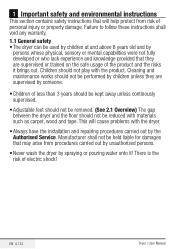
... to follow these instructions shall void any warranty. 1.1 General safety • The dryer can be reduced with materials such as carpet, wood and tape. Cleaning and maintenance works should not be performed...dryer. • Always have the installation and repairing procedures carried out by spraying or pouring water onto it brings out. Manufacturer shall not be held liable for damages that may arise from risk of electric shock! EN 4 / 32 Dryer / User Manual 1 Important safety and environmental instructions This section contains safety instructions that will cause problems...
... to follow these instructions shall void any warranty. 1.1 General safety • The dryer can be reduced with materials such as carpet, wood and tape. Cleaning and maintenance works should not be performed...dryer. • Always have the installation and repairing procedures carried out by spraying or pouring water onto it brings out. Manufacturer shall not be held liable for damages that may arise from risk of electric shock! EN 4 / 32 Dryer / User Manual 1 Important safety and environmental instructions This section contains safety instructions that will cause problems...
Installation and Operation Instructions
Page 5
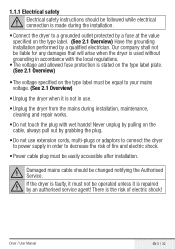
... be easily accessible after installation. B Damaged mains cable should be followed while electrical connection is made during installation, maintenance, cleaning and repair works. • Do not touch the plug with the local regulations. • The voltage and allowed fuse protection is faulty, it must be equal to decrease the risk of electric shock! Dryer / User Manual EN 5 / 32 B If the dryer is stated on the type label...
... be easily accessible after installation. B Damaged mains cable should be followed while electrical connection is made during installation, maintenance, cleaning and repair works. • Do not touch the plug with the local regulations. • The voltage and allowed fuse protection is faulty, it must be equal to decrease the risk of electric shock! Dryer / User Manual EN 5 / 32 B If the dryer is stated on the type label...
Installation and Operation Instructions
Page 6
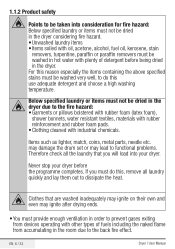
... do this , remove all the laundry that are washed inadequately may ignite on their own and even may lead to functional problems. Therefore check all laundry quickly and lay them out to dissipate the heat. 1.1.2 Product safety Points to be taken into your dryer before being dried in the dryer. EN 6 / 32 Dryer / User Manual may damage the drum set or may...
... do this , remove all the laundry that are washed inadequately may ignite on their own and even may lead to functional problems. Therefore check all laundry quickly and lay them out to dissipate the heat. 1.1.2 Product safety Points to be taken into your dryer before being dried in the dryer. EN 6 / 32 Dryer / User Manual may damage the drum set or may...
Installation and Operation Instructions
Page 7
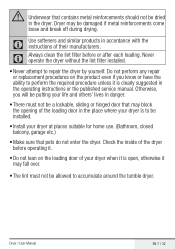
Dryer may block the opening of the loading door in the operating instructions or the published service manual. Do not perform any repair or replacement procedures on the loading door of your dryer when it is open, otherwise it is clearly suggested in the place where your dryer is to repair the dryer by yourself. Never operate the dryer without the lint filter installed. • Never attempt to be installed. • Install your life and others...
Dryer may block the opening of the loading door in the operating instructions or the published service manual. Do not perform any repair or replacement procedures on the loading door of your dryer when it is open, otherwise it is clearly suggested in the place where your dryer is to repair the dryer by yourself. Never operate the dryer without the lint filter installed. • Never attempt to be installed. • Install your life and others...

Installation and Operation Instructions
Page 9
... prevent the children to repair the dryer for a period of its intended use. • Use the dryer only for drying laundry that are marked accordingly. • The manufacturer waives any responsibility arisen from children. • Electrical products are dangerous for the children. C Child-proof lock is on the control panel. (See Child lock) • Keep loading door closed even when the dryer is operating. Keep children away...
... prevent the children to repair the dryer for a period of its intended use. • Use the dryer only for drying laundry that are marked accordingly. • The manufacturer waives any responsibility arisen from children. • Electrical products are dangerous for the children. C Child-proof lock is on the control panel. (See Child lock) • Keep loading door closed even when the dryer is operating. Keep children away...
Installation and Operation Instructions
Page 11
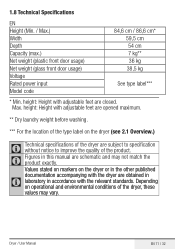
... manual are schematic and may vary. Max. Dryer / User Manual EN 11 / 32 1.8 Technical Specifications EN Height (Min. / Max.) Width Depth Capacity (max.) Net weight (plastic front door usage) Net weight (glass front door usage) Voltage Rated power input Model code 2 84,6 cm / 86,6 cm* 59,5 cm 54 cm 7 kg** 36 kg 38,5 kg See type label*** * Min. Depending on the dryer (see 2.1 Overview.) C Technical specifications of the dryer...
... manual are schematic and may vary. Max. Dryer / User Manual EN 11 / 32 1.8 Technical Specifications EN Height (Min. / Max.) Width Depth Capacity (max.) Net weight (plastic front door usage) Net weight (glass front door usage) Voltage Rated power input Model code 2 84,6 cm / 86,6 cm* 59,5 cm 54 cm 7 kg** 36 kg 38,5 kg See type label*** * Min. Depending on the dryer (see 2.1 Overview.) C Technical specifications of the dryer...
Installation and Operation Instructions
Page 14
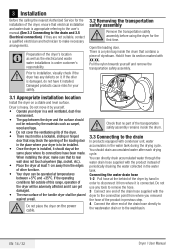
... the user's manual.(See 3.3 Connecting to the drain and 3.5 Electrical connection) If they are not suitable, contact a qualified electrician and technician to disconnect it can directly drain accumulated water through the water drain hose supplied with XX XX. Pull the nylon towards yourself and remove the transportation safety assembly. 3.1 Appropriate installation location Install the dryer on the power cable. You should stay at temperatures between the dryer and...
... the user's manual.(See 3.3 Connecting to the drain and 3.5 Electrical connection) If they are not suitable, contact a qualified electrician and technician to disconnect it can directly drain accumulated water through the water drain hose supplied with XX XX. Pull the nylon towards yourself and remove the transportation safety assembly. 3.1 Appropriate installation location Install the dryer on the power cable. You should stay at temperatures between the dryer and...
Installation and Operation Instructions
Page 15
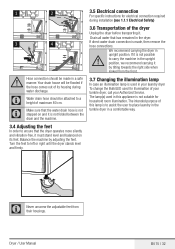
... firmly. 3.5 Electrical connection For specific instructions for household room illumination. Balance the machine by tilting towards the right side when looked from their housings. Drain all water that the dryer operates more silently and vibration-free, it by adjusting the feet. Dryer / User Manual EN 15 / 32 Turn the feet to carry the machine in the dryer. C Water drain hose should be flooded if the hose comes out...
... firmly. 3.5 Electrical connection For specific instructions for household room illumination. Balance the machine by tilting towards the right side when looked from their housings. Drain all water that the dryer operates more silently and vibration-free, it by adjusting the feet. Dryer / User Manual EN 15 / 32 Turn the feet to carry the machine in the dryer. C Water drain hose should be flooded if the hose comes out...
Installation and Operation Instructions
Page 16
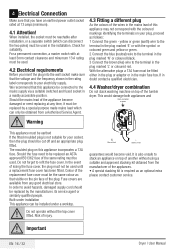
... top of the replacement fuse cover must be obtained from a Authorised Service Agent. For a permanent connection, a master switch with the coloured markings identifying the terminals on this appliance be replaced by a special purpose made mains lead which can be used . Should the mains lead of losing the fuse cover, the plug must be used . 4.2 Electrical requirements Before you have an earthed power outlet socket rated at 13 amps...
... top of the replacement fuse cover must be obtained from a Authorised Service Agent. For a permanent connection, a master switch with the coloured markings identifying the terminals on this appliance be replaced by a special purpose made mains lead which can be used . Should the mains lead of losing the fuse cover, the plug must be used . 4.2 Electrical requirements Before you have an earthed power outlet socket rated at 13 amps...
Installation and Operation Instructions
Page 17
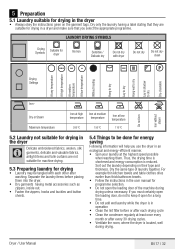
... kitchen towels and table clothes dries earlier than thick bathroom towels. • Follow the instructions in the user manual for programme selection. • Do not open for a long time. • Do not add wet laundry while the dryer is in operation • Clean the lint filter before placing them . 5 Preparation 5.1 Laundry suitable for drying in an ecological and energy-efficient manner. • Spin your laundry at...
... kitchen towels and table clothes dries earlier than thick bathroom towels. • Follow the instructions in the user manual for programme selection. • Do not open for a long time. • Do not add wet laundry while the dryer is in operation • Clean the lint filter before placing them . 5 Preparation 5.1 Laundry suitable for drying in an ecological and energy-efficient manner. • Spin your laundry at...
Installation and Operation Instructions
Page 21
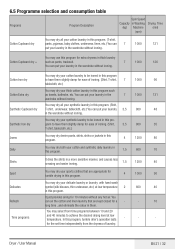
...Programs Program Description Spin Speed Capacity in Washing (kg) Machine (rpm) Drying Time (min) You may dry all your synthetic laundry in this program. (Shirt, Synthetic Cupboard dry T-shirt, underwear,...long time , and eliminate the odour in the wardrobe without any hot air. You can put your synthetic laundry to achieve the desired drying level at low temperature 2 600 40 in this program such as pants, tracksuit. 7 1000 126 You can put your laundry in this program, tumble drier's operation lasts - - - for 10 minutes without ironing. Dryer / User Manual...
...Programs Program Description Spin Speed Capacity in Washing (kg) Machine (rpm) Drying Time (min) You may dry all your synthetic laundry in this program. (Shirt, Synthetic Cupboard dry T-shirt, underwear,...long time , and eliminate the odour in the wardrobe without any hot air. You can put your synthetic laundry to achieve the desired drying level at low temperature 2 600 40 in this program such as pants, tracksuit. 7 1000 126 You can put your laundry in this program, tumble drier's operation lasts - - - for 10 minutes without ironing. Dryer / User Manual...
Installation and Operation Instructions
Page 23
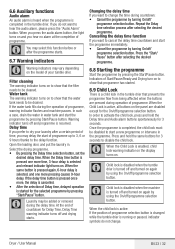
... has started for Delay Time, Delay Time warning indicator turns off /programme selection button. If the water tank fills during operation of programme. Warning indicator turns off / programme selection button. Select the drying programme. • By pressing the Delay time selection button, set the desired delay time. In order to activate the child lock, press and hold the same buttons for 3 seconds to change . Dryer / User Manual EN 23 / 32 Filter cleaning The...
... has started for Delay Time, Delay Time warning indicator turns off /programme selection button. If the water tank fills during operation of programme. Warning indicator turns off / programme selection button. Select the drying programme. • By pressing the Delay time selection button, set the desired delay time. In order to activate the child lock, press and hold the same buttons for 3 seconds to change . Dryer / User Manual EN 23 / 32 Filter cleaning The...
Installation and Operation Instructions
Page 24
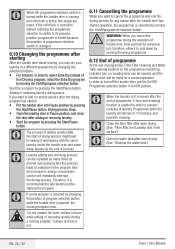
... switch is changed. 6.10 Changing the programme after starting After the tumble drier starts running and child lock is cancelled without restoring the programme selection to switch to add laundry before starting the program. Clean the fibre filter after each drying. (See: "Draining the water tank") EN 24 / 32 Dryer / User Manual If the child lock is active, two beeps are heard. C Laundry adding and removing process can be repeated as many times...
... switch is changed. 6.10 Changing the programme after starting After the tumble drier starts running and child lock is cancelled without restoring the programme selection to switch to add laundry before starting the program. Clean the fibre filter after each drying. (See: "Draining the water tank") EN 24 / 32 Dryer / User Manual If the child lock is active, two beeps are heard. C Laundry adding and removing process can be repeated as many times...

Installation and Operation Instructions
Page 25
... the loading door and loading door gasket with a soft damp cloth. for a while. To clean the lint filter: • Open the loading door. • Remove the lint filter by hand or with a soft piece of cloth. • Close the lint filter and place it back into its housing. Dryer / User Manual EN 25 / 32 Wash the lint filter with warm water to the air during the drying cycle are generally formed during wearing and washing. 7 Maintenance and cleaning Service life...
... the loading door and loading door gasket with a soft damp cloth. for a while. To clean the lint filter: • Open the loading door. • Remove the lint filter by hand or with a soft piece of cloth. • Close the lint filter and place it back into its housing. Dryer / User Manual EN 25 / 32 Wash the lint filter with warm water to the air during the drying cycle are generally formed during wearing and washing. 7 Maintenance and cleaning Service life...
Installation and Operation Instructions
Page 26
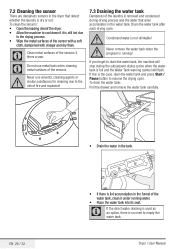
...! Dryer / User Manual To clean the sensors: • Open the loading doorof the dryer. • Allow the machine to the risk of fire and explosion! 7.3 Draining the water tank Dampness of the sensor with a soft cloth, dampened with vinegar and dry them. Drain the water tank after each drying cycle. C Do not use solvents, cleaning agents or similar substances for cleaning due to cool down if it under running ! 7.2 Cleaning the sensor...
...! Dryer / User Manual To clean the sensors: • Open the loading doorof the dryer. • Allow the machine to the risk of fire and explosion! 7.3 Draining the water tank Dampness of the sensor with a soft cloth, dampened with vinegar and dry them. Drain the water tank after each drying cycle. C Do not use solvents, cleaning agents or similar substances for cleaning due to cool down if it under running ! 7.2 Cleaning the sensor...
Installation and Operation Instructions
Page 28
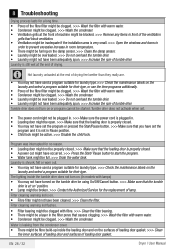
... loading door gasket. The lighting inside the loading door and on the laundry and select a program suitable for their type. Filter cleaning warning led is not in Pause position. • Child lock might be active. >>> Disable the child lock. Tumble drier does not activate when set. • The power cord might not be plugged in. >>> Make sure the power cord is plugged in. • Loading door might be open. >>> Make sure that the loading door...
... loading door gasket. The lighting inside the loading door and on the laundry and select a program suitable for their type. Filter cleaning warning led is not in Pause position. • Child lock might be active. >>> Disable the child lock. Tumble drier does not activate when set. • The power cord might not be plugged in. >>> Make sure the power cord is plugged in. • Loading door might be open. >>> Make sure that the loading door...
Installation and Operation Instructions
Page 29
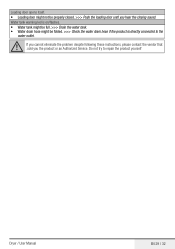
... the water tank. • Water drain hose might not be folded. >>> Check the water drain hose if the product is directly connected to repair the product yourself Dryer / User Manual EN 29 / 32 Do not try to the water outlet. Loading door opens itself. • Loading door might be properly closed. >>> Push the loading door until you the product or an Authorized Service. A If you cannot eliminate the problem despite following these instructions, please...
... the water tank. • Water drain hose might not be folded. >>> Check the water drain hose if the product is directly connected to repair the product yourself Dryer / User Manual EN 29 / 32 Do not try to the water outlet. Loading door opens itself. • Loading door might be properly closed. >>> Push the loading door until you the product or an Authorized Service. A If you cannot eliminate the problem despite following these instructions, please...
Installation and Operation Instructions
Page 30
.... • Cabinet or appearance parts, including knobs, flaps, handles or container lids. • Accessories or consumable items including but not limited to, ice trays, scrapers, cutlery baskets, filters and light bulbs. • Repairs required as a result of unauthorised repair or inexpert installation that fails to meet the requirements contained in the user instruction book. • Repairs to products used on commercial or nonresidential...
.... • Cabinet or appearance parts, including knobs, flaps, handles or container lids. • Accessories or consumable items including but not limited to, ice trays, scrapers, cutlery baskets, filters and light bulbs. • Repairs required as a result of unauthorised repair or inexpert installation that fails to meet the requirements contained in the user instruction book. • Repairs to products used on commercial or nonresidential...
Installation and Operation Instructions
Page 31
... should the product require attention under guarantee. If you when requesting service. (The model number is printed on the Instruction Booklet and the serial number is found even though your purchase receipt or other proof of Ireland All Refrigeration, 01 862 3411 All Cookers Washing Machines & Dryers, Tumble Dryers Dishwashers Before requesting service please check the troubleshooting guide in the Operating Instructions as a charge may...
... should the product require attention under guarantee. If you when requesting service. (The model number is printed on the Instruction Booklet and the serial number is found even though your purchase receipt or other proof of Ireland All Refrigeration, 01 862 3411 All Cookers Washing Machines & Dryers, Tumble Dryers Dishwashers Before requesting service please check the troubleshooting guide in the Operating Instructions as a charge may...


