Owners Manual
Page 2
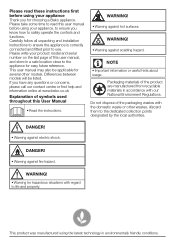
... friendly conditions. 2 Dryer / User Manual DANGER! • Warning against electric shock. WARNING! • Warning against hot surfaces. Please write your product model and serial number on the last page of this User Manual • Read the instructions. This user manual may also be listed. If you know how to safely operate the controls and functions. Please take some time to read these instructions first before using your appliance Thank...
... friendly conditions. 2 Dryer / User Manual DANGER! • Warning against electric shock. WARNING! • Warning against hot surfaces. Please write your product model and serial number on the last page of this User Manual • Read the instructions. This user manual may also be listed. If you know how to safely operate the controls and functions. Please take some time to read these instructions first before using your appliance Thank...
Owners Manual
Page 3
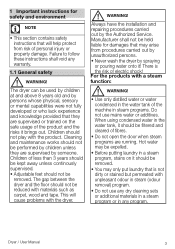
... not be filtered and cleared of fibres. • Do not open the door when steam programs are supervised by the Authorized Service. There is not dirty or stained but permeated with unpleasant odour in steam (odour removal) program. • Do not use any dry cleaning sets or additional materials in a steam program or in steam programs. Do not use mains water or additives. 1 Important instructions for...
... not be filtered and cleared of fibres. • Do not open the door when steam programs are supervised by the Authorized Service. There is not dirty or stained but permeated with unpleasant odour in steam (odour removal) program. • Do not use any dry cleaning sets or additional materials in a steam program or in steam programs. Do not use mains water or additives. 1 Important instructions for...
Owners Manual
Page 4
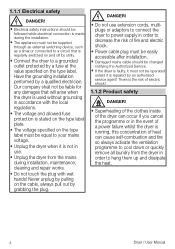
... dissipate the heat. 4 Dryer / User Manual 1.1.1 Electrical safety B DANGER! • Electrical safety instructions should be followed while electrical connection is made during installation, maintenance, cleaning and repair works. • Do not touch the plug with the local regulations. • The voltage and allowed fuse protection is stated on the type label plate. • The voltage specified on the type label must not be operated unless it is used without grounding...
... dissipate the heat. 4 Dryer / User Manual 1.1.1 Electrical safety B DANGER! • Electrical safety instructions should be followed while electrical connection is made during installation, maintenance, cleaning and repair works. • Do not touch the plug with the local regulations. • The voltage and allowed fuse protection is stated on the type label plate. • The voltage specified on the type label must not be operated unless it is used without grounding...
Owners Manual
Page 5
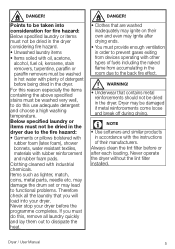
... due to dissipate the heat. may damage the drum set or may lead to functional problems. Therefore check all laundry quickly and lay them out to the back fire effect. A WARNING! • Underwear that contains metal reinforcements should not be dried in the dryer. Never operate the dryer without the lint filter installed. Dryer / User Manual 5 Never stop your dryer. DANGER! • Clothes that you must provide...
... due to dissipate the heat. may damage the drum set or may lead to functional problems. Therefore check all laundry quickly and lay them out to the back fire effect. A WARNING! • Underwear that contains metal reinforcements should not be dried in the dryer. Never operate the dryer without the lint filter installed. Dryer / User Manual 5 Never stop your dryer. DANGER! • Clothes that you must provide...
Owners Manual
Page 6
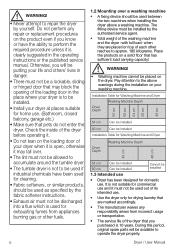
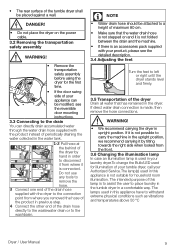
... dryer -with full load- should be used between the two machines when installing the dryer above warnings during the installation on a solid floor that you will be used for commercial use and it may block the opening of the loading door in the operating instructions or the published service manual. A WARNING! • Never attempt to operate the dryer properly. 6 Dryer / User Manual Do not perform any responsibility arisen from appliances burning gas...
... dryer -with full load- should be used between the two machines when installing the dryer above warnings during the installation on a solid floor that you will be used for commercial use and it may block the opening of the loading door in the operating instructions or the published service manual. A WARNING! • Never attempt to operate the dryer properly. 6 Dryer / User Manual Do not perform any responsibility arisen from appliances burning gas...
Owners Manual
Page 7
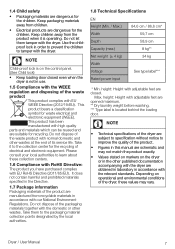
... with the dryer. C NOTE • Technical specifications of the dryer are subject to specification without notice to learn about these values may not match the product exactly. • Values stated on markers on the control panel. (See Child lock) • Keep loading door closed . Keep packaging materials away from recyclable materials in the Directive. 1.7 Package information Packaging materials of its service life. This...
... with the dryer. C NOTE • Technical specifications of the dryer are subject to specification without notice to learn about these values may not match the product exactly. • Values stated on markers on the control panel. (See Child lock) • Keep loading door closed . Keep packaging materials away from recyclable materials in the Directive. 1.7 Package information Packaging materials of its service life. This...
Owners Manual
Page 8
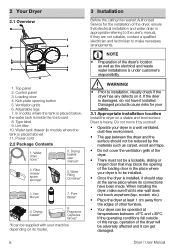
Top panel 2. Kick plate opening of the loading door in models where the tank is appropriate referring to make sure that may block the opening button 5. Type label 9. Water drain hose * 5. User Manual 7. If the operating conditions fall outside of this range, operation of the dryer, ensure that electrical installation and water drain is placed above) 11. Lint filter 10. Water Filling Container* 3. Fragrance Capsules Group* *It can be supplied with your machine...
Top panel 2. Kick plate opening of the loading door in models where the tank is appropriate referring to make sure that may block the opening button 5. Type label 9. Water drain hose * 5. User Manual 7. If the operating conditions fall outside of this range, operation of the dryer, ensure that electrical installation and water drain is placed above) 11. Lint filter 10. Water Filling Container* 3. Fragrance Capsules Group* *It can be supplied with your machine...
Owners Manual
Page 9
... pack supplied with your product, please see the reversible door mounting instructions. 3.3 Connecting to the drain You can directly drain accumulated water through the water drain hose supplied with the dryer to the connection point from the front. 3.6 Changing the illumination lamp In case an illumination lamp is used in your laundry dryer.To change the Bulb/LED used for household room illumination. B DANGER! • Do...
... pack supplied with your product, please see the reversible door mounting instructions. 3.3 Connecting to the drain You can directly drain accumulated water through the water drain hose supplied with the dryer to the connection point from the front. 3.6 Changing the illumination lamp In case an illumination lamp is used in your laundry dryer.To change the Bulb/LED used for household room illumination. B DANGER! • Do...
Owners Manual
Page 10
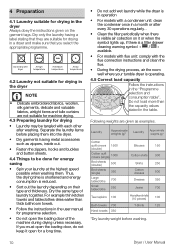
... are suitable for drying in the user manual for programme selection. • Do not open for energy saving • Spin your tumble dryer is operating. 4.5 Correct load capacity Follow the instructions in the dryer Always obey the instructions given on their type and thickness. Laundry Approximate weights (g)* Laundry Approximate weights (g)* Cotton quilt covers (double) 1500 Cotton quilt covers (single) 1000 Bed sheets (double) 500 Bed sheets (single) 350...
... are suitable for drying in the user manual for programme selection. • Do not open for energy saving • Spin your tumble dryer is operating. 4.5 Correct load capacity Follow the instructions in the dryer Always obey the instructions given on their type and thickness. Laundry Approximate weights (g)* Laundry Approximate weights (g)* Cotton quilt covers (double) 1500 Cotton quilt covers (single) 1000 Bed sheets (double) 500 Bed sheets (single) 350...
Owners Manual
Page 11
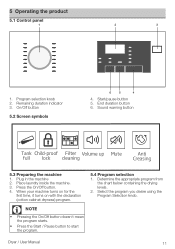
.../Off button 5.2 Screen symbols 6 5 4 4. End duration button 6. Sound warning button Tank Child-proof Filter Volume up Mute full lock cleaning Anti Creasing 5.3 Preparing the machine 1. Plug in the machine 2. When your machine turns on for the first time, it turns on with the declaration (cotton cabinet dryness) program. Program selection knob 2. Start/pause button 5. C NOTE • Pressing the On/Off button doesn't mean the program starts...
.../Off button 5.2 Screen symbols 6 5 4 4. End duration button 6. Sound warning button Tank Child-proof Filter Volume up Mute full lock cleaning Anti Creasing 5.3 Preparing the machine 1. Plug in the machine 2. When your machine turns on for the first time, it turns on with the declaration (cotton cabinet dryness) program. Program selection knob 2. Start/pause button 5. C NOTE • Pressing the On/Off button doesn't mean the program starts...
Owners Manual
Page 13
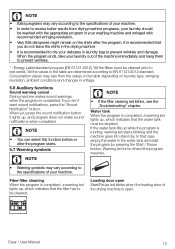
... be cleaned prior to dry your washing machine and wringed with recommended wringing revolution.. • Very little dampness might remain on laundry type, wringing revolution, ambient conditions and changes in laundry bag to EN 61121:2012 standard. If you press the sound notification button it lights up while the program is open Start/Pause led blinks when the loading door of...
... be cleaned prior to dry your washing machine and wringed with recommended wringing revolution.. • Very little dampness might remain on laundry type, wringing revolution, ambient conditions and changes in laundry bag to EN 61121:2012 standard. If you press the sound notification button it lights up while the program is open Start/Pause led blinks when the loading door of...
Owners Manual
Page 14
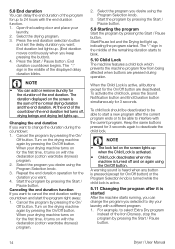
... pressing the On/Off button. For example, to deactivate the child lock. Open the loading door and place your drying machine turns on with a different program. 1. At the end of the countdown the end duration led turns off and on the drying machine again by pressing the Start / Pause button. Turn on again using the Program Selection knob. 3. Turn on the screen is started . Cancel the program...
... pressing the On/Off button. For example, to deactivate the child lock. Open the loading door and place your drying machine turns on with a different program. 1. At the end of the countdown the end duration led turns off and on the drying machine again by pressing the Start / Pause button. Turn on again using the Program Selection knob. 3. Turn on the screen is started . Cancel the program...
Owners Manual
Page 15
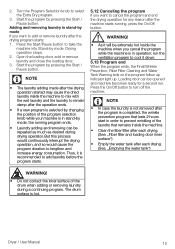
Open the loading door, add or remove laundry and close the loading door. 3. Start the program by pressing the Start / Pause button. A WARNING! • As it will be extremely hot inside the machine when you want to cancel the program and end the drying operation for a second run the ventilation program to prevent wrinkling of the laundry that lasts 2 hours start in operation; Press the On/Off...
Open the loading door, add or remove laundry and close the loading door. 3. Start the program by pressing the Start / Pause button. A WARNING! • As it will be extremely hot inside the machine when you want to cancel the program and end the drying operation for a second run the ventilation program to prevent wrinkling of the laundry that lasts 2 hours start in operation; Press the On/Off...
Owners Manual
Page 16
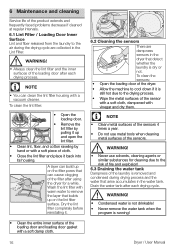
... water to the air during drying process and the water that can clean the lint filter housing with a soft damp cloth. 16 Dryer / User Manual 6 Maintenance and cleaning Service life of cloth. • Close the lint filter and place it back into its housing. To clean the sensors: • Open the loading door of the dryer. • Allow the machine to cool down if it is dry or not. C NOTE • Clean metal surfaces of the sensors 4 times...
... water to the air during drying process and the water that can clean the lint filter housing with a soft damp cloth. 16 Dryer / User Manual 6 Maintenance and cleaning Service life of cloth. • Close the lint filter and place it back into its housing. To clean the sensors: • Open the loading door of the dryer. • Allow the machine to cool down if it is dry or not. C NOTE • Clean metal surfaces of the sensors 4 times...
Owners Manual
Page 18
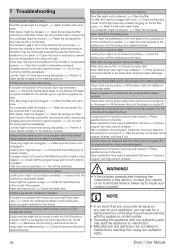
... temperature sensors. A WARNING! • If the problem persists after drying. Clothes come out damp after following the instructions in . Clothes have accumulated on /flashing. Loading door might have accumulated clogging up on the washing machine. Water discharge hose might be pressed. >>> Check that you encounter an issue on /flashing. Excessive amount of fluff might be closed . Steam symbol is properly closed completely. >>> Ensure that the loading door is connected directly...
... temperature sensors. A WARNING! • If the problem persists after drying. Clothes come out damp after following the instructions in . Clothes have accumulated on /flashing. Loading door might have accumulated clogging up on the washing machine. Water discharge hose might be pressed. >>> Check that you encounter an issue on /flashing. Excessive amount of fluff might be closed . Steam symbol is properly closed completely. >>> Ensure that the loading door is connected directly...

Owners Manual
Page 19
...; A special stacking kit is required as an optional extra please contact customer service. With the alternative plugs a 13A fuse must be fitted either in the plug or adaptor or in the installation. Should the mains lead of the appliance become void. Should the fuse need replacing at any good electrical store. In the event of losing the fuse cover, the plug must be used . In order...
...; A special stacking kit is required as an optional extra please contact customer service. With the alternative plugs a 13A fuse must be fitted either in the plug or adaptor or in the installation. Should the mains lead of the appliance become void. Should the fuse need replacing at any good electrical store. In the event of losing the fuse cover, the plug must be used . In order...
Owners Manual
Page 21
... use fails to meet the requirements contained in this guarantee or the User Instructions Booklet. • Repairs to a product operated at restaurants or from which you have previously agreed to carry out the repair. Your product is not limited to loss arising from the initial date of purchase of a Beko Approved Engineer to the installation environment. 3. Professional installation by a qualified Electrical...
... use fails to meet the requirements contained in this guarantee or the User Instructions Booklet. • Repairs to a product operated at restaurants or from which you have previously agreed to carry out the repair. Your product is not limited to loss arising from the initial date of purchase of a Beko Approved Engineer to the installation environment. 3. Professional installation by a qualified Electrical...
Owners Manual
Page 22
...right to terminate the guarantee if you are subjected to pay the costs for specific timed appointments, this guarantee will be any service call in our Standard Guarantee Terms and Conditions. 22 Dryer / User Manual If you fail to physical or verbal abuse in accordance with an invoice. 9. Where a replacement is not possible, a model...extras, where available (i.e. Does Beko offer replacements? the new product will not be provided. Our Engineers work Monday to Friday 9.00am to the replacement product; extendable feet) are supplied on the number set out above. 10. On ...
...right to terminate the guarantee if you are subjected to pay the costs for specific timed appointments, this guarantee will be any service call in our Standard Guarantee Terms and Conditions. 22 Dryer / User Manual If you fail to physical or verbal abuse in accordance with an invoice. 9. Where a replacement is not possible, a model...extras, where available (i.e. Does Beko offer replacements? the new product will not be provided. Our Engineers work Monday to Friday 9.00am to the replacement product; extendable feet) are supplied on the number set out above. 10. On ...
Owners Manual
Page 23
... selected washing machines, washer-dryers, tumble dryers and dishwashers. Customers will automatically activate the ProSmart Motor 10 year guarantee. The Terms and Conditions shown above are governed by an authorised Beko Service Agent (the "Service Agent"). 6. We may keep your purchasing preferences. We may use the information you will receive a unique reference code as standard. Any repair/replacement of a claim being...
... selected washing machines, washer-dryers, tumble dryers and dishwashers. Customers will automatically activate the ProSmart Motor 10 year guarantee. The Terms and Conditions shown above are governed by an authorised Beko Service Agent (the "Service Agent"). 6. We may keep your purchasing preferences. We may use the information you will receive a unique reference code as standard. Any repair/replacement of a claim being...
Owners Manual
Page 24
... purchase will be required to input your serial number into your telephone keypad during your call us on the Operating Instruction Booklet / User guide • The product model and serial number is found, and even though your product may still be under guarantee or for product advice please call our Contact centre Before requesting service please check the troubleshooting guide in the Operating Instructions booklet, as...
... purchase will be required to input your serial number into your telephone keypad during your call us on the Operating Instruction Booklet / User guide • The product model and serial number is found, and even though your product may still be under guarantee or for product advice please call our Contact centre Before requesting service please check the troubleshooting guide in the Operating Instructions booklet, as...


