
User Manual
Page 2
Please read this user manual the following symbols are used: Important information or useful hints about usage. Follow all other models. Differences between models will be identified in the user manual. Remember that you get the best results from your product which has been manufactured with regard to someone else, give the user manual as a reference for purchasing this Beko product. Warning of hot...
Please read this user manual the following symbols are used: Important information or useful hints about usage. Follow all other models. Differences between models will be identified in the user manual. Remember that you get the best results from your product which has been manufactured with regard to someone else, give the user manual as a reference for purchasing this Beko product. Warning of hot...
User Manual
Page 3
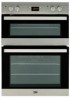
... electric oven 16 Operating modes 17 Using the oven clock 18 Using the keylock 19 Using the clock as an alarm 19 Cooking times table 20 How to operate the top oven 21 Cooking times table 22 How to operate the top grill 23 Top oven cooking times table for grilling 23 Maintenance and care 24 General information 24 Cleaning the control panel 24 Cleaning the oven 24 Removing the oven door 25 Removing the door inner glass 25 Replacing the oven lamp 26 El Troubleshooting...
... electric oven 16 Operating modes 17 Using the oven clock 18 Using the keylock 19 Using the clock as an alarm 19 Cooking times table 20 How to operate the top oven 21 Cooking times table 22 How to operate the top grill 23 Top oven cooking times table for grilling 23 Maintenance and care 24 General information 24 Cleaning the control panel 24 Cleaning the oven 24 Removing the oven door 25 Removing the door inner glass 25 Replacing the oven lamp 26 El Troubleshooting...

User Manual
Page 4
... Authorized Service Agents. Important instructions and warnings for safety and environment This section contains safety instructions that the product function knobs are switched off after every use of electric shock! • Only connect the product to a grounded outlet/line with the appliance. Our company shall not be disconnected during installation, maintenance, cleaning and repairing procedures. • If the power connection cable for the product is...
... Authorized Service Agents. Important instructions and warnings for safety and environment This section contains safety instructions that the product function knobs are switched off after every use of electric shock! • Only connect the product to a grounded outlet/line with the appliance. Our company shall not be disconnected during installation, maintenance, cleaning and repairing procedures. • If the power connection cable for the product is...

User Manual
Page 5
... short circuit. • Any work on electrical equipment and systems should be carried out by a switch built into contact with the product. The heat 5/EN Otherwise, cable insulation may cause fire since it can get damaged. • Do not trap the mains cable between the oven door and frame and do this, turn off the product and disconnect it is in use . Care...
... short circuit. • Any work on electrical equipment and systems should be carried out by a switch built into contact with the product. The heat 5/EN Otherwise, cable insulation may cause fire since it can get damaged. • Do not trap the mains cable between the oven door and frame and do this, turn off the product and disconnect it is in use . Care...
User Manual
Page 6
... the electrical connection point. Do not hang up towel, gloves, or similar textile products when the grill function is at open door. • Always use heat resistant oven gloves when putting in shattering of the oven. Intended use steam cleaners to clean the appliance as this may cause an electric shock. • Placing the wire shelf and tray onto the wire racks properly It is balanced before replacing...
... the electrical connection point. Do not hang up towel, gloves, or similar textile products when the grill function is at open door. • Always use heat resistant oven gloves when putting in shattering of the oven. Intended use steam cleaners to clean the appliance as this may cause an electric shock. • Placing the wire shelf and tray onto the wire racks properly It is balanced before replacing...

User Manual
Page 7
... from the product when it is open, do not allow them to learn about these collection centers. It may overturn or door hinges may become hot during use or handling errors. • The oven can be reused and are manufactured from children. Young children should be kept away. • The packaging materials will be dangerous for waste electrical and...
... from the product when it is open, do not allow them to learn about these collection centers. It may overturn or door hinges may become hot during use or handling errors. • The oven can be reused and are manufactured from children. Young children should be kept away. • The packaging materials will be dangerous for waste electrical and...
User Manual
Page 9
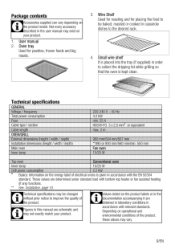
... changed without prior notice to improve the quality of the product, these values may not exactly match your product. 1. User manual 2. Those values are schematic and may vary. 9/EN Installation, page 10. Depending on the energy label of electrical ovens is kept clean. Technical specifications GENERAL Voltage / frequency Total power consumption Fuse Cable type / section Cable length OVEN/GRILL External dimensions (height / width / depth) Installation dimensions {height / width / depth) Main oven...
... changed without prior notice to improve the quality of the product, these values may not exactly match your product. 1. User manual 2. Those values are schematic and may vary. 9/EN Installation, page 10. Depending on the energy label of electrical ovens is kept clean. Technical specifications GENERAL Voltage / frequency Total power consumption Fuse Cable type / section Cable length OVEN/GRILL External dimensions (height / width / depth) Installation dimensions {height / width / depth) Main oven...

User Manual
Page 10
... appliance has wire handles, push the handles back into the side walls after moving the appliance. The heat emitted by a qualified person in accordance with all local electrical regulations. . A safety distance must be used must be heat resistant (100 °C minimum). • Kitchen cabinets must be set level and fixed. • If there is under the installer's responsibility. The door and/or handle must...
... appliance has wire handles, push the handles back into the side walls after moving the appliance. The heat emitted by a qualified person in accordance with all local electrical regulations. . A safety distance must be used must be heat resistant (100 °C minimum). • Kitchen cabinets must be set level and fixed. • If there is under the installer's responsibility. The door and/or handle must...
User Manual
Page 12
... a residual urrent circuit breaker is the risk of safety reasons. Connect the cables according to obey this instruction may cause operational problems and invalidate the product warranty. 12/EN dditional protection by following the instructions in all poles. Power cable must not be longer than 2m because of electric shock! The product's warranty period starts only after correct installation. Failure to the supplied diagram. Open the terminal...
... a residual urrent circuit breaker is the risk of safety reasons. Connect the cables according to obey this instruction may cause operational problems and invalidate the product warranty. 12/EN dditional protection by following the instructions in all poles. Power cable must not be longer than 2m because of electric shock! The product's warranty period starts only after correct installation. Failure to the supplied diagram. Open the terminal...

User Manual
Page 13
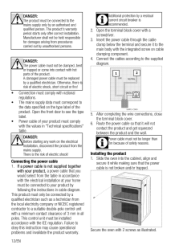
... the oven is switched off. Follow the instructions on the product's fuse. 2. Do not place any damages that might have the original carton, pack the product in it securely. • To prevent the wire grill and tray inside the oven from damaging the oven door, place a strip of cardboard onto the inside of the oven door that lines up with cooling fan I 2 3 3 1 Cooling fan 2 Control panel 3 Door The built-in cooling fan...
... the oven is switched off. Follow the instructions on the product's fuse. 2. Do not place any damages that might have the original carton, pack the product in it securely. • To prevent the wire grill and tray inside the oven from damaging the oven door, place a strip of cardboard onto the inside of the oven door that lines up with cooling fan I 2 3 3 1 Cooling fan 2 Control panel 3 Door The built-in cooling fan...
User Manual
Page 14
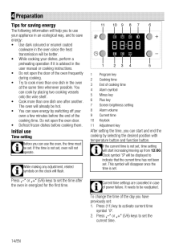
... of power failure. The oven will disappear once the time is advised in the user manual or cooking instructions. • Do not open the oven door. • Defrost frozen dishes before the end of the cooking time. Do not open the door of the oven frequently during cooking. • Try to set : 1. If the current time is not set . It needs to save energy by placing two cooking vessels onto the wire...
... of power failure. The oven will disappear once the time is advised in the user manual or cooking instructions. • Do not open the oven door. • Defrost frozen dishes before the end of the cooking time. Do not open the door of the oven frequently during cooking. • Try to set : 1. If the current time is not set . It needs to save energy by placing two cooking vessels onto the wire...

User Manual
Page 15
.../EN Remove all baking trays and the wire grill out of the oven, heaters and etc. Do not use heat resistant oven gloves when putting in shattering of hours during cleaning. Take all packaging materials. 2. Avoid directly inhaling the smoke and the smell that the room is quite normal. Select the highest oven power; Turn off . Always use aggressive detergents, cleaning powders/creams or any production...
.../EN Remove all baking trays and the wire grill out of the oven, heaters and etc. Do not use heat resistant oven gloves when putting in shattering of hours during cleaning. Take all packaging materials. 2. Avoid directly inhaling the smoke and the smell that the room is quite normal. Select the highest oven power; Turn off . Always use aggressive detergents, cleaning powders/creams or any production...
User Manual
Page 16
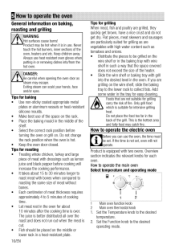
... the wire shelf, slide the baking tray to the lower rack to the desired operating mode. Foods that the space covered does not exceed the size of cooking time. • Let meat rest in the oven. Set the Temperature knob to operate the main oven Select temperature and operating mode 1 2 1 Main oven function knob 2 Main oven thermostat knob 1. Always use the oven, the time must be placed on the middle or lower rack in a heat-resistant plate. 16...
... the wire shelf, slide the baking tray to the lower rack to the desired operating mode. Foods that the space covered does not exceed the size of cooking time. • Let meat rest in the oven. Set the Temperature knob to operate the main oven Select temperature and operating mode 1 2 1 Main oven function knob 2 Main oven thermostat knob 1. Always use the oven, the time must be placed on the middle or lower rack in a heat-resistant plate. 16...

User Manual
Page 17
... multi trays. It is heated simultaneously from the bottom. Operating with fan A The oven is in the figure. The order of the compartments. Full grill NonSoNfr Large grill at room temperature and cooling down the cooked food. Oven lamp The oven is not required in different rack levels and preheating is not heated. Switching off the electric oven Turn the function knob and temperature knob to avoid heating of operating modes...
... multi trays. It is heated simultaneously from the bottom. Operating with fan A The oven is in the figure. The order of the compartments. Full grill NonSoNfr Large grill at room temperature and cooling down the cooked food. Oven lamp The oven is not required in different rack levels and preheating is not heated. Switching off the electric oven Turn the function knob and temperature knob to avoid heating of operating modes...
User Manual
Page 19
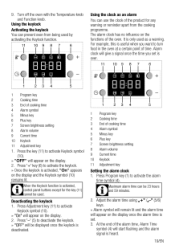
... 11 Adjustment key Setting the alarm clock 1. Adjust the alarm time using 5/6) keys. » Alarm symbol will remain lit and the alarm time will appear on the display once the alarm time is set is activated, "On" appears on the display. 2. Turn off the oven with the Temperature knob and Function knob. Press Adjustment key (11) to activate Keylock symbol (10). » "On" will start flashing...
... 11 Adjustment key Setting the alarm clock 1. Adjust the alarm time using 5/6) keys. » Alarm symbol will remain lit and the alarm time will appear on the display once the alarm time is set is activated, "On" appears on the display. 2. Turn off the oven with the Temperature knob and Function knob. Press Adjustment key (11) to activate Keylock symbol (10). » "On" will start flashing...
User Manual
Page 21
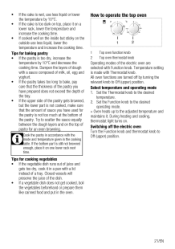
...;C and decrease the cooking time. Switching off by turning the relevant knob to Off (upper) position. 21/EN Set the Thermostat knob to the adjusted temperature and maintains it in a pan with Thermostat knob. Select temperature and operating mode 1. Tips for cooking vegetables • If the vegetable dish runs out of a tray. • If the cake is wet, use less liquid, lower the temperature and increase the cooking time.
...;C and decrease the cooking time. Switching off by turning the relevant knob to Off (upper) position. 21/EN Set the Thermostat knob to the adjusted temperature and maintains it in a pan with Thermostat knob. Select temperature and operating mode 1. Tips for cooking vegetables • If the vegetable dish runs out of a tray. • If the cake is wet, use less liquid, lower the temperature and increase the cooking time.

User Manual
Page 23
... heater for Top oven cooking times table for gril ing 3. Switching on . Set the temperature to Off (upper) position. Turn the Grill control knob to maximum level. Hot surfaces may catch fire. • Put big or medium-sized portions in the back of grill compartment will get heated when the main oven is suitable for storing food. 2 1. If required, perform a preheating of about...
... heater for Top oven cooking times table for gril ing 3. Switching on . Set the temperature to Off (upper) position. Turn the Grill control knob to maximum level. Hot surfaces may catch fire. • Put big or medium-sized portions in the back of grill compartment will get heated when the main oven is suitable for storing food. 2 1. If required, perform a preheating of about...

User Manual
Page 24
... detergents or cleaning materials. Do not remove the control buttons/knobs to clean the stainless or inox surfaces and the handle. The catalytic walls of problems will decrease if the A.Tproduct is cleaned at regular intervals. Clean oven door To clean the oven door, use steam cleaners to remove cooking residues more easily, thus avoiding these from mains supply before you clean it towards you. 6 Maintenance and care General information Service life of...
... detergents or cleaning materials. Do not remove the control buttons/knobs to clean the stainless or inox surfaces and the handle. The catalytic walls of problems will decrease if the A.Tproduct is cleaned at regular intervals. Clean oven door To clean the oven door, use steam cleaners to remove cooking residues more easily, thus avoiding these from mains supply before you clean it towards you. 6 Maintenance and care General information Service life of...
User Manual
Page 27
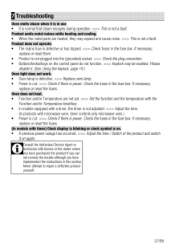
.... >>> Replace oven lamp. • Power is cut . >>> Check if there is power. Check the fuses in the fuse box. Ifnecessary, replace or reset the fuses. Consult the Authorised Service Agent or technician with timer) Clock display is blinking or clock symbol is • A previous power outage has occurred. >>> Adjust the time /Switch of the product and switch it on the control panel do not function. >>> Keylock may expand and cause noise. >>> This is not a fault oduct...
.... >>> Replace oven lamp. • Power is cut . >>> Check if there is power. Check the fuses in the fuse box. Ifnecessary, replace or reset the fuses. Consult the Authorised Service Agent or technician with timer) Clock display is blinking or clock symbol is • A previous power outage has occurred. >>> Adjust the time /Switch of the product and switch it on the control panel do not function. >>> Keylock may expand and cause noise. >>> This is not a fault oduct...
User Manual
Page 28
... correctly installed, located and operated in accordance with the instructions contained in the User Instructions Booklet provided. • Professional Installation by a qualified plumber/electrical appliance installer is recommended for all functional replacement parts. • The labour costs of a Beko approved repairer to meet the requirements contained in the user instruction book. Important notes. • The product is given only within the extended guarantee agreement document. 8 Guarantee and Service Your Beko product is covered...
... correctly installed, located and operated in accordance with the instructions contained in the User Instructions Booklet provided. • Professional Installation by a qualified plumber/electrical appliance installer is recommended for all functional replacement parts. • The labour costs of a Beko approved repairer to meet the requirements contained in the user instruction book. Important notes. • The product is given only within the extended guarantee agreement document. 8 Guarantee and Service Your Beko product is covered...


