
User Manual
Page 8
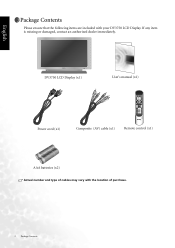
If any item is missing or damaged, contact an authorized dealer immediately. DV3750 LCD Display (x1) User's manual (x1) Power cord (x1) Composite (AV) cable (x1) Remote control (x1) AAA batteries (x2) Actual number and type of purchase. 2 Package Contents English Package Contents Please ensure that the following items are included with the location of cables may vary with your DV3750 LCD Display.
If any item is missing or damaged, contact an authorized dealer immediately. DV3750 LCD Display (x1) User's manual (x1) Power cord (x1) Composite (AV) cable (x1) Remote control (x1) AAA batteries (x2) Actual number and type of purchase. 2 Package Contents English Package Contents Please ensure that the following items are included with the location of cables may vary with your DV3750 LCD Display.
User Manual
Page 9
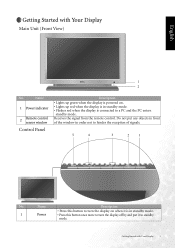
...connected to hinder the reception of the window in order not to a PC and the PC enters standby mode. Receives the signal from the remote control. Getting Started with Your Display Main Unit (Front View) 1 2 No. Name Description • Press this button to turn the ...display off by and put any objects in front of signals. 5 4 3 2 1 No. Name 1 Power indicator 2 Remote control sensor window Control Panel Description • Lights up green when the display is powered on. • Lights up red when the display is in...
...connected to hinder the reception of the window in order not to a PC and the PC enters standby mode. Receives the signal from the remote control. Getting Started with Your Display Main Unit (Front View) 1 2 No. Name Description • Press this button to turn the ...display off by and put any objects in front of signals. 5 4 3 2 1 No. Name 1 Power indicator 2 Remote control sensor window Control Panel Description • Lights up green when the display is powered on. • Lights up red when the display is in...
User Manual
Page 17
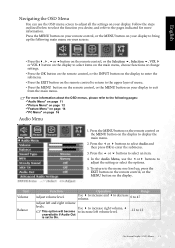
...indicated for more information about the OSD menus, please refer to the following main menu on your screen: • Press the , , or button on the remote control, or the Selection , Selection , VOL or VOL button on the display to select items on the main menu, choose functions or change settings. •...the INPUT button on the display to enter the submenu. • Press the EXIT button on the remote control to return to the upper layer of menu. • Press the MENU button on the remote control, or the MENU button on your display to enter the submenu. 3. English Navigating the OSD ...
...indicated for more information about the OSD menus, please refer to the following main menu on your screen: • Press the , , or button on the remote control, or the Selection , Selection , VOL or VOL button on the display to select items on the main menu, choose functions or change settings. •...the INPUT button on the display to enter the submenu. • Press the EXIT button on the remote control to return to the upper layer of menu. • Press the MENU button on the remote control, or the MENU button on your display to enter the submenu. 3. English Navigating the OSD ...
User Manual
Page 18
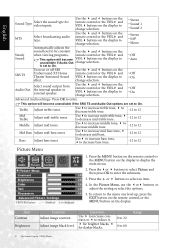
... the setting or select the options. 5. Automatically adjusts the sound level to be constant Use the and buttons on the Steady Sound when viewing programs. remote control or the VOL and This option will become VOL buttons on the display to display the main menu. 2. change selection. In the Picture Menu... increase mid treble tone, to decrease mid treble tone. -12 to 12 Use to the menu one level up, press the EXIT button on the remote control, or the MENU button on the display. To return to increase middle tone, decrease middle tone. Press the or buttons to select Picture and...
... the setting or select the options. 5. Automatically adjusts the sound level to be constant Use the and buttons on the Steady Sound when viewing programs. remote control or the VOL and This option will become VOL buttons on the display to display the main menu. 2. change selection. In the Picture Menu... increase mid treble tone, to decrease mid treble tone. -12 to 12 Use to the menu one level up, press the EXIT button on the remote control, or the MENU button on the display. To return to increase middle tone, decrease middle tone. Press the or buttons to select Picture and...
User Manual
Page 19
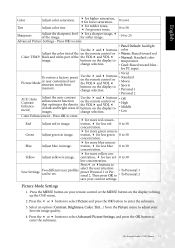
for redder tones, for a sharper image, of Use the and buttons on the remote control or the VOL and VOL buttons on the remote control or • Warm: Biased toward blue - for softer image. -14 to 30 Sharpness Adjust the sharpness level for greener tones. 0 to 25 ... concentration. Picture Mode Settings 1. black and white part of the on the display to bring up the OSD menu. 2. Use the and buttons on the remote control or the VOL and VOL buttons on the display to change selection. • Standard • Movie • Sports • Personal 1 • Personal 2 ACE...
for redder tones, for a sharper image, of Use the and buttons on the remote control or the VOL and VOL buttons on the remote control or • Warm: Biased toward blue - for softer image. -14 to 30 Sharpness Adjust the sharpness level for greener tones. 0 to 25 ... concentration. Picture Mode Settings 1. black and white part of the on the display to bring up the OSD menu. 2. Use the and buttons on the remote control or the VOL and VOL buttons on the display to change selection. • Standard • Movie • Sports • Personal 1 • Personal 2 ACE...

User Manual
Page 20
.... 4. Press the or buttons to select Feature and then press OK to enter the submenu. 6. This option is available only if the PBP on the remote control or the VOL and VOL buttons on your settings in either Picture-In-Pic- Press the or button to select Save Settings, and press... select Advanced Picture Settings, and press the OK button to select a picture mode. 5. This option is available only if the PIP on the remote control or the VOL and VOL buttons on the remote control to switch to the picture mode you want to bring up , press the EXIT button on the...
.... 4. Press the or buttons to select Feature and then press OK to enter the submenu. 6. This option is available only if the PBP on the remote control or the VOL and VOL buttons on your settings in either Picture-In-Pic- Press the or button to select Save Settings, and press... select Advanced Picture Settings, and press the OK button to select a picture mode. 5. This option is available only if the PIP on the remote control or the VOL and VOL buttons on the remote control to switch to the picture mode you want to bring up , press the EXIT button on the...

User Manual
Page 21
...buttons Select video signal input on the display to change selection. Aspect Adjust image aspect Ratio ratio. • 4:3 Format - on the remote control or the VOL and VOL buttons on the remote control or AV1, AV1-S, AV2, AV2-S, AV3, AV3-S source for PIP/PBP the VOL and VOL AV1-S, AV2-S or AV3...-S will extend vertically and horizontally to fill the full screen. Use the and buttons on the remote control or • Dark the VOL and VOL • Normal buttons on the upper and bottom of the screen. DVD signal), no change selection. ...
...buttons Select video signal input on the display to change selection. Aspect Adjust image aspect Ratio ratio. • 4:3 Format - on the remote control or the VOL and VOL buttons on the remote control or AV1, AV1-S, AV2, AV2-S, AV3, AV3-S source for PIP/PBP the VOL and VOL AV1-S, AV2-S or AV3...-S will extend vertically and horizontally to fill the full screen. Use the and buttons on the remote control or • Dark the VOL and VOL • Normal buttons on the upper and bottom of the screen. DVD signal), no change selection. ...

User Manual
Page 22
...VOL buttons on the display to -30 to • On change selection. When receiving Component video signal in this function to the display. 1. remote control or the VOL and VOL buttons on the display to 30 change selection. ment. 16 On-Screen Display (OSD) Menu Press the or buttons... an item. 4. Item DPMS Frequency Phase H. Use the and buttons on the Adjust horizontal position of the image. Use the and buttons on the remote control or the VOL and VOL buttons on the display to • PC • Component 1 • Component 2 change selection. Press the or...
...VOL buttons on the display to -30 to • On change selection. When receiving Component video signal in this function to the display. 1. remote control or the VOL and VOL buttons on the display to 30 change selection. ment. 16 On-Screen Display (OSD) Menu Press the or buttons... an item. 4. Item DPMS Frequency Phase H. Use the and buttons on the Adjust horizontal position of the image. Use the and buttons on the remote control or the VOL and VOL buttons on the display to • PC • Component 1 • Component 2 change selection. Press the or...

User Manual
Page 23
... • Check for incorrect battery orientation. • Check for any devices (PC or personal digital assistant, PDA) nearby that the remote control sensor window is properly connected. Degraded colors or tints • Check whether all the picture adjustments have been properly performed. •... player is being pointed at too high a brightness level. Improper screen position or size Try selecting a different aspect button on the remote control to diagnose the problem. Power indicator lamp flashes red. • Check the PC/DVI cable for disconnection. • This ...
... • Check for incorrect battery orientation. • Check for any devices (PC or personal digital assistant, PDA) nearby that the remote control sensor window is properly connected. Degraded colors or tints • Check whether all the picture adjustments have been properly performed. •... player is being pointed at too high a brightness level. Improper screen position or size Try selecting a different aspect button on the remote control to diagnose the problem. Power indicator lamp flashes red. • Check the PC/DVI cable for disconnection. • This ...
