

MH680 Quick Start Guide
Page 14
...without notice. Optical Resolution 1920 (H) x 1080 (V) Display system 1-CHIP DMD Lens F/Number F = 2.59 ~ 2.87, f = 16.88 ~ 21.88 mm Lamp 210 W lamp Electrical Power supply AC100-240V, 3.1 A, 50-60 Hz (Automatic) Power consumption 315 W (Max); < 0.5 W (Standby) Mechanical Weight 2.8 Kg (6.39 lbs) ...Digital - HDMI x 1 Audio signal input Audio in RCA audio jack (L/R) x 2 PC audio jack x 1 USB ports (Type-A x 1; (EN) MH680-QSG-17L.fm Page 13 Thursday, August 8, 2013 2:14 PM Specifications All specifications are subject to change without condensation) Operating altitude 0-1499 m at 0°C-...
...without notice. Optical Resolution 1920 (H) x 1080 (V) Display system 1-CHIP DMD Lens F/Number F = 2.59 ~ 2.87, f = 16.88 ~ 21.88 mm Lamp 210 W lamp Electrical Power supply AC100-240V, 3.1 A, 50-60 Hz (Automatic) Power consumption 315 W (Max); < 0.5 W (Standby) Mechanical Weight 2.8 Kg (6.39 lbs) ...Digital - HDMI x 1 Audio signal input Audio in RCA audio jack (L/R) x 2 PC audio jack x 1 USB ports (Type-A x 1; (EN) MH680-QSG-17L.fm Page 13 Thursday, August 8, 2013 2:14 PM Specifications All specifications are subject to change without condensation) Operating altitude 0-1499 m at 0°C-...

MH680 Quick Start Guide
Page 26
(TH) MH680-QSG-17L.fm Page 25 Thursday, August 8, 2013 2:14 PM 1920 (H) x 1080 (V) 1-CHIP DMD àŹÊì F F = 2.59 ~ 2.87, f = 16.88 ~ 21.88 &#...;Á. Mini-B x 1) 0°C-40°C 10%-90 0-1499 Á ·Õè 0°C-35°C 1500-3000 Á ·Õè 0°C-30°C 25 Lamp 210 W Ãкºä¿ AC100-240V, 3.1 A, 50-60 Hz 315 W 0.5 W 2.8 ¡¡. (6.39 »Í¹´ì) RGB D-Sub 15-pin...
(TH) MH680-QSG-17L.fm Page 25 Thursday, August 8, 2013 2:14 PM 1920 (H) x 1080 (V) 1-CHIP DMD àŹÊì F F = 2.59 ~ 2.87, f = 16.88 ~ 21.88 &#...;Á. Mini-B x 1) 0°C-40°C 10%-90 0-1499 Á ·Õè 0°C-35°C 1500-3000 Á ·Õè 0°C-30°C 25 Lamp 210 W Ãкºä¿ AC100-240V, 3.1 A, 50-60 Hz 315 W 0.5 W 2.8 ¡¡. (6.39 »Í¹´ì) RGB D-Sub 15-pin...
MH680 User Manual
Page 2
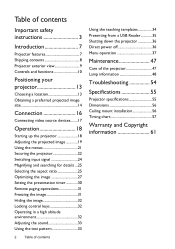
... 34 Presenting from a USB Reader 35 Shutting down the projector 36 Direct power off 36 Menu operation 37 Maintenance 47 Care of the projector 47 Lamp information 48 Troubleshooting 54 Specifications 55 Projector specifications 55 Dimensions 56 Ceiling mount installation 56 Timing chart 57 Warranty and Copyright information 61
... 34 Presenting from a USB Reader 35 Shutting down the projector 36 Direct power off 36 Menu operation 37 Maintenance 47 Care of the projector 47 Lamp information 48 Troubleshooting 54 Specifications 55 Projector specifications 55 Dimensions 56 Ceiling mount installation 56 Timing chart 57 Warranty and Copyright information 61

MH680 User Manual
Page 3
...shutter (if any) or remove the lens cap (if any objects when the projector is NOT stable. Safety Instructions 1. To temporarily turn off the lamp, press ECO BLANK on the product. Please read this could fail if power cuts or surges of ±10 volts occur. you connect your ...qualified service personnel. 6. Do not look straight at the projector lens during operation. Do not block the projection lens with any ) when the projector lamp is important that you operate your eyes. The intense light beam may fluctuate or cut out, it is designed to operate safely within a mains voltage...
...shutter (if any) or remove the lens cap (if any objects when the projector is NOT stable. Safety Instructions 1. To temporarily turn off the lamp, press ECO BLANK on the product. Please read this could fail if power cuts or surges of ±10 volts occur. you connect your ...qualified service personnel. 6. Do not look straight at the projector lens during operation. Do not block the projection lens with any ) when the projector lamp is important that you operate your eyes. The intense light beam may fluctuate or cut out, it is designed to operate safely within a mains voltage...
MH680 User Manual
Page 4
...Under no circumstances should come into contact with cause them to cool for replacement. 11. Never replace the lamp assembly or any other covers. It is unplugged. 12. The lamp becomes extremely hot 10. The to break on an during operation. Allow the projector unstable cart, stand,... or table. Refer servicing only to disassemble this product on rare live parts. There are dangerous high rated lamp life. Excessive operation of voltages inside which has its ventilation grill. When the projector is under operation, you ever undo or remove ...
...Under no circumstances should come into contact with cause them to cool for replacement. 11. Never replace the lamp assembly or any other covers. It is unplugged. 12. The lamp becomes extremely hot 10. The to break on an during operation. Allow the projector unstable cart, stand,... or table. Refer servicing only to disassemble this product on rare live parts. There are dangerous high rated lamp life. Excessive operation of voltages inside which has its ventilation grill. When the projector is under operation, you ever undo or remove ...

MH680 User Manual
Page 5
... instructions 5 Do not block the ventilation holes. - Using the projector when it is poorly ventilated or confined. Allow at angle of , or damage to, the lamp. 3000 m (10000 feet) 0 m (0 feet) 16. Locations where excessive humidity, dust, or cigarette smoke may result in a fire. Do not place this projector on a level, horizontal...
... instructions 5 Do not block the ventilation holes. - Using the projector when it is poorly ventilated or confined. Allow at angle of , or damage to, the lamp. 3000 m (10000 feet) 0 m (0 feet) 16. Locations where excessive humidity, dust, or cigarette smoke may result in a fire. Do not place this projector on a level, horizontal...

MH680 User Manual
Page 6
... it is securely and safely installed. Hg - This apparatus must be earthed. 6 Important safety instructions Safety Instructions (Continued) 17. BenQ recommends that the projector may fall from the ceiling due to the projector, doing so may cause it to the mounting bracket become wet... restraining the projector should its attachment to fail. Lamp contains mercury. Use only BenQ's Ceiling Mount Kit for ceiling mount installation. You can purchase a BenQ projector ceiling mount kit from the power supply's power outlet and call BenQ to mount your projector on the projector or place...
... it is securely and safely installed. Hg - This apparatus must be earthed. 6 Important safety instructions Safety Instructions (Continued) 17. BenQ recommends that the projector may fall from the ceiling due to the projector, doing so may cause it to the mounting bracket become wet... restraining the projector should its attachment to fail. Lamp contains mercury. Use only BenQ's Ceiling Mount Kit for ceiling mount installation. You can purchase a BenQ projector ceiling mount kit from the power supply's power outlet and call BenQ to mount your projector on the projector or place...
MH680 User Manual
Page 7
...Cooling function speeds up the projector automatically when the power is connected. • Instant Restart Selectable Instant Restart function enables you can wear BenQ 3D glasses to enjoy the 3D movies, videos and sporting events in a more flexible. Signal Power On function turns on a USB... depending on the ambient lighting conditions, selected input signal contrast/brightness settings, and is directly proportional to projection distance. • The lamp brightness will decline over time and may vary within 90 seconds after a set period of time. By presenting the depth of the images...
...Cooling function speeds up the projector automatically when the power is connected. • Instant Restart Selectable Instant Restart function enables you can wear BenQ 3D glasses to enjoy the 3D movies, videos and sporting events in a more flexible. Signal Power On function turns on a USB... depending on the ambient lighting conditions, selected input signal contrast/brightness settings, and is directly proportional to projection distance. • The lamp brightness will decline over time and may vary within 90 seconds after a set period of time. By presenting the depth of the images...
MH680 User Manual
Page 8
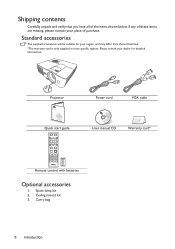
Ceiling mount kit 3. Carry bag 8 Introduction Spare lamp kit 2. Standard accessories The supplied accessories will be suitable for your dealer for detailed information. Please consult your region, and may differ from those illustrated. *...
Ceiling mount kit 3. Carry bag 8 Introduction Spare lamp kit 2. Standard accessories The supplied accessories will be suitable for your dealer for detailed information. Please consult your region, and may differ from those illustrated. *...

MH680 User Manual
Page 9
External control panel (See "Controls and functions" on page 10 for details.) Lamp cover Vent (heated air exhaust) Quick-release button Lens cap Focus and Zoom ring Vent (cool air intake) Speaker grill Front IR remote sensor Projection ...
External control panel (See "Controls and functions" on page 10 for details.) Lamp cover Vent (heated air exhaust) Quick-release button Lens cap Focus and Zoom ring Vent (cool air intake) Speaker grill Front IR remote sensor Projection ...

MH680 User Manual
Page 10
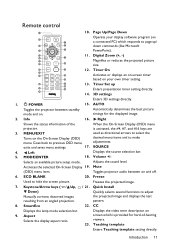
... if the projector's temperature becomes too high. 10 Introduction menu. Controls and functions Projector 1 2 9 10 3 11 12 4 13 5 14 6 7 15 8 13 1. LAMP indicator light Adjusts the focus of the lamp. Goes back to hide the screen picture. 9. SOURCE 8. ECO BLANK Displays the source selection bar. Lights up 2. POWER Toggles the projector between.... Top IR remote sensor 12. Indicates the status of the projected image. Used to previous OSD menu, 13. Down) 5. Zoom ring or flashes when the lamp has developed a Adjusts the size of the image.
... if the projector's temperature becomes too high. 10 Introduction menu. Controls and functions Projector 1 2 9 10 3 11 12 4 13 5 14 6 7 15 8 13 1. LAMP indicator light Adjusts the focus of the lamp. Goes back to hide the screen picture. 9. SOURCE 8. ECO BLANK Displays the source selection bar. Lights up 2. POWER Toggles the projector between.... Top IR remote sensor 12. Indicates the status of the projected image. Used to previous OSD menu, 13. Down) 5. Zoom ring or flashes when the lamp has developed a Adjusts the size of the image.
MH680 User Manual
Page 11
... to previous OSD menu, desired menu items and to hide the screen picture. Left 5. MODE/ENTER Displays the source selection bar. 18. CC Displays the lamp mode selection bar. 9. Displays the video term description on and off. 6. Digital Zoom (+, -) 6 17 7 Magnifies or reduces the projected picture 8 18 size. 9 18 12. MENU...
... to previous OSD menu, desired menu items and to hide the screen picture. Left 5. MODE/ENTER Displays the source selection bar. 18. CC Displays the lamp mode selection bar. 9. Displays the video term description on and off. 6. Digital Zoom (+, -) 6 17 7 Magnifies or reduces the projected picture 8 18 size. 9 18 12. MENU...
MH680 User Manual
Page 18
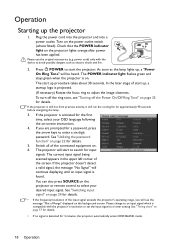
... all of the screen. As soon as electric shock and fire. 2. See "Timing chart" on page 22 for approximately 90 seconds before energizing the lamp. 3. If the projector is found. Turn on . 6. power cord) only with the projector's resolution or set the input signal to avoid possible ...dangers such as the lamp lights up the projector 1. Operation Starting up , a "Power On Ring Tone" will be heard. Plug the power cord into the projector and into...
... all of the screen. As soon as electric shock and fire. 2. See "Timing chart" on page 22 for approximately 90 seconds before energizing the lamp. 3. If the projector is found. Turn on . 6. power cord) only with the projector's resolution or set the input signal to avoid possible ...dangers such as the lamp lights up the projector 1. Operation Starting up , a "Power On Ring Tone" will be heard. Plug the power cord into the projector and into...

MH680 User Manual
Page 19
...-release button and lift the front of the screen for details. 1 2 Do not look into the lens while the lamp is close to the exhaust vent where hot air comes from the lamp may need using the zoom ring. 2. Screw the rear adjuster foot in the corner of the projector. Be careful...
...-release button and lift the front of the screen for details. 1 2 Do not look into the lens while the lamp is close to the exhaust vent where hot air comes from the lamp may need using the zoom ring. 2. Screw the rear adjuster foot in the corner of the projector. Be careful...

MH680 User Manual
Page 36
...projector after the fans stop . The POWER indicator light is a steady orange and fans stop and the POWER indicator light turns orange. • Lamp life results will not respond to start the projector, the fans may run for a few minutes to cool down. The POWER indicator light flashes ... projector. (When you can be heard. Once the cooling process finishes, a "Power Off Ring Tone" will continue to cool down , to protect the lamp, when you don't respond in a few minutes to run for approximately 90 seconds to start the projector, the fans will run for a few seconds, ...
...projector after the fans stop . The POWER indicator light is a steady orange and fans stop and the POWER indicator light turns orange. • Lamp life results will not respond to start the projector, the fans may run for a few minutes to cool down. The POWER indicator light flashes ... projector. (When you can be heard. Once the cooling process finishes, a "Power Off Ring Tone" will continue to cool down , to protect the lamp, when you don't respond in a few minutes to run for approximately 90 seconds to start the projector, the fans will run for a few seconds, ...
MH680 User Manual
Page 39
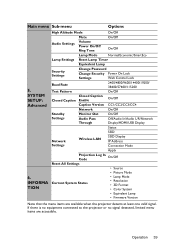
...High Altitude Mode On/Off Mute On/Off Audio Settings Volume Power On/Off Ring Tone On/Off Lamp Mode Normal/Economic/SmartEco Lamp Settings Reset Lamp Timer Equivalent Lamp Security Settings Change Password Change Security Power On Lock Settings Web Control Lock Baud Rate 2400/4800/... In Code On/Off Reset All Settings • Source • Picture Mode • Lamp Mode Current System Status • Resolution • 3D Format • Color System • Equivalent Lamp • Firmware Version Note that the menu items are accessible. Main menu Sub-menu Options...
...High Altitude Mode On/Off Mute On/Off Audio Settings Volume Power On/Off Ring Tone On/Off Lamp Mode Normal/Economic/SmartEco Lamp Settings Reset Lamp Timer Equivalent Lamp Security Settings Change Password Change Security Power On Lock Settings Web Control Lock Baud Rate 2400/4800/... In Code On/Off Reset All Settings • Source • Picture Mode • Lamp Mode Current System Status • Resolution • 3D Format • Color System • Equivalent Lamp • Firmware Version Note that the menu items are accessible. Main menu Sub-menu Options...

MH680 User Manual
Page 45
...sound" on page 48 for details. Lamp Mode See "Setting the Lamp Mode" on page 33 for details. Equivalent Lamp See "Getting to know the lamp hour" on page 48 for details on page 33 for details. Baud Rate Web Control Lock See BenQ Network Projector Operation Guide for details. ...Test Pattern See "Using the test pattern" on how the total lamp hour is intended for qualified service personnel. Operation 45 Change Password Change Security Settings ...
...sound" on page 48 for details. Lamp Mode See "Setting the Lamp Mode" on page 33 for details. Equivalent Lamp See "Getting to know the lamp hour" on page 48 for details on page 33 for details. Baud Rate Web Control Lock See BenQ Network Projector Operation Guide for details. ...Test Pattern See "Using the test pattern" on how the total lamp hour is intended for qualified service personnel. Operation 45 Change Password Change Security Settings ...

MH680 User Manual
Page 46
...to choose the source that you wish to the factory preset values. See BenQ Network Projector Operation Guide for how to devices. Enabling this function slightly increases the standby power consumption. Equivalent Lamp Displays the number of your projector. 6. Picture Mode Shows the selected mode.... Color System Shows input system format. The following settings will still remain: Phase, H. Lamp Mode Shows the current lamp mode. Firmware Version Shows the firmware version of hours the lamp has been used. See "Connection" on page 16 for how to devices. Size, Projector...
...to choose the source that you wish to the factory preset values. See BenQ Network Projector Operation Guide for how to devices. Enabling this function slightly increases the standby power consumption. Equivalent Lamp Displays the number of your projector. 6. Picture Mode Shows the selected mode.... Color System Shows input system format. The following settings will still remain: Phase, H. Lamp Mode Shows the current lamp mode. Firmware Version Shows the firmware version of hours the lamp has been used. See "Connection" on page 16 for how to devices. Size, Projector...
MH680 User Manual
Page 47
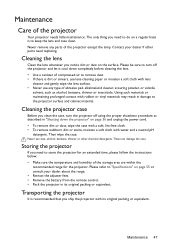
... cleaner, scouring powder, or volatile solvent, such as described in "Shutting down completely before cleaning the lens. • Use a canister of the projector except the lamp. Never use any parts of compressed air to the projector surface and cabinet material. Never remove any type of the projector Your projector needs little...
... cleaner, scouring powder, or volatile solvent, such as described in "Shutting down completely before cleaning the lens. • Use a canister of the projector except the lamp. Never use any parts of compressed air to the projector surface and cabinet material. Never remove any type of the projector Your projector needs little...
MH680 User Manual
Page 48
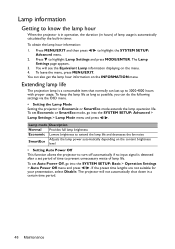
... the preset time lengths are not suitable for your presentation, select Disable. Press MENU/EXIT and then press / to highlight Lamp Settings and press MODE/ENTER. To keep the lamp life as long as possible, you can do the following settings via the OSD menu. • Setting the... Lamp Mode Setting the projector in timer. Lamp information Getting to know the lamp hour When the projector is in operation, the duration (in hours) of lamp life. To obtain the lamp hour information: 1. Press to highlight the SYSTEM SETUP: Advanced...
... the preset time lengths are not suitable for your presentation, select Disable. Press MENU/EXIT and then press / to highlight Lamp Settings and press MODE/ENTER. To keep the lamp life as long as possible, you can do the following settings via the OSD menu. • Setting the... Lamp Mode Setting the projector in timer. Lamp information Getting to know the lamp hour When the projector is in operation, the duration (in hours) of lamp life. To obtain the lamp hour information: 1. Press to highlight the SYSTEM SETUP: Advanced...

