
MW712 Data Sheet
Page 1
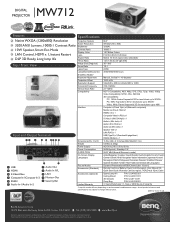
MW712 DIGITAL PROJECTOR Features Specifications Native WXGA (1280x800) Resolution Projection System DLP 3200 ANSI Lumens, 10000:1 Contrast Ratio Native Resolution Brightness WXGA(1280 x 800) 3200AL 10W... Ratio Throw Ratio Native 16:10 (5 aspect ratio selectable) 1.46-1.60 (62.25" @6.56ft) Top / Front View Image Size (Diagonal) Zoom Ratio 30"~300" 1.2:1 Lamp Type 230W Lamp(Normal/Economic/ 3500/5000/6500 hours SmartEco Mode)* Keystone Adjustment Manual, Vertical +/- 40 degrees Projection Offset 120% ±5% Resolution Support VGA(640 x 480) to...
MW712 DIGITAL PROJECTOR Features Specifications Native WXGA (1280x800) Resolution Projection System DLP 3200 ANSI Lumens, 10000:1 Contrast Ratio Native Resolution Brightness WXGA(1280 x 800) 3200AL 10W... Ratio Throw Ratio Native 16:10 (5 aspect ratio selectable) 1.46-1.60 (62.25" @6.56ft) Top / Front View Image Size (Diagonal) Zoom Ratio 30"~300" 1.2:1 Lamp Type 230W Lamp(Normal/Economic/ 3500/5000/6500 hours SmartEco Mode)* Keystone Adjustment Manual, Vertical +/- 40 degrees Projection Offset 120% ±5% Resolution Support VGA(640 x 480) to...
User Manual
Page 2
... 40 Operating in a high altitude environment 40 Adjusting the sound 40 2 Table of contents Personalizing the projector menu display 41 Select the lamp saver mode 42 Use build-in test pattern 42 Use Teaching Template 43 Controlling the projector through a LAN environment 44 Shutting down the... projector 48 Direct power off 48 Menu operation 49 Maintenance 61 Care of the projector 61 Lamp information 62 Troubleshooting......... 68 Specifications 69 Dimensions 70 Ceiling mount installation 70 Timing chart 71 Warranty and Copyright information 74
... 40 Operating in a high altitude environment 40 Adjusting the sound 40 2 Table of contents Personalizing the projector menu display 41 Select the lamp saver mode 42 Use build-in test pattern 42 Use Teaching Template 43 Controlling the projector through a LAN environment 44 Shutting down the... projector 48 Direct power off 48 Menu operation 49 Maintenance 61 Care of the projector 61 Lamp information 62 Troubleshooting......... 68 Specifications 69 Dimensions 70 Ceiling mount installation 70 Timing chart 71 Warranty and Copyright information 74
User Manual
Page 3
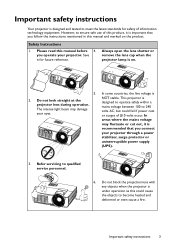
... through a power stabilizer, surge protector or uninterruptible power supply (UPS). 3. Safety Instructions 1. Always open the lens shutter or remove the lens cap when the projector lamp is on the product. Please read this product, it is recommended that you operate your projector. Save it for safety of this manual before 4. Important...
... through a power stabilizer, surge protector or uninterruptible power supply (UPS). 3. Safety Instructions 1. Always open the lens shutter or remove the lens cap when the projector lamp is on the product. Please read this product, it is recommended that you operate your projector. Save it for safety of this manual before 4. Important...
User Manual
Page 4
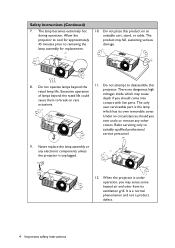
.... 8. Allow the projector to cool for approximately 45 minutes prior to suitably qualified professional service personnel. 9. Never replace the lamp assembly or any other covers. It is unplugged. 12. The only user serviceable part is under operation, you ever undo ...and not a product defect. 4 Important safety instructions Refer servicing only to removing the lamp assembly for replacement. 10. The lamp becomes extremely hot during operation. Do not place this rated lamp life. Do not attempt to break on an unstable cart, stand, or table. Excessive...
.... 8. Allow the projector to cool for approximately 45 minutes prior to suitably qualified professional service personnel. 9. Never replace the lamp assembly or any other covers. It is unplugged. 12. The only user serviceable part is under operation, you ever undo ...and not a product defect. 4 Important safety instructions Refer servicing only to removing the lamp assembly for replacement. 10. The lamp becomes extremely hot during operation. Do not place this rated lamp life. Do not attempt to break on an unstable cart, stand, or table. Excessive...

User Manual
Page 5
... angle of more than 3000 m (10000 feet). 3000 m (10000 feet) 0 m (0 feet) Important safety instructions 5 Allow at angle of more than 10 degrees left to , the lamp. - Do not place this projector on a level, horizontal surface during operation. - Always place the projector on a blanket, bedding or any other item. - Using the projector...
... angle of more than 3000 m (10000 feet). 3000 m (10000 feet) 0 m (0 feet) Important safety instructions 5 Allow at angle of more than 10 degrees left to , the lamp. - Do not place this projector on a level, horizontal surface during operation. - Always place the projector on a blanket, bedding or any other item. - Using the projector...
User Manual
Page 7
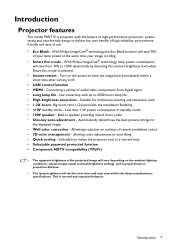
...Eco mode is selected. • Instant restart - Big zoom ratio (1.2x) provides the installation flexibility • Introduction Projector features The model MW712 is projector with up to deliver the user benefit of high reliability, environmentfriendly and ease of use. • Eco Blank - With Philips ImageCare...® technology,the Eco Blank function will save 70% of your lamp power at the same time your image is hiding. • Smart Eco mode - low ownership with the feature of high-performance projection,...
...Eco mode is selected. • Instant restart - Big zoom ratio (1.2x) provides the installation flexibility • Introduction Projector features The model MW712 is projector with up to deliver the user benefit of high reliability, environmentfriendly and ease of use. • Eco Blank - With Philips ImageCare...® technology,the Eco Blank function will save 70% of your lamp power at the same time your image is hiding. • Smart Eco mode - low ownership with the feature of high-performance projection,...
User Manual
Page 8
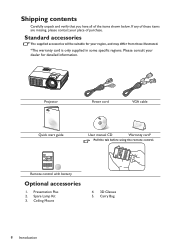
Please consult your dealer for your place of purchase. Spare Lamp Kit 3. If any of the items shown below. Presentation Plus 2. Standard accessories The supplied accessories will be suitable for detailed information. Remote control with battery ...
Please consult your dealer for your place of purchase. Spare Lamp Kit 3. If any of the items shown below. Presentation Plus 2. Standard accessories The supplied accessories will be suitable for detailed information. Remote control with battery ...
User Manual
Page 9
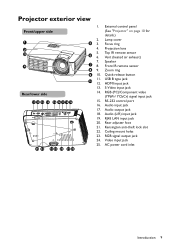
Lamp cover 3. USB B type jack 12. Audio (L/R) input jack 19. Quick-release button 11. S-Video input jack 14. Audio output jack 18. Kensington anti-theft lock ...
Lamp cover 3. USB B type jack 12. Audio (L/R) input jack 19. Quick-release button 11. S-Video input jack 14. Audio output jack 18. Kensington anti-theft lock ...
User Manual
Page 10
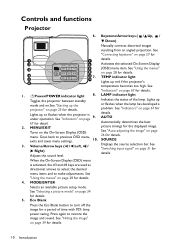
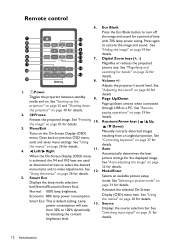
... saving. Eco Blank Press the Eco Blank button to make adjustments. Lights up mode and on.See "Starting up the or flashes when the lamp has developed a projector" on page 67 for details. See "Indicators" on page menu. AUTO 67 for the displayed image. Turns on the ...signal" on page 34 for details. 4 3 7. Adjusts the sound level. under operation. See "Selecting a picture mode" on page 31 for a period of the lamp. TEMP indicator light 5 10 6 Lights up or flashes when the projector is activated, the #3 and #6 keys are used as directional arrows to select the desired...
... saving. Eco Blank Press the Eco Blank button to make adjustments. Lights up mode and on.See "Starting up the or flashes when the lamp has developed a projector" on page 67 for details. See "Indicators" on page menu. AUTO 67 for the displayed image. Turns on the ...signal" on page 34 for details. 4 3 7. Adjusts the sound level. under operation. See "Selecting a picture mode" on page 31 for a period of the lamp. TEMP indicator light 5 10 6 Lights up or flashes when the projector is activated, the #3 and #6 keys are used as directional arrows to select the desired...
User Manual
Page 12
...desired menu items and to turn off the image and sound for details. Auto Automatically determines the best picture timings for details. Normal: 100% lamp brightness. See "Selecting a picture mode" on page 39 for details. See "Remote paging operations" on page 34 for details. See 12....adjustments. See "Correcting keystone" on page 28 for details. 3. See "Using the menus" on page 27 for a period of time with 70% lamp power saving. mode and on the On-Screen Display (OSD) menu. the image" on page 31 for details. 2. See "Switching input signal" ...
...desired menu items and to turn off the image and sound for details. Auto Automatically determines the best picture timings for details. Normal: 100% lamp brightness. See "Selecting a picture mode" on page 39 for details. See "Remote paging operations" on page 34 for details. See 12....adjustments. See "Correcting keystone" on page 28 for details. 3. See "Using the menus" on page 27 for a period of time with 70% lamp power saving. mode and on the On-Screen Display (OSD) menu. the image" on page 31 for details. 2. See "Switching input signal" ...
User Manual
Page 25
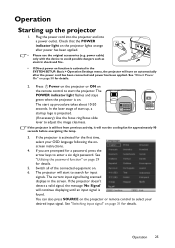
... light on . If the projector doesn't detect a valid signal, the message 'No Signal' will turn on page 50 for approximately 90 seconds before energizing the lamp. 3. If the projector is projected. (If necessary) Use the focus ring/focus slide lever to start the projector. Operation Starting up procedure takes about 10...
... light on . If the projector doesn't detect a valid signal, the message 'No Signal' will turn on page 50 for approximately 90 seconds before energizing the lamp. 3. If the projector is projected. (If necessary) Use the focus ring/focus slide lever to start the projector. Operation Starting up procedure takes about 10...
User Manual
Page 26
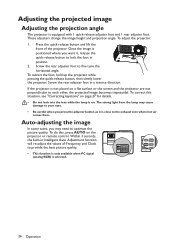
The strong light from the lamp may need to optimize the picture quality. Within 3 seconds, the built-in position. 2. To retract the foot, hold up the projector while pressing the quick-... projected image becomes trapezoidal. To do this situation, see "Correcting keystone" on page 27 for details. • Do not look into the lens while the lamp is not placed on the projector or remote control. Screw the rear adjuster foot in a reverse direction. Adjusting the projected image Adjusting the projection angle...
The strong light from the lamp may need to optimize the picture quality. Within 3 seconds, the built-in position. 2. To retract the foot, hold up the projector while pressing the quick-... projected image becomes trapezoidal. To do this situation, see "Correcting keystone" on page 27 for details. • Do not look into the lens while the lamp is not placed on the projector or remote control. Screw the rear adjuster foot in a reverse direction. Adjusting the projected image Adjusting the projection angle...
User Manual
Page 39
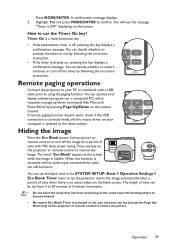
... message. Press MODE/ENTER. Timer On is a multi-functional key. • If the presentation timer is off the image for a period of time with 70% lamp power saving. You can decide whether to turn off the timer by following the on-screen instruction. • If the timer is activated or not...
... message. Press MODE/ENTER. Timer On is a multi-functional key. • If the presentation timer is off the image for a period of time with 70% lamp power saving. You can decide whether to turn off the timer by following the on-screen instruction. • If the timer is activated or not...
User Manual
Page 42
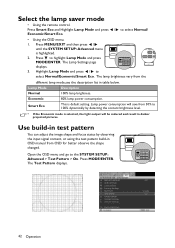
... go to 100% dynamically by observing the input signal content, or using the test pattern build-in OSD manual from the different lamp mode,see the description list in darker projected pictures. Press MODE/ENTER. Smart Eco This is highlighted. 2. Use build-in test... the SYSTEM SETUP: Advanced > Test Pattern > On. Press Smart Eco and Highlight Lamp Mode and press / to highlight Lamp Mode and press MODE/ENTER. The Test Pattern displays. 42 Operation Lamp Mode Description Normal 100% lamp brightness. Press to select Normal/ Economic/Smart Eco. • Using the OSD menu...
... go to 100% dynamically by observing the input signal content, or using the test pattern build-in OSD manual from the different lamp mode,see the description list in darker projected pictures. Press MODE/ENTER. Smart Eco This is highlighted. 2. Use build-in test... the SYSTEM SETUP: Advanced > Test Pattern > On. Press Smart Eco and Highlight Lamp Mode and press / to highlight Lamp Mode and press MODE/ENTER. The Test Pattern displays. 42 Operation Lamp Mode Description Normal 100% lamp brightness. Press to select Normal/ Economic/Smart Eco. • Using the OSD menu...
User Manual
Page 48
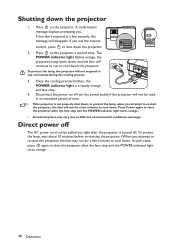
... to cool down , and the fans will not be pulled out right after the fans stop and the POWER indicator light turns orange. • Actual lamp lives may run to start the projector, the fans will run for a few seconds, the message will not respond to cool down . If you don...'t respond in an extended period of time. • If the projector is not properly shut down, to protect the lamp, when you . Press II on the projector. Disconnect the power cord from the power putlet if the projector will continue to run for a few minutes...
... to cool down , and the fans will not be pulled out right after the fans stop and the POWER indicator light turns orange. • Actual lamp lives may run to start the projector, the fans will run for a few seconds, the message will not respond to cool down . If you don...'t respond in an extended period of time. • If the projector is not properly shut down, to protect the lamp, when you . Press II on the projector. Disconnect the power cord from the power putlet if the projector will continue to run for a few minutes...
User Manual
Page 51
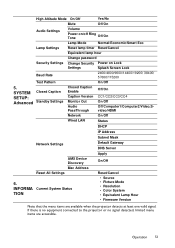
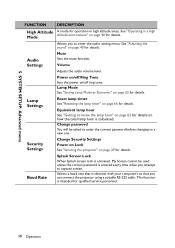
.../Off Yes/No Mute Off/On Audio Settings Volume Power on/off Ring Tone Off/On Lamp Mode Normal/Economic/Smart Eco Lamp Settings Reset lamp timer Reset/Cancel Equivalent lamp hour Change password Security Settings Change Security Power on Lock Settings Splash Screen Lock Baud Rate ... 6. Operation 51 INFORMA Current System Status TION • Source • Picture Mode • Resolution • Color System • Equivalent Lamp Hour • Firmware Version Note that the menu items are accessible. If there is no equipment connected to the projector or no signal detected...
.../Off Yes/No Mute Off/On Audio Settings Volume Power on/off Ring Tone Off/On Lamp Mode Normal/Economic/Smart Eco Lamp Settings Reset lamp timer Reset/Cancel Equivalent lamp hour Change password Security Settings Change Security Power on Lock Settings Splash Screen Lock Baud Rate ... 6. Operation 51 INFORMA Current System Status TION • Source • Picture Mode • Resolution • Color System • Equivalent Lamp Hour • Firmware Version Note that the menu items are accessible. If there is no equipment connected to the projector or no signal detected...
User Manual
Page 57
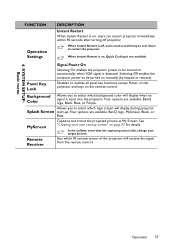
... projector power to be turned on , users can restart projector immediately within 90 seconds after turning off , users need to wait lamp to cool down to be turned on page 37 for details. Disables or enables all panel key functions except Power on the projector... and keys on , Quick Cooling is detected. Four options are available: BenQ logo, MyScreen, Black, or Blue. 4. SYSTEM SETUP: Basic menu FUNCTION Operation Settings DESCRIPTION Instant Restart When Instant Restart is on automatically when...
... projector power to be turned on , users can restart projector immediately within 90 seconds after turning off , users need to wait lamp to cool down to be turned on page 37 for details. Disables or enables all panel key functions except Power on the projector... and keys on , Quick Cooling is detected. Four options are available: BenQ logo, MyScreen, Black, or Blue. 4. SYSTEM SETUP: Basic menu FUNCTION Operation Settings DESCRIPTION Instant Restart When Instant Restart is on automatically when...
User Manual
Page 58
... Screen Lock When Splash screen lock is activated, My Screen cannot be asked to enter the current password before changing to know the lamp hour" on page 62 for operation in a high Mode altitude environment" on page 62 for details. Change password You will be ...function is identical with your computer's so that you attempt to enter the audio setting menu. Audio Settings Mute Sets the mute function. Lamp Mode See "Setting Lamp Mode as Economic" on page 40 for details. Volume Adjusts the audio volume level. 5. See "Operating in high altitude areas. ...
... Screen Lock When Splash screen lock is activated, My Screen cannot be asked to enter the current password before changing to know the lamp hour" on page 62 for operation in a high Mode altitude environment" on page 62 for details. Change password You will be ...function is identical with your computer's so that you attempt to enter the audio setting menu. Audio Settings Mute Sets the mute function. Lamp Mode See "Setting Lamp Mode as Economic" on page 40 for details. Volume Adjusts the audio volume level. 5. See "Operating in high altitude areas. ...
User Manual
Page 60
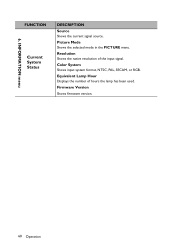
Equivalent Lamp Hour Displays the number of the input signal. Picture Mode Shows the selected mode in the PICTURE menu. Firmware Version Shows firmware version. 60 Operation Resolution Shows the native resolution of hours the lamp has been used. INFORMATION menu FUNCTION Current System Status DESCRIPTION Source Shows the current signal source. 6. Color System Shows input system format, NTSC, PAL, SECAM, or RGB.
Equivalent Lamp Hour Displays the number of the input signal. Picture Mode Shows the selected mode in the PICTURE menu. Firmware Version Shows firmware version. 60 Operation Resolution Shows the native resolution of hours the lamp has been used. INFORMATION menu FUNCTION Current System Status DESCRIPTION Source Shows the current signal source. 6. Color System Shows input system format, NTSC, PAL, SECAM, or RGB.
User Manual
Page 61
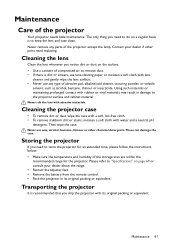
... use any parts of the projector Your projector needs little maintenance. Storing the projector If you need replacing. Maintenance Care of the projector except the lamp.
... use any parts of the projector Your projector needs little maintenance. Storing the projector If you need replacing. Maintenance Care of the projector except the lamp.

