MX750 User Manual
Page 2
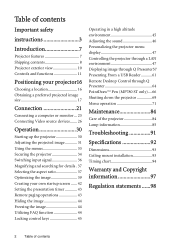
...)....66 Shutting down the projector 69 Menu operation 71 Maintenance 84 Care of the projector 84 Lamp information 85 Troubleshooting 91 Specifications 92 Dimensions 93 Ceiling mount installation 93 Timing chart 94 Warranty and Copyright information 97 Regulation statements ......98 2 Table of contents
...)....66 Shutting down the projector 69 Menu operation 71 Maintenance 84 Care of the projector 84 Lamp information 85 Troubleshooting 91 Specifications 92 Dimensions 93 Ceiling mount installation 93 Timing chart 94 Warranty and Copyright information 97 Regulation statements ......98 2 Table of contents
MX750 User Manual
Page 6
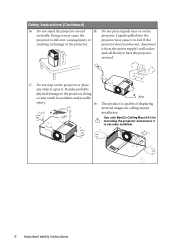
... projector and ensure it to have the projector serviced. 17. If the resulting in accidents and possible injury. 19. Use only BenQ's Ceiling Mount Kit for ceiling mount installation. This product is securely installed. 6 Important safety instructions Do not place liquids near or on end 18. Do not step on the projector or ...
... projector and ensure it to have the projector serviced. 17. If the resulting in accidents and possible injury. 19. Use only BenQ's Ceiling Mount Kit for ceiling mount installation. This product is securely installed. 6 Important safety instructions Do not place liquids near or on end 18. Do not step on the projector or ...

MX750 User Manual
Page 9
RS232 cable 5. Soft carry case (standard accessory for MX750) 4. PointDrawTM pen 7. BenQ wireless dongle 6. Ceiling mount kit 3. Wall mount kit Introduction 9 USB power adapter PointDrawTM pen PointDrawTM pen wrist holder strap PointDrawTM pen quick start guide Q Draw interactive software Optional accessories 1. Spare lamp kit 2.
RS232 cable 5. Soft carry case (standard accessory for MX750) 4. PointDrawTM pen 7. BenQ wireless dongle 6. Ceiling mount kit 3. Wall mount kit Introduction 9 USB power adapter PointDrawTM pen PointDrawTM pen wrist holder strap PointDrawTM pen quick start guide Q Draw interactive software Optional accessories 1. Spare lamp kit 2.

MX750 User Manual
Page 10
...input jack 14. USB B type jack 19. Rear adjuster foot 3 23. Audio (L/R) input jack 30. Focus ring (MX750) Focus slide lever (MP780 ST) 4. HDMI input jack 17. Ceiling mount holes 10 26. 12V DC output terminal Used to connect these devices. 27. Quick-release button 9 11. RGB (PC...)/Component video (YPbPr/ YCbCr) signal input jack 16. Rear IR remote sensor 7 22. Zoom slide lever (MX750 only) 9. Audio input jack ...
...input jack 14. USB B type jack 19. Rear adjuster foot 3 23. Audio (L/R) input jack 30. Focus ring (MX750) Focus slide lever (MP780 ST) 4. HDMI input jack 17. Ceiling mount holes 10 26. 12V DC output terminal Used to connect these devices. 27. Quick-release button 9 11. RGB (PC...)/Component video (YPbPr/ YCbCr) signal input jack 16. Rear IR remote sensor 7 22. Zoom slide lever (MX750 only) 9. Audio input jack ...
MX750 User Manual
Page 12
... secondary role of the wrong gauge or length screws. You can purchase a BenQ projector ceiling mount or wall mount kit from the ceiling or wall due to an improper attachment through the use a non-BenQ brand projector mounting kit, there is a safety risk that you also purchase a separate Kensington lock... to prevent possible damage to person and property. Mounting the projector We want you to have a pleasant experience using your BenQ projector, so we strongly recommend that you use a proper fitting BenQ projector ceiling mount kit or wall mount kit and that you ensure it securely to both...
... secondary role of the wrong gauge or length screws. You can purchase a BenQ projector ceiling mount or wall mount kit from the ceiling or wall due to an improper attachment through the use a non-BenQ brand projector mounting kit, there is a safety risk that you also purchase a separate Kensington lock... to prevent possible damage to person and property. Mounting the projector We want you to have a pleasant experience using your BenQ projector, so we strongly recommend that you use a proper fitting BenQ projector ceiling mount kit or wall mount kit and that you ensure it securely to both...

MX750 User Manual
Page 16
... the SYSTEM SETUP: Basic > Projector Position menu after you select. Note that a special rear projection screen and the BenQ Projector Ceiling Mounting Kit are required for quick setup and portability. 2. Your projector is designed to mount your projector Set Rear Table in one of the screen. Take into consideration the size and position of...
... the SYSTEM SETUP: Basic > Projector Position menu after you select. Note that a special rear projection screen and the BenQ Projector Ceiling Mounting Kit are required for quick setup and portability. 2. Your projector is designed to mount your projector Set Rear Table in one of the screen. Take into consideration the size and position of...
MX750 User Manual
Page 17
... size increases, and the vertical offset also increases proportionately. When ceiling mounted, this type of projection causes the bottom edge of the projected image to be placed horizontally ...two dimensions to the top edge of the projector. BenQ has provided a table of 4:3-aspect-ratio screen sizes for your projector 17 If the projector is mounted on a table), and positioned directly perpendicular (90&#... and the video format each factors in determining the ideal location for MX750 and a table of the screen. The projector should always be vertically offset from the horizontal plane...
... size increases, and the vertical offset also increases proportionately. When ceiling mounted, this type of projection causes the bottom edge of the projected image to be placed horizontally ...two dimensions to the top edge of the projector. BenQ has provided a table of 4:3-aspect-ratio screen sizes for your projector 17 If the projector is mounted on a table), and positioned directly perpendicular (90&#... and the video format each factors in determining the ideal location for MX750 and a table of the screen. The projector should always be vertically offset from the horizontal plane...
MX750 Data sheet
Page 1
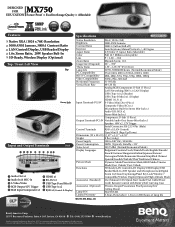
MX750 DESIGNED FOR EDUCATION Future Proof Excellent Image Quality Affordable SNMP Features Native XGA (1024 x 768) Resolution 3000 ANSI Lumens, 3000:1 Contrast Ratio LAN Control/Display, ...
MX750 DESIGNED FOR EDUCATION Future Proof Excellent Image Quality Affordable SNMP Features Native XGA (1024 x 768) Resolution 3000 ANSI Lumens, 3000:1 Contrast Ratio LAN Control/Display, ...


