
Operating Instructions
Page 2
... while operating a power tool. Use the correct tool for which may result in unexpected situations. Never use common sense when operating a power tool. Avoid accidental starting. Remove adjusting keys or wrenches before plugging in the Accessory section of electric shock. Always wear eye protection. BM 2610993477 2-04 2/9/04 9:24 AM Page 2 Power Tool Safety Rules ! SAVE THESE INSTRUCTIONS Work Area Keep your application. Refer to a rotating part of electric shock. Water entering a power tool will...
... while operating a power tool. Use the correct tool for which may result in unexpected situations. Never use common sense when operating a power tool. Avoid accidental starting. Remove adjusting keys or wrenches before plugging in the Accessory section of electric shock. Always wear eye protection. BM 2610993477 2-04 2/9/04 9:24 AM Page 2 Power Tool Safety Rules ! SAVE THESE INSTRUCTIONS Work Area Keep your application. Refer to a rotating part of electric shock. Water entering a power tool will...
Operating Instructions
Page 3
Such preventive safety measures reduce the risk of parts, and any adjustments, changing accessories, or storing the tool. Tools are recommended by first pulling the trigger then immediately releasing it in the hands of the tool "live" and shock the operator. Keep cutting tools sharp and clean. Check for misalignment or binding of moving parts, breakage of starting to cut, turn it "ON" or "OFF". Service or maintenance performed by insulated...
Such preventive safety measures reduce the risk of parts, and any adjustments, changing accessories, or storing the tool. Tools are recommended by first pulling the trigger then immediately releasing it in the hands of the tool "live" and shock the operator. Keep cutting tools sharp and clean. Check for misalignment or binding of moving parts, breakage of starting to cut, turn it "ON" or "OFF". Service or maintenance performed by insulated...
Operating Instructions
Page 4
... ventilated area, and work . When removing the blade from mixture of work with dust particles. Some examples of dust disposal, materials in time, result from the tool avoid contact with a dust bag, empty it frequently and after prolonged use proper protective gloves when grasping the blade or accessory. Make certain all adjusting screws and the blade holder are : • Lead from lead-based paints, • Crystalline...
... ventilated area, and work . When removing the blade from mixture of work with dust particles. Some examples of dust disposal, materials in time, result from the tool avoid contact with a dust bag, empty it frequently and after prolonged use proper protective gloves when grasping the blade or accessory. Make certain all adjusting screws and the blade holder are : • Lead from lead-based paints, • Crystalline...
Operating Instructions
Page 5
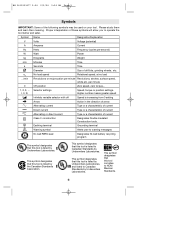
n0 .../min No load speed Rotational speed, at no load Revolutions or reciprocation per minute 0 Off position Zero speed, zero torque... 1, 2, 3, ... Higher number means greater speed 0 Infinitely variable selector with off Speed is listed by Underwriters Laboratories. This symbol designates that this tool is listed to NOM Mexican Standards. -5- BM 2610993477 2-04 2/9/04 9:24 AM Page 5 Symbols IMPORTANT: Some of drill bits, grinding wheels, etc. Please...
n0 .../min No load speed Rotational speed, at no load Revolutions or reciprocation per minute 0 Off position Zero speed, zero torque... 1, 2, 3, ... Higher number means greater speed 0 Infinitely variable selector with off Speed is listed by Underwriters Laboratories. This symbol designates that this tool is listed to NOM Mexican Standards. -5- BM 2610993477 2-04 2/9/04 9:24 AM Page 5 Symbols IMPORTANT: Some of drill bits, grinding wheels, etc. Please...

Operating Instructions
Page 6
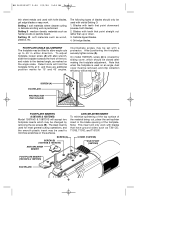
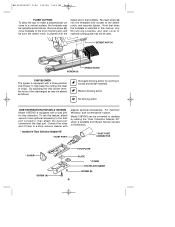
... the power source before making any assembly, adjustments or changing accessories. Jigsaws TRIGGER SWITCH TRIGGER PRESET SPEED ADJUSTING DIAL BLADE CHANGE KNOB "LOCK-ON" BUTTON ALLEN WRENCH 5 MM VENTILATION OPENINGS BLADE PLUNGER BASE VENTILATION OPENINGS CHIP BLOWER LEVER BLADE ORBIT SELECTOR LEVER BLADE ROLLER GUIDE CUTTING GUIDE SLOTS BLADE TRIGGER SWITCH TRIGGER PRESET SPEED ADJUSTING DIAL BLADE CHANGE KNOB "LOCK-ON" BUTTON ALLEN WRENCH 5 MM VENTILATION OPENINGS VACUUM HOSE BLADE PLUNGER DUST COVER (1587DVS) CUTTING GUIDE SLOTS BASE BLADE VENTILATION OPENINGS DUST PORT CONNECTOR...
... the power source before making any assembly, adjustments or changing accessories. Jigsaws TRIGGER SWITCH TRIGGER PRESET SPEED ADJUSTING DIAL BLADE CHANGE KNOB "LOCK-ON" BUTTON ALLEN WRENCH 5 MM VENTILATION OPENINGS BLADE PLUNGER BASE VENTILATION OPENINGS CHIP BLOWER LEVER BLADE ORBIT SELECTOR LEVER BLADE ROLLER GUIDE CUTTING GUIDE SLOTS BLADE TRIGGER SWITCH TRIGGER PRESET SPEED ADJUSTING DIAL BLADE CHANGE KNOB "LOCK-ON" BUTTON ALLEN WRENCH 5 MM VENTILATION OPENINGS VACUUM HOSE BLADE PLUNGER DUST COVER (1587DVS) CUTTING GUIDE SLOTS BASE BLADE VENTILATION OPENINGS DUST PORT CONNECTOR...

Operating Instructions
Page 7
... use for your tool allows for soft materials. BM 2610993477 2-04 2/9/04 9:24 AM Page 7 Assembly BLADE INSTALLATION Set the blade orbit selector lever to decrease speed. Depress knob to disengage and continue to turn knob clockwise until it is continuously being cut ) and guide the back of time, the motor temperature will help you determine which setting to the cutting direction. TO LOCK TRIGGER "ON": squeeze trigger, depress button and release trigger. TRIGGER PRESET SPEED ADJUSTING...
... use for your tool allows for soft materials. BM 2610993477 2-04 2/9/04 9:24 AM Page 7 Assembly BLADE INSTALLATION Set the blade orbit selector lever to decrease speed. Depress knob to disengage and continue to turn knob clockwise until it is continuously being cut ) and guide the back of time, the motor temperature will help you determine which setting to the cutting direction. TO LOCK TRIGGER "ON": squeeze trigger, depress button and release trigger. TRIGGER PRESET SPEED ADJUSTING...
Operating Instructions
Page 8
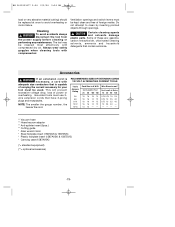
... scratches on an angle, dust cover must be removed, and chip collection efficiency will accept two footplate inserts which should only be closed after making the footplate adjustment. Blades with allen wrench, slide the footplate towards the front of the footplate. On model 1587DVS, screw (A) is used on fine surfaces. The steel insert is performed. After positioning the footplate, securely tighten screw (A). SCREW (A) SCREW (B) (1587AVS & 1587DVS...
... scratches on an angle, dust cover must be removed, and chip collection efficiency will accept two footplate inserts which should only be closed after making the footplate adjustment. Blades with allen wrench, slide the footplate towards the front of the footplate. On model 1587DVS, screw (A) is used on fine surfaces. The steel insert is performed. After positioning the footplate, securely tighten screw (A). SCREW (A) SCREW (B) (1587AVS & 1587DVS...
Operating Instructions
Page 9
... cutting guide may not be used. Remove screw (A), move footplate to the front mounting slot, and be sure the detent notch is equipped with the detent slot in the footplate. Note that when the footplate is equipped with adapter (optional accessories). By adjusting the chip blower lever, the force of hose to a shop vacuum cleaner with a dust port for working in "Dust Collection Adapter Kit" * DUST PORT * DUST...
... cutting guide may not be used. Remove screw (A), move footplate to the front mounting slot, and be sure the detent notch is equipped with the detent slot in the footplate. Note that when the footplate is equipped with adapter (optional accessories). By adjusting the chip blower lever, the force of hose to a shop vacuum cleaner with a dust port for working in "Dust Collection Adapter Kit" * DUST PORT * DUST...
Operating Instructions
Page 10
... support. Blades with teeth that tools with gears be regreased with teeth that point straight out (rather than up or down . 3. Blades with a special gear lubricant at every brush change , the bearings should be replaced at every second brush change . Maintenance Service ! When using reverse-tooth blades, downward force must be applied to the jigsaw. • Blades with downward-pointing teeth (reverse-tooth blade) can be used with orbital Setting...
... support. Blades with teeth that tools with gears be regreased with teeth that point straight out (rather than up or down . 3. Blades with a special gear lubricant at every brush change , the bearings should be replaced at every second brush change . Maintenance Service ! When using reverse-tooth blades, downward force must be applied to the jigsaw. • Blades with downward-pointing teeth (reverse-tooth blade) can be used with orbital Setting...
Operating Instructions
Page 11
... load or very abrasive material cutting) should be replaced at once to clean by inserting pointed objects through openings. ! WARNING To avoid accidents always disconnect the tool from the power supply before cleaning or performing any maintenance. Always wear safety goggles when cleaning tools with compressed dry air. CAUTION Certain cleaning agents and solvents damage plastic parts. Ventilation openings and switch levers must use...
... load or very abrasive material cutting) should be replaced at once to clean by inserting pointed objects through openings. ! WARNING To avoid accidents always disconnect the tool from the power supply before cleaning or performing any maintenance. Always wear safety goggles when cleaning tools with compressed dry air. CAUTION Certain cleaning agents and solvents damage plastic parts. Ventilation openings and switch levers must use...
Parts List
Page 2
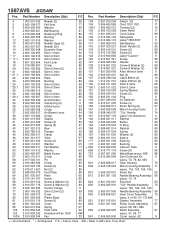
... Spring Washer 65 Screw {2} 89 Plug 9 Air Deflector 24 Screw {4} 89 Brush Spring {2} 27 Motor Housing Cover 9 "Clic" Handle 74 Label "clic directions" 9 Ratchet 80 Button 80 O-Ring 80 Ratchet 80 Spring 80 Washer {2} 80 Sleeve 80 Bushing 82 Bushing 82 Vacuum Tube 9 Screw {6} 89 Metal Base w/pos. 658 88 Dust Collection Kit 9 w/pos. 70, 79, 82, 656 Gear Housing 72 Motor Housing Assembly 71 w/pos. 116, 153, 155, 156 Brush Set...
... Spring Washer 65 Screw {2} 89 Plug 9 Air Deflector 24 Screw {4} 89 Brush Spring {2} 27 Motor Housing Cover 9 "Clic" Handle 74 Label "clic directions" 9 Ratchet 80 Button 80 O-Ring 80 Ratchet 80 Spring 80 Washer {2} 80 Sleeve 80 Bushing 82 Bushing 82 Vacuum Tube 9 Screw {6} 89 Metal Base w/pos. 658 88 Dust Collection Kit 9 w/pos. 70, 79, 82, 656 Gear Housing 72 Motor Housing Assembly 71 w/pos. 116, 153, 155, 156 Brush Set...

Parts List
Page 3
... on Illustrated Parts Lists) is no longer available. Please be directed to your Bosch Parts Manual, only after making any additions or notes to $9.00 effective immediately. * For exact models listed above only. Older models not listed may require different assembly number. A change was made that part number 2600 326 903 Roller Assembly (pos. 855 on Illustrated Parts Lists) in place of your Authorized Service Manager. Product Service Department S-B Power Tool Company...
... on Illustrated Parts Lists) is no longer available. Please be directed to your Bosch Parts Manual, only after making any additions or notes to $9.00 effective immediately. * For exact models listed above only. Older models not listed may require different assembly number. A change was made that part number 2600 326 903 Roller Assembly (pos. 855 on Illustrated Parts Lists) in place of your Authorized Service Manager. Product Service Department S-B Power Tool Company...


