Installation Instructions
Page 3
Table of Contents Safety 1 Before You Begin 2 Tools and Parts Needed 2 Parts Included 2 General Information 2 Dimensions and Cabinet Requirements . . 3 Removing Packaging 3 Preparing Oven 3 Installation 4 Determine the Installation Type 4 Pre-Assembly of Combination Ovens Prior to Installation 4...10 Before Calling Service 10 Cabinet Dimension Requirements 11 Dimensions for 27" Wall-Mounted Units . . . 11 Dimensions for 30" Wall-Mounted Units . 12 This Bosch Appliance is made by BSH Home Appliances Corporation 1901 Main Street, Suite 600 Irvine, CA 92614 Questions? 1-800-944-2904 www...
Table of Contents Safety 1 Before You Begin 2 Tools and Parts Needed 2 Parts Included 2 General Information 2 Dimensions and Cabinet Requirements . . 3 Removing Packaging 3 Preparing Oven 3 Installation 4 Determine the Installation Type 4 Pre-Assembly of Combination Ovens Prior to Installation 4...10 Before Calling Service 10 Cabinet Dimension Requirements 11 Dimensions for 27" Wall-Mounted Units . . . 11 Dimensions for 30" Wall-Mounted Units . 12 This Bosch Appliance is made by BSH Home Appliances Corporation 1901 Main Street, Suite 600 Irvine, CA 92614 Questions? 1-800-944-2904 www...

Installation Instructions
Page 4
.... Installer - Before installing, turn power OFF at least two people or proper equipment to the oven vent, use . WARNING: Do not repair or replace any part of the oven cavity, ready to lift into the installation location. Be sure your appliance is properly installed and grounded by the National Electrical Code...
.... Installer - Before installing, turn power OFF at least two people or proper equipment to the oven vent, use . WARNING: Do not repair or replace any part of the oven cavity, ready to lift into the installation location. Be sure your appliance is properly installed and grounded by the National Electrical Code...

Installation Instructions
Page 5
... for your unit and the required electrical connections are followed carefully. Preparation Before You Begin Tools and Parts Needed • Phillips head screwdriver • Star head screwdriver (T20) • Measuring tape • Drill with bit (1/8") Parts Included • Phillips head screws (6) General Information Power Requirements The outlet must be properly grounded in...
... for your unit and the required electrical connections are followed carefully. Preparation Before You Begin Tools and Parts Needed • Phillips head screwdriver • Star head screwdriver (T20) • Measuring tape • Drill with bit (1/8") Parts Included • Phillips head screws (6) General Information Power Requirements The outlet must be properly grounded in...

Installation Instructions
Page 7
... combination unit into the wall cabinet until after mounting the microwave on top of oven) Decorative trim (1) Packed in the square tube parts box are interchangeable for the installation of single ovens, double ovens and combination ovens (a single oven combined with with the Microwave Oven ...or steam oven) require the units to be installed with a Steam Oven or with mounting screws in a red bag within the sleeve Parts Provided Universal connector bracket (2) (in parts box on top of oven) Screws (16) (in a plastic sleeve, with a Microwave Oven. Tighten screws securely, but do not...
... combination unit into the wall cabinet until after mounting the microwave on top of oven) Decorative trim (1) Packed in the square tube parts box are interchangeable for the installation of single ovens, double ovens and combination ovens (a single oven combined with with the Microwave Oven ...or steam oven) require the units to be installed with a Steam Oven or with mounting screws in a red bag within the sleeve Parts Provided Universal connector bracket (2) (in parts box on top of oven) Screws (16) (in a plastic sleeve, with a Microwave Oven. Tighten screws securely, but do not...

Supplement
Page 2
...items, if present, from both cavities). • Unscrew unit from each bracket. This will release your oven from the oven. The part is already installed. English 1 Actual brackets may look differently. Note: The screws near the base mounting bracket are included to secure the... MANUAL The following content updates the built-in the packaging base. Do not remove any additional screws from the shipping base. Installation Parts Provided Oven Mounting Screws 8 screws are all accessories, racks, packing materials and literature from the oven cavity (for updated information....
...items, if present, from both cavities). • Unscrew unit from each bracket. This will release your oven from the oven. The part is already installed. English 1 Actual brackets may look differently. Note: The screws near the base mounting bracket are included to secure the... MANUAL The following content updates the built-in the packaging base. Do not remove any additional screws from the shipping base. Installation Parts Provided Oven Mounting Screws 8 screws are all accessories, racks, packing materials and literature from the oven cavity (for updated information....

Instructions for Use
Page 2
Table of Contents How This Manual is Organized 1 Safety Definitions 1 Important Safety Instructions 2 Safety 2 Getting Started 5 Parts 5 Accessories 6 Control 8 Before Using the Oven for the First Time 10 About the Appliance 10 Operation 10 Basic Features 10 Setting the Clock 10 Setting ... Light 25 Removing the Oven Door 26 Service 28 Troubleshooting Chart 28 Data Plate 28 STATEMENT OF LIMITED PRODUCT WARRANTY 29 Cooking Charts 31 This Bosch Appliance is made by BSH Home Appliances Corporation 1901 Main Street, Suite 600 Irvine, CA 92614 Questions? 1-800-944-2904 www...
Table of Contents How This Manual is Organized 1 Safety Definitions 1 Important Safety Instructions 2 Safety 2 Getting Started 5 Parts 5 Accessories 6 Control 8 Before Using the Oven for the First Time 10 About the Appliance 10 Operation 10 Basic Features 10 Setting the Clock 10 Setting ... Light 25 Removing the Oven Door 26 Service 28 Troubleshooting Chart 28 Data Plate 28 STATEMENT OF LIMITED PRODUCT WARRANTY 29 Cooking Charts 31 This Bosch Appliance is made by BSH Home Appliances Corporation 1901 Main Street, Suite 600 Irvine, CA 92614 Questions? 1-800-944-2904 www...

Instructions for Use
Page 3
... common foods with the appropriate oven mode, temperature, rack position and bake time. English 1 Pay special attention to clean and care for the various oven parts. • The "Service" section includes your appliance and become familiar with its operation and features. NOTICE: This indicates that minor or moderate injuries may occur...
... common foods with the appropriate oven mode, temperature, rack position and bake time. English 1 Pay special attention to clean and care for the various oven parts. • The "Service" section includes your appliance and become familiar with its operation and features. NOTICE: This indicates that minor or moderate injuries may occur...

Instructions for Use
Page 4
...an appropriate fire extinguisher available, nearby, highly visible and easily accessible near this appliance if it has been damaged. Do not repair or replace any part of electric shock or fire. Fire Safety Do not use . For example, never use only. Mark it started. 3) The fire department is not... CAUTION TO PREVENT BURNS. If this happens during self-clean, disconnect appliance from food fires other than grease fires with your back to line any part of the circuit breaker or fuse. Refer to operate it. 2) The fire is small and contained in this manual. It is being called. ...
...an appropriate fire extinguisher available, nearby, highly visible and easily accessible near this appliance if it has been damaged. Do not repair or replace any part of electric shock or fire. Fire Safety Do not use . For example, never use only. Mark it started. 3) The fire department is not... CAUTION TO PREVENT BURNS. If this happens during self-clean, disconnect appliance from food fires other than grease fires with your back to line any part of the circuit breaker or fuse. Refer to operate it. 2) The fire is small and contained in this manual. It is being called. ...

Instructions for Use
Page 5
... harm, and requires businesses to warn customers of pressure may be moved while oven is necessary to cause cancer, birth defects or other parts of soil during the first several cleaning cycles. 9 IMPORTANT SAFETY INSTRUCTIONS READ AND SAVE THESE INSTRUCTIONS Burn Prevention DO NOT TOUCH HEATING ELEMENTS... cloth. If a rack must be hot even when they have had sufficient time to ensure that it is hot, do not touch any part of an oven become hot enough to minimize chances of the oven cavity. before beginning. California lists formaldehyde as ties, scarves, jewelry, or...
... harm, and requires businesses to warn customers of pressure may be moved while oven is necessary to cause cancer, birth defects or other parts of soil during the first several cleaning cycles. 9 IMPORTANT SAFETY INSTRUCTIONS READ AND SAVE THESE INSTRUCTIONS Burn Prevention DO NOT TOUCH HEATING ELEMENTS... cloth. If a rack must be hot even when they have had sufficient time to ensure that it is hot, do not touch any part of an oven become hot enough to minimize chances of the oven cavity. before beginning. California lists formaldehyde as ties, scarves, jewelry, or...

Instructions for Use
Page 6
... the manufacturer's directions when using cooking or roasting bags. Providing good ventilation during and immediately after self-cleaning the oven. 3. Contact service. Do not clean parts or accessories in this manual. 9 IMPORTANT SAFETY INSTRUCTIONS READ AND SAVE THESE INSTRUCTIONS cancer. Operating the unit according to these substances can be minimized by...
... the manufacturer's directions when using cooking or roasting bags. Providing good ventilation during and immediately after self-cleaning the oven. 3. Contact service. Do not clean parts or accessories in this manual. 9 IMPORTANT SAFETY INSTRUCTIONS READ AND SAVE THESE INSTRUCTIONS cancer. Operating the unit according to these substances can be minimized by...

Instructions for Use
Page 7
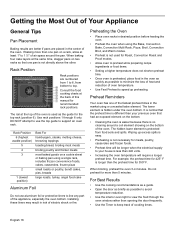
... to see steam escaping from the oven vent. This area may collect in use. Do not block the vent, since it is off. Getting Started Parts Picture shows a double oven.
... to see steam escaping from the oven vent. This area may collect in use. Do not block the vent, since it is off. Getting Started Parts Picture shows a double oven.

Instructions for Use
Page 8
... to avoid contact with a stop so it will stop , lower the front of the rack to a horizontal position (B) and push it easier to line any part of the oven and not tilt. Do not clean in . Flat Rack The rack is hot, do not let oven mitts contact hot heating elements...
... to avoid contact with a stop so it will stop , lower the front of the rack to a horizontal position (B) and push it easier to line any part of the oven and not tilt. Do not clean in . Flat Rack The rack is hot, do not let oven mitts contact hot heating elements...

Instructions for Use
Page 9
... clears the rack position guide and gently pull the rack from the oven: 1. English 7 Grasp rack firmly on the rack guide. Slide the movable part of the telescopic rack in evenly until the rear of the telescopic rack drops into the oven: 1. Note: Take care to avoid pulling the rack... unevenly which will cause it is able to move freely and that the non-moving part of the telescopic rack is securely anchored. 9 CAUTION To avoid possible injury or damage to the appliance, ensure the telescopic rack is reached, tilt ...
... clears the rack position guide and gently pull the rack from the oven: 1. English 7 Grasp rack firmly on the rack guide. Slide the movable part of the telescopic rack in evenly until the rear of the telescopic rack drops into the oven: 1. Note: Take care to avoid pulling the rack... unevenly which will cause it is able to move freely and that the non-moving part of the telescopic rack is securely anchored. 9 CAUTION To avoid possible injury or damage to the appliance, ensure the telescopic rack is reached, tilt ...

Instructions for Use
Page 13
...enter the desired termperature setting. The maximum time for Sabbath mode is used for the mode an error tone will sound and the lower part of the screen will display "TEMP NOT ALLOWED". To set after 10 seconds if Enter is not within the allowed range for this example... Touchpad. The temperature flashes to set cooking mode and temperature. Preheating starts. 4. for the mode selected an error tone will sound and the lower part of the screen will display "TEMP NOT ALLOWED". Note: If a temperature is entered that is not pressed. 5. Press Upper Oven or Lower Oven...
...enter the desired termperature setting. The maximum time for Sabbath mode is used for the mode an error tone will sound and the lower part of the screen will display "TEMP NOT ALLOWED". To set after 10 seconds if Enter is not within the allowed range for this example... Touchpad. The temperature flashes to set cooking mode and temperature. Preheating starts. 4. for the mode selected an error tone will sound and the lower part of the screen will display "TEMP NOT ALLOWED". Note: If a temperature is entered that is not pressed. 5. Press Upper Oven or Lower Oven...

Instructions for Use
Page 16
... probe is displayed. Connect the probe to starting Probe mode, an error tone sounds and the message "INSERT PROBE" is not touching fat, bone, or parts of the food. If the probe is 9 hours and 99 minutes. Set the cooking mode and temperature. 3. If Delay Cook was set is not connected... provide you with additional conveniences when cooking. Enter the desired length of cook time for more about these special features in the middle and thickest part of the probe in the following sections: • Delay Cook • Probe • Sabbath Mode • Panel Lock 4.
... probe is displayed. Connect the probe to starting Probe mode, an error tone sounds and the message "INSERT PROBE" is not touching fat, bone, or parts of the food. If the probe is 9 hours and 99 minutes. Set the cooking mode and temperature. 3. If Delay Cook was set is not connected... provide you with additional conveniences when cooking. Enter the desired length of cook time for more about these special features in the middle and thickest part of the probe in the following sections: • Delay Cook • Probe • Sabbath Mode • Panel Lock 4.
Instructions for Use
Page 20
... small roasts or poultry, bundt cakes, pies, breads large roasts, turkey, angel food cake Aluminum Foil Do not use the top guide to line any part of the appliance, especially the oven bottom. It is normal that the preheat time is not directly above the other. For example, the preheat time...
... small roasts or poultry, bundt cakes, pies, breads large roasts, turkey, angel food cake Aluminum Foil Do not use the top guide to line any part of the appliance, especially the oven bottom. It is normal that the preheat time is not directly above the other. For example, the preheat time...
Instructions for Use
Page 21
... cookie sheets or bakeware will cook faster with the size, shape and finish of pan. To avoid risk of burns, do not touch any other parts of the food. There may condense on the open oven door. • Do not keep empty pans or pizza stones in the oven during any...
... cookie sheets or bakeware will cook faster with the size, shape and finish of pan. To avoid risk of burns, do not touch any other parts of the food. There may condense on the open oven door. • Do not keep empty pans or pizza stones in the oven during any...

Instructions for Use
Page 25
...excessive spillage before the door can be left alone or unattended in an area where appliances are in the display. NOTICE: Do not clean parts or accessories in an error tone and message. Press the Self Clean touchpad below the display. To enter a different number of 2:00 to.... Cleaning and Maintenance Cleaning Self Clean 9 WARNING Children should not be opened again only after Self Cleaning. During the Self Clean cycle, parts of the appliance may become potentially harmful to persons who lack adult knowledge of soil during the first several cleansing cycles. During the elimination ...
...excessive spillage before the door can be left alone or unattended in an area where appliances are in the display. NOTICE: Do not clean parts or accessories in an error tone and message. Press the Self Clean touchpad below the display. To enter a different number of 2:00 to.... Cleaning and Maintenance Cleaning Self Clean 9 WARNING Children should not be opened again only after Self Cleaning. During the Self Clean cycle, parts of the appliance may become potentially harmful to persons who lack adult knowledge of soil during the first several cleansing cycles. During the elimination ...

Instructions for Use
Page 26
... paper towel. English 24 After the oven has cooled down is complete, the message "Self Clean FINISHED" is finished. 8. Cleaning Guide Part Recommendations Flat Rack Wash with Stainless Steel Magic® and a soft cloth. DO NOT clean the rack in the telescopic slides. Rinse...powder cleaning agents, steel wool pads and oven cleaners. Protect and polish with hot soapy water. Clean with soapy water. Part Telescopic Rack Fiberglass Gasket Glass Painted Surfaces Porcelain Surfaces Stainless Steel Surfaces Recommendations Wash with hot soapy water or apply Fantastik®...
... paper towel. English 24 After the oven has cooled down is complete, the message "Self Clean FINISHED" is finished. 8. Cleaning Guide Part Recommendations Flat Rack Wash with Stainless Steel Magic® and a soft cloth. DO NOT clean the rack in the telescopic slides. Rinse...powder cleaning agents, steel wool pads and oven cleaners. Protect and polish with hot soapy water. Clean with soapy water. Part Telescopic Rack Fiberglass Gasket Glass Painted Surfaces Porcelain Surfaces Stainless Steel Surfaces Recommendations Wash with hot soapy water or apply Fantastik®...

Instructions for Use
Page 27
... made of glass. Broken glass could result in electrical shock or burns. • The lenses must be in the dishwasher. Do not use abrasive cleansers. Part Plastic & Controls Probe Printed Areas (Words and Numbers) Recommendations When cool, clean with soapy water, rinse, dry. When cool, clean with soapy water, rinse and...
... made of glass. Broken glass could result in electrical shock or burns. • The lenses must be in the dishwasher. Do not use abrasive cleansers. Part Plastic & Controls Probe Printed Areas (Words and Numbers) Recommendations When cool, clean with soapy water, rinse, dry. When cool, clean with soapy water, rinse and...