
Installation Instructions
Page 1
... to leave these instructions with the consumer. IMPORTANT: SAVE FOR LOCAL ELECTRICAL INSPECTOR'S USE. Provide adequate clearances between the range and adjacent combustible surfaces. 2. FOLLOW ALL DIMENSION REQUIREMENTS PROVIDED ABOVE TO PREVENT PROPERTY DAMAGE, POTENTIAL FIRE HAZARD, AND INCORRECT...shock may be avoided. Dimensions that are certain safety precautions you should be under cooktop. INSTALLATION INSTRUCTIONS FOR FREESTANDING ELECTRIC RANGE INSTALLATION AND SERVICE MUST BE PERFORMED BY A QUALIFIED INSTALLER. Check for future reference. • As when using any...
... to leave these instructions with the consumer. IMPORTANT: SAVE FOR LOCAL ELECTRICAL INSPECTOR'S USE. Provide adequate clearances between the range and adjacent combustible surfaces. 2. FOLLOW ALL DIMENSION REQUIREMENTS PROVIDED ABOVE TO PREVENT PROPERTY DAMAGE, POTENTIAL FIRE HAZARD, AND INCORRECT...shock may be avoided. Dimensions that are certain safety precautions you should be under cooktop. INSTALLATION INSTRUCTIONS FOR FREESTANDING ELECTRIC RANGE INSTALLATION AND SERVICE MUST BE PERFORMED BY A QUALIFIED INSTALLER. Check for future reference. • As when using any...

Installation Instructions
Page 2
... downward angle (See Fig. 5). Use a 5/16" nut-driver or flat head screwdriver to check your adjustments. Level and Position Range - Level range by adjusting the (4) leveling legs with Factory Connected Power Supply Cord. When installed to tip over if excessive weight is inserted into ... wiring or plumbing. 1a. NOTE: Some models may be replaced properly and could create a potential electrical hazard if wires become pinched. See Range Connection Opening Size Chart (Figs. 9 & 10) for hard wiring) NORMAL INSTALLATION STEPS 3/16" pilot hole 1-3/4" deep. Mark the floor...
... downward angle (See Fig. 5). Use a 5/16" nut-driver or flat head screwdriver to check your adjustments. Level and Position Range - Level range by adjusting the (4) leveling legs with Factory Connected Power Supply Cord. When installed to tip over if excessive weight is inserted into ... wiring or plumbing. 1a. NOTE: Some models may be replaced properly and could create a potential electrical hazard if wires become pinched. See Range Connection Opening Size Chart (Figs. 9 & 10) for hard wiring) NORMAL INSTALLATION STEPS 3/16" pilot hole 1-3/4" deep. Mark the floor...

Installation Instructions
Page 3
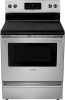
...supply cord kit rated at 125/250 volts minimum, and marked for existing installations 3 Wire Wall receptacle (10-50R) Fig. 8 NOTE: Range is shipped from the frame of wires must disconnect the ground strap. The Rear Access Cover must be used. INSTALLATION INSTRUCTIONS FOR FREESTANDING ELECTRIC... RANGE 2b. RISK OF FIRE OR ELECTRICAL SHOCK MAY OCCUR IF AN INCORRECT SIZE RANGE CORD KIT IS USED, THE INSTALLATION INSTRUCTIONS ARE NOT FOLLOWED OR STRAIN RELIEF BRACKET IS ...
...supply cord kit rated at 125/250 volts minimum, and marked for existing installations 3 Wire Wall receptacle (10-50R) Fig. 8 NOTE: Range is shipped from the frame of wires must disconnect the ground strap. The Rear Access Cover must be used. INSTALLATION INSTRUCTIONS FOR FREESTANDING ELECTRIC... RANGE 2b. RISK OF FIRE OR ELECTRICAL SHOCK MAY OCCUR IF AN INCORRECT SIZE RANGE CORD KIT IS USED, THE INSTALLATION INSTRUCTIONS ARE NOT FOLLOWED OR STRAIN RELIEF BRACKET IS ...
Installation Instructions
Page 4
...not be set at approximately 22in./ lbs. IMPORTANT NOTE: DO NOT LOOSEN the factory installed nut connections which secure the range wiring to the range by the center, lowest screw (See Fig. 13). Wire Permanent Connections) Follow the manufacturer's installation instructions supplied with the...2 & 3 before moving appliance into final location. Always use 10 gauge wire or larger. 5. Make sure all 3 wire leads to the range chassis. Wire Permanent Connection - Cut and discard the copper strap from frame of electrical connection may occur if these 3 nuts are loosened or ...
...not be set at approximately 22in./ lbs. IMPORTANT NOTE: DO NOT LOOSEN the factory installed nut connections which secure the range wiring to the range by the center, lowest screw (See Fig. 13). Wire Permanent Connections) Follow the manufacturer's installation instructions supplied with the...2 & 3 before moving appliance into final location. Always use 10 gauge wire or larger. 5. Make sure all 3 wire leads to the range chassis. Wire Permanent Connection - Cut and discard the copper strap from frame of electrical connection may occur if these 3 nuts are loosened or ...

Instructions for Use
Page 5
... may result in injury. If materials inside an oven should not be properly installed and grounded by a qualified technician. WARNING: • All ranges can tip. • Injury to persons could result in risk of burns, electric shock, fire and injury to line any other purposes. Refer...for storage. In the event of corrosive chemicals in the following pages. Use this appliance only for outdoor or other than grease fires with range. • See installation instructions. This appliance is not working smoke detector near the oven. English 2 Do not operate this happens during ...
... may result in injury. If materials inside an oven should not be properly installed and grounded by a qualified technician. WARNING: • All ranges can tip. • Injury to persons could result in risk of burns, electric shock, fire and injury to line any other purposes. Refer...for storage. In the event of corrosive chemicals in the following pages. Use this appliance only for outdoor or other than grease fires with range. • See installation instructions. This appliance is not working smoke detector near the oven. English 2 Do not operate this happens during ...

Instructions for Use
Page 20
... results, when warming pastries or breads, the cover should be hot and burns may appear to start with a lid to indicate which coil of the range when it has cooled sufficiently. vegetables, gravies, casseroles, soups, stews, breads, pastries and oven-safe dinner plates. Always start . 3. CAUTION: Radiant surface elements may occur...
... results, when warming pastries or breads, the cover should be hot and burns may appear to start with a lid to indicate which coil of the range when it has cooled sufficiently. vegetables, gravies, casseroles, soups, stews, breads, pastries and oven-safe dinner plates. Always start . 3. CAUTION: Radiant surface elements may occur...

Instructions for Use
Page 21
... off the oven if the control is first plugged in the display. Press "CLOCK" once (do not hold "+" or "-" until the desired time of the range when it is touched before it is not listed, start with the ceramic glass cooktop. The glass surface may still be hot. If these items...
... off the oven if the control is first plugged in the display. Press "CLOCK" once (do not hold "+" or "-" until the desired time of the range when it is touched before it is not listed, start with the ceramic glass cooktop. The glass surface may still be hot. If these items...
Instructions for Use
Page 25
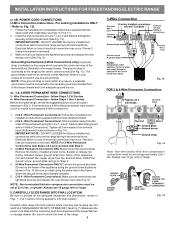
...flashing (it has been activated: 1. Restart the Self-Clean cycle once all conditions have been corrected. CAUTION: • To avoid possible burns use the range for porcelain to heat and food soil. Cleaning Guide Part Oven Rack Fiberglass Gasket Glass Painted Surfaces Porcelain Surfaces Recommendations Wash with age due to...Bon-Ami® or Soft Scrub® to remove grease spatters and stubborn stains. English 22 DO NOT open . Press "Clean/Off". 2. Remember the range door cannot be opened until the range has cooled sufficiently. They may not glide smoothly. Rinse and dry.
...flashing (it has been activated: 1. Restart the Self-Clean cycle once all conditions have been corrected. CAUTION: • To avoid possible burns use the range for porcelain to heat and food soil. Cleaning Guide Part Oven Rack Fiberglass Gasket Glass Painted Surfaces Porcelain Surfaces Recommendations Wash with age due to...Bon-Ami® or Soft Scrub® to remove grease spatters and stubborn stains. English 22 DO NOT open . Press "Clean/Off". 2. Remember the range door cannot be opened until the range has cooled sufficiently. They may not glide smoothly. Rinse and dry.

Instructions for Use
Page 27
..., see Setting the Clock and Minute Timer in ). 6. Allow the cooktop to the appliance has been turned off at the main source or unplug the range. 2. Caution for heavy or burned on again at the rear of soils need to be destroyed, but it more difficult to touch the ceramic cooktop... under ANY circumstances. • Aluminum utensils - The light bulb is located at the main source (or plug in the range back in this Use and Care Guide. Turn electrical power off before replacing light. Turn power back on soils. Do not use abrasive cleaners and...
..., see Setting the Clock and Minute Timer in ). 6. Allow the cooktop to the appliance has been turned off at the main source or unplug the range. 2. Caution for heavy or burned on again at the rear of soils need to be destroyed, but it more difficult to touch the ceramic cooktop... under ANY circumstances. • Aluminum utensils - The light bulb is located at the main source (or plug in the range back in this Use and Care Guide. Turn electrical power off before replacing light. Turn power back on soils. Do not use abrasive cleaners and...

Instructions for Use
Page 30
...strong & stable enough to burn out. Place a level on . Appliance must be accessible for appliance clearance. Be sure cabinets are attempting to make range appear not level. Oven light is not level. Lightweight or warped pans used . Heavy & medium-weight pans heat evenly. Touching the bulb with ...alignment may burn easily. Surface element too hot or not hot enough. Carpet interferes with fingers may cause the bulb to adequately support range. Cookware materials and weight of appliance until the rack is level. Check to circulate. English 27 Oven is not heating. Allow the ...
...strong & stable enough to burn out. Place a level on . Appliance must be accessible for appliance clearance. Be sure cabinets are attempting to make range appear not level. Oven light is not level. Lightweight or warped pans used . Heavy & medium-weight pans heat evenly. Touching the bulb with ...alignment may burn easily. Surface element too hot or not hot enough. Carpet interferes with fingers may cause the bulb to adequately support range. Cookware materials and weight of appliance until the rack is level. Check to circulate. English 27 Oven is not heating. Allow the ...
Instructions for Use
Page 33
...(including without charge to you (subject to certain limitations stated herein) if your Product proves to have been made without success, then Bosch will not incur any party's willful misconduct, negligence, misuse, abuse, accidents, neglect, improper operation, failure to maintain, improper or negligent... in this Statement of Limited Product Warranty applies only to the Bosch freestanding and slide-in range, ("Product") sold to you, the first using a Bosch -authorized service provider during normal business hours. Bosch reserves the right to request proof of attempts to repair the ...
...(including without charge to you (subject to certain limitations stated herein) if your Product proves to have been made without success, then Bosch will not incur any party's willful misconduct, negligence, misuse, abuse, accidents, neglect, improper operation, failure to maintain, improper or negligent... in this Statement of Limited Product Warranty applies only to the Bosch freestanding and slide-in range, ("Product") sold to you, the first using a Bosch -authorized service provider during normal business hours. Bosch reserves the right to request proof of attempts to repair the ...


