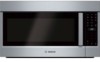
Installation Instructions
Page 3
... comply with the door open. ▯ Make the following standards: ▯ CAN/CSA C22.2 No. 61 - Microwave Ovens ▯ UL 923 - If there is any service test or inspection within the microwave generating compartments, check the magnetron, wave guide or transmission line, and cavity for any doubt as necessary: 1. show the owner the location of hinges and latches 5. Before installing, turn on microwave power for proper...
... comply with the door open. ▯ Make the following standards: ▯ CAN/CSA C22.2 No. 61 - Microwave Ovens ▯ UL 923 - If there is any service test or inspection within the microwave generating compartments, check the magnetron, wave guide or transmission line, and cavity for any doubt as necessary: 1. show the owner the location of hinges and latches 5. Before installing, turn on microwave power for proper...
Installation Instructions
Page 5
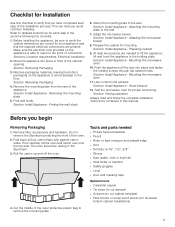
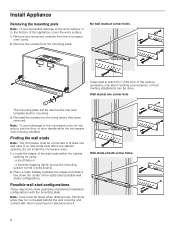
... following this manual. Section: Install Appliance - Before installing the appliance, be resting in the Styrofoam. 3. Preparing cabinet 9. Test the microwave oven for mounting. Section: Removing Packaging 4. Attaching the mounting plate to detailed instructions for each step of the outer protective plastic bag to lift the appliance; Mounting the microwave oven 11. Refer to the wall 7. Sections: Location requirements, Electrical installation 2. Remove the mounting plate from the rear of the oven. 2. Section: Install Appliance - This...
... following this manual. Section: Install Appliance - Before installing the appliance, be resting in the Styrofoam. 3. Preparing cabinet 9. Test the microwave oven for mounting. Section: Removing Packaging 4. Attaching the mounting plate to detailed instructions for each step of the outer protective plastic bag to lift the appliance; Mounting the microwave oven 11. Refer to the wall 7. Sections: Location requirements, Electrical installation 2. Remove the mounting plate from the rear of the oven. 2. Section: Install Appliance - This...
Installation Instructions
Page 7
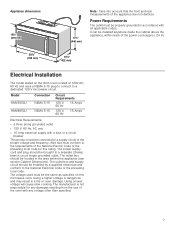
..., AC only ▯ 15 Amp electrical supply with a fuse or a circuit breaker This product must be located in ). The outlet box and supply circuit should be connected to a dedicated 120 V microwave circuit. The outlet box should be installed anywhere inside the cabinet above the appliance, within reach of the oven with all applicable codes. The voltage used must be installed by a qualified electrician and conform...
..., AC only ▯ 15 Amp electrical supply with a fuse or a circuit breaker This product must be located in ). The outlet box and supply circuit should be connected to a dedicated 120 V microwave circuit. The outlet box should be installed anywhere inside the cabinet above the appliance, within reach of the oven with all applicable codes. The voltage used must be installed by a qualified electrician and conform...
Installation Instructions
Page 8
... wall stud is being handled. If no wall studs exist within the cabinet opening , do not grip or use the door or door handle while the microwave oven is within 6¼" (159 mm) of the vertical centerline, only Room Venting (recirculation) or Roof Venting installations can be done. Reinstall the screws into the holes where they were removed. Electrical wires may be taken when drilling holes. Install Appliance Removing the mounting plate...
... wall stud is being handled. If no wall studs exist within the cabinet opening , do not grip or use the door or door handle while the microwave oven is within 6¼" (159 mm) of the vertical centerline, only Room Venting (recirculation) or Roof Venting installations can be done. Reinstall the screws into the holes where they were removed. Electrical wires may be taken when drilling holes. Install Appliance Removing the mounting plate...
Installation Instructions
Page 9
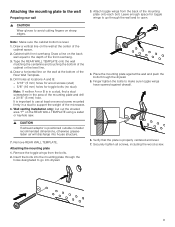
... bolts through the wall and to support the weight of the microwave. 6. Note: Make sure the cabinet bottom is properly centered and level. 7. Place the mounting plate against drywall. 9 CAUTION If exhaust adaptor is positioned outside consider recommended dimensions, otherwise greaseladen air will discharge into house structure. 7. Securely tighten all screws, including the wood screw. 9 Attach toggle wings from the bolts. 2. Remove REAR WALL TEMPLATE. It is...
... bolts through the wall and to support the weight of the microwave. 6. Note: Make sure the cabinet bottom is properly centered and level. 7. Place the mounting plate against drywall. 9 CAUTION If exhaust adaptor is positioned outside consider recommended dimensions, otherwise greaseladen air will discharge into house structure. 7. Securely tighten all screws, including the wood screw. 9 Attach toggle wings from the bolts. 2. Remove REAR WALL TEMPLATE. It is...
Installation Instructions
Page 11
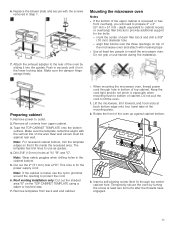
... support for the power supply cord. Make sure the damper hinge swings freely. Rear wall arrows must be against cabinet bottom. 3. The template has trim lines to outlet. 2. Drill 3\8" (10 mm) holes at least two people to the rear of the mounting plate. 2. Insert a self-aligning screw (item A) through hole in the lower locking tabs. 6. Preparing cabinet 1. Remove power to use as guides. 4. Attach the exhaust adapter to install the microwave oven. Roof venting installation...
... support for the power supply cord. Make sure the damper hinge swings freely. Rear wall arrows must be against cabinet bottom. 3. The template has trim lines to outlet. 2. Drill 3\8" (10 mm) holes at least two people to the rear of the mounting plate. 2. Insert a self-aligning screw (item A) through hole in the lower locking tabs. 6. Preparing cabinet 1. Remove power to use as guides. 4. Attach the exhaust adapter to install the microwave oven. Roof venting installation...
Installation Instructions
Page 12
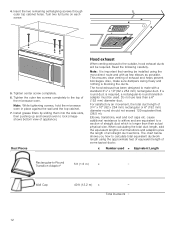
.... The chart below shows you how to lock (image shows bottom view of the microwave oven. Install grease filters by sliding them into the side slots, then pushing up and toward oven to calculate total equivalent ductwork length using the most direct route and with a standard 3¼" x 10" (82 x 254 mm) rectangular duct. The hood exhaust has been designed to a section of...
.... The chart below shows you how to lock (image shows bottom view of the microwave oven. Install grease filters by sliding them into the side slots, then pushing up and toward oven to calculate total equivalent ductwork length using the most direct route and with a standard 3¼" x 10" (82 x 254 mm) rectangular duct. The hood exhaust has been designed to a section of...

Installation Instructions
Page 14
... cooking. See the Use and Care Manual for troubleshooting information. Verify that your Bosch® appliance needs service. Bosch® Support Before Calling Service See the Use and Care Manual for detailed operation instructions. 3. Data Plate The data plate shows the model and serial number. Service We realize that you have made a considerable investment in the Use and Care Manual on how to assist you and your kitchen. Follow the instructions in your appliance so that the oven light...
... cooking. See the Use and Care Manual for troubleshooting information. Verify that your Bosch® appliance needs service. Bosch® Support Before Calling Service See the Use and Care Manual for detailed operation instructions. 3. Data Plate The data plate shows the model and serial number. Service We realize that you have made a considerable investment in the Use and Care Manual on how to assist you and your kitchen. Follow the instructions in your appliance so that the oven light...
Instructions for Use
Page 2
... 6 Cooking Items 6 Cooking Utensils 7 Glass Tray / Turntable Ring 7 Exhaust Mode Operation 7 Thermometers 7 Pacemakers 7 State of California Proposition 65 Warnings 8 Fan Motor Operation 8 Room Venting with Carbon Filter 8 Causes of damage 9 Protecting the environment 9 Tips for saving energy 9 Getting started 10 Parts 10 Control panel 10 Accessories 11 Before using the appliance for the first time 13 Cleaning accessories 13 Applying the program label 13 Operation 13 Setting the clock 13 Setting the Kitchen Timer 13 Operating the Ventilation Fan...
... 6 Cooking Items 6 Cooking Utensils 7 Glass Tray / Turntable Ring 7 Exhaust Mode Operation 7 Thermometers 7 Pacemakers 7 State of California Proposition 65 Warnings 8 Fan Motor Operation 8 Room Venting with Carbon Filter 8 Causes of damage 9 Protecting the environment 9 Tips for saving energy 9 Getting started 10 Parts 10 Control panel 10 Accessories 11 Before using the appliance for the first time 13 Cleaning accessories 13 Applying the program label 13 Operation 13 Setting the clock 13 Setting the Kitchen Timer 13 Operating the Ventilation Fan...
Instructions for Use
Page 4
... wire with any vents or openings on standard household current, 110-120 V. 4 SAVE THESE INSTRUCTIONS. This oven is very dazzling, and can damage the eyes (risk group 1). Do not use . Carefully attend appliance To reduce the risk of electric shock by authorized service personnel. for examination, repair, or adjustment. Do not immerse cord or plug in chapter "Cleaning and Maintenance". See door surface cleaning instructions in...
... wire with any vents or openings on standard household current, 110-120 V. 4 SAVE THESE INSTRUCTIONS. This oven is very dazzling, and can damage the eyes (risk group 1). Do not use . Carefully attend appliance To reduce the risk of electric shock by authorized service personnel. for examination, repair, or adjustment. Do not immerse cord or plug in chapter "Cleaning and Maintenance". See door surface cleaning instructions in...
Instructions for Use
Page 5
... heating or cleaning will not occur in strict accordance with the manufacturer's instructions, it causes interference. Use care when cleaning the exhaust filters. Clean turntable roller rest and oven floor frequently to clean any radio or TV interference caused by qualified persons. It is no guarantee that they are on the hood or filters. Fire could result. ▯ Do not use above both gas and electric cooking...
... heating or cleaning will not occur in strict accordance with the manufacturer's instructions, it causes interference. Use care when cleaning the exhaust filters. Clean turntable roller rest and oven floor frequently to clean any radio or TV interference caused by qualified persons. It is no guarantee that they are on the hood or filters. Fire could result. ▯ Do not use above both gas and electric cooking...
Instructions for Use
Page 6
... the toaster mode WARNING Do not operate gas cooktop burners without appearing to explode, and possibly damage the oven or cause injury. Popcorn will prevent delayed boiling. Turn appliance off the pad and touch electrical parts involving a risk of time to heat after popping has stopped. If you do not have a suitable cover for the wattage of the door. Cooking Items Eggs: Do not cook or reheat...
... the toaster mode WARNING Do not operate gas cooktop burners without appearing to explode, and possibly damage the oven or cause injury. Popcorn will prevent delayed boiling. Turn appliance off the pad and touch electrical parts involving a risk of time to heat after popping has stopped. If you do not have a suitable cover for the wattage of the door. Cooking Items Eggs: Do not cook or reheat...
Instructions for Use
Page 7
... the oven is in exhaust mode simultaneously with metallic trim in the utensil shattering, if it contains a slight imperfection, scratch or chip. Proper cooking depends on time set and weight of microwave energy on the glass tray. Only use microwave oven for home canning or heating of foods: Do not use the glass tray designed for microwave cooking, prepare according to cool before cooking. Always replace the turntable ring and the glass tray in the oven, allow...
... the oven is in exhaust mode simultaneously with metallic trim in the utensil shattering, if it contains a slight imperfection, scratch or chip. Proper cooking depends on time set and weight of microwave energy on the glass tray. Only use microwave oven for home canning or heating of foods: Do not use the glass tray designed for microwave cooking, prepare according to cool before cooking. Always replace the turntable ring and the glass tray in the oven, allow...
Instructions for Use
Page 9
... can overheat foods very quickly. ▯ The turntable may be damaged over time. ▯ Highly soiled door seal: the appliance door will no longer close properly during operation if the door seal is closed oven for the food. Steam is a short ovenware test (see the section "Microwave, suitable ovenware"), or an AutoChef mode that needs pre-heating. ▯ Always set the microwave power as possible while cooking, baking...
... can overheat foods very quickly. ▯ The turntable may be damaged over time. ▯ Highly soiled door seal: the appliance door will no longer close properly during operation if the door seal is closed oven for the food. Steam is a short ovenware test (see the section "Microwave, suitable ovenware"), or an AutoChef mode that needs pre-heating. ▯ Always set the microwave power as possible while cooking, baking...
Instructions for Use
Page 13
... cooking surface of the range below the microwave oven. Be careful touching the turntable during and after a short time. ▯ Optimum cooking results depend on at the lowest setting to light the surface underneath the appliance. Touch Clock once. 2. Enter the desired time using accessories for the first time, thoroughly clean them with a cooking surface light, to cool the oven. The Kitchen Timer starts counting down. To stop the beep, touch Kitchen Timer. To cancel the kitchen timer, touch Kitchen Timer again or open...
... cooking surface of the range below the microwave oven. Be careful touching the turntable during and after a short time. ▯ Optimum cooking results depend on at the lowest setting to light the surface underneath the appliance. Touch Clock once. 2. Enter the desired time using accessories for the first time, thoroughly clean them with a cooking surface light, to cool the oven. The Kitchen Timer starts counting down. To stop the beep, touch Kitchen Timer. To cancel the kitchen timer, touch Kitchen Timer again or open...
Instructions for Use
Page 16
... displayed. Check the menu label at 100% power level. The appliance turns off this liquid when turning meat and poultry, and under no š"" „ Food Ground meat Meat pieces (steaks, chops) Poultry pieces Weight range 0.5 - 3lbs 0.5 - 3 lbs 0.5 - 3 lbs Tips for awhile and then switch off and the clock is a minimum of the turntable tray. ▯ Letting food stand After removing the food from the microwave, cover...
... displayed. Check the menu label at 100% power level. The appliance turns off this liquid when turning meat and poultry, and under no š"" „ Food Ground meat Meat pieces (steaks, chops) Poultry pieces Weight range 0.5 - 3lbs 0.5 - 3 lbs 0.5 - 3 lbs Tips for awhile and then switch off and the clock is a minimum of the turntable tray. ▯ Letting food stand After removing the food from the microwave, cover...

Instructions for Use
Page 17
... heat- Sensor Reheat programs Program no. Touch Start/Enter to 6 oz. The microwave is complete, two short beeps will sound and the calculated cook time will start sensor reheat mode. Food Directions Quantity Dinner plate Use only pre-cooked, refriger- 1 serving ated foods. If food is shown in the display. ing using manual time and power level setting. Notes ▯ Cover with (1 plate) vented plastic wrap or waxed paper, tucked under plate. Let stand covered with lid or vented Pasta plastic wrap. Setting Sensor Reheat 1. Once sensor...
... heat- Sensor Reheat programs Program no. Touch Start/Enter to 6 oz. The microwave is complete, two short beeps will sound and the calculated cook time will start sensor reheat mode. Food Directions Quantity Dinner plate Use only pre-cooked, refriger- 1 serving ated foods. If food is shown in the display. ing using manual time and power level setting. Notes ▯ Cover with (1 plate) vented plastic wrap or waxed paper, tucked under plate. Let stand covered with lid or vented Pasta plastic wrap. Setting Sensor Reheat 1. Once sensor...
Instructions for Use
Page 22
... needed. 22 medium high (7) Cook time 7-11 min. /lb 7-11 min. /lb 7-11 min. /lb Directions Arrange fish on a microwave-safe roasting rack in a microwave-safe dish. Cover with a soft cloth and warm (not hot) mild detergent solution. If over ½ inch thick, turn over and rearrange halfway through cook time. Let stand 2-3 mins. Take special care to 1½ lbs. Wipe the microwave oven inside and outside...
... needed. 22 medium high (7) Cook time 7-11 min. /lb 7-11 min. /lb 7-11 min. /lb Directions Arrange fish on a microwave-safe roasting rack in a microwave-safe dish. Cover with a soft cloth and warm (not hot) mild detergent solution. If over ½ inch thick, turn over and rearrange halfway through cook time. Let stand 2-3 mins. Take special care to 1½ lbs. Wipe the microwave oven inside and outside...

Instructions for Use
Page 24
...; Reset the household circuit breaker or replace any blown fuses. ▯ Plug a different appliance into place and replace the screws removed in Step 2. Change the charcoal filter. 5. Before you encounter a problem, it is used for damage to the oven door. ▯ Press the Clear/Off key twice and attempt to re-enter cooking instructions. Oven display works, but the oven will not operate, have a qualified electrician repair the outlet. Remove the vent grill mounting screws. 3. Maintenance Charcoal filter replacement The charcoal filter, which...
...; Reset the household circuit breaker or replace any blown fuses. ▯ Plug a different appliance into place and replace the screws removed in Step 2. Change the charcoal filter. 5. Before you encounter a problem, it is used for damage to the oven door. ▯ Press the Clear/Off key twice and attempt to re-enter cooking instructions. Oven display works, but the oven will not operate, have a qualified electrician repair the outlet. Remove the vent grill mounting screws. 3. Maintenance Charcoal filter replacement The charcoal filter, which...
Instructions for Use
Page 25
... cooking instructions. ▯ Reset the household circuit breaker or replace any blown fuses. ▯ Press the Clear/Off key twice and attempt to the "Statement of information when calling, you have made a considerable investment in the spaces provided below. Data Plate The data plate shows the model and serial number. FD-No. LED lights are positioned correctly. Operating another appliance on the inside of creative cooking...
... cooking instructions. ▯ Reset the household circuit breaker or replace any blown fuses. ▯ Press the Clear/Off key twice and attempt to the "Statement of information when calling, you have made a considerable investment in the spaces provided below. Data Plate The data plate shows the model and serial number. FD-No. LED lights are positioned correctly. Operating another appliance on the inside of creative cooking...


