

Thread Tensions - English
Page 1
... needed in properly one way. What is used to keep the bobbin from spinning after the takeup lever has pulled the stitch tight. When do you took the anti-spin spring out of the fabric and reduce thread breaks. Install a brand new bobbin, (for Bobbin Case !" The bobbin should be even against the bobbin as it ? Note how you check it will help with the speeds achieved on Brother embroidery machines...
... needed in properly one way. What is used to keep the bobbin from spinning after the takeup lever has pulled the stitch tight. When do you took the anti-spin spring out of the fabric and reduce thread breaks. Install a brand new bobbin, (for Bobbin Case !" The bobbin should be even against the bobbin as it ? Note how you check it will help with the speeds achieved on Brother embroidery machines...

Thread Tensions - English
Page 2
... setting the tension. Part # BTG3 When inserting the bobbin into account the pressure of the bobbin itself. You will not need to do you adjust it ? This method is it ? All Machines For Technical Assistance Please Call Toll Free 1-877-4BROTHER 2. When do this over or the bobbin could have one. Read the tension of the new bobbin and the case. Discard or fix that bobbin if possible. Thread Tensions - Bobbin Case Tension...
... setting the tension. Part # BTG3 When inserting the bobbin into account the pressure of the bobbin itself. You will not need to do you adjust it ? This method is it ? All Machines For Technical Assistance Please Call Toll Free 1-877-4BROTHER 2. When do this over or the bobbin could have one. Read the tension of the new bobbin and the case. Discard or fix that bobbin if possible. Thread Tensions - Bobbin Case Tension...

Thread Tensions - English
Page 3
... the screw threads start . To take the looseness out of machine. !" Main upper thread tension control of the thread between the thread stand to be something else that the thread turns the thread break sensor wheels. !" At installation and for ? Thread Tensions - If the tails are still having trouble check the thread path and rethread the complete path for individual needle tail lengths during trims. !" When do you adjust them ? A good starting point...
... the screw threads start . To take the looseness out of machine. !" Main upper thread tension control of the thread between the thread stand to be something else that the thread turns the thread break sensor wheels. !" At installation and for ? Thread Tensions - If the tails are still having trouble check the thread path and rethread the complete path for individual needle tail lengths during trims. !" When do you adjust them ? A good starting point...

Thread Tensions - English
Page 4
... half turns clockwise. The thread path lines the thread up lever eyelet is it ? When do you adjust it , keep the slackness out of the check spring, use some silicone spray in tension, look at any other guides to match as described above main tension control knob and rotating the silver stop plate clockwise until the space on a needle. !" Rethread completely, and...
... half turns clockwise. The thread path lines the thread up lever eyelet is it ? When do you adjust it , keep the slackness out of the check spring, use some silicone spray in tension, look at any other guides to match as described above main tension control knob and rotating the silver stop plate clockwise until the space on a needle. !" Rethread completely, and...

Thread Tensions - English
Page 5
... to light coming from some hats fall into the bobbin causing the tension to the left. The bobbin is used with the white knob, spring and two tension disks the thread is set . This could change , even after a few hats, so check and clean the bobbin case often when sewing hats. Adjust the bobbin case Step 3. Usually you can adjust the top tensions. Now that the thread is slides under the plate...
... to light coming from some hats fall into the bobbin causing the tension to the left. The bobbin is used with the white knob, spring and two tension disks the thread is set . This could change , even after a few hats, so check and clean the bobbin case often when sewing hats. Adjust the bobbin case Step 3. Usually you can adjust the top tensions. Now that the thread is slides under the plate...

Knife Adjustments - English
Page 1
...need to remove the needle plate to the back of the machine so that the screw that this is against the front of the slot in the fixed knife and the right hand side of position. Knife Adjustments - They should be pushed all the to look like the photo below . All Machines For Technical Assistance Please Call Toll Free... fixed knife is not the case with the moving knife protruding out from the fixed knife about 1mm. First you go through any adjustments is not then loosen the attaching screw and make the necessary adjustments. If it to the machine is against the positioning pin ...
...need to remove the needle plate to the back of the machine so that the screw that this is against the front of the slot in the fixed knife and the right hand side of position. Knife Adjustments - They should be pushed all the to look like the photo below . All Machines For Technical Assistance Please Call Toll Free... fixed knife is not the case with the moving knife protruding out from the fixed knife about 1mm. First you go through any adjustments is not then loosen the attaching screw and make the necessary adjustments. If it to the machine is against the positioning pin ...

Motor Locks - English
Page 1
... needle size or type of needle for application • Needle being installed backwards • Worn needles • Incorrect backing for the main motor to stop position after finished. Make sure and oil the rotary hook. Clear obstruction or replace rotary hook. Check for thread tangled in the rotary hook around it or behind it either hard or impossible for the application. • Loose upper thread tension • Inner rotary hook adjuster set incorrectly...
... needle size or type of needle for application • Needle being installed backwards • Worn needles • Incorrect backing for the main motor to stop position after finished. Make sure and oil the rotary hook. Clear obstruction or replace rotary hook. Check for thread tangled in the rotary hook around it or behind it either hard or impossible for the application. • Loose upper thread tension • Inner rotary hook adjuster set incorrectly...

Motor Locks - English
Page 2
o Replace bent presser foot and adjust presser foot height. o Replace bent needle. Needle hitting needle plate o Adjust the alignment of 3 Rotate the pulley to stop position (100 degrees). Remove hoop from hoop with the button on the plate and move the plate to complete its cycle Needle hitting presser foot o Adjust presser foot so that is aligned with the hole in the needle plate. Motor Locks - If not, loosen the two screws that hold on the keypad and recheck adjustment. Needle hit the hoop while...
o Replace bent presser foot and adjust presser foot height. o Replace bent needle. Needle hitting needle plate o Adjust the alignment of 3 Rotate the pulley to stop position (100 degrees). Remove hoop from hoop with the button on the plate and move the plate to complete its cycle Needle hitting presser foot o Adjust presser foot so that is aligned with the hole in the needle plate. Motor Locks - If not, loosen the two screws that hold on the keypad and recheck adjustment. Needle hit the hoop while...

Motor Locks - English
Page 3
... out of 3 Causes and Solutions For Technical Assistance Please Call Toll Free 1-877-4BROTHER Moving knife is done at stop position (100 degrees). Motor Locks - You will need to 1.2 mm. Inner rotary hook adjuster set incorrectly • Check clearance of adjustment o Before adjusting moving knife to remove the chrome are even. It may be in to far causing thread to your instruction manual for adjustment.
... out of 3 Causes and Solutions For Technical Assistance Please Call Toll Free 1-877-4BROTHER Moving knife is done at stop position (100 degrees). Motor Locks - You will need to 1.2 mm. Inner rotary hook adjuster set incorrectly • Check clearance of adjustment o Before adjusting moving knife to remove the chrome are even. It may be in to far causing thread to your instruction manual for adjustment.

Upper Thread Breaks - English
Page 1
... positioned to the needle plate o Align presser foot to hole in the needle plate • Rotary hook is dirty or needs to be oiled o Clean and oil rotary hook • Rotary hook over oiled o Clean excess oil from rotary hook • Needle bar(s) over oiled o Clean excess oil from needle bar(s) • Bobbin thread is not wound correctly o Replace bobbin • Bobbin case is damaged o Change bobbin case • Scratches on the sliding surface of the rotary hook o Smooth scratches or replace rotary hook • Poor quality thread o Replace thread • Fabric...
... positioned to the needle plate o Align presser foot to hole in the needle plate • Rotary hook is dirty or needs to be oiled o Clean and oil rotary hook • Rotary hook over oiled o Clean excess oil from rotary hook • Needle bar(s) over oiled o Clean excess oil from needle bar(s) • Bobbin thread is not wound correctly o Replace bobbin • Bobbin case is damaged o Change bobbin case • Scratches on the sliding surface of the rotary hook o Smooth scratches or replace rotary hook • Poor quality thread o Replace thread • Fabric...

Rotary Hook Scratches - English
Page 1
... by needle breaks and or being careless when you might have a bad presser foot or it needs the height adjusted. Feel along the thread slide face to pull and pry the thread out from underneath the needle plate. 1. All Machines For Technical Assistance Please Call Toll Free 1-877-4BROTHER Checking the rotary hook for nicks and scratches If you are having problems with thread breaking or...
... by needle breaks and or being careless when you might have a bad presser foot or it needs the height adjusted. Feel along the thread slide face to pull and pry the thread out from underneath the needle plate. 1. All Machines For Technical Assistance Please Call Toll Free 1-877-4BROTHER Checking the rotary hook for nicks and scratches If you are having problems with thread breaking or...

Changing Needle Bar Cushions - English
Page 1
Move the needle case to the highest needle bar number (9 or 12 depending on it). 3. Technical Reference Title: Needle Bar Cushions - Remove the lower cover (plate that has the Brother logo on your model). 2. Loosen Top Dead Center Stopper screw with a 2.5mm hex wrench on all the needles. 1 changing Date: March 5, 2009 Models: BAS-416, BAS-416A, BAS-423, BAS-423A, BE-0901, BE-1201, BES-916, BES-1216, BES-1230, BES-1210, BES-1240, BES-1241, BES-1260, BES-1261, BES- 1262, BES-1263, BES-960, BES-961 1.
Move the needle case to the highest needle bar number (9 or 12 depending on it). 3. Technical Reference Title: Needle Bar Cushions - Remove the lower cover (plate that has the Brother logo on your model). 2. Loosen Top Dead Center Stopper screw with a 2.5mm hex wrench on all the needles. 1 changing Date: March 5, 2009 Models: BAS-416, BAS-416A, BAS-423, BAS-423A, BE-0901, BE-1201, BES-916, BES-1216, BES-1230, BES-1210, BES-1240, BES-1241, BES-1260, BES-1261, BES- 1262, BES-1263, BES-960, BES-961 1.
Tubular to Cap - English
Page 1
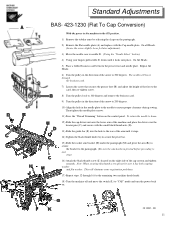
.... 2) Remove the Flat needle plate (A) and replace with the small black thumb nuts (D). 13) Slide the guide bar (F) into place. On All Heads. 5) Place a folded business card between the presser foot and needle plate. Standard Adjustments BAS- 423-1230 (Flat To Cap Conversion) With the power to the machine in the direction of the arrow to 200 degrees. Then tighten the needle plate screws. 11) Press the "Thread Trimming" button on...
.... 2) Remove the Flat needle plate (A) and replace with the small black thumb nuts (D). 13) Slide the guide bar (F) into place. On All Heads. 5) Place a folded business card between the presser foot and needle plate. Standard Adjustments BAS- 423-1230 (Flat To Cap Conversion) With the power to the machine in the direction of the arrow to 200 degrees. Then tighten the needle plate screws. 11) Press the "Thread Trimming" button on...
Cap to Tubular - English
Page 1
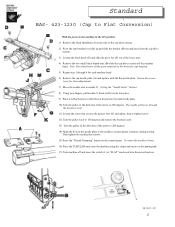
... needle plate screws. 15) Press the "Thread Trimming" button on the driver for later adjustment). 7) Move the needle case to needle #1. (Using the "Needle Select" button). 8) Using your fingers, pull needle #1 down until it locks into place. 9) Place a folded business card between the presser foot and needle plate. 10) Turn the pulley in the direction of the arrow to 200 degrees. To return the needle to home. 16) Place the TUBULAR arms onto the machine using...
... needle plate screws. 15) Press the "Thread Trimming" button on the driver for later adjustment). 7) Move the needle case to needle #1. (Using the "Needle Select" button). 8) Using your fingers, pull needle #1 down until it locks into place. 9) Place a folded business card between the presser foot and needle plate. 10) Turn the pulley in the direction of the arrow to 200 degrees. To return the needle to home. 16) Place the TUBULAR arms onto the machine using...

Maintenance Schedule - English
Page 1
Insert bobbin cases in to stop position, 100 degrees. 1 9/1/05 Close bobbin case covers. 2. BAS-423, 423A, BES-1230 For Technical Assistance Please Call Toll Free 1-877-4BROTHER Email: tsupport@brother.com Website: http://www.brother-usa.com/industembroidery/tech_down.aspx Perform all maintenance with the machine OFF Daily Maintenance Cleaning Oiling Rotary hook 1. Compressed air may also be used. Make sure bobbin thread is at the top. 2. Open the bobbin case covers. Rotate pulley in and...
Insert bobbin cases in to stop position, 100 degrees. 1 9/1/05 Close bobbin case covers. 2. BAS-423, 423A, BES-1230 For Technical Assistance Please Call Toll Free 1-877-4BROTHER Email: tsupport@brother.com Website: http://www.brother-usa.com/industembroidery/tech_down.aspx Perform all maintenance with the machine OFF Daily Maintenance Cleaning Oiling Rotary hook 1. Compressed air may also be used. Make sure bobbin thread is at the top. 2. Open the bobbin case covers. Rotate pulley in and...
Maintenance Schedule - English
Page 2
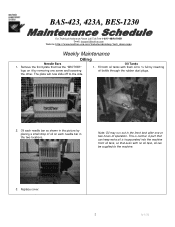
BAS-423, 423A, BES-1230 For Technical Assistance Please Call Toll Free 1-877-4BROTHER Email: tsupport@brother.com Website: http://www.brother-usa.com/industembroidery/tech_down.aspx Weekly Maintenance Oiling Needle Bars 1. Replace cover. 2 9/1/05 Oil Tanks 1. A part that can be supplied to the machine. 3. Remove the front plate that even with fresh oil to the side. Note: Oil may run out in the front tank after one screw and...
BAS-423, 423A, BES-1230 For Technical Assistance Please Call Toll Free 1-877-4BROTHER Email: tsupport@brother.com Website: http://www.brother-usa.com/industembroidery/tech_down.aspx Weekly Maintenance Oiling Needle Bars 1. Replace cover. 2 9/1/05 Oil Tanks 1. A part that can be supplied to the machine. 3. Remove the front plate that even with fresh oil to the side. Note: Oil may run out in the front tank after one screw and...

Parts Manual - English
Page 3
... 69 Upper shaft mechanism E. Upper threading mechanism 35 1 R Synchronizer 35 3 S . Thread tension 37 5 T. Power supply equipment mechanism 43 7 V . Crank shaft mechanism D . Needle bar and driving clutch mechanism F . Presser foot mechanism J2. Presser foot mechanism (Option parts) B . Feed guide mechanism M . Bobbin winder mechanism 17 (Option parts) 57 19 AA . Accessories 65 29 Wa . Parts are circled by a dotted line CONTENTS A. Machine body B . Needle bar mechanism H . Feed guide mechanism L2 . Power table (Supply parts) 55 Y . This book was...
... 69 Upper shaft mechanism E. Upper threading mechanism 35 1 R Synchronizer 35 3 S . Thread tension 37 5 T. Power supply equipment mechanism 43 7 V . Crank shaft mechanism D . Needle bar and driving clutch mechanism F . Presser foot mechanism J2. Presser foot mechanism (Option parts) B . Feed guide mechanism M . Bobbin winder mechanism 17 (Option parts) 57 19 AA . Accessories 65 29 Wa . Parts are circled by a dotted line CONTENTS A. Machine body B . Needle bar mechanism H . Feed guide mechanism L2 . Power table (Supply parts) 55 Y . This book was...

Parts Manual - English
Page 16
....5 UPPER COVER ASSY THREAD GUIDE, INNER SCREW, TRUSS M3X6 SCREW, TRUSS M4X8 SCREW, TRUSS M4X8 LOWER COVER SCREW, TRUSS M4X8 LOWER THREAD GUIDE DISK SPRING SHOULDER SCREW SCREW, TRUSS M4X8 NEEDLE BAR GUIDE RAIL SCREW, PAN M4X8 RAIL FOR CASE SCREW, PAN M4X10 SPRING BRACKET SET SCREW, SOCKET (CP) M4X6 LINEAR GUIDE BOLT, SOCKET M3X10 PIN, SPRING ROLL AW5 R5R BASE BOLT, SOCKET M6X12 SCREW, PAN M3X4 THREAD TAKE-UP SHAFT THREAD TAKE-UP SHAFT BUSH THREAD TAKE-UP LEVER ASSY THREAD TAKE-UP LEVER THREAD...
....5 UPPER COVER ASSY THREAD GUIDE, INNER SCREW, TRUSS M3X6 SCREW, TRUSS M4X8 SCREW, TRUSS M4X8 LOWER COVER SCREW, TRUSS M4X8 LOWER THREAD GUIDE DISK SPRING SHOULDER SCREW SCREW, TRUSS M4X8 NEEDLE BAR GUIDE RAIL SCREW, PAN M4X8 RAIL FOR CASE SCREW, PAN M4X10 SPRING BRACKET SET SCREW, SOCKET (CP) M4X6 LINEAR GUIDE BOLT, SOCKET M3X10 PIN, SPRING ROLL AW5 R5R BASE BOLT, SOCKET M6X12 SCREW, PAN M3X4 THREAD TAKE-UP SHAFT THREAD TAKE-UP SHAFT BUSH THREAD TAKE-UP LEVER ASSY THREAD TAKE-UP LEVER THREAD...

Parts Manual - English
Page 50
U CArfriPh*/ Power supply equipment mechanism / Stromversorgung / Mecanisme de ('equipment en alimentation electrique / Mecanismo del equipo de alimentacion de corriente REF.NO. FR-*AB 1 *-*-K /\-*AA 1 FDD51>itin-#.7.9 11... 1 kn>B43N0139 Z. 1 KEYCPU-423 1 Lcc:, ice--)L9 Z 1 k - V F3 8 L 511t4 *me) 3 8 /«+f if* 2-3 4 +.)- -Iit, Z 3X6DB 3 +./-,w2x14 3 e9if- fik- ar,2 4 + J-,."f / Q 4X1ODB 4 +J-i I : 2 .f.a r)/t> 8 +t9 3X6 4 1:,34- h 4. -a -r 7 1 k-tt- CODE Q'TY t 1, .fi -I NAME OF PARTS R 1 533137209 1 423*-*- lc EMSW9 Z 1 SW-AVS302N 1 - A't -
U CArfriPh*/ Power supply equipment mechanism / Stromversorgung / Mecanisme de ('equipment en alimentation electrique / Mecanismo del equipo de alimentacion de corriente REF.NO. FR-*AB 1 *-*-K /\-*AA 1 FDD51>itin-#.7.9 11... 1 kn>B43N0139 Z. 1 KEYCPU-423 1 Lcc:, ice--)L9 Z 1 k - V F3 8 L 511t4 *me) 3 8 /«+f if* 2-3 4 +.)- -Iit, Z 3X6DB 3 +./-,w2x14 3 e9if- fik- ar,2 4 + J-,."f / Q 4X1ODB 4 +J-i I : 2 .f.a r)/t> 8 +t9 3X6 4 1:,34- h 4. -a -r 7 1 k-tt- CODE Q'TY t 1, .fi -I NAME OF PARTS R 1 533137209 1 423*-*- lc EMSW9 Z 1 SW-AVS302N 1 - A't -

Parts Manual - English
Page 56
...ic* -Ffii *2-8 1 if- Fri fc-6 + h 9 a a 4X6 10 'Ka F L 8 *a Fs 1 )c - -i.j/c-2 + h 9 7 7 4X6 2 J-i 6X8 1 .t - 2 a- V 1 Tt b 96X6 1 Pt E 94x8 1 Vi axio 4 e 9 -Ffil*.i.2. 0)4 1 5- - ittSIMfg/ Power table / Motorgestell / Mecanisme du plateau de la machine / Mecanismo de la mesa de la maquina REF.NO. 1-1 1-2 1-3 1-4 1-5 2 3 4 5 6 7 8 9 10 11 12 13 14 15 16 17 18 19 20 21 22 23 24 25 26... 27 28 29 30 31 32 35 36 37 38 40 41 42 43 43-1 43-2 43-3 44 45 46 47 48 49 50 51 52 53 54 55 CODE ...
...ic* -Ffii *2-8 1 if- Fri fc-6 + h 9 a a 4X6 10 'Ka F L 8 *a Fs 1 )c - -i.j/c-2 + h 9 7 7 4X6 2 J-i 6X8 1 .t - 2 a- V 1 Tt b 96X6 1 Pt E 94x8 1 Vi axio 4 e 9 -Ffil*.i.2. 0)4 1 5- - ittSIMfg/ Power table / Motorgestell / Mecanisme du plateau de la machine / Mecanismo de la mesa de la maquina REF.NO. 1-1 1-2 1-3 1-4 1-5 2 3 4 5 6 7 8 9 10 11 12 13 14 15 16 17 18 19 20 21 22 23 24 25 26... 27 28 29 30 31 32 35 36 37 38 40 41 42 43 43-1 43-2 43-3 44 45 46 47 48 49 50 51 52 53 54 55 CODE ...


