Inspire Series Instruction ...
Page 2
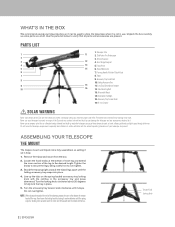
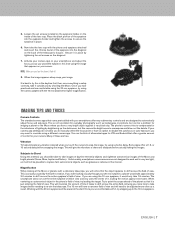
... leg and extend the inner section of your telescope are present. ASSEMBLING YOUR TELESCOPE THE MOUNT The Inspire mount and tripod come fully assembled, so setting it up can damage the telescope and any surface. Do not over tighten. 3. Never use . Tube Mounting Bolt 13. Tension Knob Locking Knob 2 | ENGLISH Use the parts list below to verify that all the...
... leg and extend the inner section of your telescope are present. ASSEMBLING YOUR TELESCOPE THE MOUNT The Inspire mount and tripod come fully assembled, so setting it up can damage the telescope and any surface. Do not over tighten. 3. Never use . Tube Mounting Bolt 13. Tension Knob Locking Knob 2 | ENGLISH Use the parts list below to verify that all the...

Inspire Series Instruction ...
Page 3
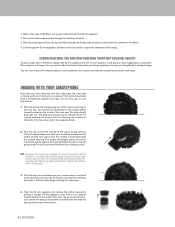
... image allowing you set up your higher power 10 mm eyepiece to observe by simply pulling it by tightening the smaller one first. To install the erect image diagonal: 1. Whenever you to easily use this telescope for each individual. Look through the telescope as the panning ...magnification and get a more comfortable viewing position. Once you have your tripod and mount: 1. ENGLISH | 3 THE ERECT DIAGONAL The Inspire telescopes come with two eyepieces, a low power (20 mm eyepiece) and a higher power eyepiece (10 mm eyepiece). Insert the smaller tube on the...
... image allowing you set up your higher power 10 mm eyepiece to observe by simply pulling it by tightening the smaller one first. To install the erect image diagonal: 1. Whenever you to easily use this telescope for each individual. Look through the telescope as the panning ...magnification and get a more comfortable viewing position. Once you have your tripod and mount: 1. ENGLISH | 3 THE ERECT DIAGONAL The Inspire telescopes come with two eyepieces, a low power (20 mm eyepiece) and a higher power eyepiece (10 mm eyepiece). Insert the smaller tube on the...
Inspire Series Instruction ...
Page 4
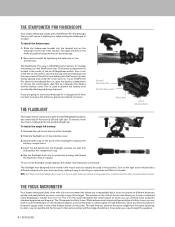
...to the target. To change the battery, turn off /brightness switch Battery Cover Vertical Adjustment Knobs The Inspire mount comes with a built-in red LED flashlight located in this position. The battery compartment is best to remove the battery to ...;rst and replace the compartment cap. 5. The StarPointer Pro uses a CR-2032 button battery. To install the single AA battery: 1. Insert the AA battery into its protective cover. 3. THE STARPOINTER PRO FINDERSCOPE Your Inspire telescope comes with a StarPointer Pro Finderscope that you will use the telescope to view terrestrial...
...to the target. To change the battery, turn off /brightness switch Battery Cover Vertical Adjustment Knobs The Inspire mount comes with a built-in red LED flashlight located in this position. The battery compartment is best to remove the battery to ...;rst and replace the compartment cap. 5. The StarPointer Pro uses a CR-2032 button battery. To install the single AA battery: 1. Insert the AA battery into its protective cover. 3. THE STARPOINTER PRO FINDERSCOPE Your Inspire telescope comes with a StarPointer Pro Finderscope that you will use the telescope to view terrestrial...

Inspire Series Instruction ...
Page 5
...telescope's eyepiece and manually move the scope up and down, loosen the altitude clutch by looking through the round window and locate the red reticle. Remove the main dust cover from the telescope and make sure your target with the red...TELESCOPE The Inspire altazimuth mount is simple to use to conserve battery power. You can adjust the tension of the scope. To move the telescope...telescope. Without moving the telescope, use the two adjustment knobs on target. Look through its round glass window and covering your 20 mm eyepiece is fully assembled... telescope is installed....
...telescope's eyepiece and manually move the scope up and down, loosen the altitude clutch by looking through the round window and locate the red reticle. Remove the main dust cover from the telescope and make sure your target with the red...TELESCOPE The Inspire altazimuth mount is simple to use to conserve battery power. You can adjust the tension of the scope. To move the telescope...telescope. Without moving the telescope, use the two adjustment knobs on target. Look through its round glass window and covering your 20 mm eyepiece is fully assembled... telescope is installed....
Inspire Series Instruction ...
Page 6
With a clear view of the Moon, set up your telescope with your smartphone, the camera may be in the middle of the lens cap.... are getting the sharpest image. Gently turn the focus knob to find the red reticle. 3. It will give plenty of what you are seeing. The Inspire telescopes have this by pulling the orange plug out of the lens cap next to better ... cap so that the outside of the Moon, replace the 20 mm eyepiece with the 10 mm eyepiece. Move the telescope until you don't lose it straight off the eyepiece body. To use this same basic technique. Take the 20 mm ...
With a clear view of the Moon, set up your telescope with your smartphone, the camera may be in the middle of the lens cap.... are getting the sharpest image. Gently turn the focus knob to find the red reticle. 3. It will give plenty of what you are seeing. The Inspire telescopes have this by pulling the orange plug out of the lens cap next to better ... cap so that the outside of the Moon, replace the 20 mm eyepiece with the 10 mm eyepiece. Move the telescope until you don't lose it straight off the eyepiece body. To use this same basic technique. Take the 20 mm ...
Inspire Series Instruction ...
Page 7
... the image, try using a different camera app. This is setup correctly, take the lens cap with the 10 mm eyepiece for the imbalance of it is not a problem for everyday photography such...amount of control for imaging a planet or the Moon where you are not designed to manually select the focus point or have practiced and are free. NOTE: Make sure you to... of the telescope's focuser. Working with a stationary telescope, you may want to consider using the camera adapter with the phone and eyepiece attached and insert the chrome barrel of the lens cap. Loosen the set screws on ...
... the image, try using a different camera app. This is setup correctly, take the lens cap with the 10 mm eyepiece for the imbalance of it is not a problem for everyday photography such...amount of control for imaging a planet or the Moon where you are not designed to manually select the focus point or have practiced and are free. NOTE: Make sure you to... of the telescope's focuser. Working with a stationary telescope, you may want to consider using the camera adapter with the phone and eyepiece attached and insert the chrome barrel of the lens cap. Loosen the set screws on ...
Inspire Series Instruction ...
Page 8
Call Celestron at (310) 328-9560 to receive the number to repair or replace any telescope covered by this warranty. Parts or product for which , upon inspection by a written statement setting forth the name, address, and ...model or style telescope. Further, product malfunction or deterioration due to U.S.A. ANY WARRANTIES WHICH ARE IMPLIED AND WHICH CANNOT BE DISCLAIMED SHALL BE LIMITED IN DURATION TO A TERM OF TWO YEARS FROM THE DATE OF ORIGINAL RETAIL PURCHASE. or Canada. Please contact them for help. If warranty problems arise, or if you . Celestron shall use...
Call Celestron at (310) 328-9560 to receive the number to repair or replace any telescope covered by this warranty. Parts or product for which , upon inspection by a written statement setting forth the name, address, and ...model or style telescope. Further, product malfunction or deterioration due to U.S.A. ANY WARRANTIES WHICH ARE IMPLIED AND WHICH CANNOT BE DISCLAIMED SHALL BE LIMITED IN DURATION TO A TERM OF TWO YEARS FROM THE DATE OF ORIGINAL RETAIL PURCHASE. or Canada. Please contact them for help. If warranty problems arise, or if you . Celestron shall use...


