User Guide
Page 2
TABLE OF CONTENTS Safe Use Checklist 4 Registration & Recall 5 Assistance 5 Warnings 6 Base Features Base Overview 12 Storage Compartment 13 Recline Adjustment 13 LATCH Removal & Storage 14 Shoulder Belt Lockoff 15 Carrier Features Carrier Overview 16 Harness Buckle 18 Chest Clip 18 Harness Adjuster 18 Handle 19 Canopy 20 Newborn Insert 21 Head Support 22 Carrier/Base Attachment 23 Securing Child In Carrier Child Requirements 24 Changing Harness Height 25...
TABLE OF CONTENTS Safe Use Checklist 4 Registration & Recall 5 Assistance 5 Warnings 6 Base Features Base Overview 12 Storage Compartment 13 Recline Adjustment 13 LATCH Removal & Storage 14 Shoulder Belt Lockoff 15 Carrier Features Carrier Overview 16 Harness Buckle 18 Chest Clip 18 Harness Adjuster 18 Handle 19 Canopy 20 Newborn Insert 21 Head Support 22 Carrier/Base Attachment 23 Securing Child In Carrier Child Requirements 24 Changing Harness Height 25...

User Guide
Page 3
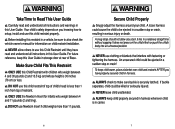
... 2 Install in Safe Location in Vehicle 2 position with NO frontal airbag compatible vehicle belts 3 Ensure Child is in Size Range 3 4 weight - 4-30 lbs (2 and 13.5 kg) height - 30 inches or less (76cm) 4 Secure Child Properly in Carrier correct shoulder strap height harness snug and chest clip correct 5 Secure Restraint Properly in Vehicle 5 vehicle belts tight and restraint secure Carrier securely attached to be recalled for...
... 2 Install in Safe Location in Vehicle 2 position with NO frontal airbag compatible vehicle belts 3 Ensure Child is in Size Range 3 4 weight - 4-30 lbs (2 and 13.5 kg) height - 30 inches or less (76cm) 4 Secure Child Properly in Carrier correct shoulder strap height harness snug and chest clip correct 5 Secure Restraint Properly in Vehicle 5 vehicle belts tight and restraint secure Carrier securely attached to be recalled for...
User Guide
Page 4
... Time to Read This User Guide Carefully read and understood all instructions and warnings in a relatively straight line without sagging. A snug strap should not allow others to use Newborn Insert if child weighs more than 1 inch from top of Base. Before installing this child restraint properly. DO NOT use this restraint in harness. Make Sure Child Fits This Restraint ONLY USE this Child Restraint until they...
... Time to Read This User Guide Carefully read and understood all instructions and warnings in a relatively straight line without sagging. A snug strap should not allow others to use Newborn Insert if child weighs more than 1 inch from top of Base. Before installing this child restraint properly. DO NOT use this restraint in harness. Make Sure Child Fits This Restraint ONLY USE this Child Restraint until they...

User Guide
Page 5
... installation of carrier each use Chicco KeyFit infant child restraints with a vehicle belt. BEFORE each time you use restraint in rear facing or side facing vehicle seats. ALWAYS install rear-facing when using this child restraint in the front seating positions. According to Base. ONLY install this Child Restraint in the vehicle seat. ALWAYS check for secure attachment of Child Restraint, you install this User Guide. NEVER use this Child Restraint unsecured in a seating...
... installation of carrier each use Chicco KeyFit infant child restraints with a vehicle belt. BEFORE each time you use restraint in rear facing or side facing vehicle seats. ALWAYS install rear-facing when using this child restraint in the front seating positions. According to Base. ONLY install this Child Restraint in the vehicle seat. ALWAYS check for secure attachment of Child Restraint, you install this User Guide. NEVER use this Child Restraint unsecured in a seating...
User Guide
Page 6
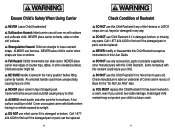
... out if the damaged part or parts can slide carrier. Cover unoccupied carrier with blanket when leaving in a future crash. 11 Call 1-877424-4226 to child. DO NOT use this User Guide. Call 1-877-424-4226 to sunlight. NEVER place carrier near edges of the Harness or LATCH straps are lose or undone. DO NOT use harness. Items not tested with this...
... out if the damaged part or parts can slide carrier. Cover unoccupied carrier with blanket when leaving in a future crash. 11 Call 1-877424-4226 to child. DO NOT use this User Guide. Call 1-877-424-4226 to sunlight. NEVER place carrier near edges of the Harness or LATCH straps are lose or undone. DO NOT use harness. Items not tested with this...
User Guide
Page 7
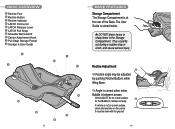
...LATCH Release Lever f LATCH Pull Strap g Shoulder Belt Lockoff h Carrier Attachment Hook i Pull Strap Storage Pocket j Storage & User Guide j c i h f e b g d a 12 BASE FEATURES Storage Compartment The Storage ...Compartment is stored inside. They could fly out during a sudden stop or crash, and cause serious injury. Recline Adjustment 1 1 Recline angle may be level with the ground. 13 DO NOT place heavy or sharp items...
...LATCH Release Lever f LATCH Pull Strap g Shoulder Belt Lockoff h Carrier Attachment Hook i Pull Strap Storage Pocket j Storage & User Guide j c i h f e b g d a 12 BASE FEATURES Storage Compartment The Storage ...Compartment is stored inside. They could fly out during a sudden stop or crash, and cause serious injury. Recline Adjustment 1 1 Recline angle may be level with the ground. 13 DO NOT place heavy or sharp items...

User Guide
Page 8
... and Pull Strap MUST be stored properly to allow Carrier to attach securely to Base. 14 SHOULDER BELT LOCKOFF The Shoulder Belt Lockoff is installed tightly, the shoulder belt can be put in the locked mode. Refer to "Installation Using Vehicle Belt" on LATCH Release Lever. LATCH REMOVAL & STORAGE This Child Restraint can be safely installed using your vehicle belts. See vehicle owner's manual or label on seat belt for...
... and Pull Strap MUST be stored properly to allow Carrier to attach securely to Base. 14 SHOULDER BELT LOCKOFF The Shoulder Belt Lockoff is installed tightly, the shoulder belt can be put in the locked mode. Refer to "Installation Using Vehicle Belt" on LATCH Release Lever. LATCH REMOVAL & STORAGE This Child Restraint can be safely installed using your vehicle belts. See vehicle owner's manual or label on seat belt for...
User Guide
Page 9
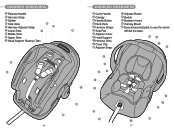
CARRIER OVERVIEW a Release Handle b Harness Strap c Splitter d Side Hook e Harness Adjuster Strap g h f Lower Slots f a g Middle Slots h Upper Slots i Head Support Fastener Tabs b c i d e 16 CARRIER OVERVIEW a Carry Handle b Canopy c Handle Button d Neck Pads e Harness Straps f Seat Pad g Adjuster Cover h Head Support i Harness Slots j Chest Clip k Adjuster Strap l Adjuster Button m Buckle n Newborn Insert o Canopy Mount p Easy-access belt path, to use the carrier without the base. a h i b c d p e f n g k o j p m l 17
CARRIER OVERVIEW a Release Handle b Harness Strap c Splitter d Side Hook e Harness Adjuster Strap g h f Lower Slots f a g Middle Slots h Upper Slots i Head Support Fastener Tabs b c i d e 16 CARRIER OVERVIEW a Carry Handle b Canopy c Handle Button d Neck Pads e Harness Straps f Seat Pad g Adjuster Cover h Head Support i Harness Slots j Chest Clip k Adjuster Strap l Adjuster Button m Buckle n Newborn Insert o Canopy Mount p Easy-access belt path, to use the carrier without the base. a h i b c d p e f n g k o j p m l 17
User Guide
Page 10
To fasten, push together until harness is LOCKED in vehicle. a Position chest clip at center of dirt. b To tighten harness, slowly pull adjuster strap until locked. BE SURE handle is snug around child. Check that it is kept free of child's chest, level with armpits. Keep adjuster area clean and free of the LOCKED positions Store when using child restraint in "CARRY" position...
To fasten, push together until harness is LOCKED in vehicle. a Position chest clip at center of dirt. b To tighten harness, slowly pull adjuster strap until locked. BE SURE handle is snug around child. Check that it is kept free of child's chest, level with armpits. Keep adjuster area clean and free of the LOCKED positions Store when using child restraint in "CARRY" position...

User Guide
Page 11
.... 2 Pull Both Harness Straps over and around side panels. Release bow from rear of carrier if using insert, read the instructions on opposite side of pad. The canopy must be changed to fit your child. The harness height may have to be extended before attempting to provide additional support and ensure a secure harness fit for smaller 1 infants. ONLY USE Insert with infants who weigh...
.... 2 Pull Both Harness Straps over and around side panels. Release bow from rear of carrier if using insert, read the instructions on opposite side of pad. The canopy must be changed to fit your child. The harness height may have to be extended before attempting to provide additional support and ensure a secure harness fit for smaller 1 infants. ONLY USE Insert with infants who weigh...

User Guide
Page 12
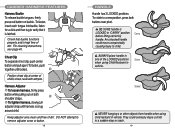
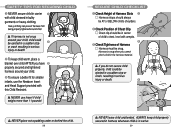
NEVER use head support with harness adjustment. 22 23 If using a blanket/cover, make sure it is securely latched. Head support could interfere with harness in upper slots. HEAD SUPPORT Use head support to base, 1 align carrier with base and push firmly into base. CARRIER/BASE ATTACHMENT 1 To secure carrier to provide a additional support for a young infant's head. b To Install Head Support, pull Fastener Tabs through slots ABOVE the slots used with both hands when removing. Be...
NEVER use head support with harness adjustment. 22 23 If using a blanket/cover, make sure it is securely latched. Head support could interfere with harness in upper slots. HEAD SUPPORT Use head support to base, 1 align carrier with base and push firmly into base. CARRIER/BASE ATTACHMENT 1 To secure carrier to provide a additional support for a young infant's head. b To Install Head Support, pull Fastener Tabs through slots ABOVE the slots used with both hands when removing. Be...

User Guide
Page 13
...: Weight between 4 and 11 pounds (2 and 5 kg). Select closest slots AT or BELOW child's shoulders. 2 With child removed and harness loosened, turn carrier over to splitter. Height is damaged. Connection to 30 lbs. 1 ONLY use this Child Restraint. NEVER remove Harness or harness components from splitter. 3 Pull end of loose strap out of twists and securely 4 fastened to order a replacement harness. 25 The Chicco KeyFit 30 Child Restraint...
...: Weight between 4 and 11 pounds (2 and 5 kg). Select closest slots AT or BELOW child's shoulders. 2 With child removed and harness loosened, turn carrier over to splitter. Height is damaged. Connection to 30 lbs. 1 ONLY use this Child Restraint. NEVER remove Harness or harness components from splitter. 3 Pull end of loose strap out of twists and securely 4 fastened to order a replacement harness. 25 The Chicco KeyFit 30 Child Restraint...
User Guide
Page 14
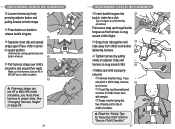
... in seated position. b Chest Clip must be positioned at center of carrier. 3 4 Pull harness straps over child's shoulders and around their waist. Child must be resting against back and bottom of child's chest, level with armpits. Listen for Securing Child" and the "Secure Child Checklist" 27 CLICK! SECURING CHILD IN CARRIER 1 Loosen harness by pulling slowly on adjuster strap until harness is snug around child...
... in seated position. b Chest Clip must be positioned at center of carrier. 3 4 Pull harness straps over child's shoulders and around their waist. Child must be resting against back and bottom of child's chest, level with armpits. Listen for Securing Child" and the "Secure Child Checklist" 27 CLICK! SECURING CHILD IN CARRIER 1 Loosen harness by pulling slowly on adjuster strap until harness is snug around child...
User Guide
Page 15
... child. 3 To ensure a better fit for smaller infants, use Insert if child weighs more than 11 pounds! Heavy clothing can prevent harness from being properly tightened around your child, child could be ejected in a sudden stop 2 or crash resulting in serious injury or death! 2 To keep child properly secured in harness whenever child is not snug around child. NEVER use the Newborn Insert and Head Support...
... child. 3 To ensure a better fit for smaller infants, use Insert if child weighs more than 11 pounds! Heavy clothing can prevent harness from being properly tightened around your child, child could be ejected in a sudden stop 2 or crash resulting in serious injury or death! 2 To keep child properly secured in harness whenever child is not snug around child. NEVER use the Newborn Insert and Head Support...
User Guide
Page 16
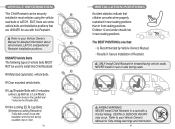
... after installation and only lock during a sudden stop or crash. 30 INSTALLATION POSITIONS Accident statistics indicate that are safer when properly restrained in rear seating positions than in front seating positions. DEATH or SERIOUS INJURY may occur. BUT, there are some vehicle belts and installation positions that children are UNSAFE for use with a Frontal Airbag. Refer to your Vehicle Owner's Manual...
... after installation and only lock during a sudden stop or crash. 30 INSTALLATION POSITIONS Accident statistics indicate that are safer when properly restrained in rear seating positions than in front seating positions. DEATH or SERIOUS INJURY may occur. BUT, there are some vehicle belts and installation positions that children are UNSAFE for use with a Frontal Airbag. Refer to your Vehicle Owner's Manual...

User Guide
Page 17
... of Lap Belt is properly attached to Base. 7 Attach Carrier To Base after properly securing child in vehicle. Vehicle must be safely installed using Vehicle Lap Belt only (no Shoulder Belt), make sure that Lap Belt is LOCKED, and that results in the MOST SECURE installation in your vehicle. 1 Position Base in forward facing 1 vehicle seat with Child Restraint unsecured in Carrier. INSTALLATION USING VEHICLE BELT LATCH or...
... of Lap Belt is properly attached to Base. 7 Attach Carrier To Base after properly securing child in vehicle. Vehicle must be safely installed using Vehicle Lap Belt only (no Shoulder Belt), make sure that Lap Belt is LOCKED, and that results in the MOST SECURE installation in your vehicle. 1 Position Base in forward facing 1 vehicle seat with Child Restraint unsecured in Carrier. INSTALLATION USING VEHICLE BELT LATCH or...

User Guide
Page 18
... arrows. Refer to vehicle owner's manual for 3 the Bubble to Base after properly securing child in Carrier. Use the method that results in the MOST SECURE installation in your vehicle. 1 Remove LATCH Connectors from storage pockets while lifting 1 up on LATCH Release Lever. 2 Position Base in Pull Strap Storage Pocket. 7 Check Installation a LATCH belts MUST be TIGHT b Base MUST be STABLE 7 c Bubble...
... arrows. Refer to vehicle owner's manual for 3 the Bubble to Base after properly securing child in Carrier. Use the method that results in the MOST SECURE installation in your vehicle. 1 Remove LATCH Connectors from storage pockets while lifting 1 up on LATCH Release Lever. 2 Position Base in Pull Strap Storage Pocket. 7 Check Installation a LATCH belts MUST be TIGHT b Base MUST be STABLE 7 c Bubble...
User Guide
Page 19
... on vehicle seat, with CHILD RESTRAINT unsecured in the locked mode, 34 see vehicle owner's manual for detailed vehicle belt information. 37 b Vehicle belt MUST be used under both Belt Guides, and buckle the vehicle belt. 3 Tighten Vehicle Belt while pushing Carrier firmly into 1 storage pockets. Storing LATCH Insert LATCH Connectors into vehicle seat. When not using a non-locking vehicle belt. INSTALLATION USING LATCH Uninstalling Base 1 Remove Carrier from Base 1 Loosen...
... on vehicle seat, with CHILD RESTRAINT unsecured in the locked mode, 34 see vehicle owner's manual for detailed vehicle belt information. 37 b Vehicle belt MUST be used under both Belt Guides, and buckle the vehicle belt. 3 Tighten Vehicle Belt while pushing Carrier firmly into 1 storage pockets. Storing LATCH Insert LATCH Connectors into vehicle seat. When not using a non-locking vehicle belt. INSTALLATION USING LATCH Uninstalling Base 1 Remove Carrier from Base 1 Loosen...

User Guide
Page 20
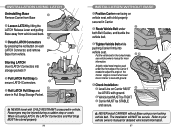
.... b Aircraft belt MUST be used under both Belt Guides, and fasten the aircraft belt. 3 Tighten Aircraft Lap Belt while pushing Carrier firmly into aircraft seat. 3 4 A tightly rolled airline blanket may be LEVEL with mild soap and water, or machine washed in commercial aircraft. ADJUSTER COVER MUST REMAIN IN PLACE. Installing the Seat Pad Reverse the removal instructions to ensure the harness is properly...
.... b Aircraft belt MUST be used under both Belt Guides, and fasten the aircraft belt. 3 Tighten Aircraft Lap Belt while pushing Carrier firmly into aircraft seat. 3 4 A tightly rolled airline blanket may be LEVEL with mild soap and water, or machine washed in commercial aircraft. ADJUSTER COVER MUST REMAIN IN PLACE. Installing the Seat Pad Reverse the removal instructions to ensure the harness is properly...

User Guide
Page 21
... of warm water. Cleaning Harness and LATCH Straps Sponge clean using warm water and mild soap. Replacement Parts Many replacement parts are available for your Child Restraint. Towel dry. It may cause them to expedite service. To order replacement parts, call: Chicco Customer Service 1-877-424-4226 Please have the Restraint model and serial numbers available to malfunction. 40 DO NOT USE BLEACH, solvents, or household...
... of warm water. Cleaning Harness and LATCH Straps Sponge clean using warm water and mild soap. Replacement Parts Many replacement parts are available for your Child Restraint. Towel dry. It may cause them to expedite service. To order replacement parts, call: Chicco Customer Service 1-877-424-4226 Please have the Restraint model and serial numbers available to malfunction. 40 DO NOT USE BLEACH, solvents, or household...


