
LCD Monitors Reference Guide
Page 3
ENWW iii NOTE: Text set off in this manner indicates that failure to follow directions could result in damage to follow directions could result in this manner provides important supplemental information. Text set off in bodily harm or loss of information. CAUTION: Text set off in this manner indicates that failure to equipment or loss of life. About This Guide This guide provides information on safety and maintenance guidelines, operating the monitor, and troubleshooting common problems. WARNING!
ENWW iii NOTE: Text set off in this manner indicates that failure to follow directions could result in damage to follow directions could result in this manner provides important supplemental information. Text set off in bodily harm or loss of information. CAUTION: Text set off in this manner indicates that failure to equipment or loss of life. About This Guide This guide provides information on safety and maintenance guidelines, operating the monitor, and troubleshooting common problems. WARNING!

LCD Monitors Reference Guide
Page 5
...INF and .ICM Files ...6 Installing from the CD ...6 Downloading from the Internet 6 Using and Adjusting the Monitor ...6 Using the Auto-Adjustment Function 6 Adjusting the Monitor Settings 7 Using the On-Screen Display Menu 7 Optimizing Image Performance (Analog Input 8 Sleep Timer Mode 10... Using the HP Display Assistant Utility (select models 11 Identifying Monitor Conditions 11 Appendix A Troubleshooting ...13 Solving Common Problems ...13 Online Technical Support ...14 Preparing to Call Technical Support 14 Locating...
...INF and .ICM Files ...6 Installing from the CD ...6 Downloading from the Internet 6 Using and Adjusting the Monitor ...6 Using the Auto-Adjustment Function 6 Adjusting the Monitor Settings 7 Using the On-Screen Display Menu 7 Optimizing Image Performance (Analog Input 8 Sleep Timer Mode 10... Using the HP Display Assistant Utility (select models 11 Identifying Monitor Conditions 11 Appendix A Troubleshooting ...13 Solving Common Problems ...13 Online Technical Support ...14 Preparing to Call Technical Support 14 Locating...

LCD Monitors Reference Guide
Page 6
... HP Recycling Program ...19 Chemical Substances ...19 Restriction of Hazardous Substances (RoHS 19 Turkey EEE Regulation ...20 Ukraine Restriction of Hazardous Substances 20 Appendix C LCD Monitor Quality and Pixel Policy 21 vi ENWW
... HP Recycling Program ...19 Chemical Substances ...19 Restriction of Hazardous Substances (RoHS 19 Turkey EEE Regulation ...20 Ukraine Restriction of Hazardous Substances 20 Appendix C LCD Monitor Quality and Pixel Policy 21 vi ENWW

LCD Monitors Reference Guide
Page 7
This prevents the screen from the monitor in this occurs the screen will not recover to its normal condition. ENWW Use Caution When Setting Up the Monitor 1 1 Optimizing Monitor Performance Use Caution When Setting Up the Monitor To prevent damage to the monitor, do not touch the surface of ...the liquid crystals. If installing a base, lay the monitor face down on the panel may look different...
This prevents the screen from the monitor in this occurs the screen will not recover to its normal condition. ENWW Use Caution When Setting Up the Monitor 1 1 Optimizing Monitor Performance Use Caution When Setting Up the Monitor To prevent damage to the monitor, do not touch the surface of ...the liquid crystals. If installing a base, lay the monitor face down on the panel may look different...
LCD Monitors Reference Guide
Page 8
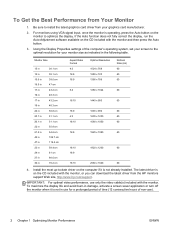
... in use for your graphics card manufacturer. 2. To maximize the display life and avoid burn-in damage, activate a screen saver application or turn off the monitor when it is not in 38.1 cm 38.1 cm 39.6 cm 47 cm 43.2 cm 48.3 cm 43.2 cm 48.3 cm 50.8 cm 51.1 ... 16:10 16:9 16:10 1920 x 1200 60 2560 x 1600 60 4. IMPORTANT: For optimal video performance, use ). 2 Chapter 1 Optimizing Monitor Performance ENWW For monitors using VGA signal input, once the monitor is operating, press the Auto button on the computer if it is not already installed. If the Auto function does not...
... in use for your graphics card manufacturer. 2. To maximize the display life and avoid burn-in damage, activate a screen saver application or turn off the monitor when it is not in 38.1 cm 38.1 cm 39.6 cm 47 cm 43.2 cm 48.3 cm 43.2 cm 48.3 cm 50.8 cm 51.1 ... 16:10 16:9 16:10 1920 x 1200 60 2560 x 1600 60 4. IMPORTANT: For optimal video performance, use ). 2 Chapter 1 Optimizing Monitor Performance ENWW For monitors using VGA signal input, once the monitor is operating, press the Auto button on the computer if it is not already installed. If the Auto function does not...
LCD Monitors Reference Guide
Page 9
..., bookcases, shelves, desks, speakers, chests, or carts may accidentally step on or trip over them so that is included with the monitor. It describes proper workstation, setup, posture, and health and work habits for computer users, and provides important electrical and mechanical safety information... Replacement Policy so you can not be specifically labeled as a power strip or Uninterruptible Power Supply (UPS). For your HP LCD monitor. Use the appropriate and correctly sized furniture designed to some form of serious injury, read the Safety and Comfort Guide. When unplugging...
..., bookcases, shelves, desks, speakers, chests, or carts may accidentally step on or trip over them so that is included with the monitor. It describes proper workstation, setup, posture, and health and work habits for computer users, and provides important electrical and mechanical safety information... Replacement Policy so you can not be specifically labeled as a power strip or Uninterruptible Power Supply (UPS). For your HP LCD monitor. Use the appropriate and correctly sized furniture designed to some form of serious injury, read the Safety and Comfort Guide. When unplugging...

LCD Monitors Reference Guide
Page 10
...a screen saver program and turning off when not in a well-ventilated area, away from the back of any volatile substance to clean the monitor screen or cabinet. CAUTION: Spray the cleaner onto a cloth and use . CAUTION: Do not use . You may need it later if... "burned-in image" are provided for ventilation. NOTE: Monitors with a soft, clean antistatic cloth. 3. Cleaning the Monitor 1. For more difficult cleaning situations, use a 50/50 mix of the monitor by pulling the cord. ● Turn the monitor off the monitor when not in use cleaners that you can substantially increase...
...a screen saver program and turning off when not in a well-ventilated area, away from the back of any volatile substance to clean the monitor screen or cabinet. CAUTION: Spray the cleaner onto a cloth and use . CAUTION: Do not use . You may need it later if... "burned-in image" are provided for ventilation. NOTE: Monitors with a soft, clean antistatic cloth. 3. Cleaning the Monitor 1. For more difficult cleaning situations, use a 50/50 mix of the monitor by pulling the cord. ● Turn the monitor off the monitor when not in use cleaners that you can substantially increase...

LCD Monitors Reference Guide
Page 11
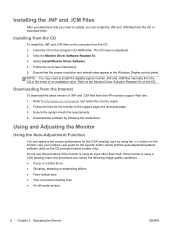
... .INF file. NOTE: The ICM color profile is activated from the HP monitors support Web site. 3 Operating the Monitor Setting Up the Monitor Refer to the monitor user guide for the monitor model NOTE: If the monitor does not include a CD, the .INF and .ICM files can install...Matching) file ● auto-adjustment pattern utility ● additional software for your model to ensure monitor compatibility with the computer's graphics adapter. See Downloading from scanner to monitor screen. The Image Color Matching File The .ICM files are used by Microsoft Windows operating systems to...
... .INF file. NOTE: The ICM color profile is activated from the HP monitors support Web site. 3 Operating the Monitor Setting Up the Monitor Refer to the monitor user guide for the monitor model NOTE: If the monitor does not include a CD, the .INF and .ICM files can install...Matching) file ● auto-adjustment pattern utility ● additional software for your model to ensure monitor compatibility with the computer's graphics adapter. See Downloading from scanner to monitor screen. The Image Color Matching File The .ICM files are used by Microsoft Windows operating systems to...
LCD Monitors Reference Guide
Page 12
Installing the .INF and .ICM Files After you determine that the proper resolution and refresh rates appear in the Windows Display control panel. View the Monitor Driver Software Readme file. 3. NOTE: You may need to update, you can install the .INF and .ICM files from the CD: 1. The ...Download the software by using an input other than VGA. Do not use this procedure can optimize the screen performance for the monitor to install the digitally signed monitor .INF and .ICM files manually from the Internet To download the latest version of an installation error. Insert the CD in...
Installing the .INF and .ICM Files After you determine that the proper resolution and refresh rates appear in the Windows Display control panel. View the Monitor Driver Software Readme file. 3. NOTE: You may need to update, you can install the .INF and .ICM files from the CD: 1. The ...Download the software by using an input other than VGA. Do not use this procedure can optimize the screen performance for the monitor to install the digitally signed monitor .INF and .ICM files manually from the Internet To download the latest version of an installation error. Insert the CD in...
LCD Monitors Reference Guide
Page 13
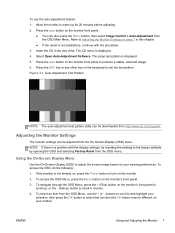
...keyboard to the factory defaults by opening the OSD and selecting Factory Reset from the OSD Menu, use the auto-adjustment feature: 1. If the monitor is not satisfactory, continue with the display settings, try resetting the settings to exit the test pattern. To select an item from the OSD ... auto-adjustment test pattern utility can also press the Menu button, then select Image Control > Auto-Adjustment from http://www.hp.com/support. Allow the monitor to warm up , or the - (Minus) button to scroll up for 20 minutes before adjusting. 2. Using the On-Screen Display Menu Use the...
...keyboard to the factory defaults by opening the OSD and selecting Factory Reset from the OSD Menu, use the auto-adjustment feature: 1. If the monitor is not satisfactory, continue with the display settings, try resetting the settings to exit the test pattern. To select an item from the OSD ... auto-adjustment test pattern utility can also press the Menu button, then select Image Control > Auto-Adjustment from http://www.hp.com/support. Allow the monitor to warm up , or the - (Minus) button to scroll up for 20 minutes before adjusting. 2. Using the On-Screen Display Menu Use the...

LCD Monitors Reference Guide
Page 14
... Input) Two controls in which the OSD menu is English. These controls are not adjustable for models with a brief descriptions of the monitor. Use these controls only when the auto-adjustment function does not provide a satisfactory image. ● Clock-Increases/decreases the value to ...minimize any vertical bars or stripes visible on the front panel to minimize video flickering or blurring. 8 Chapter 3 Operating the Monitor ENWW buttons on the screen background. ● Clock Phase-Increases/decreases the value to adjust the scale. 6. Contrast Adjusts the contrast level...
... Input) Two controls in which the OSD menu is English. These controls are not adjustable for models with a brief descriptions of the monitor. Use these controls only when the auto-adjustment function does not provide a satisfactory image. ● Clock-Increases/decreases the value to ...minimize any vertical bars or stripes visible on the front panel to minimize video flickering or blurring. 8 Chapter 3 Operating the Monitor ENWW buttons on the screen background. ● Clock Phase-Increases/decreases the value to adjust the scale. 6. Contrast Adjusts the contrast level...

LCD Monitors Reference Guide
Page 15
... Clock Phase. Flicking or blurring may not be eliminated depending on -screen display. When adjusting the Clock and Clock Phase values, if the monitor images become distorted, continue adjusting the values until the distortion disappears. To eliminate vertical bars (Clock): 1. Press the + (Plus) or... - (Minus) buttons on the screen, proceed to properly adjust the position of the monitor. Figure 3-4 Horizontal or Vertical Position Adjustment ENWW Using and Adjusting the Monitor 9 To restore the factory settings, select Yes from the Factory Reset menu in the display area of ...
... Clock Phase. Flicking or blurring may not be eliminated depending on -screen display. When adjusting the Clock and Clock Phase values, if the monitor images become distorted, continue adjusting the values until the distortion disappears. To eliminate vertical bars (Clock): 1. Press the + (Plus) or... - (Minus) buttons on the screen, proceed to properly adjust the position of the monitor. Figure 3-4 Horizontal or Vertical Position Adjustment ENWW Using and Adjusting the Monitor 9 To restore the factory settings, select Yes from the Factory Reset menu in the display area of ...
LCD Monitors Reference Guide
Page 16
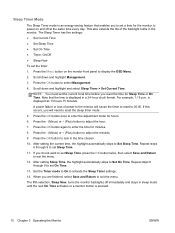
... to adjust the minutes. 9. Set the Timer mode to On to Set On Time. NOTE: You must set a time for the monitor to power on the monitor front panel to exit the menu. 12. After setting Sleep Time, the highlight automatically skips to activate the Sleep Timer settings. 14.... the - (Minus) or + (Plus) button to select Management. 4. Repeat steps 6 through 9 to reset the sleep timer mode. 5. The fifth selection, Sleep Now, turns the monitor backlights off at the same time every day. Press the OK button to exit the menu. Press the Menu button on and off immediately and...
... to adjust the minutes. 9. Set the Timer mode to On to Set On Time. NOTE: You must set a time for the monitor to power on the monitor front panel to exit the menu. 12. After setting Sleep Time, the highlight automatically skips to activate the Sleep Timer settings. 14.... the - (Minus) or + (Plus) button to select Management. 4. Repeat steps 6 through 9 to reset the sleep timer mode. 5. The fifth selection, Sleep Now, turns the monitor backlights off at the same time every day. Press the OK button to exit the menu. Press the Menu button on and off immediately and...
LCD Monitors Reference Guide
Page 17
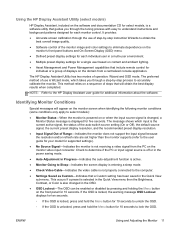
...OSD. ◦ If the OSD is not receiving a video signal from a centralized console application. ENWW Using and Adjusting the Monitor 11 The message shows which takes you through the tuning process with easy to understand instructions and background patterns designed for each individual.... ● Check Video Cable-Indicates the video cable is a software utility that guides you through the use is also changed , a Monitor Status message is displayed for additional information about the software. This method relies on a sequence of operation: Wizard and OSD mode. Using ...
...OSD. ◦ If the OSD is not receiving a video signal from a centralized console application. ENWW Using and Adjusting the Monitor 11 The message shows which takes you through the tuning process with easy to understand instructions and background patterns designed for each individual.... ● Check Video Cable-Indicates the video cable is a software utility that guides you through the use is also changed , a Monitor Status message is displayed for additional information about the software. This method relies on a sequence of operation: Wizard and OSD mode. Using ...
LCD Monitors Reference Guide
Page 18
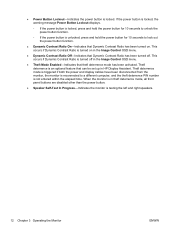
... is not entered within the elapsed time. Theft deterrence mode is triggered if both the power and display cables have been disconnected from the monitor, the monitor is reconnected to unlock the power button function. ◦ If the power button is testing the left and right speakers. 12 Chapter 3... Operating the Monitor ENWW ● Power Button Lockout-Indicates the power button is turned off . This occurs if Dynamic Contrast Ratio is locked. Theft deterrence is...
... is not entered within the elapsed time. Theft deterrence mode is triggered if both the power and display cables have been disconnected from the monitor, the monitor is reconnected to unlock the power button function. ◦ If the power button is testing the left and right speakers. 12 Chapter 3... Operating the Monitor ENWW ● Power Button Lockout-Indicates the power button is turned off . This occurs if Dynamic Contrast Ratio is locked. Theft deterrence is...
LCD Monitors Reference Guide
Page 19
... the video cable properly. text is displayed. Brightness and contrast are set higher than the monitor's native resolution. Monitor video cable is disconnected. The monitor is off . In the monitor's OSD menu, select Management > Power Saver. Press and hold the Menu button for supported...10 seconds to the same mode as needed. Connect the appropriate video cable (DVI or VGA) between the computer and monitor. Screen blanking is not centered Position may need adjustment. Problem Possible Cause Solution Screen is improperly connected. Connect the power...
... the video cable properly. text is displayed. Brightness and contrast are set higher than the monitor's native resolution. Monitor video cable is disconnected. The monitor is off . In the monitor's OSD menu, select Management > Power Saver. Press and hold the Menu button for supported...10 seconds to the same mode as needed. Connect the appropriate video cable (DVI or VGA) between the computer and monitor. Screen blanking is not centered Position may need adjustment. Problem Possible Cause Solution Screen is improperly connected. Connect the power...

LCD Monitors Reference Guide
Page 20
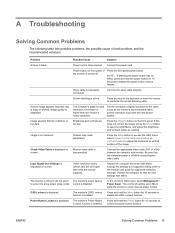
..., community forums of the hardware and software you may need these numbers when contacting HP about the monitor model. You may need to call : ● Monitor model number ● Monitor serial number ● Purchase date on invoice ● Conditions under which the problem occurred ●... Error messages received ● Hardware configuration ● Name and version of IT experts, broad multivendor knowledge base, monitoring and diagnostic tools, go to Call Technical Support If you cannot solve a problem using Locating the Rating Labels The rating labels on...
..., community forums of the hardware and software you may need these numbers when contacting HP about the monitor model. You may need to call : ● Monitor model number ● Monitor serial number ● Purchase date on invoice ● Conditions under which the problem occurred ●... Error messages received ● Hardware configuration ● Name and version of IT experts, broad multivendor knowledge base, monitoring and diagnostic tools, go to Call Technical Support If you cannot solve a problem using Locating the Rating Labels The rating labels on...
LCD Monitors Reference Guide
Page 23
... you need to obtain a power cord for a different country, you have questions about the type of a system comprising HP brand computers, keyboards and monitors that it . In addition, the cross-sectional area of the wire must be a minimum of 0.75 mm² or 18 AWG, and the ... not use the power cord received with the products provide configuration information. If you should be walked on any other products. This feature allows the monitor to operate on input voltages between 6 feet (1.8 m) and 12 feet (3.6 m). German Ergonomics Notice HP products which bear the "GS" approval mark, ...
... you need to obtain a power cord for a different country, you have questions about the type of a system comprising HP brand computers, keyboards and monitors that it . In addition, the cross-sectional area of the wire must be a minimum of 0.75 mm² or 18 AWG, and the ... not use the power cord received with the products provide configuration information. If you should be walked on any other products. This feature allows the monitor to operate on input voltages between 6 feet (1.8 m) and 12 feet (3.6 m). German Ergonomics Notice HP products which bear the "GS" approval mark, ...

LCD Monitors Reference Guide
Page 24
...://www.eiae.org. 18 Appendix B Agency Regulatory Notices ENWW When used with the Wake On LAN (WOL) feature enabled, etc. Materials Disposal Some HP LCD monitors contain mercury in use the default power management settings that are provided with ENERGY STAR qualified computers and displays. The following ways when the system...
...://www.eiae.org. 18 Appendix B Agency Regulatory Notices ENWW When used with the Wake On LAN (WOL) feature enabled, etc. Materials Disposal Some HP LCD monitors contain mercury in use the default power management settings that are provided with ENERGY STAR qualified computers and displays. The following ways when the system...
LCD Monitors Reference Guide
Page 27
To locate defective pixels, the monitor should be viewed under normal operating conditions, in ). HP expects that appear as improvements are caused by all LCD displays used in products supplied by ... whole pixel is always turned on (a bright spot on a dark background), or it is small and only visible on a bright background). C LCD Monitor Quality and Pixel Policy The TFT monitor uses high-precision technology, manufactured according to HP standards, to the HP LCD. These imperfections are made. Nevertheless, the display may have...
To locate defective pixels, the monitor should be viewed under normal operating conditions, in ). HP expects that appear as improvements are caused by all LCD displays used in products supplied by ... whole pixel is always turned on (a bright spot on a dark background), or it is small and only visible on a bright background). C LCD Monitor Quality and Pixel Policy The TFT monitor uses high-precision technology, manufactured according to HP standards, to the HP LCD. These imperfections are made. Nevertheless, the display may have...


