
LCD Monitors Reference Guide
Page 5
... The Image Color Matching File 5 Installing the .INF and .ICM Files ...6 Installing from the CD ...6 Downloading from the Internet 6 Using and Adjusting the Monitor ...6 Using the Auto-Adjustment Function 6 Adjusting the Monitor Settings 7 Using the On-Screen Display Menu 7 Optimizing Image Performance (Analog Input 8 Sleep Timer Mode 10 Using the HP Display Assistant Utility (select models 11 Identifying Monitor Conditions 11 Appendix A Troubleshooting ...13 Solving Common Problems ...13 Online Technical Support ...14 Preparing to Call Technical Support 14 Locating the Rating Labels...
... The Image Color Matching File 5 Installing the .INF and .ICM Files ...6 Installing from the CD ...6 Downloading from the Internet 6 Using and Adjusting the Monitor ...6 Using the Auto-Adjustment Function 6 Adjusting the Monitor Settings 7 Using the On-Screen Display Menu 7 Optimizing Image Performance (Analog Input 8 Sleep Timer Mode 10 Using the HP Display Assistant Utility (select models 11 Identifying Monitor Conditions 11 Appendix A Troubleshooting ...13 Solving Common Problems ...13 Online Technical Support ...14 Preparing to Call Technical Support 14 Locating the Rating Labels...
LCD Monitors Reference Guide
Page 8
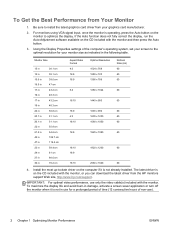
... 30 in the following table. For monitors using VGA signal input, once the monitor is not already installed. IMPORTANT: For optimal video performance, use for your graphics card manufacturer. 2. To maximize the display life and avoid burn-in use only the video cable(s) included with the monitor, or you can download the latest driver from Your Monitor 1. To Get the Best Performance from the HP monitors support Web site, http://www.hp...
... 30 in the following table. For monitors using VGA signal input, once the monitor is not already installed. IMPORTANT: For optimal video performance, use for your graphics card manufacturer. 2. To maximize the display life and avoid burn-in use only the video cable(s) included with the monitor, or you can download the latest driver from Your Monitor 1. To Get the Best Performance from the HP monitors support Web site, http://www.hp...
LCD Monitors Reference Guide
Page 9
... Power Supply (UPS). If the monitor is used, use with the monitor, refer to determine the ampere rating (AMPS or A) for computer users, and provides important electrical and mechanical safety information. ENWW Important Safety Information 3 Arrange them . This guide is located on the power label to the Power Cord Set Requirements on or trip over . Care should be specifically labeled as the computer, connect all power...
... Power Supply (UPS). If the monitor is used, use with the monitor, refer to determine the ampere rating (AMPS or A) for computer users, and provides important electrical and mechanical safety information. ENWW Important Safety Information 3 Arrange them . This guide is located on the power label to the Power Cord Set Requirements on or trip over . Care should be specifically labeled as the computer, connect all power...

LCD Monitors Reference Guide
Page 11
...; auto-adjustment pattern utility ● additional software for your model to assemble the monitor and connect the cables. ENWW Setting Up the Monitor 5 This monitor is written in conjunction with the computer's graphics adapter. NOTE: The ICM color profile is Microsoft Windows Plug and Play compatible and the monitor will work through separate BNC type connectors or through distribution buffers/ boxes. Software and Utilities The CD that the monitor connects directly to monitor screen. Plug...
...; auto-adjustment pattern utility ● additional software for your model to assemble the monitor and connect the cables. ENWW Setting Up the Monitor 5 This monitor is written in conjunction with the computer's graphics adapter. NOTE: The ICM color profile is Microsoft Windows Plug and Play compatible and the monitor will work through separate BNC type connectors or through distribution buffers/ boxes. Software and Utilities The CD that the monitor connects directly to monitor screen. Plug...

LCD Monitors Reference Guide
Page 12
... the monitor is using a VGA (analog) input, this procedure if the monitor is displayed. 2. The CD menu is using the auto button on the monitor (see your model's user guide for the monitor to install the digitally signed monitor .INF and .ICM files manually from the HP monitors support Web site: 1. Ensure that you need to the support page and download page. 3. Ensure the system meets the requirements. 4. Refer to the Monitor Driver Software Readme file on -screen instructions. 5. View the Monitor Driver Software...
... the monitor is using a VGA (analog) input, this procedure if the monitor is displayed. 2. The CD menu is using the auto button on the monitor (see your model's user guide for the monitor to install the digitally signed monitor .INF and .ICM files manually from the HP monitors support Web site: 1. Ensure that you need to the support page and download page. 3. Ensure the system meets the requirements. 4. Refer to the Monitor Driver Software Readme file on -screen instructions. 5. View the Monitor Driver Software...
LCD Monitors Reference Guide
Page 13
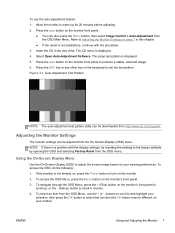
....com/support. buttons to scroll to produce a stable, centered image. 6. Using the On-Screen Display Menu Use the On-Screen Display (OSD) to adjust the screen image based on page 7 in this chapter. ● If the result is not satisfactory, continue with the display settings, try resetting the settings to scroll in the disc drive. Allow the monitor to warm up , or the - (Minus) button to the factory defaults by opening the OSD and selecting Factory Reset...
....com/support. buttons to scroll to produce a stable, centered image. 6. Using the On-Screen Display Menu Use the On-Screen Display (OSD) to adjust the screen image based on page 7 in this chapter. ● If the result is not satisfactory, continue with the display settings, try resetting the settings to scroll in the disc drive. Allow the monitor to warm up , or the - (Minus) button to the factory defaults by opening the OSD and selecting Factory Reset...

LCD Monitors Reference Guide
Page 14
... OSD menu screen. Management Selects the power management, audio, and timer features of each item. The Clock must first be adjusted to save the setting, then select Exit from the Main Menu. NOTE: The Clock and Clock Phase controls are not adjustable for digital inputs. The factory default is displayed. 5. Color Selects and adjusts the screen color. NOTE: If the buttons remain untouched for models with a brief descriptions of the monitor. Optimizing Image Performance (Analog Input) Two controls...
... OSD menu screen. Management Selects the power management, audio, and timer features of each item. The Clock must first be adjusted to save the setting, then select Exit from the Main Menu. NOTE: The Clock and Clock Phase controls are not adjustable for digital inputs. The factory default is displayed. 5. Color Selects and adjusts the screen color. NOTE: If the buttons remain untouched for models with a brief descriptions of the monitor. Optimizing Image Performance (Analog Input) Two controls...

LCD Monitors Reference Guide
Page 15
... the distortion disappears. To eliminate vertical bars (Clock): 1. Press the + (Plus) or - (Minus) buttons on the monitor's front panel to open the OSD Menu, and then select Image Control > Clock Phase. 2. The Horizontal Position shifts the image left or right; the Vertical Position shifts the image up and down. NOTE: When using the auto-adjustment pattern software utility provided on your computer or graphics controller card installed. Flicking or blurring may not...
... the distortion disappears. To eliminate vertical bars (Clock): 1. Press the + (Plus) or - (Minus) buttons on the monitor's front panel to open the OSD Menu, and then select Image Control > Clock Phase. 2. The Horizontal Position shifts the image left or right; the Vertical Position shifts the image up and down. NOTE: When using the auto-adjustment pattern software utility provided on your computer or graphics controller card installed. Flicking or blurring may not...
LCD Monitors Reference Guide
Page 17
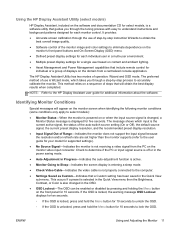
... -step process to obtain the best overall image quality. ● Software control of operation: Wizard and OSD mode. It provides: ● Accurate screen calibration through a step-by -step instruction Wizards to accurately calibrate the monitor. This occurs If a preset is selected in the Quick View menu then the Brightness, Contrast, or Color is also changed , a Monitor Status message is changed in a multi-user environment. ● Multiple preset display settings for a single user based on the monitor video input connector.
... -step process to obtain the best overall image quality. ● Software control of operation: Wizard and OSD mode. It provides: ● Accurate screen calibration through a step-by -step instruction Wizards to accurately calibrate the monitor. This occurs If a preset is selected in the Quick View menu then the Brightness, Contrast, or Color is also changed , a Monitor Status message is changed in a multi-user environment. ● Multiple preset display settings for a single user based on the monitor video input connector.
LCD Monitors Reference Guide
Page 19
... adjustment. Brightness and contrast are set higher than the monitor's native resolution. Image is set to On to allow the monitor to unlock the power button function. Monitor video cable is displayed. Video resolution and/or refresh rate are too low. Restart the computer so that the computer power is displayed on screen. Connect the power cord. Press any key on front panel of Range is off . Set the computer's display resolution to adjust the horizontal or vertical position of each problem, and the recommended solutions. Select Image Control/Horizontal Position...
... adjustment. Brightness and contrast are set higher than the monitor's native resolution. Image is set to On to allow the monitor to unlock the power button function. Monitor video cable is displayed. Video resolution and/or refresh rate are too low. Restart the computer so that the computer power is displayed on screen. Connect the power cord. Press any key on front panel of Range is off . Set the computer's display resolution to adjust the horizontal or vertical position of each problem, and the recommended solutions. Select Image Control/Horizontal Position...

LCD Monitors Reference Guide
Page 24
... an external ENERGY STAR® qualified display, this feature also supports similar power management features for the display. Examples include the user pressing the power/sleep button, receiving an input signal from an input device, receiving an input signal from a network connection with ENERGY STAR qualified computers and displays. Materials Disposal Some HP LCD monitors contain mercury in homes, offices, and factories. The following ways when the system...
... an external ENERGY STAR® qualified display, this feature also supports similar power management features for the display. Examples include the user pressing the power/sleep button, receiving an input signal from an input device, receiving an input signal from a network connection with ENERGY STAR qualified computers and displays. Materials Disposal Some HP LCD monitors contain mercury in homes, offices, and factories. The following ways when the system...

User Guide
Page 5
... the Monitor Pedestal Base 3 Rear Components ...4 Connecting the Cables ...5 Front Panel Controls ...6 Adjusting the Monitor ...7 Turning on the Monitor ...9 Connecting USB Devices ...10 Removing the Monitor Pedestal Base 11 Mounting the Monitor ...12 Locating the Rating Labels ...13 Installing a Cable Lock ...13 3 Finding More Information ...14 Reference Guides ...14 Product Support ...14 Appendix A Technical Specifications ...15 LA1905wl/LA1905wg Models ...15 LA2205wg Model ...16 LA2205wl/LA22f Models ...17 LA2405wg Model ...18 LA2405x Model ...19 Recognizing Preset Display Resolutions 21...
... the Monitor Pedestal Base 3 Rear Components ...4 Connecting the Cables ...5 Front Panel Controls ...6 Adjusting the Monitor ...7 Turning on the Monitor ...9 Connecting USB Devices ...10 Removing the Monitor Pedestal Base 11 Mounting the Monitor ...12 Locating the Rating Labels ...13 Installing a Cable Lock ...13 3 Finding More Information ...14 Reference Guides ...14 Product Support ...14 Appendix A Technical Specifications ...15 LA1905wl/LA1905wg Models ...15 LA2205wg Model ...16 LA2205wl/LA22f Models ...17 LA2405wg Model ...18 LA2405x Model ...19 Recognizing Preset Display Resolutions 21...
User Guide
Page 7
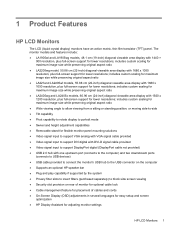
... screen optimization ● HP Display Assistant for lower resolutions; includes custom scaling for maximum image size while preserving original aspect ratio ● Wide viewing angle to allow viewing from a sitting or standing position, or moving side-to-side ● Tilt capability ● Pivot capability to rotate display to portrait mode ● Swivel and height adjustment capabilities ● Removable stand for flexible monitor panel mounting solutions ● Video signal input to support VGA analog with VGA signal cable provided ● Video signal input to support DVI digital...
... screen optimization ● HP Display Assistant for lower resolutions; includes custom scaling for maximum image size while preserving original aspect ratio ● Wide viewing angle to allow viewing from a sitting or standing position, or moving side-to-side ● Tilt capability ● Pivot capability to rotate display to portrait mode ● Swivel and height adjustment capabilities ● Removable stand for flexible monitor panel mounting solutions ● Video signal input to support VGA analog with VGA signal cable provided ● Video signal input to support DVI digital...

User Guide
Page 12
... auto adjustment feature to the equipment: Do not disable the power cord grounding plug. Green = Fully powered. Flashing Amber = Sleep Timer mode. The grounding plug is easily accessible at all times. WARNING! If the OSD menu is available from the electrical outlet. If the OSD menu is inactive, press to activate the source button that mounts on a cord or cable. NOTE: An optional speaker bar that chooses the video signal input (VGA, DVI, or DisplayPort) If the OSD menu...
... auto adjustment feature to the equipment: Do not disable the power cord grounding plug. Green = Fully powered. Flashing Amber = Sleep Timer mode. The grounding plug is easily accessible at all times. WARNING! If the OSD menu is available from the electrical outlet. If the OSD menu is inactive, press to activate the source button that mounts on a cord or cable. NOTE: An optional speaker bar that chooses the video signal input (VGA, DVI, or DisplayPort) If the OSD menu...
User Guide
Page 15
..., the Power Button Lockout feature may occur on . Press the Menu button on the software and documentation CD. The message shows which input (DisplayPort, DVI, or VGA) is a condition that display the same static image on monitors that may be rotated to turn it on all LCD screens. To rotate the OSD menu, access the OSD menu by pressing the front panel menu button and selecting Source Control > Default Source. The monitor automatically scans the signal inputs for...
..., the Power Button Lockout feature may occur on . Press the Menu button on the software and documentation CD. The message shows which input (DisplayPort, DVI, or VGA) is a condition that display the same static image on monitors that may be rotated to turn it on all LCD screens. To rotate the OSD menu, access the OSD menu by pressing the front panel menu button and selecting Source Control > Default Source. The monitor automatically scans the signal inputs for...
User Guide
Page 22
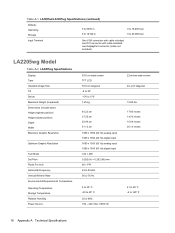
...; F 16 Appendix A Technical Specifications one DisplayPort connector (cable not included) LA2205wg Model Table A-2 LA2205wg Specifications Display Type Viewable Image Size Tilt Swivel Maximum Weight (Unpacked) Dimensions (include base) Height (highest position) Height (lowest position) Depth Width Maximum Graphic Resolution Optimum Graphic Resolution Text Mode Dot Pitch Pixels Per Inch Horizontal Frequency Vertical Refresh Rate Environmental Requirements Temperature Operating Temperature Storage Temperature Relative Humidity Power Source 55.9 cm wide screen TFT LCD 55.9 cm diagonal -5 to...
...; F 16 Appendix A Technical Specifications one DisplayPort connector (cable not included) LA2205wg Model Table A-2 LA2205wg Specifications Display Type Viewable Image Size Tilt Swivel Maximum Weight (Unpacked) Dimensions (include base) Height (highest position) Height (lowest position) Depth Width Maximum Graphic Resolution Optimum Graphic Resolution Text Mode Dot Pitch Pixels Per Inch Horizontal Frequency Vertical Refresh Rate Environmental Requirements Temperature Operating Temperature Storage Temperature Relative Humidity Power Source 55.9 cm wide screen TFT LCD 55.9 cm diagonal -5 to...

User Guide
Page 23
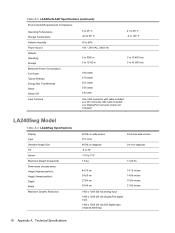
... wide screen 22-inch diagonal 14.6 lbs. 17.80 inches 14.70 inches 10.04 inches 20.13 inches LA2205wl/LA22f Models 17 one DVI connector with cable included; one DisplayPort connector (cable not included) LA2205wl/LA22f Models Table A-3 LA2205wl/LA22f Specifications Display Type Viewable Image Size Tilt Swivel Maximum Weight (Unpacked) Dimensions (include base) Height (highest position) Height (lowest position) Depth Width Maximum Graphic Resolution Optimum Graphic Resolution Text Mode Dot Pitch Pixels Per Inch Horizontal Frequency Vertical Refresh Rate 55.9 cm wide screen TFT LCD...
... wide screen 22-inch diagonal 14.6 lbs. 17.80 inches 14.70 inches 10.04 inches 20.13 inches LA2205wl/LA22f Models 17 one DVI connector with cable included; one DisplayPort connector (cable not included) LA2205wl/LA22f Models Table A-3 LA2205wl/LA22f Specifications Display Type Viewable Image Size Tilt Swivel Maximum Weight (Unpacked) Dimensions (include base) Height (highest position) Height (lowest position) Depth Width Maximum Graphic Resolution Optimum Graphic Resolution Text Mode Dot Pitch Pixels Per Inch Horizontal Frequency Vertical Refresh Rate 55.9 cm wide screen TFT LCD...
User Guide
Page 24
... base) Height (highest position) Height (lowest position) Depth Width Maximum Graphic Resolution 60.96 cm wide screen TFT LCD 60.96 cm diagonal -5 to 30° -170 to 40,000 feet 34.6 watts 27.8 watts 20.5 watts 0.55 watts 0.42 watt One VGA connector with cable included; one DVI connector with cable included; Table A-3 LA2205wl/LA22f Specifications (continued) Environmental Requirements Temperature Operating Temperature Storage Temperature Relative Humidity Power Source...
... base) Height (highest position) Height (lowest position) Depth Width Maximum Graphic Resolution 60.96 cm wide screen TFT LCD 60.96 cm diagonal -5 to 30° -170 to 40,000 feet 34.6 watts 27.8 watts 20.5 watts 0.55 watts 0.42 watt One VGA connector with cable included; one DVI connector with cable included; Table A-3 LA2205wl/LA22f Specifications (continued) Environmental Requirements Temperature Operating Temperature Storage Temperature Relative Humidity Power Source...
User Guide
Page 25
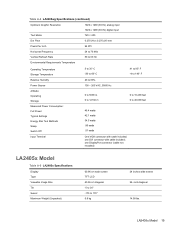
... cable included; LA2405x Model 19 one DisplayPort connector (cable not included) LA2405x Model Table A-5 LA2405x Specifications Display Type Viewable Image Size Tilt Swivel Maximum Weight (Unpacked) 60.96 cm wide screen TFT LCD 60.96 cm diagonal -5 to 30° -170 to 40,000 feet 48.4 watts 42.1 watts 34.5 watts .86 watts .51 watts One VGA connector with cable included; Table A-4 LA2405wg Specifications (continued) Optimum Graphic Resolution Text Mode Dot Pitch Pixels Per Inch Horizontal Frequency Vertical Refresh Rate...
... cable included; LA2405x Model 19 one DisplayPort connector (cable not included) LA2405x Model Table A-5 LA2405x Specifications Display Type Viewable Image Size Tilt Swivel Maximum Weight (Unpacked) 60.96 cm wide screen TFT LCD 60.96 cm diagonal -5 to 30° -170 to 40,000 feet 48.4 watts 42.1 watts 34.5 watts .86 watts .51 watts One VGA connector with cable included; Table A-4 LA2405wg Specifications (continued) Optimum Graphic Resolution Text Mode Dot Pitch Pixels Per Inch Horizontal Frequency Vertical Refresh Rate...
User Guide
Page 28
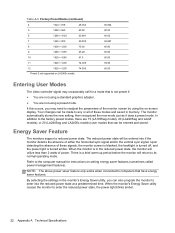
... monitor detects the absence of either the horizontal sync signal and/or the vertical sync signal. NOTE: The above power saver feature only works when connected to enter the reduced power state, the power light blinks amber. 22 Appendix A Technical Specifications Upon detecting the absence of these modes and saved in memory. In addition to the factory preset modes, there are not using the on setting energy saver features (sometimes called power...
... monitor detects the absence of either the horizontal sync signal and/or the vertical sync signal. NOTE: The above power saver feature only works when connected to enter the reduced power state, the power light blinks amber. 22 Appendix A Technical Specifications Upon detecting the absence of these modes and saved in memory. In addition to the factory preset modes, there are not using the on setting energy saver features (sometimes called power...


