
User Manual
Page 3
... Resolutions up to 1920 x 1440 are not compatible with no deterioration of image quality. Switching between PCs can be accomplished in the case that the device is also provided for purchasing the DKVM-2/4 KVM Switch. Older style keyboards or mice can be used with PS/2 type connectors. The... DKVM-2/4 is compatible with mouse and keyboard with PS/2 adapters in two ways: through a single ...
... Resolutions up to 1920 x 1440 are not compatible with no deterioration of image quality. Switching between PCs can be accomplished in the case that the device is also provided for purchasing the DKVM-2/4 KVM Switch. Older style keyboards or mice can be used with PS/2 type connectors. The... DKVM-2/4 is compatible with mouse and keyboard with PS/2 adapters in two ways: through a single ...
User Manual
Page 4
...... The status of the CAPS LOCK, SCROLL LOCK and NUM LOCK keys is preserved for convenient automatic switching. Model No. No drivers or other additional software required. DKVM-2/4 Power Adapter 2 Comes with DOS, Windows, OS/2, UNIX, Linux etc. Package Contents In addition ...to 1920 x 1440. DKVM-CB Supports Monitor resolutions of up . Product Features Allows a user to control 2/4 computers from one console. Molded KVM cables are recommended. ...
...... The status of the CAPS LOCK, SCROLL LOCK and NUM LOCK keys is preserved for convenient automatic switching. Model No. No drivers or other additional software required. DKVM-2/4 Power Adapter 2 Comes with DOS, Windows, OS/2, UNIX, Linux etc. Package Contents In addition ...to 1920 x 1440. DKVM-CB Supports Monitor resolutions of up . Product Features Allows a user to control 2/4 computers from one console. Molded KVM cables are recommended. ...
User Manual
Page 5
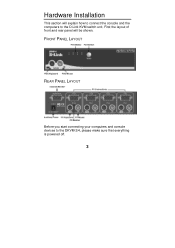
First the layout of front and rear panel will explain how to connect the console and the computers to the DKVM-2/4, please make sure that everything is powered off. 3 Hardware Installation This section will be shown. FRONT PANEL LAYOUT REAR PANEL LAYOUT Before you start connecting your computers and console devices to the D-Link KVM switch unit.
First the layout of front and rear panel will explain how to connect the console and the computers to the DKVM-2/4, please make sure that everything is powered off. 3 Hardware Installation This section will be shown. FRONT PANEL LAYOUT REAR PANEL LAYOUT Before you start connecting your computers and console devices to the D-Link KVM switch unit.
User Manual
Page 6
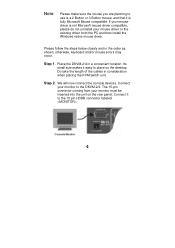
... uninstall your monitor to the 15 pin HDDB connector labeled =MONITOR=. 4 Place the DKVM-2/4 in the order as shown, otherwise, keyboard and/or mouse errors may occur. Do take the length of the cables in consideration when placing the KVM switch unit. Step 1. We will now connect the console devices. The 15-pin...
... uninstall your monitor to the 15 pin HDDB connector labeled =MONITOR=. 4 Place the DKVM-2/4 in the order as shown, otherwise, keyboard and/or mouse errors may occur. Do take the length of the cables in consideration when placing the KVM switch unit. Step 1. We will now connect the console devices. The 15-pin...
User Manual
Page 10
If you switch PC ports on the KVM at this manual. Normally, during boot-up process. Do not press the push button of this moment, it will communicate with the keyboard and mouse. ... and verify the functionality in the same way. If you find errors, recheck all cables for proper connections before going to the troubleshooting section of KVM switch or run hot key) while the computers are under their boot-up process, each PC will cause communication errors or initialization failures between PC and...
If you switch PC ports on the KVM at this manual. Normally, during boot-up process. Do not press the push button of this moment, it will communicate with the keyboard and mouse. ... and verify the functionality in the same way. If you find errors, recheck all cables for proper connections before going to the troubleshooting section of KVM switch or run hot key) while the computers are under their boot-up process, each PC will cause communication errors or initialization failures between PC and...
User Manual
Page 13
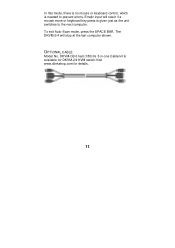
Erratic input will stop at the last computer shown. OPTIONAL CABLE Model No. In this mode, there is no mouse or keyboard control, which is needed to the next computer. The DKVM-2/4 will result if a mouse move or keyboard key press is available for DKVM-2/4 KVM switch.Visit www.dlinkshop.com for details. 11 DKVM-CB 6 feet (180cm) 3-in-one Cable kit is given just as the unit switches to prevent errors. To exit Auto-Scan mode, press the SPACE BAR.
Erratic input will stop at the last computer shown. OPTIONAL CABLE Model No. In this mode, there is no mouse or keyboard control, which is needed to the next computer. The DKVM-2/4 will result if a mouse move or keyboard key press is available for DKVM-2/4 KVM switch.Visit www.dlinkshop.com for details. 11 DKVM-CB 6 feet (180cm) 3-in-one Cable kit is given just as the unit switches to prevent errors. To exit Auto-Scan mode, press the SPACE BAR.
Quick Installation Guide
Page 1
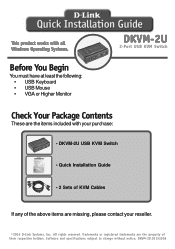
... Mouse • VGA or Higher Monitor DKVM-2U 2-Port USB KVM Switch Check Your Package Contents These are the items included with your reseller. ©2006 D-Link Systems, Inc. Trademarks or registered trademarks are missing, please contact your purchase: • DKVM-2U USB KVM Switch • Quick Installation Guide • 2 Sets of KVM Cables If any of the above items...
... Mouse • VGA or Higher Monitor DKVM-2U 2-Port USB KVM Switch Check Your Package Contents These are the items included with your reseller. ©2006 D-Link Systems, Inc. Trademarks or registered trademarks are missing, please contact your purchase: • DKVM-2U USB KVM Switch • Quick Installation Guide • 2 Sets of KVM Cables If any of the above items...
Quick Installation Guide
Page 2
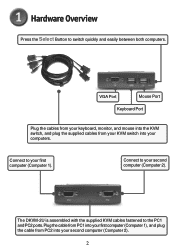
... 2). 2 Plug the cable from PC1 into your first computer (Computer 1), and plug the cable from your KVM switch into your computers. Connect to your second computer (Computer 2). The DKVM-2U is assembled with the supplied KVM cables fastened to switch quickly and easily between both computers. Hardware Overview Press the Select Button to the PC1 and...
... 2). 2 Plug the cable from PC1 into your first computer (Computer 1), and plug the cable from your KVM switch into your computers. Connect to your second computer (Computer 2). The DKVM-2U is assembled with the supplied KVM cables fastened to switch quickly and easily between both computers. Hardware Overview Press the Select Button to the PC1 and...
Quick Installation Guide
Page 6
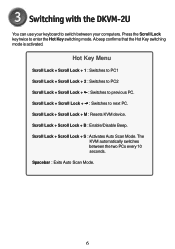
... the DKVM-2U You can use your computers. Scroll Lock + Scroll Lock + B : Enable/Disable Beep. The KVM automatically switches between your keyboard to enter the Hot Key switching mode. Hot Key Menu Scroll Lock + Scroll Lock + 1 : Switches to PC1 Scroll Lock + Scroll Lock + 2 : Switches to PC2 Scroll Lock + Scroll Lock + I : Switches to next PC. Scroll Lock + Scroll Lock + J : Switches...
... the DKVM-2U You can use your computers. Scroll Lock + Scroll Lock + B : Enable/Disable Beep. The KVM automatically switches between your keyboard to enter the Hot Key switching mode. Hot Key Menu Scroll Lock + Scroll Lock + 1 : Switches to PC1 Scroll Lock + Scroll Lock + 2 : Switches to PC2 Scroll Lock + Scroll Lock + I : Switches to next PC. Scroll Lock + Scroll Lock + J : Switches...


