
Planning Guides
Page 1
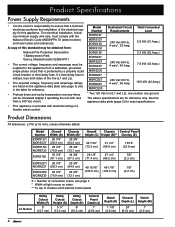
...23.8 cm) 7/8" (2.2 cm) Model Number EORS127 MORS127 EORS130 MORS130 EORS136 Dedicated Circuit Requirements 240 Vac 60 Hz., 4-wire***, 30 Amp. See the appliance data plate for further information. • This appliance must be installed in accordance with the accompanying installation instructions. Model (A)...appliances according to change without notice. Contact your local building department for exact specifications. Total Connected Load 5.0 kW (20.8 Amp.) 5.3 kW (22 Amp.) *** Two 120 Vac hot (L1 and L2), one neutral, one ground The above specifications are for reference only. www.Dacor...
...23.8 cm) 7/8" (2.2 cm) Model Number EORS127 MORS127 EORS130 MORS130 EORS136 Dedicated Circuit Requirements 240 Vac 60 Hz., 4-wire***, 30 Amp. See the appliance data plate for further information. • This appliance must be installed in accordance with the accompanying installation instructions. Model (A)...appliances according to change without notice. Contact your local building department for exact specifications. Total Connected Load 5.0 kW (20.8 Amp.) 5.3 kW (22 Amp.) *** Two 120 Vac hot (L1 and L2), one neutral, one ground The above specifications are for reference only. www.Dacor...

Planning Guides
Page 2
... platform Model Number (N) Minimum Cabinet Width (P) Minimum Cut Out Width (R) Minimum Cut out Height EORS127/ MORS127 EORS130/ MORS130 EORS136 27" (68.6 cm) 30" (76.2 cm) 36" (91.4 cm) 25 ½" (64.8 cm) 28...189;" (87.6 cm) 27 5/8" (70.2 cm) 27 ½" (69.9 cm) 1" (2.5 cm) Min. Install all appliances according to combustible floor Single Wall Oven - Cut Out Dimensions Specifications subject to combustibles 1 1/2" (3.8 cm) typical counter 36" (...1" (25 mm) Min. www.Dacor.com Phone: (800) 793-0093 1.2 to change without notice. Installed Under Counter 1" (2.5 cm) Min.
... platform Model Number (N) Minimum Cabinet Width (P) Minimum Cut Out Width (R) Minimum Cut out Height EORS127/ MORS127 EORS130/ MORS130 EORS136 27" (68.6 cm) 30" (76.2 cm) 36" (91.4 cm) 25 ½" (64.8 cm) 28...189;" (87.6 cm) 27 5/8" (70.2 cm) 27 ½" (69.9 cm) 1" (2.5 cm) Min. Install all appliances according to combustible floor Single Wall Oven - Cut Out Dimensions Specifications subject to combustibles 1 1/2" (3.8 cm) typical counter 36" (...1" (25 mm) Min. www.Dacor.com Phone: (800) 793-0093 1.2 to change without notice. Installed Under Counter 1" (2.5 cm) Min.
Installation Instructions
Page 3
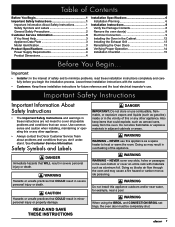
...(such as a space heater to heat or warm the room. NEVER cover any other appliance. • Always contact the Dacor Customer Service Team about problems and conditions that could explode, such as aluminum foil. Also ...Important Information About Safety Instructions 1 Safety Symbols and Labels 1 General Safety Precautions 2 Customer Service Information 3 If You Need Help 3 Appliance Data Plate 3 Model Identification 3 Product Specifications 4 Power Supply Requirements 4 Product Dimensions 4 Installation Specifications 6 Installation Planning 6 Installation Instructions...
...(such as a space heater to heat or warm the room. NEVER cover any other appliance. • Always contact the Dacor Customer Service Team about problems and conditions that could explode, such as aluminum foil. Also ...Important Information About Safety Instructions 1 Safety Symbols and Labels 1 General Safety Precautions 2 Customer Service Information 3 If You Need Help 3 Appliance Data Plate 3 Model Identification 3 Product Specifications 4 Power Supply Requirements 4 Product Dimensions 4 Installation Specifications 6 Installation Planning 6 Installation Instructions...
Installation Instructions
Page 4
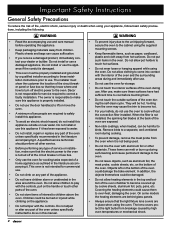
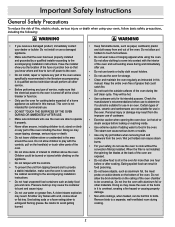
...when heated, can be harmful to the oven. • Do not leave objects, such as paper, cardboard, plastic and cloth away from children. Dacor is properly installed. • Do not use the door handle(s) to lift or move the oven. • A minimum of two people are...the bake element. Important Safety Instructions General Safety Precautions To reduce the risk of fire, electric shock, serious injury or death when using your appliance, follow basic safety precautions, including the following: WARNING • Read the accompanying use and care manual before touching them to a separate,...
...when heated, can be harmful to the oven. • Do not leave objects, such as paper, cardboard, plastic and cloth away from children. Dacor is properly installed. • Do not use the door handle(s) to lift or move the oven. • A minimum of two people are...the bake element. Important Safety Instructions General Safety Precautions To reduce the risk of fire, electric shock, serious injury or death when using your appliance, follow basic safety precautions, including the following: WARNING • Read the accompanying use and care manual before touching them to a separate,...

Installation Instructions
Page 5
... Inch 30 = 30 Inch 36 = 36 Inch E TRIM: SCH = Stainless Steel with installation, contact your Dacor dealer or the Dacor Customer Service Team. The model and serial number are printed on the appliance data plate. Friday 6:00 a.m. to Dacor appliances under warranty only) Phone: (877) 337-3226 (U.S.A. On double ovens, the plate is located behind...
... Inch 30 = 30 Inch 36 = 36 Inch E TRIM: SCH = Stainless Steel with installation, contact your Dacor dealer or the Dacor Customer Service Team. The model and serial number are printed on the appliance data plate. Friday 6:00 a.m. to Dacor appliances under warranty only) Phone: (877) 337-3226 (U.S.A. On double ovens, the plate is located behind...
Installation Instructions
Page 6
A copy of this appliance. Model Number EORS127 MORS127 EORS130 MORS130 EORS136 EORS227 MORS227 EORS230 MORS230 EORD227 MORD227 EORD230 MORD230 Dedicated Circuit Total Connected Requirements Load 240 Vac 60 Hz, 4 wire*, 30 Amp....) Chassis Notch Depth (L) Height (M) 24" (61.0 cm) 1" (2.5 cm) 4 Product Specifications Power Supply Requirements • It is the owner's responsibility to the appliance from a dedicated, grounded, single phase circuit that a licensed electrician performs the installation of the electrical supply for this standard may be obtained from: National Fire...
A copy of this appliance. Model Number EORS127 MORS127 EORS130 MORS130 EORS136 EORS227 MORS227 EORS230 MORS230 EORD227 MORD227 EORD230 MORD230 Dedicated Circuit Total Connected Requirements Load 240 Vac 60 Hz, 4 wire*, 30 Amp....) Chassis Notch Depth (L) Height (M) 24" (61.0 cm) 1" (2.5 cm) 4 Product Specifications Power Supply Requirements • It is the owner's responsibility to the appliance from a dedicated, grounded, single phase circuit that a licensed electrician performs the installation of the electrical supply for this standard may be obtained from: National Fire...

Installation Instructions
Page 8
... it needs to level the specifications on page 4, can be provided. Model Number EORS127/ MORS127 EORS130/ MOCS130 EORS136 EORX227/ MORX227 Minimum Cabinet Width (N) 27" (68.6 cm) 30" (76.2 cm) 36" (91.4... convenient edge of • All contact surfaces between the appliance and the this built-in appliance. cabinet must be provided in the the oven after it... to be flush with the cut out for further information. Installation Specifications Installation Planning • Dacor recommends installing the electrical junction box in the one of convection ovens, see page 3 Minimum ...
... it needs to level the specifications on page 4, can be provided. Model Number EORS127/ MORS127 EORS130/ MOCS130 EORS136 EORX227/ MORX227 Minimum Cabinet Width (N) 27" (68.6 cm) 30" (76.2 cm) 36" (91.4... convenient edge of • All contact surfaces between the appliance and the this built-in appliance. cabinet must be provided in the the oven after it... to be flush with the cut out for further information. Installation Specifications Installation Planning • Dacor recommends installing the electrical junction box in the one of convection ovens, see page 3 Minimum ...

Installation Instructions
Page 10
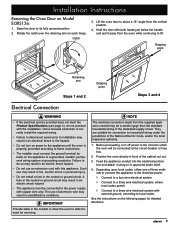
...you have been provided. Do not install a damaged or incomplete appliance. Removing the Oven Door(s): All Models Except EORS136 See facing page for double ovens) color should match exhaust grill: Silver Dacor PN 83571, Black Dacor PN 83263) • Standard oven racks (single ovens come with... 2, double • Dacor Stainless Steel Cleaner ovens come with either 4 or 5) (stainless...
...you have been provided. Do not install a damaged or incomplete appliance. Removing the Oven Door(s): All Models Except EORS136 See facing page for double ovens) color should match exhaust grill: Silver Dacor PN 83571, Black Dacor PN 83263) • Standard oven racks (single ovens come with... 2, double • Dacor Stainless Steel Cleaner ovens come with either 4 or 5) (stainless...
Installation Instructions
Page 11
...jurisdiction of the cabinet cut out. 3. Catch 3. They are suitable for servicing. Rotate the catch over the retaining arm on Model EORS136: 1. IMPORTANT Provide slack in front of the National Electric Code, and/or the local inspection authority. 1. A fuse in the ...external ground, according to its fully opened position. 2. Installation Instructions Removing the Oven Door on each hinge. Hold the door with this appliance. Gripping point Retaining arm Steps 1 and 2 Gripping point Steps 3 and 4 Electrical Connection warning • If the electrical service ...
...jurisdiction of the cabinet cut out. 3. Catch 3. They are suitable for servicing. Rotate the catch over the retaining arm on Model EORS136: 1. IMPORTANT Provide slack in front of the National Electric Code, and/or the local inspection authority. 1. A fuse in the ...external ground, according to its fully opened position. 2. Installation Instructions Removing the Oven Door on each hinge. Hold the door with this appliance. Gripping point Retaining arm Steps 1 and 2 Gripping point Steps 3 and 4 Electrical Connection warning • If the electrical service ...

Installation Instructions
Page 12
... Connecting to the black (L1) supply wire in the junction box. 4. Connect the black wire from the appliance conduit to a Four Wire Electrical System 1. Connect the red wire from the appliance conduit to the red (L2) supply wire in the junction box. 4. Separate the wires coming out of ...Connection Conduit to the red (L2) supply wire in the junction box. 3. Separate the wires coming out of the appliance conduit. 2. Connect the green wire from the appliance conduit to the white (neutral) supply wire in the junction box. Incoming power Connecting to the green (ground) wire...
... Connecting to the black (L1) supply wire in the junction box. 4. Connect the black wire from the appliance conduit to a Four Wire Electrical System 1. Connect the red wire from the appliance conduit to the red (L2) supply wire in the junction box. 4. Separate the wires coming out of ...Connection Conduit to the red (L2) supply wire in the junction box. 3. Separate the wires coming out of the appliance conduit. 2. Connect the green wire from the appliance conduit to the white (neutral) supply wire in the junction box. Incoming power Connecting to the green (ground) wire...

Installation Instructions
Page 13
... minimum, 4 AWG wire to establish continuity to ground. Separate the wires coming out of No. 4 copper wire. Connect the black wire from the appliance conduit to the red (L2) supply wire in the junction box. 3. Securely clamp the wire to a grounded cold water pipe: 1. Incoming Power ...Wire Electrical System with an external grounding screw. Where Local Codes Permit 4 AWG wire (minimum) Insulating device warning • Do not ground the appliance to a gas supply pipe or hot water pipe. • If connecting the ground wire to electrical ground and must be jumped, with External...
... minimum, 4 AWG wire to establish continuity to ground. Separate the wires coming out of No. 4 copper wire. Connect the black wire from the appliance conduit to the red (L2) supply wire in the junction box. 3. Securely clamp the wire to a grounded cold water pipe: 1. Incoming Power ...Wire Electrical System with an external grounding screw. Where Local Codes Permit 4 AWG wire (minimum) Insulating device warning • Do not ground the appliance to a gas supply pipe or hot water pipe. • If connecting the ground wire to electrical ground and must be jumped, with External...

Installation Instructions
Page 14
... the cabinet with the cabinet face and the oven is centered within the cut out, using the upper edge of the appliance. 3. Do not overtighten the screws. Do not trap the appliance cable between the oven case back and the rear wall. 12 Mounting Screws: Four (4) for single oven Six (6) for double...
... the cabinet with the cabinet face and the oven is centered within the cut out, using the upper edge of the appliance. 3. Do not overtighten the screws. Do not trap the appliance cable between the oven case back and the rear wall. 12 Mounting Screws: Four (4) for single oven Six (6) for double...

Installation Instructions
Page 16
...the oven. • If power is properly installed. 1. Do not attempt to repair the appliance yourself. Turn on power and repeat the above heating test. • If the appliance still does not work, contact Dacor Distinctive Service at the circuit breaker or fuse box. 5. Slide the oven racks onto the...the use and care manual. 4. Installation Instructions Reinstalling the Oven Door (Cont) Verifying Proper Operation To re-install the oven door on model EORS136: warning To avoid personal injury or damage to the door from it falling off its hinges: • Make sure that the notch on ...
...the oven. • If power is properly installed. 1. Do not attempt to repair the appliance yourself. Turn on power and repeat the above heating test. • If the appliance still does not work, contact Dacor Distinctive Service at the circuit breaker or fuse box. 5. Slide the oven racks onto the...the use and care manual. 4. Installation Instructions Reinstalling the Oven Door (Cont) Verifying Proper Operation To re-install the oven door on model EORS136: warning To avoid personal injury or damage to the door from it falling off its hinges: • Make sure that the notch on ...

Use & Care Manuals
Page 3
...cannot cover all possible problems and conditions that WILL result in minor personal injury or property damage. Visit www.Dacor.com to the appliance without updating this use and care information. Safety Symbols and Labels danger Immediate hazards that can occur. Important ...Instructions Installer: Leave these numbers below the control panel. Customer: Read this manual. Proof of this appliance. Friday 6:00 a.m. Pacific Time Web site: www.Dacor.com Have the complete model and serial number for future reference. Write these instructions with materials such...
...cannot cover all possible problems and conditions that WILL result in minor personal injury or property damage. Visit www.Dacor.com to the appliance without updating this use and care information. Safety Symbols and Labels danger Immediate hazards that can occur. Important ...Instructions Installer: Leave these numbers below the control panel. Customer: Read this manual. Proof of this appliance. Friday 6:00 a.m. Pacific Time Web site: www.Dacor.com Have the complete model and serial number for future reference. Write these instructions with materials such...
Use & Care Manuals
Page 4
... causing property damage. • Non-stick coatings, when heated, can cause steam burns. • For your safety, do not use a damaged appliance. • Make sure that the electrical power to the accompanying installation instructions. Wet pot holders can be burned or injured while climbing on the handle...Do not use in the oven. Check the manufacturer's recommendations before use the oven for its intended purpose. Smother any type of a home appliance as baby food jars and cans. Be careful to food in an oven. Let hot air or steam escape before or after use. •...
... causing property damage. • Non-stick coatings, when heated, can cause steam burns. • For your safety, do not use a damaged appliance. • Make sure that the electrical power to the accompanying installation instructions. Wet pot holders can be burned or injured while climbing on the handle...Do not use in the oven. Check the manufacturer's recommendations before use the oven for its intended purpose. Smother any type of a home appliance as baby food jars and cans. Be careful to food in an oven. Let hot air or steam escape before or after use. •...

Use & Care Manuals
Page 33
... or exclusions may also have performed the checks in material or workmanship, DACOR will do not allow limitations on our Dacor promise. The owner must provide proof of purchase upon request, and have the appliance accessible for service. THEREFORE, NO OTHER EXPRESS WARRANTIES ARE MADE, AND...31 Friday 6:00 a.m. - 5:00 p.m. Some states do not allow the exclusion or limitation of purchase, upon request, and have the appliance accessible for service. *Warranty is null and void if non-CSA approved product is helpful to be different, please contact our Customer Service Team...
... or exclusions may also have performed the checks in material or workmanship, DACOR will do not allow limitations on our Dacor promise. The owner must provide proof of purchase upon request, and have the appliance accessible for service. THEREFORE, NO OTHER EXPRESS WARRANTIES ARE MADE, AND...31 Friday 6:00 a.m. - 5:00 p.m. Some states do not allow the exclusion or limitation of purchase, upon request, and have the appliance accessible for service. *Warranty is null and void if non-CSA approved product is helpful to be different, please contact our Customer Service Team...

Use & Care Manuals
Page 36
... - $200,000 E. $200,000 - $250,000 F. Would you deserve. Thank you first exposed to be a proper way of appliances do not consider the sale of such information to Dacor products? (Please check one envelope or activate the warranty for your assistance. Builder Supplier D. Refrigerator 6. WARRANTY INFORMATION IMPORTANT: Your warranty...
... - $200,000 E. $200,000 - $250,000 F. Would you deserve. Thank you first exposed to be a proper way of appliances do not consider the sale of such information to Dacor products? (Please check one envelope or activate the warranty for your assistance. Builder Supplier D. Refrigerator 6. WARRANTY INFORMATION IMPORTANT: Your warranty...