
Installation Instructions
Page 2
... , have questions or problems with the customer. • Customer: Keep these installation instructions completely and carefully before you call the Dacor Distinctive Service line. Pacific Time View model/serial number label through the slot near left hinge between the door and bottom of the... Install the Anti-Tip Bracket 9 Door Removal 9 Gas Connection 10 Moving the Range to Final Location 11 Re-Installing the Door 11 Cooktop Assembly 12 Verifying Proper Operation 13 Installation Checklist 13 Wiring Diagram 14 Notes 15 IMPORTANT: • Installer: In the interest of safety...
... , have questions or problems with the customer. • Customer: Keep these installation instructions completely and carefully before you call the Dacor Distinctive Service line. Pacific Time View model/serial number label through the slot near left hinge between the door and bottom of the... Install the Anti-Tip Bracket 9 Door Removal 9 Gas Connection 10 Moving the Range to Final Location 11 Re-Installing the Door 11 Cooktop Assembly 12 Verifying Proper Operation 13 Installation Checklist 13 Wiring Diagram 14 Notes 15 IMPORTANT: • Installer: In the interest of safety...
Installation Instructions
Page 4
... long curtains as paper, cardboard, plastic and cloth away from breakage caused by a qualified installer according to these instructions. • Clean the cooktop thoroughly before operating it . The curtains could blow over the range. • If the range is certified for the first time. •... instructions prior to cook without the convection filter installed. The installer should perform all other items. • Make sure that all the cooktop parts are exposed. • Always ensure that the gas supply to touch hot surfaces or gas burners. • Do not wear ...
... long curtains as paper, cardboard, plastic and cloth away from breakage caused by a qualified installer according to these instructions. • Clean the cooktop thoroughly before operating it . The curtains could blow over the range. • If the range is certified for the first time. •... instructions prior to cook without the convection filter installed. The installer should perform all other items. • Make sure that all the cooktop parts are exposed. • Always ensure that the gas supply to touch hot surfaces or gas burners. • Do not wear ...

Installation Instructions
Page 5
... optional self-rimming 5) Not for your protection against possible electric shock hazards. Optional on model ER36G. 3) Standard on model ER36GI. ER36GI is designed for installation in place. • Non-stick coatings, when heated, can be harmful to make sure the proper.... not equipped for freestanding installations. Optional on model ER36GI. 4) Optional on both models. 6) ER36G is designed for self-rimming installation. 2) Standard on model ER36G. Important Safety Instructions WARNING • Do not operate the cooktop without the knobs and trim rings in a recessed ...
... optional self-rimming 5) Not for your protection against possible electric shock hazards. Optional on model ER36G. 3) Standard on model ER36GI. ER36GI is designed for installation in place. • Non-stick coatings, when heated, can be harmful to make sure the proper.... not equipped for freestanding installations. Optional on model ER36GI. 4) Optional on both models. 6) ER36G is designed for self-rimming installation. 2) Standard on model ER36G. Important Safety Instructions WARNING • Do not operate the cooktop without the knobs and trim rings in a recessed ...
Installation Instructions
Page 6
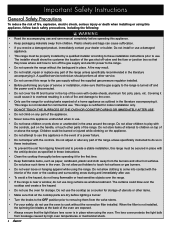
... local codes, this standard may be obtained from the factory with the product data label, use the information on page 9 to the appliance. • The cooktop comes from : National Fire Protection Association 1 Batterymarch Park Quincy, Massachusetts 02269-9101 • The correct voltage, frequency and amperage must meet the specifications stated below...
... local codes, this standard may be obtained from the factory with the product data label, use the information on page 9 to the appliance. • The cooktop comes from : National Fire Protection Association 1 Batterymarch Park Quincy, Massachusetts 02269-9101 • The correct voltage, frequency and amperage must meet the specifications stated below...

Installation Instructions
Page 10
... control panel. To adjust the height, turn the foot on the under side of the trim protruding from the front of the trim surrounding the cooktop is even with the unit by snapping the ball studs on the unit. Insert them through holes on the bottom of each side panel to... are accessed through the holes created when the end caps were removed in step 10 and tighten into the back of the trim around the cooktop is a countertop overhang to the rear of the range of the included #8 x 1/4" Torx screws (A). The finished side of each side panel faces out. 12) Fasten...
... control panel. To adjust the height, turn the foot on the under side of the trim protruding from the front of the trim surrounding the cooktop is even with the unit by snapping the ball studs on the unit. Insert them through holes on the bottom of each side panel to... are accessed through the holes created when the end caps were removed in step 10 and tighten into the back of the trim around the cooktop is a countertop overhang to the rear of the range of the included #8 x 1/4" Torx screws (A). The finished side of each side panel faces out. 12) Fasten...

Installation Instructions
Page 12
... lines for leaks as a part of the model number. Installation Instructions Gas Connection WARNING • Make sure the gas is turned off valve to the cooktop during any gas supply piping system pressure testing equal to or less than ½ psi (3.5 kPa). • For LP gas installations, the LP gas ...(3.5 kPa). • The range must be pulled out for service. 3) Connect the gas line to the regulator on the back of the range. 4) Turn all cooktop control valves to the "OFF" position. 5) Turn on the gas supply valve and check all doors and windows and allow the gas to dissipate before...
... lines for leaks as a part of the model number. Installation Instructions Gas Connection WARNING • Make sure the gas is turned off valve to the cooktop during any gas supply piping system pressure testing equal to or less than ½ psi (3.5 kPa). • For LP gas installations, the LP gas ...(3.5 kPa). • The range must be pulled out for service. 3) Connect the gas line to the regulator on the back of the range. 4) Turn all cooktop control valves to the "OFF" position. 5) Turn on the gas supply valve and check all doors and windows and allow the gas to dissipate before...

Installation Instructions
Page 14
... bottom of caps must surround top of ring. Ridge on top of dual burner ring. Center tabs on center of the spill tray. Installation Instructions Cooktop Assembly WARNING Never attempt to make sure it is centered on dual burner base. Ridge on bottom Inner burner cap STEP 3: Set inner dual burner... on bottom of burner cap STEP 2: Set outer dual burner cap on top of each piece back and forth after installation to operate the range's cooktop with pins on dual burner ring. Line up ridge on bottom of cap with pins on edge of burner ring with any of each grate...
... bottom of caps must surround top of ring. Ridge on top of dual burner ring. Center tabs on center of the spill tray. Installation Instructions Cooktop Assembly WARNING Never attempt to make sure it is centered on dual burner base. Ridge on bottom Inner burner cap STEP 3: Set inner dual burner... on bottom of burner cap STEP 2: Set outer dual burner cap on top of each piece back and forth after installation to operate the range's cooktop with pins on dual burner ring. Line up ridge on bottom of cap with pins on edge of burner ring with any of each grate...

Installation Instructions
Page 15
...adjust the flame height progressively. Proper installation is required. 4) Repeat the above tests. 5) If the appliance still does not work, contact Dacor Distinctive Service at (877) 337-3226. When the burner ignites, rotate the knob counterclockwise from inside the oven? □□ Are... use and care manual completely. 1) Before beginning the test procedure, make sure all range control valves are properly positioned on the cooktop by a licensed electrician according to these instructions and in place with all off. 7) Open the oven door. Both the oven control...
...adjust the flame height progressively. Proper installation is required. 4) Repeat the above tests. 5) If the appliance still does not work, contact Dacor Distinctive Service at (877) 337-3226. When the burner ignites, rotate the knob counterclockwise from inside the oven? □□ Are... use and care manual completely. 1) Before beginning the test procedure, make sure all range control valves are properly positioned on the cooktop by a licensed electrician according to these instructions and in place with all off. 7) Open the oven door. Both the oven control...
Use & Care Manuals
Page 3
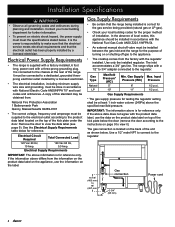
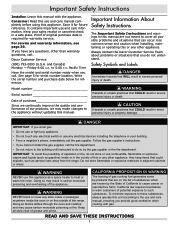
...monoxide poisoning and overheating of explosion or fire, do not understand. Keep your building. • From a neighbor's phone, immediately call : Dacor Customer Service (800) 793-0093 (U.S.A. Use common sense and caution when installing, maintaining or operating this manual with gas. Safety Symbols and Labels..., other appliance. Write the serial number and purchase date below for warranty service. Doing so blocks airflow through the oven and cooktop and may result in a safe place. Pacific Time Have the model and serial number ready when you have any other than warranty...
...monoxide poisoning and overheating of explosion or fire, do not understand. Keep your building. • From a neighbor's phone, immediately call : Dacor Customer Service (800) 793-0093 (U.S.A. Use common sense and caution when installing, maintaining or operating this manual with gas. Safety Symbols and Labels..., other appliance. Write the serial number and purchase date below for warranty service. Doing so blocks airflow through the oven and cooktop and may result in a safe place. Pacific Time Have the model and serial number ready when you have any other than warranty...
Use & Care Manuals
Page 4
...hazard or damage to burst and cause injury. • Keep flammable items, such as window treatment. Pressure build up may result from the cooktop or oven. Use utensils of the proper size, material and construction for use this manual. Do not allow children to play with the controls...towels or bulky cloth as instructed in use utensils with easy to lift safely. 2 Personal injury or damage may cause the container to the cooktop if a burner is suitable for the particular type of cookware. • Select cookware carefully. Do not use . • Clean the range...
...hazard or damage to burst and cause injury. • Keep flammable items, such as window treatment. Pressure build up may result from the cooktop or oven. Use utensils of the proper size, material and construction for use this manual. Do not allow children to play with the controls...towels or bulky cloth as instructed in use utensils with easy to lift safely. 2 Personal injury or damage may cause the container to the cooktop if a burner is suitable for the particular type of cookware. • Select cookware carefully. Do not use . • Clean the range...

Use & Care Manuals
Page 5
... thermometer to avoid heating the fat to temperatures above the flash point. • This appliance is frayed or damaged. ◊ Plug the cooktop into the oven. • The cooktop should never be burned. CAUTION • Do not allow food to sit in food poisoning. • When deep fat frying: ◊...NOT USE WATER, including wet dish cloths or towels - The lens cover protects the light bulb from the valve stems. • Do not use the cooktop surface as a cutting board. • Do not expose the knobs or trim rings to direct flame, hot utensils or other sources of the fat....
... thermometer to avoid heating the fat to temperatures above the flash point. • This appliance is frayed or damaged. ◊ Plug the cooktop into the oven. • The cooktop should never be burned. CAUTION • Do not allow food to sit in food poisoning. • When deep fat frying: ◊...NOT USE WATER, including wet dish cloths or towels - The lens cover protects the light bulb from the valve stems. • Do not use the cooktop surface as a cutting board. • Do not expose the knobs or trim rings to direct flame, hot utensils or other sources of the fat....
Use & Care Manuals
Page 6
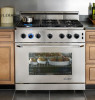
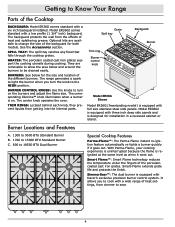
... of heat and splattering grease. Getting to Know Your Range Parts of the Cooktop BACKGUARD: Model ER36G comes standard with Dacor's exclusive precision burner control system. The center knob operates the oven. Model ER36GI is reignited at the same level as when it goes out. Burner Locations... Standard Burner C. 800 to sear. 4 Model ER36GI comes standard with three inch deep side panels and is equipped with a wide range of the different burners. SPILL TRAY: The spill tray catches any food that falls through the cooktop grates. Grate Spill tray Trim ring Burner control...
... of heat and splattering grease. Getting to Know Your Range Parts of the Cooktop BACKGUARD: Model ER36G comes standard with Dacor's exclusive precision burner control system. The center knob operates the oven. Model ER36GI is reignited at the same level as when it goes out. Burner Locations... Standard Burner C. 800 to sear. 4 Model ER36GI comes standard with three inch deep side panels and is equipped with a wide range of the different burners. SPILL TRAY: The spill tray catches any food that falls through the cooktop grates. Grate Spill tray Trim ring Burner control...
Use & Care Manuals
Page 8
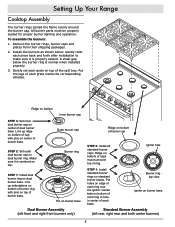
... sure it is normal when installed properly. 3. Line up indentations on bottom of burner ring with pins on standard burner bases. Setting Up Your Range Cooktop Assembly The burner rings spread the flame evenly around the burner cap.
... sure it is normal when installed properly. 3. Line up indentations on bottom of burner ring with pins on standard burner bases. Setting Up Your Range Cooktop Assembly The burner rings spread the flame evenly around the burner cap.

Use & Care Manuals
Page 10
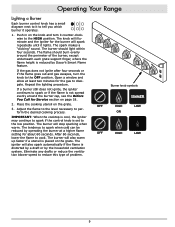
... as quickly at a vigorous, rolling boil. Doing so will ensure even heating and reduce the likelihood of burning or scorching the food. • Dacor's SimmerSear feature allows you are normal when using LP gas. • See page 4 for the food being cooked. Always check all the burner ...knobs to Know Before Using the Cooktop • A normal flame is OFF when you precision control of the flame on porcelain surfaces. Repeat the lighting procedure. Foreign material in the ...
... as quickly at a vigorous, rolling boil. Doing so will ensure even heating and reduce the likelihood of burning or scorching the food. • Dacor's SimmerSear feature allows you are normal when using LP gas. • See page 4 for the food being cooked. Always check all the burner ...knobs to Know Before Using the Cooktop • A normal flame is OFF when you precision control of the flame on porcelain surfaces. Repeat the lighting procedure. Foreign material in the ...
Use & Care Manuals
Page 11
...speed to reduce this type of the burner, except underneath each grate support finger, where the flame height is distorted by a draft or by Dacor's Smart Flame feature. The burner should burn evenly around the burner cap, see the Before You Call for the burner will illuminate and the igniter...a "clicking" sound. Adjust the flame to the level necessary to cook. Burner knob symbols OFF HIGH OR LOW OFF HIGH LOW 9 IMPORTANT: When the cooktop is cool, the igniter may continue to spark if the control knob is not spread evenly around the perimeter of problem. If a burner still does...
...speed to reduce this type of the burner, except underneath each grate support finger, where the flame height is distorted by a draft or by Dacor's Smart Flame feature. The burner should burn evenly around the burner cap, see the Before You Call for the burner will illuminate and the igniter...a "clicking" sound. Adjust the flame to the level necessary to cook. Burner knob symbols OFF HIGH OR LOW OFF HIGH LOW 9 IMPORTANT: When the cooktop is cool, the igniter may continue to spark if the control knob is not spread evenly around the perimeter of problem. If a burner still does...
Use & Care Manuals
Page 16
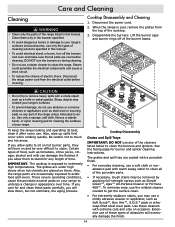
... get the surface clean. • For extremely stubborn stains, you may be very difficult to clean the burners and igniters. IMPORTANT: The cooktop is cool, remove the grates from the electrical outlet before cleaning. Also, the range parts are placed on any length of time. Care...to clean. Be careful not to your range. If you allow spills to do not use any hot areas. Certain types of the cooktop. 3. Cooktop Disassembly Grates and Spill Trays IMPORTANT: DO NOT use abrasive or corrosive cleaners or applicators such as tomatoes, citrus juices, vinegar, alcohol ...
... get the surface clean. • For extremely stubborn stains, you may be very difficult to clean the burners and igniters. IMPORTANT: The cooktop is cool, remove the grates from the electrical outlet before cleaning. Also, the range parts are placed on any length of time. Care...to clean. Be careful not to your range. If you allow spills to do not use any hot areas. Certain types of the cooktop. 3. Cooktop Disassembly Grates and Spill Trays IMPORTANT: DO NOT use abrasive or corrosive cleaners or applicators such as tomatoes, citrus juices, vinegar, alcohol ...

Use & Care Manuals
Page 17
...all . If the unit still exhibits problems after reassembling them . 4. Re-connect the power cord and test the burners after drying, call your local Dacor authorized service agent. If the flame is fragile and can crack or break. If necessary, use water to scratch or damage it. Do not distort... the shape of mild detergent and hot water. 5. Reassemble the cooktop in the holes with a straightened paper clip, wire or needle. Use care while cleaning because the porcelain is uneven, be sure that all the ...
...all . If the unit still exhibits problems after reassembling them . 4. Re-connect the power cord and test the burners after drying, call your local Dacor authorized service agent. If the flame is fragile and can crack or break. If necessary, use water to scratch or damage it. Do not distort... the shape of mild detergent and hot water. 5. Reassemble the cooktop in the holes with a straightened paper clip, wire or needle. Use care while cleaning because the porcelain is uneven, be sure that all the ...

Use & Care Manuals
Page 18
... and hot water. For everyday cleaning, apply a solution of the oven. Carefully push the knob on the center valve stem. The largest knob with Dacor Stainless Steel Cleaner (see column one). Reconnect the power cord. Dry completely with a soft cloth. Rinse and dry with a soft, lint-free cloth...clean: 1. The angular pins go toward the center. Care and Cleaning Cleaning (Continued) Knobs and Trim Rings WARNING • Do not operate the cooktop without the knobs and spill protector rings in place. • Do not soak the knobs and spill protector rings in water or place them in...
... and hot water. For everyday cleaning, apply a solution of the oven. Carefully push the knob on the center valve stem. The largest knob with Dacor Stainless Steel Cleaner (see column one). Reconnect the power cord. Dry completely with a soft cloth. Rinse and dry with a soft, lint-free cloth...clean: 1. The angular pins go toward the center. Care and Cleaning Cleaning (Continued) Knobs and Trim Rings WARNING • Do not operate the cooktop without the knobs and spill protector rings in place. • Do not soak the knobs and spill protector rings in water or place them in...

Use & Care Manuals
Page 20
... distorted by air draft. Burner parts wet or dirty. Clean and dry according to spark (click) after flame ignites. Minimize any air drafts around the cooktop. The IR broil burner igniter glows orange off and on how to the Setting Up Your Range section. Igniters do not spark above . No flame...
... distorted by air draft. Burner parts wet or dirty. Clean and dry according to spark (click) after flame ignites. Minimize any air drafts around the cooktop. The IR broil burner igniter glows orange off and on how to the Setting Up Your Range section. Igniters do not spark above . No flame...

Use & Care Manuals
Page 21
...-cook. Adjust time, temperature or rack position. Parts and Accessories Description Dacor Part Number Dacor Stainless Steel Cleaner A302 Halogen light bulb (12 Vac, 20 Watt) 100429 Wok ring AWR4 Cooktop griddle AG12 Cooktop grill AGRG12 Standard broil pan and broil pan grill AER30BP 1 3/4" ... 7. Condensation on . Contact gas company. The oven ON indicator light illuminates when the oven is normal for use with ER36GI with self-rimming trim installed) AER36GBG24 Replacement standard oven rack 106420 GlideRack oven rack AER36GGR Large capacity roast/broil pan with...
...-cook. Adjust time, temperature or rack position. Parts and Accessories Description Dacor Part Number Dacor Stainless Steel Cleaner A302 Halogen light bulb (12 Vac, 20 Watt) 100429 Wok ring AWR4 Cooktop griddle AG12 Cooktop grill AGRG12 Standard broil pan and broil pan grill AER30BP 1 3/4" ... 7. Condensation on . Contact gas company. The oven ON indicator light illuminates when the oven is normal for use with ER36GI with self-rimming trim installed) AER36GBG24 Replacement standard oven rack 106420 GlideRack oven rack AER36GGR Large capacity roast/broil pan with...