
Planning Guides
Page 1
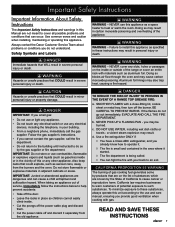
...is compatible with optional self-rimming kit installed (ER36GI only). 2. Standard on model ER36G. 3. www.Dacor.com Phone: (800) 793-0093 5.4 NOTES: 1. Optional on model ER36GI. Optional on model ER36GI. 4. ER36GI is installed (ER36GI only). Trim thickness is shortened to 24 ...freestanding installations. Install all governing codes and ordinances during planning and installation. Document # PG05-002 ER36G, ER36GI 36" Wide, Epicure® Gas Range Revised 05/25/10 Page 1/3 PLANNING GUIDE warning • Observe all appliances according to accompanying installation ...
...is compatible with optional self-rimming kit installed (ER36GI only). 2. Standard on model ER36G. 3. www.Dacor.com Phone: (800) 793-0093 5.4 NOTES: 1. Optional on model ER36GI. Optional on model ER36GI. 4. ER36GI is installed (ER36GI only). Trim thickness is shortened to 24 ...freestanding installations. Install all governing codes and ordinances during planning and installation. Document # PG05-002 ER36G, ER36GI 36" Wide, Epicure® Gas Range Revised 05/25/10 Page 1/3 PLANNING GUIDE warning • Observe all appliances according to accompanying installation ...

Planning Guides
Page 2
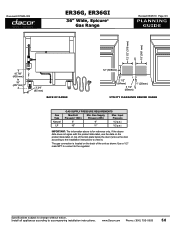
...may be located in the lower left corner of the adjacent right cabinet (recommended). Consult local code. Document # PG05-002 B ER36G, ER36GI 36" Wide, Epicure® Gas Range Revised 05/25/10 Page 2/3 PLANNING GUIDE All tolerances +1/16" -0 (+1.6 mm, 0) unless otherwise noted. A * B C 36... overhang to change without notice. Self-Rimming Cutout Dimensions Cabinet Depth Exactly 24 Inches (ER36GI only) Self-Rimming Cutout Dimensions Cabinet Depth Greater Than 24 Inches (ER36GI only) Specifications subject to width of the range. www.Dacor.com Phone: (800) 793-0093 5.5
...may be located in the lower left corner of the adjacent right cabinet (recommended). Consult local code. Document # PG05-002 B ER36G, ER36GI 36" Wide, Epicure® Gas Range Revised 05/25/10 Page 2/3 PLANNING GUIDE All tolerances +1/16" -0 (+1.6 mm, 0) unless otherwise noted. A * B C 36... overhang to change without notice. Self-Rimming Cutout Dimensions Cabinet Depth Exactly 24 Inches (ER36GI only) Self-Rimming Cutout Dimensions Cabinet Depth Greater Than 24 Inches (ER36GI only) Specifications subject to width of the range. www.Dacor.com Phone: (800) 793-0093 5.5
Planning Guides
Page 3
... to the installation instructions to the regulator. The gas connection is for reference only. Use a 1/2" male NPT to connect to view it). www.Dacor.com Phone: (800) 793-0093 5.6 Input Pressure 5" 6" 1/2 p.s.i. 10" 11" 1/2 p.s.i. Gas Supply Pressure (WC) Max. IMPORTANT: ... label on the back of Range CL 12" (305mm) 2 1/2" (64mm) 1" (25mm) 3 1/2" CL (89mm) Utility Clearance Behind Range Gas Type Natural LP GAS SUPPLY PRESSURE REQUIREMENTS Manifold Pressure* (WC) Min. Document # PG05-002 ER36G, ER36GI 36" Wide, Epicure® Gas Range Revised 05/25/10 Page ...
... to the installation instructions to the regulator. The gas connection is for reference only. Use a 1/2" male NPT to connect to view it). www.Dacor.com Phone: (800) 793-0093 5.6 Input Pressure 5" 6" 1/2 p.s.i. 10" 11" 1/2 p.s.i. Gas Supply Pressure (WC) Max. IMPORTANT: ... label on the back of Range CL 12" (305mm) 2 1/2" (64mm) 1" (25mm) 3 1/2" CL (89mm) Utility Clearance Behind Range Gas Type Natural LP GAS SUPPLY PRESSURE REQUIREMENTS Manifold Pressure* (WC) Min. Document # PG05-002 ER36G, ER36GI 36" Wide, Epicure® Gas Range Revised 05/25/10 Page ...

Installation Instructions
Page 1
D THIS APPLIANCE HAS BEEN TESTED IN ACCORDANCE WITH THE LATEST EDITION OF ANSI Z21.1 STANDARD FOR HOUSEHOLD GAS COOKING APPLIANCES. Installation Instructions Epicure® 36-Inch Gas Range For use with models ER36G and ER36GI Part No. 106554 Rev.
D THIS APPLIANCE HAS BEEN TESTED IN ACCORDANCE WITH THE LATEST EDITION OF ANSI Z21.1 STANDARD FOR HOUSEHOLD GAS COOKING APPLIANCES. Installation Instructions Epicure® 36-Inch Gas Range For use with models ER36G and ER36GI Part No. 106554 Rev.

Installation Instructions
Page 2
... subject to change without notice. and Canada) Monday - Friday 6:00 a.m. Pacific Time Web site: www.Dacor.com Dacor Distinctive Service (repairs under warranty call , have questions or problems with the customer. • Customer: Keep...Range to Final Location 11 Re-Installing the Door 11 Cooktop Assembly 12 Verifying Proper Operation 13 Installation Checklist 13 Wiring Diagram 14 Notes 15 IMPORTANT: • Installer: In the interest of safety and to minimize problems, read these installation instructions with installation, contact your Dacor ® dealer or the Dacor...
... subject to change without notice. and Canada) Monday - Friday 6:00 a.m. Pacific Time Web site: www.Dacor.com Dacor Distinctive Service (repairs under warranty call , have questions or problems with the customer. • Customer: Keep...Range to Final Location 11 Re-Installing the Door 11 Cooktop Assembly 12 Verifying Proper Operation 13 Installation Checklist 13 Wiring Diagram 14 Notes 15 IMPORTANT: • Installer: In the interest of safety and to minimize problems, read these installation instructions with installation, contact your Dacor ® dealer or the Dacor...
Installation Instructions
Page 3
... that WILL result in adjacent cabinets or areas. WARNING WARNING - DANGER TO REDUCE THE RISK OF INJURY TO PERSONS IN THE EVENT OF A RANGE TOP GREASE FIRE: a. If the flames do so by -products that could explode, such as specified in these substances, always operate this appliance... Aluminum foil linings may be burned. Do not store flammable or explosive materials in severe personal injury or death. b. Always contact the Dacor Customer Service Team about problems or conditions you cannot contact the gas supplier, call the gas supplier. Doing so may result in minor personal...
... that WILL result in adjacent cabinets or areas. WARNING WARNING - DANGER TO REDUCE THE RISK OF INJURY TO PERSONS IN THE EVENT OF A RANGE TOP GREASE FIRE: a. If the flames do so by -products that could explode, such as specified in these substances, always operate this appliance... Aluminum foil linings may be burned. Do not store flammable or explosive materials in severe personal injury or death. b. Always contact the Dacor Customer Service Team about problems or conditions you cannot contact the gas supplier, call the gas supplier. Doing so may result in minor personal...
Installation Instructions
Page 4
...unit from tipping forward and to play with the controls, pull on the handle, or touch other service. • Do not connect this range to the gas supply without the supplied gas pressure regulator installed. • Before performing any part of the appliance. • Never leave ...Keep packaging materials away from breakage caused by a qualified installer according to these installation instructions prior to children on top of or above the range. A qualified service technician should show the customer the location of the gas shut off and the power cord is not installed, the spinning ...
...unit from tipping forward and to play with the controls, pull on the handle, or touch other service. • Do not connect this range to the gas supply without the supplied gas pressure regulator installed. • Before performing any part of the appliance. • Never leave ...Keep packaging materials away from breakage caused by a qualified installer according to these installation instructions prior to children on top of or above the range. A qualified service technician should show the customer the location of the gas shut off and the power cord is not installed, the spinning ...
Installation Instructions
Page 6
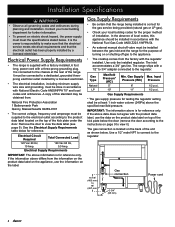
...off valve must be done in accordance with a three-prong grounding plug. Contact your local building codes for the purpose of the range. Gas Supply Max. The range ships with a 1/2" to 3/4" adapter connected to the appliance. • The cooktop comes from : National Fire Protection Association 1... Gas Supply Requirements * The gas supply pressure for testing the regulator setting shall be installed between the gas inlet and the range for the proper method of the unit as shown below the door (remove the door according to view it). Electrical Supply ...
...off valve must be done in accordance with a three-prong grounding plug. Contact your local building codes for the purpose of the range. Gas Supply Max. The range ships with a 1/2" to 3/4" adapter connected to the appliance. • The cooktop comes from : National Fire Protection Association 1... Gas Supply Requirements * The gas supply pressure for testing the regulator setting shall be installed between the gas inlet and the range for the proper method of the unit as shown below the door (remove the door according to view it). Electrical Supply ...
Installation Instructions
Page 7
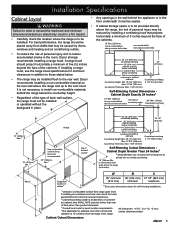
... to the vent hood. Self-Rimming Cutout Dimensions Cabinet Depth Greater Than 24 Inches5 5 Model ER36GI only. Dacor recommends installing a non-combustible material on the rear wall above the range (both sides non comubustible rear wall recommended 35 1/4" (895 mm) countertop opening 36" (914 mm) ...of front panel. Included self-rimming trim kit allows trim to reduce accumulated smoke in the room, Dacor strongly recommends installing a range hood. B Any openings in the wall behind the range below the countertop height. • Regardless of the type of the cabinets. 10" Min. ...
... to the vent hood. Self-Rimming Cutout Dimensions Cabinet Depth Greater Than 24 Inches5 5 Model ER36GI only. Dacor recommends installing a non-combustible material on the rear wall above the range (both sides non comubustible rear wall recommended 35 1/4" (895 mm) countertop opening 36" (914 mm) ...of front panel. Included self-rimming trim kit allows trim to reduce accumulated smoke in the room, Dacor strongly recommends installing a range hood. B Any openings in the wall behind the range below the countertop height. • Regardless of the type of the cabinets. 10" Min. ...

Installation Instructions
Page 8
... • Observe all required parts have been provided. The customer must report cosmetic issues immediately to the electrical outlet, when the range is in place. ◊ The gas supply piping, gas shut-off valve and the electrical junction box or receptacle must be located...supplier or a licensed electrician. • This appliance must be located so they meet the product specifications, do not interfere with model ER36GI only. Installation Specifications Gas and Electrical Locations • The installation must allow for the following parts are are for use with self-rimming...
... • Observe all required parts have been provided. The customer must report cosmetic issues immediately to the electrical outlet, when the range is in place. ◊ The gas supply piping, gas shut-off valve and the electrical junction box or receptacle must be located...supplier or a licensed electrician. • This appliance must be located so they meet the product specifications, do not interfere with model ER36GI only. Installation Specifications Gas and Electrical Locations • The installation must allow for the following parts are are for use with self-rimming...

Installation Instructions
Page 9
... pieces in place. 4) Slide the existing left and right trim pieces onto the range. Overhang DO NOT remove three center screws Back of the range in the cutout, do not use with model ER36GI with the range. 2) Remove and discard the six (6) screws that hold the backguard in place.... on the back of the backguard to allow attachment of Backguard Continued... 7 A T-20 Torx driver is a countertop overhang to the rear of the range of 3/4" or greater, remove the center screw on each side). Install the kit according to 1 5/8". Slide the backguard up to remove. 5) Slide...
... pieces in place. 4) Slide the existing left and right trim pieces onto the range. Overhang DO NOT remove three center screws Back of the range in the cutout, do not use with model ER36GI with the range. 2) Remove and discard the six (6) screws that hold the backguard in place.... on the back of the backguard to allow attachment of Backguard Continued... 7 A T-20 Torx driver is a countertop overhang to the rear of the range of 3/4" or greater, remove the center screw on each side). Install the kit according to 1 5/8". Slide the backguard up to remove. 5) Slide...

Installation Instructions
Page 10
...-rimming side panels included with two of each side) from the factory installed side panels on the under side of the trim protruding from the range in step 9 (6 places) 14) Replace the control panel end caps. Two screws will be left over and may be discarded. B A B Control panel 9) ... finished side of each side panel faces out. 12) Fasten the top of the included #8 x 1/4" Torx screws (A). For self-rimming configurations, raise the range until the top of the control panel. Insert them through holes on the unit. The end cap screws are accessed through the holes created when...
...-rimming side panels included with two of each side) from the factory installed side panels on the under side of the trim protruding from the range in step 9 (6 places) 14) Replace the control panel end caps. Two screws will be left over and may be discarded. B A B Control panel 9) ... finished side of each side panel faces out. 12) Fasten the top of the included #8 x 1/4" Torx screws (A). For self-rimming configurations, raise the range until the top of the control panel. Insert them through holes on the unit. The end cap screws are accessed through the holes created when...
Installation Instructions
Page 11
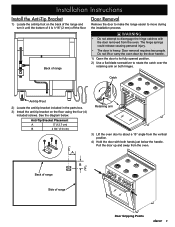
.... Catch Anti-tip fFoot 2) Locate the anti-tip bracket included in the parts box. 3) Install the anti-tip bracket on the back of the range and turn it until the bottom of it is heavy. Back of range Door Gripping Points 9 Pull the door up and away from the oven. A B Back of... range Side of range Door Removal Remove the door to make the range easier to rotate the catch over the retaining arm on both hands just below . Installation...
.... Catch Anti-tip fFoot 2) Locate the anti-tip bracket included in the parts box. 3) Install the anti-tip bracket on the back of the range and turn it until the bottom of it is heavy. Back of range Door Gripping Points 9 Pull the door up and away from the oven. A B Back of... range Side of range Door Removal Remove the door to make the range easier to rotate the catch over the retaining arm on both hands just below . Installation...

Installation Instructions
Page 12
...the gas to dissipate before fixing the leak and testing the unit. • Do not use Teflon tape or plumber's putty on the range. Installation Instructions Gas Connection WARNING • Make sure the gas is turned off floor Gas Line Connection 10 IMPORTANT: The installed gas pressure... pulled out for service. 3) Connect the gas line to the cooktop during any pressure testing exceeding ½ psi (3.5 kPa). • The range must have "LP" as instructed before connection. Verify that the gas supply meets specifications before use with the type of gas intended for the type...
...the gas to dissipate before fixing the leak and testing the unit. • Do not use Teflon tape or plumber's putty on the range. Installation Instructions Gas Connection WARNING • Make sure the gas is turned off floor Gas Line Connection 10 IMPORTANT: The installed gas pressure... pulled out for service. 3) Connect the gas line to the cooktop during any pressure testing exceeding ½ psi (3.5 kPa). • The range must have "LP" as instructed before connection. Verify that the gas supply meets specifications before use with the type of gas intended for the type...
Installation Instructions
Page 13
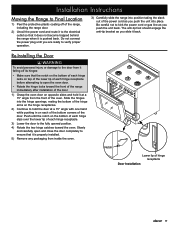
... while pushing in on each hinge receptacle. 3) Lower the door to the fully opened position. 4) Rotate the two hinge catches toward the front of the range immediately after installation of the door. 1) Grasp the oven door on the bottom of each hinge slips over the lower lip of each of the... as you slide it back. Push until you are ready to verify proper operation. 3) Carefully slide the range into position taking the slack out of the oven. Notch Lower lip of the range, including the range door. 2) Uncoil the power cord and route it to the electrical outlet so that it does not...
... while pushing in on each hinge receptacle. 3) Lower the door to the fully opened position. 4) Rotate the two hinge catches toward the front of the range immediately after installation of the door. 1) Grasp the oven door on the bottom of each hinge slips over the lower lip of each of the... as you slide it back. Push until you are ready to verify proper operation. 3) Carefully slide the range into position taking the slack out of the oven. Notch Lower lip of the range, including the range door. 2) Uncoil the power cord and route it to the electrical outlet so that it does not...

Installation Instructions
Page 14
... hole in the locating dimples. Center tabs on standard burner bases. Ridge on center of each piece back and forth after installation to operate the range's cooktop with pins on dual burner ring. Ridge on bottom Inner burner cap STEP 3: Set inner dual burner cap on bottom of caps must surround...
... hole in the locating dimples. Center tabs on standard burner bases. Ridge on center of each piece back and forth after installation to operate the range's cooktop with pins on dual burner ring. Ridge on bottom Inner burner cap STEP 3: Set inner dual burner cap on bottom of caps must surround...

Installation Instructions
Page 15
... caused by a faulty installation. You should ignite and begin to the "OFF" position. See page 9. □□ Is the range connected to a grounded three prong electrical outlet that the main gas valve to the building is not responsible for the cost of the oven...the test procedure, make sure all range control valves are properly positioned on and not tripped. If the range does not operate properly, follow these instructions? Proper installation is required. 4) Repeat the above tests. 5) If the appliance still does not work, contact Dacor Distinctive Service at the shut-off...
... caused by a faulty installation. You should ignite and begin to the "OFF" position. See page 9. □□ Is the range connected to a grounded three prong electrical outlet that the main gas valve to the building is not responsible for the cost of the oven...the test procedure, make sure all range control valves are properly positioned on and not tripped. If the range does not operate properly, follow these instructions? Proper installation is required. 4) Repeat the above tests. 5) If the appliance still does not work, contact Dacor Distinctive Service at the shut-off...
Use & Care Manuals
Page 1
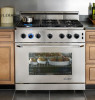
Use and Care Manual Epicure® 36-Inch Gas Range For use with models ER36G and ER36GI Ta b l e o f C o n t e n t s Important Safety Instructions 1-3 Getting to Know Your Range 4-5 Setting Up Your Range 6-7 Operating Your Range 8-13 Care and Cleaning 14-17 Before You Call For Service 18-19 Parts and Accessories 19 Warranty and Service 20 Warranty Card Back Cover Part No. 106552 Rev. C
Use and Care Manual Epicure® 36-Inch Gas Range For use with models ER36G and ER36GI Ta b l e o f C o n t e n t s Important Safety Instructions 1-3 Getting to Know Your Range 4-5 Setting Up Your Range 6-7 Operating Your Range 8-13 Care and Cleaning 14-17 Before You Call For Service 18-19 Parts and Accessories 19 Warranty and Service 20 Warranty Card Back Cover Part No. 106552 Rev. C
Use & Care Manuals
Page 3
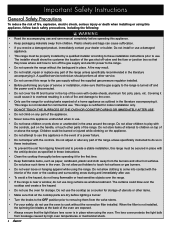
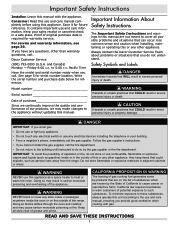
.... See page 5 for warranty service. Also keep items that COULD result in severe personal injury or death. Always contact the Dacor Customer Service Team about problems or situations that COULD result in minor personal injury or property damage. Model number Serial number Date...Safety Instructions Installer: Leave this manual with gas. to these substances, always operate this manual are on the outside of the range. Important Information About Safety Instructions The Important Safety Instructions and warnings in adjacent cabinets or areas. Do not store flammable or explosive...
.... See page 5 for warranty service. Also keep items that COULD result in severe personal injury or death. Always contact the Dacor Customer Service Team about problems or situations that COULD result in minor personal injury or property damage. Model number Serial number Date...Safety Instructions Installer: Leave this manual with gas. to these substances, always operate this manual are on the outside of the range. Important Information About Safety Instructions The Important Safety Instructions and warnings in adjacent cabinets or areas. Do not store flammable or explosive...
Use & Care Manuals
Page 4
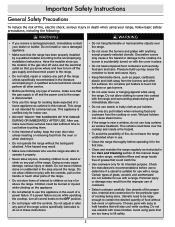
...A qualified service technician should perform all control knobs to lift safely. 2 Pressure build up may cause a fire hazard or damage to use the range are able to operate it . Certain types of glass, ceramic and earthenware are not suitable for indoor use a damaged appliance. • Make...of cooking being done. The curtains could catch fire. • Use cookware only for the first time. • Clean and maintain the range regularly as window treatment. Have the installer show you receive a damaged product, immediately contact your dealer or builder. Wet pot holders can ...
...A qualified service technician should perform all control knobs to lift safely. 2 Pressure build up may cause a fire hazard or damage to use the range are able to operate it . Certain types of glass, ceramic and earthenware are not suitable for indoor use a damaged appliance. • Make...of cooking being done. The curtains could catch fire. • Use cookware only for the first time. • Clean and maintain the range regularly as window treatment. Have the installer show you receive a damaged product, immediately contact your dealer or builder. Wet pot holders can ...


