Planning Guides
Page 1
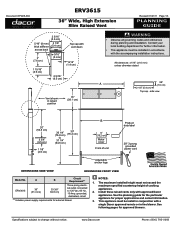
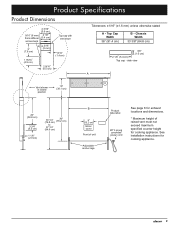
... tolerances: ±1/16" (±1.6 mm) unless otherwise stated A 3/8" (1.0 cm) 2 1/8" (5.4 cm) Top cap - Install these raised vents only with a single Dacor approved remote or in-line blower. www.Dacor.com Phone: (800) 7938-0.4093 side view 20" (50.8 cm) 3 3/4" (9.5 cm) 1 1/8" (2.9 cm) 30...shown in conjunction with approved Dacor appliances. The maximum installed height must be install in raised position 15" (38.1 cm) warning • Observe all governing codes and ordinances during planning and installation. Document # PG08-004 ERV3615 36" Wide, High Extension ...
... tolerances: ±1/16" (±1.6 mm) unless otherwise stated A 3/8" (1.0 cm) 2 1/8" (5.4 cm) Top cap - Install these raised vents only with a single Dacor approved remote or in-line blower. www.Dacor.com Phone: (800) 7938-0.4093 side view 20" (50.8 cm) 3 3/4" (9.5 cm) 1 1/8" (2.9 cm) 30...shown in conjunction with approved Dacor appliances. The maximum installed height must be install in raised position 15" (38.1 cm) warning • Observe all governing codes and ordinances during planning and installation. Document # PG08-004 ERV3615 36" Wide, High Extension ...
Planning Guides
Page 2
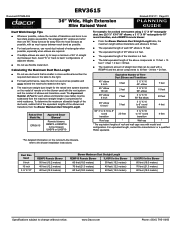
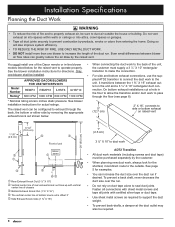
..., subtract all of the equivalent lengths of the elbows and transitions from the Blower Maximum Duct Straight Length. ERV3615 Approved Dacor Blowers* Remote blowers: REMP3 or REMP16 In-line blowers: ILHSF8 or ILHSF10 For example, for a raised ...;■ The maximum amount of adjacent elbows. ■■ Do not use flexible metal duct. Document # PG08-004 ERV3615 36" Wide, High Extension Slim Raised Vent Revised 01/21/11 Page 2/3 PLANNING GUIDE Duct Work Design Tips ■&#...; 3 ¼" X 10 to 8" round transition 25 feet 3 ¼" X 10 to the blower installation instructions.
..., subtract all of the equivalent lengths of the elbows and transitions from the Blower Maximum Duct Straight Length. ERV3615 Approved Dacor Blowers* Remote blowers: REMP3 or REMP16 In-line blowers: ILHSF8 or ILHSF10 For example, for a raised ...;■ The maximum amount of adjacent elbows. ■■ Do not use flexible metal duct. Document # PG08-004 ERV3615 36" Wide, High Extension Slim Raised Vent Revised 01/21/11 Page 2/3 PLANNING GUIDE Duct Work Design Tips ■&#...; 3 ¼" X 10 to 8" round transition 25 feet 3 ¼" X 10 to the blower installation instructions.
Installation Instructions
Page 1
Installation Instructions Downdraft Raised Vent Model ERV3615 Part No. 107000 Rev. A Use these downdraft raised vents only with approved Dacor ® appliances. See the installation instructions for the particular appliance model being installed to determine suitability.
Installation Instructions Downdraft Raised Vent Model ERV3615 Part No. 107000 Rev. A Use these downdraft raised vents only with approved Dacor ® appliances. See the installation instructions for the particular appliance model being installed to determine suitability.
Installation Instructions
Page 2
...... The product data label also specifies the power supply requirements. Pacific Time Web site: www.Dacor.com Dacor Distinctive Service (for repairs under warranty call , have questions or problems with installation, contact your Dacor ® dealer or the Dacor Customer Service Team. The model and serial number are printed on the product data label on...
...... The product data label also specifies the power supply requirements. Pacific Time Web site: www.Dacor.com Dacor Distinctive Service (for repairs under warranty call , have questions or problems with installation, contact your Dacor ® dealer or the Dacor Customer Service Team. The model and serial number are printed on the product data label on...
Installation Instructions
Page 3
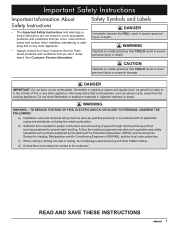
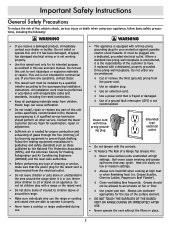
...c) When cutting or drilling into wall or ceiling, do not damage electrical wiring and other appliance. • Always contact the Dacor Customer Service Team about problems and conditions that COULD result in minor personal injury or property damage. Important Safety Instructions Important Information ... that you don't understand. TO REDUCE THE RISK OF FIRE, ELECTRIC SHOCK, OR INJURY TO PERSONS, OBSERVE THE FOLLOWING: a) Installation work and electrical wiring must always be done by the National Fire Protection Association (NFPA), and the American Society for proper combustion and...
...c) When cutting or drilling into wall or ceiling, do not damage electrical wiring and other appliance. • Always contact the Dacor Customer Service Team about problems and conditions that COULD result in minor personal injury or property damage. Important Safety Instructions Important Information ... that you don't understand. TO REDUCE THE RISK OF FIRE, ELECTRIC SHOCK, OR INJURY TO PERSONS, OBSERVE THE FOLLOWING: a) Installation work and electrical wiring must always be done by the National Fire Protection Association (NFPA), and the American Society for proper combustion and...

Installation Instructions
Page 4
... disconnect power. • Read the use and care manual. Contact the Dacor Customer Service Team for examination, repair or adjustment. • Keep all governing codes and ordinances during planning and installation. Do not allow foreign objects, such as cigarettes or napkins, to be... exhaust hazardous or explosive materials and vapors. • Use this appliance. • Do not tamper with these installation instructions, the Dacor cooking appliance installation instructions and the remote or in use only. Clean this unit unless specifically recommended in the use and care manual...
... disconnect power. • Read the use and care manual. Contact the Dacor Customer Service Team for examination, repair or adjustment. • Keep all governing codes and ordinances during planning and installation. Do not allow foreign objects, such as cigarettes or napkins, to be... exhaust hazardous or explosive materials and vapors. • Use this appliance. • Do not tamper with these installation instructions, the Dacor cooking appliance installation instructions and the remote or in use only. Clean this unit unless specifically recommended in the use and care manual...
Installation Instructions
Page 5
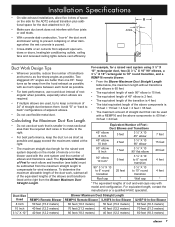
... power cord See page 6 for exhaust locations and dimensions. * Maximum height of raised vent must not exceed maximum specified counter height for cooking appliance. 3 See installation instructions for cooking appliance. Chassis Width 33 3/8" (84.8 cm) 2 1/8" (5.4 cm) 3/8" (1.0 cm) Top cap -
... power cord See page 6 for exhaust locations and dimensions. * Maximum height of raised vent must not exceed maximum specified counter height for cooking appliance. 3 See installation instructions for cooking appliance. Chassis Width 33 3/8" (84.8 cm) 2 1/8" (5.4 cm) 3/8" (1.0 cm) Top cap -

Installation Instructions
Page 6
...circuit breaker or time-delay fuse. *A copy of this standard may be sup- Planning the Installation General System Layout • The vent system consists of the raised vent itself and a single Dacor approved remote or in bottom Electrical Access Hole Locations 4 ing over a hot appliance, cabinet... storage space located directly above do so may be installed only by a licensed electrician. See Planning the Duct Work for...
...circuit breaker or time-delay fuse. *A copy of this standard may be sup- Planning the Installation General System Layout • The vent system consists of the raised vent itself and a single Dacor approved remote or in bottom Electrical Access Hole Locations 4 ing over a hot appliance, cabinet... storage space located directly above do so may be installed only by a licensed electrician. See Planning the Duct Work for...

Installation Instructions
Page 7
... Countertop overhang Vertical non-combustible surface rear wall Notches required for some rasied vent installations, see cooktop installation instructions See the cooktop installation instructions for bottom exhaust 3 ¼" X 10" to round transition Wiring/conduit from raised vent to in-line blower Duct work Floor Wall cap on outside ...
... Countertop overhang Vertical non-combustible surface rear wall Notches required for some rasied vent installations, see cooktop installation instructions See the cooktop installation instructions for bottom exhaust 3 ¼" X 10" to round transition Wiring/conduit from raised vent to in-line blower Duct work Floor Wall cap on outside ...
Installation Instructions
Page 8
...small differences between the 1 ⅝" X 16" exhaust outlet on the unit and a 3 ¼" X 10" rectangular duct connection. You must install one of the Dacor remote or in the floor to allow the transition and/or duct work materials (including screws and duct tape) must supply a 3 ¼" X... blower shall be installed. On bottom exhaust installations cut a hole in -line blower models listed below . 5" (12.7 cm) 2" X 16", connects to side or bottom exhaust on duct tape alone to seal duct joints. Model Number Rating* APPROVED DACOR BLOWERS FOR USE WITH ERV3615 REMP3 REMP16 ILHSF8 ...
...small differences between the 1 ⅝" X 16" exhaust outlet on the unit and a 3 ¼" X 10" rectangular duct connection. You must install one of the Dacor remote or in the floor to allow the transition and/or duct work materials (including screws and duct tape) must supply a 3 ¼" X... blower shall be installed. On bottom exhaust installations cut a hole in -line blower models listed below . 5" (12.7 cm) 2" X 16", connects to side or bottom exhaust on duct tape alone to seal duct joints. Model Number Rating* APPROVED DACOR BLOWERS FOR USE WITH ERV3615 REMP3 REMP16 ILHSF8 ...
Installation Instructions
Page 9
... interfere with a REMP16 and the above components is poured. • Cross-drafts or air currents from the Blower Maximum Duct Straight Length. Installation Specifications • On side exhaust installations, allow five inches of space on the model of remote or in-line blower used with the vent system and the number of...
... interfere with a REMP16 and the above components is poured. • Cross-drafts or air currents from the Blower Maximum Duct Straight Length. Installation Specifications • On side exhaust installations, allow five inches of space on the model of remote or in-line blower used with the vent system and the number of...

Installation Instructions
Page 10
... the metal cross overs and removing the insert. Back of unit ADT2 bottom installation Attach sealing foam ADT2 Transition Installation • For bottom installations cut an exhaust hole in the back of the cutout, separate from the cooking... transition to pass through the floor. Call a licensed electrician and have an electrical outlet installed that meets the specifications. • Install the vent only in noise and decrease performance. Installation Instructions Installation Preparation Verify Package Contents • Product literature • Anchoring legs • 2 wood...
... the metal cross overs and removing the insert. Back of unit ADT2 bottom installation Attach sealing foam ADT2 Transition Installation • For bottom installations cut an exhaust hole in the back of the cutout, separate from the cooking... transition to pass through the floor. Call a licensed electrician and have an electrical outlet installed that meets the specifications. • Install the vent only in noise and decrease performance. Installation Instructions Installation Preparation Verify Package Contents • Product literature • Anchoring legs • 2 wood...

Installation Instructions
Page 11
... the raised vent using the provided keps nuts and washers. 7. Adjust the anchoring leg height so that the end caps are gently resting on countertop Installing the Blower and Ducts 1. Secure the anchoring legs to round transition and 45° adjustable elbow REMP series remote blower Floor... 6. Install the remote or in-line blower according to the studs on studs Electrical access panel 3 ¼" X 10" to the cabinet floor with the electrical access ...
... the raised vent using the provided keps nuts and washers. 7. Adjust the anchoring leg height so that the end caps are gently resting on countertop Installing the Blower and Ducts 1. Secure the anchoring legs to round transition and 45° adjustable elbow REMP series remote blower Floor... 6. Install the remote or in-line blower according to the studs on studs Electrical access panel 3 ¼" X 10" to the cabinet floor with the electrical access ...

Installation Instructions
Page 12
Follow the wiring diagrams carefully to power plug. Wires to ensure a proper installation. BLACK WHITE Blower Output Power Input Electrical access panel Raised Vent Front View Ground GREEN Attach ground wire as shown. Do ... terminal block. Do not modify. Do not connect the raised vent power plug to the electrical outlet until installation is disconnected from hot surfaces. 1. Replace the electrical access panel. Installation Instructions Electrical Installation warning • ELECTRIC SHOCK HAZARD - Make sure all wiring away from the electrical outlet. 3. Run the...
Follow the wiring diagrams carefully to power plug. Wires to ensure a proper installation. BLACK WHITE Blower Output Power Input Electrical access panel Raised Vent Front View Ground GREEN Attach ground wire as shown. Do ... terminal block. Do not modify. Do not connect the raised vent power plug to the electrical outlet until installation is disconnected from hot surfaces. 1. Replace the electrical access panel. Installation Instructions Electrical Installation warning • ELECTRIC SHOCK HAZARD - Make sure all wiring away from the electrical outlet. 3. Run the...
Installation Instructions
Page 13
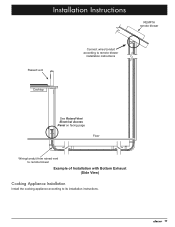
Installation Instructions REMP16 remote blower Raised vent Cooktop Connect wires/conduit according to remote blower installation instructions See Raised Vent Electrical Access Panel on facing page Floor Wiring/conduit from raised vent to remote blower Example of Installation with Bottom Exhaust (Side View) Cooking Appliance Installation Install the cooking appliance according to its installation instructions. 11
Installation Instructions REMP16 remote blower Raised vent Cooktop Connect wires/conduit according to remote blower installation instructions See Raised Vent Electrical Access Panel on facing page Floor Wiring/conduit from raised vent to remote blower Example of Installation with Bottom Exhaust (Side View) Cooking Appliance Installation Install the cooking appliance according to its installation instructions. 11

Installation Instructions
Page 14
...raised vent is not operational after performing the above checks, do not attempt to the raised vent power cord, route it yourself. Dacor is not responsible for obstructions interfering with duct tape? □□ Are both directions to lower the vent. 6. Is the ...meets the electrical specifications in permanent damage to the floor? If interference occurs, adjust the position of the unit. Installation Instructions Verifying Proper Operation Installation Checklist warning • Read the raised vent use and care manual completely before connecting it. 1. Are all of ...
...raised vent is not operational after performing the above checks, do not attempt to the raised vent power cord, route it yourself. Dacor is not responsible for obstructions interfering with duct tape? □□ Are both directions to lower the vent. 6. Is the ...meets the electrical specifications in permanent damage to the floor? If interference occurs, adjust the position of the unit. Installation Instructions Verifying Proper Operation Installation Checklist warning • Read the raised vent use and care manual completely before connecting it. 1. Are all of ...

Use & Care Manuals
Page 3
...THESE INSTRUCTIONS 1 Model Number Serial Number Date of Purchase Since Dacor continuously improves the quality and performance of our products, we may be sucked into the vent holes. Use common sense and caution when installing, maintaining or operating this and the cooking appliance use any ...manual can't cover all possible problems and conditions that you cannot contact the gas supplier, call the gas supplier. Important Safety Instructions Installer: Leave these instructions with a close-fitting lid, cookie sheet or metal tray, then turn off the burner. Do not allow...
...THESE INSTRUCTIONS 1 Model Number Serial Number Date of Purchase Since Dacor continuously improves the quality and performance of our products, we may be sucked into the vent holes. Use common sense and caution when installing, maintaining or operating this and the cooking appliance use any ...manual can't cover all possible problems and conditions that you cannot contact the gas supplier, call the gas supplier. Important Safety Instructions Installer: Leave these instructions with a close-fitting lid, cookie sheet or metal tray, then turn off the burner. Do not allow...
Use & Care Manuals
Page 4
... range or the raised vent. • Do not store items of interest to have any questions, contact Dacor. • This raised vent must be installed by the National Fire Protection Association (NFPA), and the American Society for Heating, Refrigeration and Air Conditioning Engineers.... Crepes Suzette, Cherries Jubilee, Peppercorn Beef Flambe'). ◊ Clean ventilating fans frequently. Plastic bags can cause suffocation. • Do not install, repair or replace any circumstances: ◊ Cut or remove the third (ground) prong from children. A qualified service technician should not be...
... range or the raised vent. • Do not store items of interest to have any questions, contact Dacor. • This raised vent must be installed by the National Fire Protection Association (NFPA), and the American Society for Heating, Refrigeration and Air Conditioning Engineers.... Crepes Suzette, Cherries Jubilee, Peppercorn Beef Flambe'). ◊ Clean ventilating fans frequently. Plastic bags can cause suffocation. • Do not install, repair or replace any circumstances: ◊ Cut or remove the third (ground) prong from children. A qualified service technician should not be...

Use & Care Manuals
Page 5
... up " position, the blower will take approximately 10 seconds to reach its uppermost position, where it is a normal occurrence with powerful vent systems, especially when installed with the movement of a flame, immediately turn on the rear burners whenever possible, as the draft is in the down cycle before starting to cook...
... up " position, the blower will take approximately 10 seconds to reach its uppermost position, where it is a normal occurrence with powerful vent systems, especially when installed with the movement of a flame, immediately turn on the rear burners whenever possible, as the draft is in the down cycle before starting to cook...
Use & Care Manuals
Page 6
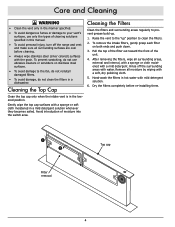
... types of cleaning solutions specified in the lowered position. Rinse off the range and vent and make sure all surrounding surfaces are cool before re-installing them. Top cap Filter removal 4 Hand-wash the filters in hot water with a sponge or soft cloth moistened in a mild detergent solution whenever...
... types of cleaning solutions specified in the lowered position. Rinse off the range and vent and make sure all surrounding surfaces are cool before re-installing them. Top cap Filter removal 4 Hand-wash the filters in hot water with a sponge or soft cloth moistened in a mild detergent solution whenever...
