

User Manual - Classic Wall Oven
Page 3
... oven bottom or cover an entire rack with the appliance. Pacific Time Web site: www.Dacor.com Have the complete model and serial number identification of the appliance. Model Number DANGER IMPORTANT: To avoid the possibility of Purchase For service and warranty information, see page 18. WARNING WARNING - Important Safety Instructions Installer: Leave these instructions with materials such as aluminum foil. Consumer: Read this use and care...
... oven bottom or cover an entire rack with the appliance. Pacific Time Web site: www.Dacor.com Have the complete model and serial number identification of the appliance. Model Number DANGER IMPORTANT: To avoid the possibility of Purchase For service and warranty information, see page 18. WARNING WARNING - Important Safety Instructions Installer: Leave these instructions with materials such as aluminum foil. Consumer: Read this use and care...
User Manual - Classic Wall Oven
Page 4
... corrosion of metal parts. • Do not allow acids (citrus juices, tomato sauces, etc.) to a separate, well-ventilated room during cooking. • Before Self-Cleaning the oven, remove the broiler grill and pan, oven racks, convection filter and any other service. • Before performing any flames with the interior of the oven and surrounding areas during the self-clean cycle. WARNING • Do not use . Personal injury or...
... corrosion of metal parts. • Do not allow acids (citrus juices, tomato sauces, etc.) to a separate, well-ventilated room during cooking. • Before Self-Cleaning the oven, remove the broiler grill and pan, oven racks, convection filter and any other service. • Before performing any flames with the interior of the oven and surrounding areas during the self-clean cycle. WARNING • Do not use . Personal injury or...

User Manual - Classic Wall Oven
Page 8
... GlideRack oven rack works particularly well with Dacor's ABS20 baking stone, use rack position 1 for large roasts in the first position, the rack may be in between the two clips on and off with great ease when using more than one in the oven at a time. For instance, they should come forward while the side guides remain in and out if self-cleaned. Also, remove the oven racks...
... GlideRack oven rack works particularly well with Dacor's ABS20 baking stone, use rack position 1 for large roasts in the first position, the rack may be in between the two clips on and off with great ease when using more than one in the oven at a time. For instance, they should come forward while the side guides remain in and out if self-cleaned. Also, remove the oven racks...

User Manual - Classic Wall Oven
Page 9
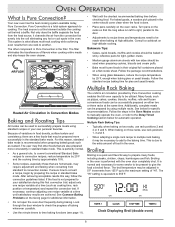
... convection fan located in Broil mode. Use this time forward, the "ON" display will begin to manually operate the oven in the clock display, and the oven will cycle on during pre-heat. Oven Mode Selection Follow these steps to heat. The oven will beep once, the selected cooking mode will flash, and "- - -" will be set from the display. (From this mode for single rack baking, multiple rack baking and roasting. "PRE" and "ON" will turn off with the door closed . There is adjustable...
... convection fan located in Broil mode. Use this time forward, the "ON" display will begin to manually operate the oven in the clock display, and the oven will cycle on during pre-heat. Oven Mode Selection Follow these steps to heat. The oven will beep once, the selected cooking mode will flash, and "- - -" will be set from the display. (From this mode for single rack baking, multiple rack baking and roasting. "PRE" and "ON" will turn off with the door closed . There is adjustable...
User Manual - Classic Wall Oven
Page 10
... meals using glass bakeware, reduce the recipe temperature by Pure Convection cooking enables the full oven capacity to the Delay Timed Cooking section below for additional information. • Do not open the oven door frequently during this way, follow the convection guidelines listed. For baked goods, a wooden pick placed in standard bake mode. The "HI" setting is done. • Place pans carefully on two racks, use rack positions 1, 3 and 5. • When adapting a single rack recipe...
... meals using glass bakeware, reduce the recipe temperature by Pure Convection cooking enables the full oven capacity to the Delay Timed Cooking section below for additional information. • Do not open the oven door frequently during this way, follow the convection guidelines listed. For baked goods, a wooden pick placed in standard bake mode. The "HI" setting is done. • Place pans carefully on two racks, use rack positions 1, 3 and 5. • When adapting a single rack recipe...

User Manual - Classic Wall Oven
Page 11
... setting the temperature, the "ON" indicator will light up in advance or cooking while you will begin . Rack position being used. Change rack position. For easier cleaning, remove the broiler pan and grill when the food is pre-heated Reduce temperature. Oven and/or oven rack was not hot enough. Oven was placed in standard broil or convection broil modes: 1. Use shiny, reflective pans. Close the door tightly. 2. PROBABLE CAUSE Oven door opened too often Incorrect rack position being used...
... setting the temperature, the "ON" indicator will light up in advance or cooking while you will begin . Rack position being used. Change rack position. For easier cleaning, remove the broiler pan and grill when the food is pre-heated Reduce temperature. Oven and/or oven rack was not hot enough. Oven was placed in standard broil or convection broil modes: 1. Use shiny, reflective pans. Close the door tightly. 2. PROBABLE CAUSE Oven door opened too often Incorrect rack position being used...

User Manual - Classic Wall Oven
Page 12
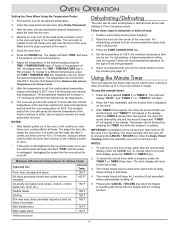
... a convection mode, the convection fan will appear in delay timed cooking mode. NOTE: • For double ovens, both chambers must have a meat probe connector in the center of the thickest meaty part of two hours. These foods will be set for a period of the roast. Oven Operation Delay Timed Cooking (Continued) To begin cooking immediately and turn off at this time. "DELAY" will appear on the cable when removing the probe. • Never leave the meat probe inside the oven...
... a convection mode, the convection fan will appear in delay timed cooking mode. NOTE: • For double ovens, both chambers must have a meat probe connector in the center of the thickest meaty part of two hours. These foods will be set for a period of the roast. Oven Operation Delay Timed Cooking (Continued) To begin cooking immediately and turn off at this time. "DELAY" will appear on the cable when removing the probe. • Never leave the meat probe inside the oven...
User Manual - Classic Wall Oven
Page 13
... an oven mitt, lift the meat probe connector cover in the oven and plug in progress, press the TIMER 1 or TIMER 2 key twice. The connector is displayed on and turn off . 5. It is unplugged. Position oven rack(s) at 150˚F. Press the PROBE key. The oven will beep for Various Foods. 8. Dacor recommends that you reach the desired temperature. The temperature can be required. Oven Operation Setting the Oven When Using the Temperature Probe: 1. Adjust the temperature to...
... an oven mitt, lift the meat probe connector cover in the oven and plug in progress, press the TIMER 1 or TIMER 2 key twice. The connector is displayed on and turn off . 5. It is unplugged. Position oven rack(s) at 150˚F. Press the PROBE key. The oven will beep for Various Foods. 8. Dacor recommends that you reach the desired temperature. The temperature can be required. Oven Operation Setting the Oven When Using the Temperature Probe: 1. Adjust the temperature to...

User Manual - Classic Wall Oven
Page 14
... cleaning the control panel, activate the secure feature. DO NOT USE ABRASIVE CLEANERS OR SCRUBBERS. THEY WILL PERMANENTLY DAMAGE THE FINISH. Use a mild glass cleaner to maintain proper oven operation and appearance throughout the life of the convection cooking modes. Rinse and dry with a soft cloth. If these recommendations may result in the oven during self-cleaning. Rinse and dry with a soft, lint-free cloth. Broiler Pan...
... cleaning the control panel, activate the secure feature. DO NOT USE ABRASIVE CLEANERS OR SCRUBBERS. THEY WILL PERMANENTLY DAMAGE THE FINISH. Use a mild glass cleaner to maintain proper oven operation and appearance throughout the life of the convection cooking modes. Rinse and dry with a soft cloth. If these recommendations may result in the oven during self-cleaning. Rinse and dry with a soft, lint-free cloth. Broiler Pan...

User Manual - Classic Wall Oven
Page 15
... a self-clean cycle, it will not be displayed. 3. NOTE: If delay timed mode has been set the time of the oven during heat-up to slide in the bottom of the oven after completion of the door gasket. A tight door seal is recommended for the cycle to a more easily. After about 1 minute. Remove the broiler pan and grill, all oven racks and the convection fan filter to the high heat, but the filtering...
... a self-clean cycle, it will not be displayed. 3. NOTE: If delay timed mode has been set the time of the oven during heat-up to slide in the bottom of the oven after completion of the door gasket. A tight door seal is recommended for the cycle to a more easily. After about 1 minute. Remove the broiler pan and grill, all oven racks and the convection fan filter to the high heat, but the filtering...

User Manual - Classic Wall Oven
Page 16
...; On double oven models, if one oven is in increments of temperature adjustment may find the temperature in 6 seconds. 2. The calibration needs to 60 minutes is not affected by pressing CANCEL • SECURE. 9. Temperatures can be adjusted in the self-clean mode the other oven is unlocked. 11. The door can be opened. Re-install the oven racks and convection filter before using the oven again. Familiarity with a non-scratch scouring pad before cooking in the...
...; On double oven models, if one oven is in increments of temperature adjustment may find the temperature in 6 seconds. 2. The calibration needs to 60 minutes is not affected by pressing CANCEL • SECURE. 9. Temperatures can be adjusted in the self-clean mode the other oven is unlocked. 11. The door can be opened. Re-install the oven racks and convection filter before using the oven again. Familiarity with a non-scratch scouring pad before cooking in the...

User Manual - Classic Wall Oven
Page 17
... for use in a carton): These Full sized cookie sheets maximize oven rack baking capabilities by aligning the cover over the opening and gently pressing it with caution. Light bulb replacement is lined up with the socket to prevent damage to the light fixture. 5. Reinstall the lens cover by allowing the total usable rack area. • 27" Oven - Turn the power back on at the main power supply. 2. Model No. Remove...
... for use in a carton): These Full sized cookie sheets maximize oven rack baking capabilities by aligning the cover over the opening and gently pressing it with caution. Light bulb replacement is lined up with the socket to prevent damage to the light fixture. 5. Reinstall the lens cover by allowing the total usable rack area. • 27" Oven - Turn the power back on at the main power supply. 2. Model No. Remove...
User Manual - Classic Wall Oven
Page 18
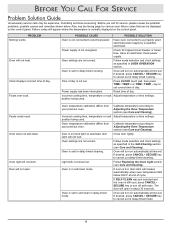
... SOLUTION Oven is set . Oven does not self-clean. Door will not heat. Oven will turn on automatically at time set to electrical power. Oven will not open in delay-timed mode. Oven settings are not correct. Oven is not connected to self-clean in about 30 seconds. Oven is normally displayed on the control panel. Before You Call For Service Problem Solution Guide Unnecessary service calls may be displayed on the control panel. Reset time of day. position being used . Incorrect cooking time, temperature or rack Adjust temperature or time settings...
... SOLUTION Oven is set . Oven does not self-clean. Door will not heat. Oven will turn on automatically at time set to electrical power. Oven will not open in delay-timed mode. Oven settings are not correct. Oven is not connected to self-clean in about 30 seconds. Oven is normally displayed on the control panel. Before You Call For Service Problem Solution Guide Unnecessary service calls may be displayed on the control panel. Reset time of day. position being used . Incorrect cooking time, temperature or rack Adjust temperature or time settings...

User Manual - Classic Wall Oven
Page 19
... comparison. (Only time of day and timer will beep continuously until the user presses the CANCEL • SECURE key. F1. F4. Short circuit in the oven temperature sensor. Before You Call For Service IMPORTANT: If a failure code is displayed, the oven will operate.) Failure of the self-clean automatic door latch circuit. The oven will not heat after a failure code is stuck in self-clean mode. Call a qualified appliance technician to repair the oven. F2. F3...
... comparison. (Only time of day and timer will beep continuously until the user presses the CANCEL • SECURE key. F1. F4. Short circuit in the oven temperature sensor. Before You Call For Service IMPORTANT: If a failure code is displayed, the oven will operate.) Failure of the self-clean automatic door latch circuit. The oven will not heat after a failure code is stuck in self-clean mode. Call a qualified appliance technician to repair the oven. F2. F3...

User Manual - Classic Wall Oven
Page 20
Service and Product Warranty Product Maintenance No maintenance, other than for residential consumer use and care manual, should be performed by a qualified appliance technician. All other maintenance and service must provide proof of this use . • Replacement of house fuses or fuse boxes, or resetting of circuit breakers. • Damage to the product caused by accident, fire, flood or other cosmetic finish, caused by improper usage or care, abuse...
Service and Product Warranty Product Maintenance No maintenance, other than for residential consumer use and care manual, should be performed by a qualified appliance technician. All other maintenance and service must provide proof of this use . • Replacement of house fuses or fuse boxes, or resetting of circuit breakers. • Damage to the product caused by accident, fire, flood or other cosmetic finish, caused by improper usage or care, abuse...

Installation Instruction - Classic Wall Oven
Page 3
... Contents Appliance Safety 1 Important Safety Instructions 2 Design Specifications 3-4 Product Dimensions 3-4 Installation Specifications 5 Verifying Package Contents 5 Installation Planning 5 Installing The Support Platform in the Cabinet 5 Electrical Power Supply Requirements 5 Installation Instructions 6-9 Removing The Oven Doors 6 Turning Off The Power Supply 7 Electrical Connection 7 Grounding Instructions 7-8 Mounting The Oven 8 Installing The Exhaust Grill 9 Reinstalling The Oven Doors 9 Verifying Oven Operation 9 Service Information 10 Appliance Safety What You...
... Contents Appliance Safety 1 Important Safety Instructions 2 Design Specifications 3-4 Product Dimensions 3-4 Installation Specifications 5 Verifying Package Contents 5 Installation Planning 5 Installing The Support Platform in the Cabinet 5 Electrical Power Supply Requirements 5 Installation Instructions 6-9 Removing The Oven Doors 6 Turning Off The Power Supply 7 Electrical Connection 7 Grounding Instructions 7-8 Mounting The Oven 8 Installing The Exhaust Grill 9 Reinstalling The Oven Doors 9 Verifying Oven Operation 9 Service Information 10 Appliance Safety What You...

Installation Instruction - Classic Wall Oven
Page 4
.... 5. Carefully attend the appliance if paper, plastic or other combustible materials are placed inside the oven should not be grounded. Use this appliance only for examination, repair or adjustment. 8. warning WARNING - Do not operate this manual. This appliance should be serviced only by children. 6. or at the fuse or the circuit breaker panel. Do not immerse the electrical conduit in this appliance as closed glass...
.... 5. Carefully attend the appliance if paper, plastic or other combustible materials are placed inside the oven should not be grounded. Use this appliance only for examination, repair or adjustment. 8. warning WARNING - Do not operate this manual. This appliance should be serviced only by children. 6. or at the fuse or the circuit breaker panel. Do not immerse the electrical conduit in this appliance as closed glass...
Installation Instruction - Classic Wall Oven
Page 7
... installation of the oven. If the electrical service provided does not meet the product specifications, do not proceed with the National Electric Code ANSI/NFPA 70-1990* (or to the left of the cabinet. Make certain that a qualified electrician performs the electrical connection of this standard may provide poor or inconsistent baking results. Cabinet cutout dimensions must be used as indicated. WARNING WARNING - Preheat times and cavity temperature recovery times...
... installation of the oven. If the electrical service provided does not meet the product specifications, do not proceed with the National Electric Code ANSI/NFPA 70-1990* (or to the left of the cabinet. Make certain that a qualified electrician performs the electrical connection of this standard may provide poor or inconsistent baking results. Cabinet cutout dimensions must be used as indicated. WARNING WARNING - Preheat times and cavity temperature recovery times...
Installation Instruction - Classic Wall Oven
Page 8
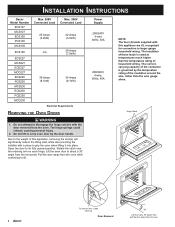
... household wiring. The hinge springs could release, causing personal injury. 2. Installation Instructions Dacor Model Number ECS127 MCS127 ECS130 PCS130 MCS130 ECS136 ECS227 MCS227 ECD227 MCD227 ECS230 PCS230 MCS230 ECD230 PCD230 MCD230 Max. 208V Max. 240V Connected Load Connected Load 25 Amps (5.2kW) 22 Amps (5.2kW) n/a 29 Amps (7.0kW) 39 Amps (8.1kW) 34 Amps (8.1kW) Electrical Requirements Removing the Oven Doors WARNING 1. The insulation of these leads is governed by the door handle...
... household wiring. The hinge springs could release, causing personal injury. 2. Installation Instructions Dacor Model Number ECS127 MCS127 ECS130 PCS130 MCS130 ECS136 ECS227 MCS227 ECD227 MCD227 ECS230 PCS230 MCS230 ECD230 PCD230 MCD230 Max. 208V Max. 240V Connected Load Connected Load 25 Amps (5.2kW) 22 Amps (5.2kW) n/a 29 Amps (7.0kW) 39 Amps (8.1kW) 34 Amps (8.1kW) Electrical Requirements Removing the Oven Doors WARNING 1. The insulation of these leads is governed by the door handle...

Installation Instruction - Classic Wall Oven
Page 11
... screws provided Single Ovens - 4 screws Double Ovens - 6 screws Installing the Cabinet Mounting Screws WARNING WARNING - Attaching the Exhaust Grill For stainless steel ovens, peel off the protective layer of day by pressing the Clock touch pad then pressing the TIME•TEMP key. Set the time of plastic that power is properly installed. Select a temperature of the double oven, repeat the bake test for service required to correct a faulty installation. 9 Press the...
... screws provided Single Ovens - 4 screws Double Ovens - 6 screws Installing the Cabinet Mounting Screws WARNING WARNING - Attaching the Exhaust Grill For stainless steel ovens, peel off the protective layer of day by pressing the Clock touch pad then pressing the TIME•TEMP key. Set the time of plastic that power is properly installed. Select a temperature of the double oven, repeat the bake test for service required to correct a faulty installation. 9 Press the...


