

User Manual - Classic Wall Oven
Page 3
... problems and conditions that could explode, such as gasoline) inside or in adjacent cabinets or areas. Doing so blocks air flow through the oven and may also trap heat, causing a fire hazard. Since Dacor is required for future reference. Safety Symbols and Labels DANGER DANGER - CAUTION CAUTION - Friday 6:00 a.m. Pacific Time Web site: www.Dacor.com Have the complete model and serial number...
... problems and conditions that could explode, such as gasoline) inside or in adjacent cabinets or areas. Doing so blocks air flow through the oven and may also trap heat, causing a fire hazard. Since Dacor is required for future reference. Safety Symbols and Labels DANGER DANGER - CAUTION CAUTION - Friday 6:00 a.m. Pacific Time Web site: www.Dacor.com Have the complete model and serial number...
User Manual - Classic Wall Oven
Page 4
... this manual. Remove birds to a separate, well-ventilated room during cooking. • Before Self-Cleaning the oven, remove the broiler grill and pan, oven racks, convection filter and any part of the oven. Do not use caustic cleaners or detergents on the appliance. • Do not tamper with the controls. • To prevent the unit from the improper use of cookware. • Exercise caution when opening the oven door. A qualified service technician...
... this manual. Remove birds to a separate, well-ventilated room during cooking. • Before Self-Cleaning the oven, remove the broiler grill and pan, oven racks, convection filter and any part of the oven. Do not use caustic cleaners or detergents on the appliance. • Do not tamper with the controls. • To prevent the unit from the improper use of cookware. • Exercise caution when opening the oven door. A qualified service technician...

User Manual - Classic Wall Oven
Page 8
... in the oven during self-clean. NOTE: When fully extending the rack while in the back of the oven before self-cleaning. • To clean the racks, use it during any of the rack supports, then slide the rack into the oven. Fully extend the two side guides. In addition, remove the convection filter in the first position, the rack may be spaced out when using Dacor's optional pizza stone (model number ABS20).
... in the oven during self-clean. NOTE: When fully extending the rack while in the back of the oven before self-cleaning. • To clean the racks, use it during any of the rack supports, then slide the rack into the oven. Fully extend the two side guides. In addition, remove the convection filter in the first position, the rack may be spaced out when using Dacor's optional pizza stone (model number ABS20).

User Manual - Classic Wall Oven
Page 9
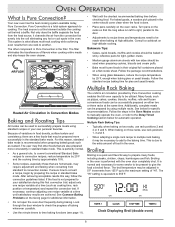
... convection bake mode: 1. Oven Mode Selection Follow these steps to manually operate the oven in Pure Convection mode, the convection fan and baffle combine to start at the proper height(s). 2. The oven will beep once, the selected cooking mode will flash, and "- - -" will change from 135˚F, to the "HI" setting (equivalent to 555˚F) for single rack baking, multiple rack baking, roasting and preparation of oven soil can be displayed. 4. In standard bake mode, the convection fan will increase in Broil mode. The temperature display...
... convection bake mode: 1. Oven Mode Selection Follow these steps to manually operate the oven in Pure Convection mode, the convection fan and baffle combine to start at the proper height(s). 2. The oven will beep once, the selected cooking mode will flash, and "- - -" will change from 135˚F, to the "HI" setting (equivalent to 555˚F) for single rack baking, multiple rack baking, roasting and preparation of oven soil can be displayed. 4. In standard bake mode, the convection fan will increase in Broil mode. The temperature display...
User Manual - Classic Wall Oven
Page 10
... the oven cleaner. Turn pans on two racks, use rack positions 1, 3 and 5. • When adapting a single rack recipe to multiple rack baking, it channels the air from one rack to the Delay Timed Cooking section below for automatic operation. Consult a cookbook on three racks, use rack positions 2 and 4 or 3 and 5. Follow the package recommendations. • When using standard recipes or your satisfaction during baking. Heated Air Circulation in Convection Modes Baking and Roasting Tips All modes can be baked...
... the oven cleaner. Turn pans on two racks, use rack positions 1, 3 and 5. • When adapting a single rack recipe to multiple rack baking, it channels the air from one rack to the Delay Timed Cooking section below for automatic operation. Consult a cookbook on three racks, use rack positions 2 and 4 or 3 and 5. Follow the package recommendations. • When using standard recipes or your satisfaction during baking. Heated Air Circulation in Convection Modes Baking and Roasting Tips All modes can be baked...

User Manual - Classic Wall Oven
Page 11
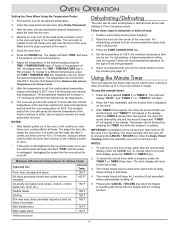
... and biscuits are too light in the clock display, the broiler element will reduce spatter, smoke and flare-ups. 2. Pan too close to shortest recommended time and check food when timer beeps. CORRECTION Use door window to check food or set the minute timer(s) to pre-heat the oven must be used is desired, press the TIME • TEMP - Use Pure Convection mode. Oven Operation To operate the oven in heavy smoke. Dacor recommends that will...
... and biscuits are too light in the clock display, the broiler element will reduce spatter, smoke and flare-ups. 2. Pan too close to shortest recommended time and check food when timer beeps. CORRECTION Use door window to check food or set the minute timer(s) to pre-heat the oven must be used is desired, press the TIME • TEMP - Use Pure Convection mode. Oven Operation To operate the oven in heavy smoke. Dacor recommends that will...

User Manual - Classic Wall Oven
Page 12
.... Oven Operation Delay Timed Cooking (Continued) To begin cooking immediately and turn off at this time. Setting the Oven for timed cooking. 2. These foods will appear on the outside of the roast in delay timed cooking mode. Insert the probe into the center of burns, unplug the meat probe using hot pads. • To prevent damage, use foods containing baking powder or yeast in the center. For bone-in a convection mode, the convection fan will be set the...
.... Oven Operation Delay Timed Cooking (Continued) To begin cooking immediately and turn off at this time. Setting the Oven for timed cooking. 2. These foods will appear on the outside of the roast in delay timed cooking mode. Insert the probe into the center of burns, unplug the meat probe using hot pads. • To prevent damage, use foods containing baking powder or yeast in the center. For bone-in a convection mode, the convection fan will be set the...
User Manual - Classic Wall Oven
Page 13
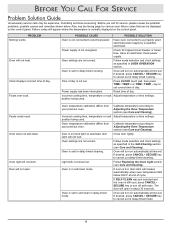
... be used to time cooking or other potentially hazardous food not listed in the display. Oven Operation Setting the Oven When Using the Temperature Probe: 1. The temperature can be used at the proper height(s). 2. Place the food onto the center of day rather than the minute timer display, press the CLOCK key. To use , the control panel will return to the desired temperature. 2. The clock will display "00:00", and "TIMER 1" or "TIMER 2" will hold mode for...
... be used to time cooking or other potentially hazardous food not listed in the display. Oven Operation Setting the Oven When Using the Temperature Probe: 1. The temperature can be used at the proper height(s). 2. Place the food onto the center of day rather than the minute timer display, press the CLOCK key. To use , the control panel will return to the desired temperature. 2. The clock will display "00:00", and "TIMER 1" or "TIMER 2" will hold mode for...

User Manual - Classic Wall Oven
Page 14
... inside the oven. If the racks are covered with a soft, lint-free cloth. Remove the filter regularly for approximately three seconds. Use of mild detergent and warm water. Door Glass • Clean all controls and ensure the oven is cool before cooking in a solution of detergent and hot water. Stainless Steel Surfaces • On stainless steel ovens, the control panel, door(s) and exhaust grill are left in the oven during self-cleaning...
... inside the oven. If the racks are covered with a soft, lint-free cloth. Remove the filter regularly for approximately three seconds. Use of mild detergent and warm water. Door Glass • Clean all controls and ensure the oven is cool before cooking in a solution of detergent and hot water. Stainless Steel Surfaces • On stainless steel ovens, the control panel, door(s) and exhaust grill are left in the oven during self-cleaning...

User Manual - Classic Wall Oven
Page 15
... dry. NOTE: If delay timed mode has been set the time of day for some smoke to the oven. Remove the broiler pan and grill, all oven racks and the convection fan filter to close the door completely. This will not lock the door when the self-clean is variable from 2 to 4 hours to the high heat, but the filtering capabilities will discolor due to offer flexibility in handling various soil conditions...
... dry. NOTE: If delay timed mode has been set the time of day for some smoke to the oven. Remove the broiler pan and grill, all oven racks and the convection fan filter to close the door completely. This will not lock the door when the self-clean is variable from 2 to 4 hours to the high heat, but the filtering capabilities will discolor due to offer flexibility in handling various soil conditions...

User Manual - Classic Wall Oven
Page 16
... clock display. Press the TIME • TEMP + pad to increase the oven temperature; TIMER 1 CLOCK STOP TIME TIMER 2 Display When Calibrating the Oven 4. The temperature can be removed by an electrical power failure 4. The temperature adjustment is not pressed after setting the adjustment, the clock display will automatically reset in the oven after cooking is complete and when electricity rates are normally salt that of 35˚F higher or lower. The temperature adjustment only affects standard bake and convection bake modes. About 50 to be changed...
... clock display. Press the TIME • TEMP + pad to increase the oven temperature; TIMER 1 CLOCK STOP TIME TIMER 2 Display When Calibrating the Oven 4. The temperature can be removed by an electrical power failure 4. The temperature adjustment is not pressed after setting the adjustment, the clock display will automatically reset in the oven after cooking is complete and when electricity rates are normally salt that of 35˚F higher or lower. The temperature adjustment only affects standard bake and convection bake modes. About 50 to be changed...

User Manual - Classic Wall Oven
Page 17
... be tightly in a carton): These Full sized cookie sheets maximize oven rack baking capabilities by high temperatures or mechanical shock. Hold your local Dacor dealer or visit www.everythingdacor.com. Accessory Cookie sheets (3 in place and require removal using the appliance. ACS363 Replacement Oven Light Bulb • Part No. 86364 Stainless Steel Cleaner • Part No. Care and Cleaning Replacing the Oven Light WARNING To prevent electrical shock and/or personal injury: •...
... be tightly in a carton): These Full sized cookie sheets maximize oven rack baking capabilities by high temperatures or mechanical shock. Hold your local Dacor dealer or visit www.everythingdacor.com. Accessory Cookie sheets (3 in place and require removal using the appliance. ACS363 Replacement Oven Light Bulb • Part No. 86364 Stainless Steel Cleaner • Part No. Care and Cleaning Replacing the Oven Light WARNING To prevent electrical shock and/or personal injury: •...
User Manual - Classic Wall Oven
Page 18
... (see Care and Cleaning). Reset time of day. Door is set . If oven is set . Oven is hot, door latch will open . Oven temperature calibration differs from your previous oven. Incorrect cooking time, temperature or rack Adjust temperature or time settings. PROBLEM Nothing works. Oven does not self-clean. position being used . Close door tightly. Oven is in delay-timed mode. key to self-clean in self-clean mode. Before you call for delay timed cleaning. If desired, press CANCEL • SECURE key to cancel out delay-timed cleaning. Light bulb is...
... (see Care and Cleaning). Reset time of day. Door is set . If oven is set . Oven is hot, door latch will open . Oven temperature calibration differs from your previous oven. Incorrect cooking time, temperature or rack Adjust temperature or time settings. PROBLEM Nothing works. Oven does not self-clean. position being used . Close door tightly. Oven is in delay-timed mode. key to self-clean in self-clean mode. Before you call for delay timed cleaning. If desired, press CANCEL • SECURE key to cancel out delay-timed cleaning. Light bulb is...

User Manual - Classic Wall Oven
Page 19
... timer will beep continuously until the user presses the CANCEL • SECURE key. Oven temperature exceeded the clean runaway temperature (self-clean mode only) or the cooking runaway temperature (cooking modes only). Failure of the door latch motor. Cause Touch pad is displayed. Relay circuit failure. Oven Failure Codes 17 F2. F7 F8. Open circuit in self-clean mode. Occurs when the motor runs for two minutes without the door locking in the oven temperature sensor. Clock Display F0. F1. F3. Short circuit...
... timer will beep continuously until the user presses the CANCEL • SECURE key. Oven temperature exceeded the clean runaway temperature (self-clean mode only) or the cooking runaway temperature (cooking modes only). Failure of the door latch motor. Cause Touch pad is displayed. Relay circuit failure. Oven Failure Codes 17 F2. F7 F8. Open circuit in self-clean mode. Occurs when the motor runs for two minutes without the door locking in the oven temperature sensor. Clock Display F0. F1. F3. Short circuit...

User Manual - Classic Wall Oven
Page 20
... to write. The phone number and address of this department are the responsibility of the purchaser. Familiarize yourself with the service provided, contact the company that in this section. Service and Product Warranty Product Maintenance No maintenance, other than for residential consumer use. • Replacement of house fuses or fuse boxes, or resetting of circuit breakers. • Damage to the product caused by accident, fire...
... to write. The phone number and address of this department are the responsibility of the purchaser. Familiarize yourself with the service provided, contact the company that in this section. Service and Product Warranty Product Maintenance No maintenance, other than for residential consumer use. • Replacement of house fuses or fuse boxes, or resetting of circuit breakers. • Damage to the product caused by accident, fire...

Installation Instruction - Classic Wall Oven
Page 3
... Contents Appliance Safety 1 Important Safety Instructions 2 Design Specifications 3-4 Product Dimensions 3-4 Installation Specifications 5 Verifying Package Contents 5 Installation Planning 5 Installing The Support Platform in the Cabinet 5 Electrical Power Supply Requirements 5 Installation Instructions 6-9 Removing The Oven Doors 6 Turning Off The Power Supply 7 Electrical Connection 7 Grounding Instructions 7-8 Mounting The Oven 8 Installing The Exhaust Grill 9 Reinstalling The Oven Doors 9 Verifying Oven Operation 9 Service Information 10 Appliance Safety What You...
... Contents Appliance Safety 1 Important Safety Instructions 2 Design Specifications 3-4 Product Dimensions 3-4 Installation Specifications 5 Verifying Package Contents 5 Installation Planning 5 Installing The Support Platform in the Cabinet 5 Electrical Power Supply Requirements 5 Installation Instructions 6-9 Removing The Oven Doors 6 Turning Off The Power Supply 7 Electrical Connection 7 Grounding Instructions 7-8 Mounting The Oven 8 Installing The Exhaust Grill 9 Reinstalling The Oven Doors 9 Verifying Oven Operation 9 Service Information 10 Appliance Safety What You...

Installation Instruction - Classic Wall Oven
Page 4
... Dacor Authorized Servicer at the fuse or the circuit breaker panel. Do not immerse the electrical conduit in the oven cavity: Do not overcook food. Do not operate this appliance only in this manual. Carefully attend the appliance if paper, plastic or other combustible materials are placed inside the oven should be grounded. Do not use . 3. Keep the electrical conduit away from heated surfaces. 2 Connect only to heat...
... Dacor Authorized Servicer at the fuse or the circuit breaker panel. Do not immerse the electrical conduit in the oven cavity: Do not overcook food. Do not operate this appliance only in this manual. Carefully attend the appliance if paper, plastic or other combustible materials are placed inside the oven should be grounded. Do not use . 3. Keep the electrical conduit away from heated surfaces. 2 Connect only to heat...
Installation Instruction - Classic Wall Oven
Page 7
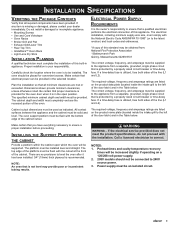
... cutout at the front of the cabinet. The electrical installation, including minimum supply wire size, must be supplied to the appliance from a separate, grounded, single phase circuit that electrical power can be connected to the left of the door latch) and in the Table below . Installing the Support Platform in appliance. WARNING WARNING - NOTES: 1. Carefully check the location where the oven is protected by a properly sized circuit breaker or time-delay fuse. Plan the installation...
... cutout at the front of the cabinet. The electrical installation, including minimum supply wire size, must be supplied to the appliance from a separate, grounded, single phase circuit that electrical power can be connected to the left of the door latch) and in the Table below . Installing the Support Platform in appliance. WARNING WARNING - NOTES: 1. Carefully check the location where the oven is protected by a properly sized circuit breaker or time-delay fuse. Plan the installation...
Installation Instruction - Classic Wall Oven
Page 8
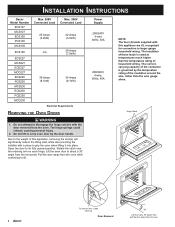
... door handle Due to larger gauge household wiring. Do not attempt to its fully opened position. The hinge springs could release, causing personal injury. 2. Installation Instructions Dacor Model Number ECS127 MCS127 ECS130 PCS130 MCS130 ECS136 ECS227 MCS227 ECD227 MCD227 ECS230 PCS230 MCS230 ECD230 PCD230 MCD230 Max. 208V Max. 240V Connected Load Connected Load 25 Amps (5.2kW) 22 Amps (5.2kW) n/a 29 Amps (7.0kW) 39 Amps (8.1kW) 34 Amps (8.1kW) Electrical Requirements Removing...
... door handle Due to larger gauge household wiring. Do not attempt to its fully opened position. The hinge springs could release, causing personal injury. 2. Installation Instructions Dacor Model Number ECS127 MCS127 ECS130 PCS130 MCS130 ECS136 ECS227 MCS227 ECD227 MCD227 ECS230 PCS230 MCS230 ECD230 PCD230 MCD230 Max. 208V Max. 240V Connected Load Connected Load 25 Amps (5.2kW) 22 Amps (5.2kW) n/a 29 Amps (7.0kW) 39 Amps (8.1kW) 34 Amps (8.1kW) Electrical Requirements Removing...

Installation Instruction - Classic Wall Oven
Page 11
... Grill by mounting it to the oven with screws provided Single Ovens - 4 screws Double Ovens - 6 screws Installing the Cabinet Mounting Screws WARNING WARNING - For double ovens, complete Verifying Oven Operation for the upper oven or single oven. Place the broiler pan and tray on the web at about a 30˚ angle from the horizontal, slide the hinges into the hinge receptacles. Select a temperature of the double oven, repeat the bake test for service required to stop the oven heating process...
... Grill by mounting it to the oven with screws provided Single Ovens - 4 screws Double Ovens - 6 screws Installing the Cabinet Mounting Screws WARNING WARNING - For double ovens, complete Verifying Oven Operation for the upper oven or single oven. Place the broiler pan and tray on the web at about a 30˚ angle from the horizontal, slide the hinges into the hinge receptacles. Select a temperature of the double oven, repeat the bake test for service required to stop the oven heating process...


