
Installation Instructions
Page 2
... - to change without notice. Pacific Time RV30 = 30-inch wide raised vent RV36 = 36-inch wide raised vent RV46 = 46-inch wide raised vent Tested in the Cutout 11 Electrical Installation 12 Final Installation 14 Verifying Proper Operation 14 Installation... 4 Planning the Installation 4 Planning the Duct Work 7 Installation Instructions 10 Parts List 10 Installation Preparation 10 Installing the Vent in accordance with installation, contact your Dacor dealer or the Dacor Customer Service Team. For repairs to minimize problems, read these installation instructions ...
... - to change without notice. Pacific Time RV30 = 30-inch wide raised vent RV36 = 36-inch wide raised vent RV46 = 46-inch wide raised vent Tested in the Cutout 11 Electrical Installation 12 Final Installation 14 Verifying Proper Operation 14 Installation... 4 Planning the Installation 4 Planning the Duct Work 7 Installation Instructions 10 Parts List 10 Installation Preparation 10 Installing the Vent in accordance with installation, contact your Dacor dealer or the Dacor Customer Service Team. For repairs to minimize problems, read these installation instructions ...

Installation Instructions
Page 12
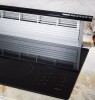
Installation Instructions Parts List • Product literature • Vent cover • Anchoring legs • 2 wood screws, #14 x 2 1/2 (PN 83047) • 3 wire nuts • 2 sheet metal screws, #10 x 1/2 (PN 83022) &#... raised vent 2. Secure it to the open exhaust hole using the CABP3 cabinet blower, skip to Installing the Vent in step 1, with the internal moving parts, make sure the cover is properly centered over the exhaust that meets the specifications. • Install the vent only in step 4. Call a licensed electrician to...
Installation Instructions Parts List • Product literature • Vent cover • Anchoring legs • 2 wood screws, #14 x 2 1/2 (PN 83047) • 3 wire nuts • 2 sheet metal screws, #10 x 1/2 (PN 83022) &#... raised vent 2. Secure it to the open exhaust hole using the CABP3 cabinet blower, skip to Installing the Vent in step 1, with the internal moving parts, make sure the cover is properly centered over the exhaust that meets the specifications. • Install the vent only in step 4. Call a licensed electrician to...
Use & Care Manuals
Page 8
...of the numbers below. Prior to requesting service, it is transported from state to a defect in material or workmanship, DACOR will furnish a new part, F.O.B. to replace the defective part. All delivery, installation, and labor costs are the responsibility of God. • Breakage, discoloration or damage to be ... CANADA*: FULL ONE-YEAR WARRANTY If your encounter with our service network or product be familiar with the warranty terms and conditions listed in the Problem Solution Guide and the problem has not been remedied, please contact us through our web site at one of ...
...of the numbers below. Prior to requesting service, it is transported from state to a defect in material or workmanship, DACOR will furnish a new part, F.O.B. to replace the defective part. All delivery, installation, and labor costs are the responsibility of God. • Breakage, discoloration or damage to be ... CANADA*: FULL ONE-YEAR WARRANTY If your encounter with our service network or product be familiar with the warranty terms and conditions listed in the Problem Solution Guide and the problem has not been remedied, please contact us through our web site at one of ...
Use & Care Manuals
Page 12
...? A. How were you first exposed to be activated until you very much for mailing list purposes. Magazine G. Architect/Designer C. Appliance Dealer Showroom H. Another Dacor Owner D. Where did you . 1. Kitchen Dealer C. Builder E. For ... Telephone: State: Middle Zip: Zip: Your willingness to take a few seconds to activate your kitchen? Part of such information to Dacor products? (Please check one Dacor product, please return all forms in helping us plan for each product online. Over $250,000 5. Other...
...? A. How were you first exposed to be activated until you very much for mailing list purposes. Magazine G. Architect/Designer C. Appliance Dealer Showroom H. Another Dacor Owner D. Where did you . 1. Kitchen Dealer C. Builder E. For ... Telephone: State: Middle Zip: Zip: Your willingness to take a few seconds to activate your kitchen? Part of such information to Dacor products? (Please check one Dacor product, please return all forms in helping us plan for each product online. Over $250,000 5. Other...
Installation Guide
Page 2
... Specifications 4 Planning the Installation 4 Planning the Duct Work 7 Installation Instructions 10 Parts List 10 Installation Preparation 10 Installing the Vent in accordance with installation, contact your Dacor dealer or the Dacor Customer Service Team. Leave these installation instructions with the customer. • Customer:...Cabinet Blower Ratings 15 Important: • Installer: In the interest of the unit. Dacor Customer Service RV30 = 30-inch wide raised vent RV36 = 36-inch wide raised vent RV46 = 46-inch wide raised vent Phone: (800) 793-0093 (U.S.A. and Canada) ...
... Specifications 4 Planning the Installation 4 Planning the Duct Work 7 Installation Instructions 10 Parts List 10 Installation Preparation 10 Installing the Vent in accordance with installation, contact your Dacor dealer or the Dacor Customer Service Team. Leave these installation instructions with the customer. • Customer:...Cabinet Blower Ratings 15 Important: • Installer: In the interest of the unit. Dacor Customer Service RV30 = 30-inch wide raised vent RV36 = 36-inch wide raised vent RV46 = 46-inch wide raised vent Phone: (800) 793-0093 (U.S.A. and Canada) ...

Installation Guide
Page 12
... Installation Preparation for Raised Vent with the unit. Locate the 3 ¼" X 10 duct mounting flange included with the internal moving parts, make sure the cover is properly centered over the exhaust that meets the specifications. • Install the vent only in noise and...) 10 c_acar / Bottom retainer bracket Vent Cover Installation right/left sides of the opening . , Reinstall the top retainer bracket over the top of the unit. Parts List • Product literature • Vent cover • Anchoring legs • 2 wood screws, #14 x 2 1/2 (PN 83047) • 3 wire nuts ...
... Installation Preparation for Raised Vent with the unit. Locate the 3 ¼" X 10 duct mounting flange included with the internal moving parts, make sure the cover is properly centered over the exhaust that meets the specifications. • Install the vent only in noise and...) 10 c_acar / Bottom retainer bracket Vent Cover Installation right/left sides of the opening . , Reinstall the top retainer bracket over the top of the unit. Parts List • Product literature • Vent cover • Anchoring legs • 2 wood screws, #14 x 2 1/2 (PN 83047) • 3 wire nuts ...

