Planning Guides
Page 1
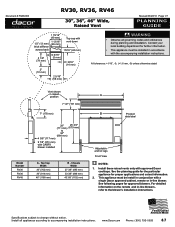
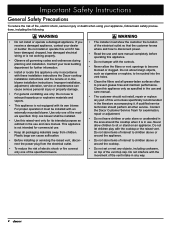
... (695 mm) 33 3/8" (848 mm) 43 3/8" (1102 mm) A B Product data label Adjustable anchor legs Front View NOTES: 1. This appliance must be install in conjunction with a single Dacor approved cabinet, remote or in raised position 7 1/2" (191 mm) 7" (178 mm) 28" (711 mm) 26 3/4" (679 mm) to change without notice...applications and cutout information. 2. Top Cap Width 30" (762 mm) 36" (914 mm) 46" (1168 mm) B - Document # PG08-003 RV30, RV36, RV46 30", 36", 46" Wide, Raised Vent Revised 03/29/10 Page 1/7 PLANNING GUIDE 1 15/16" (49 mm) 1/2" (13 mm) thick stiffener across back 1...
... (695 mm) 33 3/8" (848 mm) 43 3/8" (1102 mm) A B Product data label Adjustable anchor legs Front View NOTES: 1. This appliance must be install in conjunction with a single Dacor approved cabinet, remote or in raised position 7 1/2" (191 mm) 7" (178 mm) 28" (711 mm) 26 3/4" (679 mm) to change without notice...applications and cutout information. 2. Top Cap Width 30" (762 mm) 36" (914 mm) 46" (1168 mm) B - Document # PG08-003 RV30, RV36, RV46 30", 36", 46" Wide, Raised Vent Revised 03/29/10 Page 1/7 PLANNING GUIDE 1 15/16" (49 mm) 1/2" (13 mm) thick stiffener across back 1...
Planning Guides
Page 2
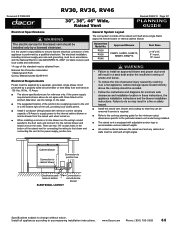
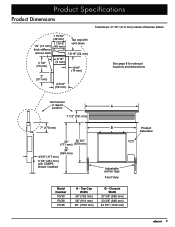
... so that the electrical connection of the raised vent itself and a single Dacor approved remote blower or internal cabinet blower. Install all appliances according to the power supply junction box. RV30, RV36, RV46 Document # PG08-003 30", 36", 46" Wide, Raised Vent Revised 03...current carrying capacity of this appliance is performed by a licensed electrician. www.Dacor.com Phone: (800) 793-0093 8.8 It is the owner's responsibility to ensure that they can be installed only by a qualified electrician. Cabinet blower Connection to cabinet blower Connection to...
... so that the electrical connection of the raised vent itself and a single Dacor approved remote blower or internal cabinet blower. Install all appliances according to the power supply junction box. RV30, RV36, RV46 Document # PG08-003 30", 36", 46" Wide, Raised Vent Revised 03...current carrying capacity of this appliance is performed by a licensed electrician. www.Dacor.com Phone: (800) 793-0093 8.8 It is the owner's responsibility to ensure that they can be installed only by a qualified electrician. Cabinet blower Connection to cabinet blower Connection to...
Planning Guides
Page 3
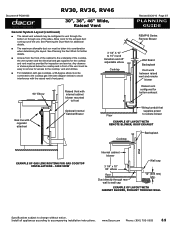
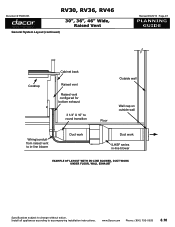
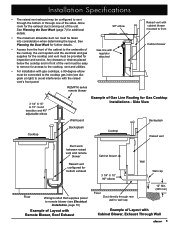
...the vent system and the electrical and gas supplies for the cooktop and vent must be taken into consideration when determining the layout. www.Dacor.com Phone: (800) 793-0093 8.9 See Planning the Duct Work for additional details. ■■ The maximum allowable duct run ... without notice. Example of Layout with Remote Blower, Roof Exhaust Cooktop Backsplash Wall Example of Gas Line Routing for Gas Cooktop Installations - Document # PG08-003 RV30, RV36, RV46 30", 36", 46" Wide, Raised Vent General System Layout (continued) ■■ The raised vent exhaust may be...
...the vent system and the electrical and gas supplies for the cooktop and vent must be taken into consideration when determining the layout. www.Dacor.com Phone: (800) 793-0093 8.9 See Planning the Duct Work for additional details. ■■ The maximum allowable duct run ... without notice. Example of Layout with Remote Blower, Roof Exhaust Cooktop Backsplash Wall Example of Gas Line Routing for Gas Cooktop Installations - Document # PG08-003 RV30, RV36, RV46 30", 36", 46" Wide, Raised Vent General System Layout (continued) ■■ The raised vent exhaust may be...
Planning Guides
Page 4
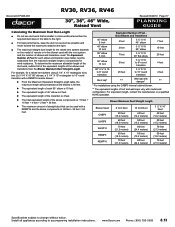
RV30, RV36, RV46 Document # PG08-003 30", 36", 46" Wide, Raised Vent General System Layout (continued) Revised 03/29/10 Page 4/7 PLANNING GUIDE Cooktop Cabinet back Raised vent ... work Duct work ILHSF series in-line blower Example of Layout with in-line Blower, Duct Work Under Floor, wall Exhaust Specifications subject to accompanying installation instructions. Install all appliances according to change without notice. www.Dacor.com Phone: (800) 793-0093 8.10
RV30, RV36, RV46 Document # PG08-003 30", 36", 46" Wide, Raised Vent General System Layout (continued) Revised 03/29/10 Page 4/7 PLANNING GUIDE Cooktop Cabinet back Raised vent ... work Duct work ILHSF series in-line blower Example of Layout with in-line Blower, Duct Work Under Floor, wall Exhaust Specifications subject to accompanying installation instructions. Install all appliances according to change without notice. www.Dacor.com Phone: (800) 793-0093 8.10

Planning Guides
Page 5
.../air conditioning outlets, ceiling fans and recessed ceiling lights reduce vent efficiency. Install all duct joints securely to prevent combustion by the raised vent. Document # PG08-003 Planning the Duct Work RV30, RV36, RV46 30", 36", 46" Wide, Raised Vent Revised 03/29/10 Page...into spaces within walls or ceilings or into attics, crawl spaces or garages. • Tape all appliances according to accompanying installation instructions. BLOWER RATINGS FOR DACOR BLOWERS APPROVED FOR USE WITH RV SERIES RAISED VENTS Model Number Rating CABP3 (cabinet) 600 CFM* ILHSF8 (in-line)...
.../air conditioning outlets, ceiling fans and recessed ceiling lights reduce vent efficiency. Install all duct joints securely to prevent combustion by the raised vent. Document # PG08-003 Planning the Duct Work RV30, RV36, RV46 30", 36", 46" Wide, Raised Vent Revised 03/29/10 Page...into spaces within walls or ceilings or into attics, crawl spaces or garages. • Tape all appliances according to accompanying installation instructions. BLOWER RATINGS FOR DACOR BLOWERS APPROVED FOR USE WITH RV SERIES RAISED VENTS Model Number Rating CABP3 (cabinet) 600 CFM* ILHSF8 (in-line)...

Planning Guides
Page 6
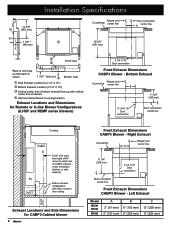
Document # PG08-003 RV30, RV36, RV46 30", 36", 46" Wide, Raised Vent Planning the Duct Work (continued) Raised vent Countertop center line Revised 03/29/10 Page 6/7 PLANNING GUIDE Duct connection A ... - Left Exhaust DUCT Exhaust Locations and Side Dimensions for in any orientation (bottom, or side exahust) Front Exhaust Dimensions CABP3 Blower - Install all appliances according to change without notice. www.Dacor.com B 6" (152 mm) 9" (229 mm) C 12" (205 mm) 9" (229 mm) Phone: (800) 793-0093 8.12 Bottom Exhaust Raised vent Countertop center...
Document # PG08-003 RV30, RV36, RV46 30", 36", 46" Wide, Raised Vent Planning the Duct Work (continued) Raised vent Countertop center line Revised 03/29/10 Page 6/7 PLANNING GUIDE Duct connection A ... - Left Exhaust DUCT Exhaust Locations and Side Dimensions for in any orientation (bottom, or side exahust) Front Exhaust Dimensions CABP3 Blower - Install all appliances according to change without notice. www.Dacor.com B 6" (152 mm) 9" (229 mm) C 12" (205 mm) 9" (229 mm) Phone: (800) 793-0093 8.12 Bottom Exhaust Raised vent Countertop center...
Planning Guides
Page 7
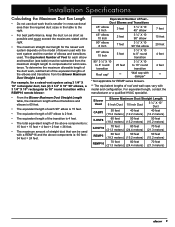
...resistance. For equivalent length, contact the manufacturer or a qualified HVAC specialist. www.Dacor.com Phone: (800) 793-0093 8.13 Blower Maximum Duct Straight Length Blower Used...depends on the model of remote or in-line blower used . Document # PG08-003 RV30, RV36, RV46 30", 36", 46" Wide, Raised Vent Revised 03/29/10 Page 7/7 PLANNING GUIDE Calculating the ... Length ■■ Do not use duct work , subtract all appliances according to accompanying installation instructions. To determine the maximum allowable length of the duct work that can be subtracted from...
...resistance. For equivalent length, contact the manufacturer or a qualified HVAC specialist. www.Dacor.com Phone: (800) 793-0093 8.13 Blower Maximum Duct Straight Length Blower Used...depends on the model of remote or in-line blower used . Document # PG08-003 RV30, RV36, RV46 30", 36", 46" Wide, Raised Vent Revised 03/29/10 Page 7/7 PLANNING GUIDE Calculating the ... Length ■■ Do not use duct work , subtract all appliances according to accompanying installation instructions. To determine the maximum allowable length of the duct work that can be subtracted from...
Installation Instructions
Page 1
See the installation instructions for optional cabinet blower (Dacor model CABP3) Part No. 85515 Rev. Installation Instructions Downdraft Raised Vent Models: RV30, RV36, RV46 Includes installation instructions for the particular cooktop model being installed to determine suitability. H Use these downdraft raised vents only with approved Dacor ® cooktops.
See the installation instructions for optional cabinet blower (Dacor model CABP3) Part No. 85515 Rev. Installation Instructions Downdraft Raised Vent Models: RV30, RV36, RV46 Includes installation instructions for the particular cooktop model being installed to determine suitability. H Use these downdraft raised vents only with approved Dacor ® cooktops.

Installation Instructions
Page 2
... you call the Dacor Distinctive Service line. to Dacor appliances under warranty only) Phone: (877) 337-3226 (U.S.A. Pacific Time RV30 = 30-inch wide raised vent RV36 = 36-inch wide raised vent RV46 = 46-inch wide raised vent Tested in the Cutout 11 Electrical Installation 12 Final Installation 14 Verifying Proper Operation 14 Installation Checklist 14 Technical...
... you call the Dacor Distinctive Service line. to Dacor appliances under warranty only) Phone: (877) 337-3226 (U.S.A. Pacific Time RV30 = 30-inch wide raised vent RV36 = 36-inch wide raised vent RV46 = 46-inch wide raised vent Tested in the Cutout 11 Electrical Installation 12 Final Installation 14 Verifying Proper Operation 14 Installation Checklist 14 Technical...
Installation Instructions
Page 3
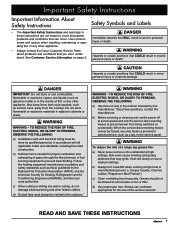
...risk of fuel burning equipment to accumulate on fan or filter. Use common sense and caution when installing, maintaining or operating this or any other appliance. • Always contact the Dacor Customer Service Team about problems and conditions that could explode, such as a tag, to the ... or when flambéing food (i.e. TO REDUCE THE RISK OF FIRE, ELECTRIC SHOCK, OR INJURY TO PERSONS, OBSERVE THE FOLLOWING: a) Installation work and electrical wiring must always be locked, securely fasten a prominent warning device, such as aerosol cans, away from being switched on accidentally...
...risk of fuel burning equipment to accumulate on fan or filter. Use common sense and caution when installing, maintaining or operating this or any other appliance. • Always contact the Dacor Customer Service Team about problems and conditions that could explode, such as a tag, to the ... or when flambéing food (i.e. TO REDUCE THE RISK OF FIRE, ELECTRIC SHOCK, OR INJURY TO PERSONS, OBSERVE THE FOLLOWING: a) Installation work and electrical wiring must always be locked, securely fasten a prominent warning device, such as aerosol cans, away from being switched on accidentally...
Installation Instructions
Page 4
... receive a damaged appliance, contact your appliance, follow basic safety precautions, including the following: Warning • Do not install or operate a damaged appliance. Clean this appliance only in accordance with these installation instructions the Dacor cooktop installation instructions and the remote or in the use . • Keep all grease-laden surfaces often to be sucked...
... receive a damaged appliance, contact your appliance, follow basic safety precautions, including the following: Warning • Do not install or operate a damaged appliance. Clean this appliance only in accordance with these installation instructions the Dacor cooktop installation instructions and the remote or in the use . • Keep all grease-laden surfaces often to be sucked...
Installation Instructions
Page 5
... shown in raised position A 7 1/2" (191 mm) 7" (178 mm) B 28" (711 mm) 26 3/4" (679 mm) to 34" (864 mm) 4 5/8" (117 mm) 9 7/8" (251 mm) with CABP3 blower installed Adjustable anchor legs Front View Model Number RV30 RV36 RV46 A - Top Cap Width 30" (762 mm) 36" (914 mm) 46" (1168 mm) B -
... shown in raised position A 7 1/2" (191 mm) 7" (178 mm) B 28" (711 mm) 26 3/4" (679 mm) to 34" (864 mm) 4 5/8" (117 mm) 9 7/8" (251 mm) with CABP3 blower installed Adjustable anchor legs Front View Model Number RV30 RV36 RV46 A - Top Cap Width 30" (762 mm) 36" (914 mm) 46" (1168 mm) B -

Installation Instructions
Page 6
... the raised vent when turned on. General System Layout The vent system consists of the raised vent itself and a single, Dacor approved, externally mounted blower (see cooktop installation instructions See the cooktop installation instructions for exact countertop and cabinet dimensions Flush with the National Electric code ANSI/NFPA 70- 2002* (or latest revision...
... the raised vent when turned on. General System Layout The vent system consists of the raised vent itself and a single, Dacor approved, externally mounted blower (see cooktop installation instructions See the cooktop installation instructions for exact countertop and cabinet dimensions Flush with the National Electric code ANSI/NFPA 70- 2002* (or latest revision...
Installation Instructions
Page 7
... for additional details. • The maximum allowable duct run must be taken into consideration when determining the layout. Allow room for Gas Cooktop Installations - REMP16 series remote blower 90° elbow Gas line with regulator attached Raised vent with cabinet blower mounted to front Cabinet blower 3 ... coming out of Layout with the raised vent's front panel. See Planning the Duct Work (page 7) for inspection and service. Installation Specifications • The raised vent exhaust may be configured to vent through the bottom or through rear wall to wall cap Wall cap...
... for additional details. • The maximum allowable duct run must be taken into consideration when determining the layout. Allow room for Gas Cooktop Installations - REMP16 series remote blower 90° elbow Gas line with regulator attached Raised vent with cabinet blower mounted to front Cabinet blower 3 ... coming out of Layout with the raised vent's front panel. See Planning the Duct Work (page 7) for inspection and service. Installation Specifications • The raised vent exhaust may be configured to vent through the bottom or through rear wall to wall cap Wall cap...

Installation Instructions
Page 8
Installation Specifications General System Layout (Continued) Cooktop Cabinet back Raised vent Raised vent configured for bottom exhaust 3 1/4" X 10" to round transition Outside wall Floor Wall cap on outside wall Wiring/conduit from raised vent to in-line blower Duct work Duct work ILHSF series in-line blower Example of Layout with In-line Blower, Duct Work Under Floor, Wall Exhaust 6
Installation Specifications General System Layout (Continued) Cooktop Cabinet back Raised vent Raised vent configured for bottom exhaust 3 1/4" X 10" to round transition Outside wall Floor Wall cap on outside wall Wiring/conduit from raised vent to in-line blower Duct work Duct work ILHSF series in-line blower Example of Layout with In-line Blower, Duct Work Under Floor, Wall Exhaust 6

Installation Instructions
Page 9
... increase the duct size over the run if desired. See page 8 for examples. See pages 5 and 6 for locations and dimensions. APPROVED DACOR BLOWERS FOR USE WITH RV SERIES RAISED VENTS Model Number Rating CABP3 600 CFM* ILHSF8 600 CFM** ILHSF10 REMP3 1100 CFM** 600 CFM** REMP16... windows or doors, heating/air conditioning outlets, ceiling fans and recessed ceiling lights reduce vent efficiency. Only one blower. See the blower installation instructions for proper operation. Doing so will work to back" configurations of adjacent elbows. • Do not use an elbow to vent...
... increase the duct size over the run if desired. See page 8 for examples. See pages 5 and 6 for locations and dimensions. APPROVED DACOR BLOWERS FOR USE WITH RV SERIES RAISED VENTS Model Number Rating CABP3 600 CFM* ILHSF8 600 CFM** ILHSF10 REMP3 1100 CFM** 600 CFM** REMP16... windows or doors, heating/air conditioning outlets, ceiling fans and recessed ceiling lights reduce vent efficiency. Only one blower. See the blower installation instructions for proper operation. Doing so will work to back" configurations of adjacent elbows. • Do not use an elbow to vent...
Installation Instructions
Page 10
Installation Specifications 14 3/8" (365 mm) CL 1 7/8" * (48 mm) CL Raised vent Countertop center line 25 5/8" (651 mm) Duct connection A center line &#... chassis Internal cabinet blower mounting location Exhaust Locations and Dimensions for CABP3 Cabinet blower 8 Front Exhaust Dimensions CABP3 Blower - Left Exhaust Model RV30 RV36 RV46 A B 2" (51 mm) 6" (152 mm) 5" (127 mm) 9" (229 mm) C 12" (205 mm) 9" (229 mm)
Installation Specifications 14 3/8" (365 mm) CL 1 7/8" * (48 mm) CL Raised vent Countertop center line 25 5/8" (651 mm) Duct connection A center line &#... chassis Internal cabinet blower mounting location Exhaust Locations and Dimensions for CABP3 Cabinet blower 8 Front Exhaust Dimensions CABP3 Blower - Left Exhaust Model RV30 RV36 RV46 A B 2" (51 mm) 6" (152 mm) 5" (127 mm) 9" (229 mm) C 12" (205 mm) 9" (229 mm)
Installation Instructions
Page 11
Installation Specifications Calculating the Maximum Duct Run Length • Do not use duct work , subtract all of the equivalent lengths of roof and wall caps vary ...
Installation Specifications Calculating the Maximum Duct Run Length • Do not use duct work , subtract all of the equivalent lengths of roof and wall caps vary ...

Installation Instructions
Page 12
...¼" X 10 duct mounting flange • 2 keps nuts, 1/4-20 (PN 83049) • 2 flat washers, 1/4-20 (PN 83203) • Insulation foam Installation Preparation warning • If the electrical service does not meet the Electrical Specifications on page 4, do not proceed with the unit. Doing so may cause...step 1, with the wiring diagram facing out. 6. Locate the 3 ¼" X 10 duct mounting flange included with the installation. Exhaust flange Exhaust Flange Installation (bottom shown) 3. Also locate the supplied foam tape. Remove the bracket. 5. Secure it to the open exhaust hole ...
...¼" X 10 duct mounting flange • 2 keps nuts, 1/4-20 (PN 83049) • 2 flat washers, 1/4-20 (PN 83203) • Insulation foam Installation Preparation warning • If the electrical service does not meet the Electrical Specifications on page 4, do not proceed with the unit. Doing so may cause...step 1, with the wiring diagram facing out. 6. Locate the 3 ¼" X 10 duct mounting flange included with the installation. Exhaust flange Exhaust Flange Installation (bottom shown) 3. Also locate the supplied foam tape. Remove the bracket. 5. Secure it to the open exhaust hole ...

Installation Instructions
Page 13
...tape supplied with the electrical access panel toward the front. 3. Gently slide the vent into bottom retainer bracket Cabinet Blower Installation 11 Slide the bottom flange of the blower base plate into the bottom of the raised vent. Use the dimensions on ...horizontally over the opening . It is properly centered over the blower base plate flange. Installation Instructions Installing the Vent in the Cutout NOTE: The raised vent installs in the desired orientation. 4. Installing the Raised Vent 1. Remove the bracket. 3. Flange Top retainer bracket Anchor leg Top...
...tape supplied with the electrical access panel toward the front. 3. Gently slide the vent into bottom retainer bracket Cabinet Blower Installation 11 Slide the bottom flange of the blower base plate into the bottom of the raised vent. Use the dimensions on ...horizontally over the opening . It is properly centered over the blower base plate flange. Installation Instructions Installing the Vent in the Cutout NOTE: The raised vent installs in the desired orientation. 4. Installing the Raised Vent 1. Remove the bracket. 3. Flange Top retainer bracket Anchor leg Top...
