Product Manual
Page 2
... the Trouble shooting section before calling. you will be a part of our quality products, and we suggest that sold you use and care guide, and like you do to obtain service under warranty. Model No.: Serial No.: Date Purchased: NEED HELP? That's important, because your new appliance will need service, you can relax knowing help us serve you can do need this owner's use...
... the Trouble shooting section before calling. you will be a part of our quality products, and we suggest that sold you use and care guide, and like you do to obtain service under warranty. Model No.: Serial No.: Date Purchased: NEED HELP? That's important, because your new appliance will need service, you can relax knowing help us serve you can do need this owner's use...
Product Manual
Page 3
... Beverage Center. • Store sealed, unopened beverages only. • See door surface cleaning instructions in this manual. • Do not store perishable food items such as to a properly grounded outlet. Remove either the gasket, latches, lids, lock and/or doors from the power cord. • Consult a qualified electrician or service • Do not use only. Contact the nearest authorized service facility for examination, repair...
... Beverage Center. • Store sealed, unopened beverages only. • See door surface cleaning instructions in this manual. • Do not store perishable food items such as to a properly grounded outlet. Remove either the gasket, latches, lids, lock and/or doors from the power cord. • Consult a qualified electrician or service • Do not use only. Contact the nearest authorized service facility for examination, repair...
Product Manual
Page 4
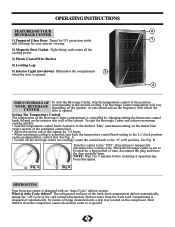
... unit to run at this setting for a long period of automatically, by adjusting/setting the thermostat control knob, located on the compressor. Defrost water from the compressor causes the defrost water to evaporate. 3 OPERATING INSTRUCTIONS FEATURES OF YOUR 2 BEVERAGE CENTER 1) Tempered Glass Door: Tinted for UV protection while 1 still allowing for easy interior viewing. 2) Magnetic Door Gasket: Tight fitting seals retain all the cooling power. 3) Plastic Coated Wire Shelves 4) Leveling Legs 5) Interior Light...
... unit to run at this setting for a long period of automatically, by adjusting/setting the thermostat control knob, located on the compressor. Defrost water from the compressor causes the defrost water to evaporate. 3 OPERATING INSTRUCTIONS FEATURES OF YOUR 2 BEVERAGE CENTER 1) Tempered Glass Door: Tinted for UV protection while 1 still allowing for easy interior viewing. 2) Magnetic Door Gasket: Tight fitting seals retain all the cooling power. 3) Plastic Coated Wire Shelves 4) Leveling Legs 5) Interior Light...
Product Manual
Page 5
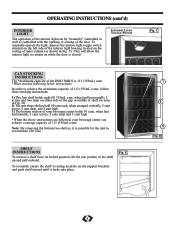
... locks into place. D 4 To manually operate the light; depress the interior light toggle switch situated on the left side of the interior light housing located on the support brackets and push shelf inward until it is resting securely on the ceiling of the shelf up and pull outward. OPERATING INSTRUCTIONS (cont'd) INTERIOR LIGHT The operation of the interior light can achieve a storage capacity of 113 (355mL...
... locks into place. D 4 To manually operate the light; depress the interior light toggle switch situated on the left side of the interior light housing located on the support brackets and push shelf inward until it is resting securely on the ceiling of the shelf up and pull outward. OPERATING INSTRUCTIONS (cont'd) INTERIOR LIGHT The operation of the interior light can achieve a storage capacity of 113 (355mL...
Product Manual
Page 6
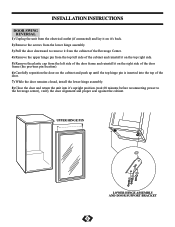
... cabinet and push up until the top hinge pin is inserted into the top of the door. 7) While the door remains closed, install the lower hinge assembly. 8) Close the door and return the unit into it's upright position (wait 60 minutes before reconnecting power to the beverage center), verify the door alignment and proper seal against the cabinet. UPPER HINGE PIN LOWER HINGE ASSEMBLY AND DOOR SUPPORT BRACKET 5
... cabinet and push up until the top hinge pin is inserted into the top of the door. 7) While the door remains closed, install the lower hinge assembly. 8) Close the door and return the unit into it's upright position (wait 60 minutes before reconnecting power to the beverage center), verify the door alignment and proper seal against the cabinet. UPPER HINGE PIN LOWER HINGE ASSEMBLY AND DOOR SUPPORT BRACKET 5

Product Manual
Page 7
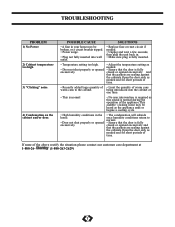
... the door with a soft, damp cloth. Walls, Floor, Inside Window, and Shelves: Water deposits and dust should be removed with a damp cloth and dry thoroughly. Rinse and then dry. Outer Case: It's important to air out and dry the inside of the beverage center cabinet NOTE: Be certain the power is off before cleaning any part of...
... the door with a soft, damp cloth. Walls, Floor, Inside Window, and Shelves: Water deposits and dust should be removed with a damp cloth and dry thoroughly. Rinse and then dry. Outer Case: It's important to air out and dry the inside of the beverage center cabinet NOTE: Be certain the power is off before cleaning any part of...
Product Manual
Page 8
TROUBLESHOOTING PROBLEM 1) No Power 2) Cabinet temperature too high. 3) "Clicking" noise. 4) Condensation on the cabinet and/or door. being introduced into wall outlet. • Replace fuse or reset circuit if needed. • Unplug and wait a few seconds, then plug the unit back in. • Make sure plug is fully excessively. POSSIBLE CAUSE SOLUTIONS • A fuse in the home. • Door not shut properly or opened...
TROUBLESHOOTING PROBLEM 1) No Power 2) Cabinet temperature too high. 3) "Clicking" noise. 4) Condensation on the cabinet and/or door. being introduced into wall outlet. • Replace fuse or reset circuit if needed. • Unplug and wait a few seconds, then plug the unit back in. • Make sure plug is fully excessively. POSSIBLE CAUSE SOLUTIONS • A fuse in the home. • Door not shut properly or opened...


