Product Manual
Page 4
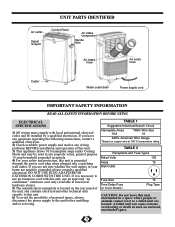
... installed by a qualified electrician. UNIT PARTS IDENTIFIED Air outlet Signal receptor Control Panel Air intake (evaporator) Handle Hole Air intake hose Air outlet hose Castor Water outlet drain Power supply cord IMPORTANT SAFETY INFORMATION READ ALL SAFETY INFORMATION BEFORE USING ELECTRICAL SPECIFICATIONS 1) All wiring must comply with this unit unattended in...
... installed by a qualified electrician. UNIT PARTS IDENTIFIED Air outlet Signal receptor Control Panel Air intake (evaporator) Handle Hole Air intake hose Air outlet hose Castor Water outlet drain Power supply cord IMPORTANT SAFETY INFORMATION READ ALL SAFETY INFORMATION BEFORE USING ELECTRICAL SPECIFICATIONS 1) All wiring must comply with this unit unattended in...
Product Manual
Page 7
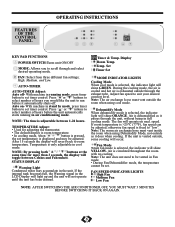
... between Celsius and Fahrenheit. speed. Press or buttons to select number of hours before it passes through the exhaust tube. STATUS DISPLAY Warning Light Condensed water may be adjusted. FEATURES OF THE CONTROL PANEL OPERATING INSTRUCTIONS KEY PAD FUNCTIONS POWER SWITCH:Turns unit ON/OFF MODE: Allows you would like the...
... between Celsius and Fahrenheit. speed. Press or buttons to select number of hours before it passes through the exhaust tube. STATUS DISPLAY Warning Light Condensed water may be adjusted. FEATURES OF THE CONTROL PANEL OPERATING INSTRUCTIONS KEY PAD FUNCTIONS POWER SWITCH:Turns unit ON/OFF MODE: Allows you would like the...
Product Manual
Page 10
...clean this unit, as these substances may cause damage to the finish and deformation of plastic parts. 2) Never attempt to clean the unit by pouring water directly over any dirt/dust with a soft damp cloth or vacuum cleaner, then wipe dry with dust/dirt, air flow is available by contacting the... Customer Service Department at the upper rear side of the unit. CAUTION: Always store the unit in lukewarm, soapy water while rubbing it lightly with a brush. More frequent cleaning may result in place, as this may be necessary depending on top of the arrow (...
...clean this unit, as these substances may cause damage to the finish and deformation of plastic parts. 2) Never attempt to clean the unit by pouring water directly over any dirt/dust with a soft damp cloth or vacuum cleaner, then wipe dry with dust/dirt, air flow is available by contacting the... Customer Service Department at the upper rear side of the unit. CAUTION: Always store the unit in lukewarm, soapy water while rubbing it lightly with a brush. More frequent cleaning may result in place, as this may be necessary depending on top of the arrow (...
Product Manual
Page 11
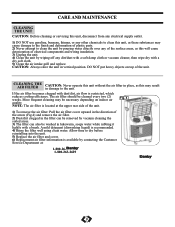
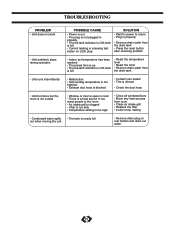
... leaking or pressing test button on LCDI plug SOLUTION • Wait for power to return • Plug in properly • Remove drain water from the drain tank • Press the reset button after resolving problem • Unit suddenly stops during operation • Indoor set temperature...8226; Replace the filter • Lower temp. tank is full • Reset the temperature level • Reset the timer • Remove drain water from the drain tank • Unit runs intermittently • Malfunction • Surrounding temperature is too high/low • Exhaust duct hose is blocked...
... leaking or pressing test button on LCDI plug SOLUTION • Wait for power to return • Plug in properly • Remove drain water from the drain tank • Press the reset button after resolving problem • Unit suddenly stops during operation • Indoor set temperature...8226; Replace the filter • Lower temp. tank is full • Reset the temperature level • Reset the timer • Remove drain water from the drain tank • Unit runs intermittently • Malfunction • Surrounding temperature is too high/low • Exhaust duct hose is blocked...


