Product Manual
Page 2
TABLE OF CONTENTS UNIT SPECIFICATIONS 2 PART IDENTIFICATION 3 IMPORTANT SAFETY INFORMATION Electrical Specifications 3 Energy Saving Tips 4 INSTALLATION Window Kit Installation 5 6 OPERATION Remote Control 7 LCD Display 7 Air Conditioning 8 Dehumidifier 9 Fan 9 Heat 10 Auto Timer 11 Clock Set 11 CARE AND MAINTENANCE 12 TROUBLESHOOTING 13 Warranty 14 1
TABLE OF CONTENTS UNIT SPECIFICATIONS 2 PART IDENTIFICATION 3 IMPORTANT SAFETY INFORMATION Electrical Specifications 3 Energy Saving Tips 4 INSTALLATION Window Kit Installation 5 6 OPERATION Remote Control 7 LCD Display 7 Air Conditioning 8 Dehumidifier 9 Fan 9 Heat 10 Auto Timer 11 Clock Set 11 CARE AND MAINTENANCE 12 TROUBLESHOOTING 13 Warranty 14 1
Product Manual
Page 6
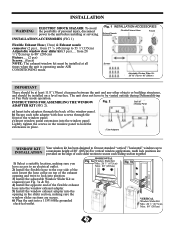
...before installing or servicing. Fig. 2 Back of Window Panel a) Insert tube adapters through the front of the window panel. Tube Adapters WINDOW KIT INSTALLATION Your window kit has been designed to fit most standard "vertical"/"horizontal" windows up to the rear side of the unit. ... of the flexible exhaust hose into the window exhaust adapter. 5) Install the window exhaust adapter into the window panel. Lightly tighten the screws in the window panel to 80" (203cm) Fixture..... (2 pcs) Screws...(8 pcs) NOTE: The exhaust/window kit must be installed on top of the ...
...before installing or servicing. Fig. 2 Back of Window Panel a) Insert tube adapters through the front of the window panel. Tube Adapters WINDOW KIT INSTALLATION Your window kit has been designed to fit most standard "vertical"/"horizontal" windows up to the rear side of the unit. ... of the flexible exhaust hose into the window exhaust adapter. 5) Install the window exhaust adapter into the window panel. Lightly tighten the screws in the window panel to 80" (203cm) Fixture..... (2 pcs) Screws...(8 pcs) NOTE: The exhaust/window kit must be installed on top of the ...

