
RS232 Command Line Interface Guide
Page 1
z RS232 Protocol Communication Settings Connection Settings Baud Rate Data Bits Parity Stop Bits Flow control Value 19200 bps 8 bits None 1 bit None Command Types To display the OSD menu and adjust the settings. Dell™ 7700FullHD RS232 Protocol Document z RS232 Projector Pin Assignment (Facing Projector) z RS232 Serial Communication Cable Pin Assignment (Facing Cable) Š Pin Assignments RS232 PIN DESCRIPTION RS232 1 2 TXD 3 3 RXD 2 4 5 GROUND 5 6 7 Not Used 7 8 Not Used 8 9 Note 1: The RS232 (pin2-3 swap) cable is not provided by Dell.
z RS232 Protocol Communication Settings Connection Settings Baud Rate Data Bits Parity Stop Bits Flow control Value 19200 bps 8 bits None 1 bit None Command Types To display the OSD menu and adjust the settings. Dell™ 7700FullHD RS232 Protocol Document z RS232 Projector Pin Assignment (Facing Projector) z RS232 Serial Communication Cable Pin Assignment (Facing Cable) Š Pin Assignments RS232 PIN DESCRIPTION RS232 1 2 TXD 3 3 RXD 2 4 5 GROUND 5 6 7 Not Used 7 8 Not Used 8 9 Note 1: The RS232 (pin2-3 swap) cable is not provided by Dell.

RS232 Command Line Interface Guide
Page 2
...)" or Byte size of Command Code and Value, "02 (Low Byte), 00 (High Byte)" Command Code [COMMAND] ==> "Power On" Command, "01" Projector Response Message Table Byte0 value: 0x00: Success 0x01: Invalid Command (on the control command list but no valid) 0x02: Error Command (includes CRC error and... unknown commands) Projector Response System Status Byte0, Byte1, Byte2 Byte0: 0x00 (Success) Byte1: 0xff (the Command Code of Payload [SoP] ==> Byte size from MsgID to ...
...)" or Byte size of Command Code and Value, "02 (Low Byte), 00 (High Byte)" Command Code [COMMAND] ==> "Power On" Command, "01" Projector Response Message Table Byte0 value: 0x00: Success 0x01: Invalid Command (on the control command list but no valid) 0x02: Error Command (includes CRC error and... unknown commands) Projector Response System Status Byte0, Byte1, Byte2 Byte0: 0x00 (Success) Byte1: 0xff (the Command Code of Payload [SoP] ==> Byte size from MsgID to ...
RS232 Command Line Interface Guide
Page 3
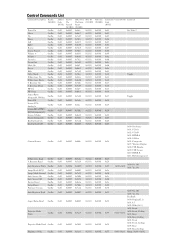
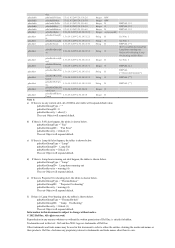
... Auto Source Off Factory Reset Lamp-Hours Firmware Version 0xefbe 0xefbe 0xefbe 0xefbe 0xefbe 0xefbe 0xefbe Auto Keystone Read 0xefbe Aspect Ratio Read 0xefbe Projector Mode Write 0xefbe Projector Mode Read 0xefbe Brightness Write 0xefbe Address Code (BYTE) 0x10 0x10 0x10 0x10 0x10 0x10 0x10 0x10 0x10 0x10 0x10 0x10 0x10 0x10...
... Auto Source Off Factory Reset Lamp-Hours Firmware Version 0xefbe 0xefbe 0xefbe 0xefbe 0xefbe 0xefbe 0xefbe Auto Keystone Read 0xefbe Aspect Ratio Read 0xefbe Projector Mode Write 0xefbe Projector Mode Read 0xefbe Brightness Write 0xefbe Address Code (BYTE) 0x10 0x10 0x10 0x10 0x10 0x10 0x10 0x10 0x10 0x10 0x10 0x10 0x10 0x10...

RS232 Command Line Interface Guide
Page 6
...Rev. Note 4: If sending multiple commands, check that a response has been received from the projector before sending next command. Dell Inc. disclaims any manner whatsoever without notice. © 2012 Dell Inc. is subject to either the entities claiming the marks and names or their products. Other...this document to refer to change without the written permission of Dell Inc. All rights reserved. Trademarks used in trademarks and trade names other than its own. A00 Note 3: The range will depend on the projector, wait for 5 seconds before sending next command. Reproduction ...
...Rev. Note 4: If sending multiple commands, check that a response has been received from the projector before sending next command. Dell Inc. disclaims any manner whatsoever without notice. © 2012 Dell Inc. is subject to either the entities claiming the marks and names or their products. Other...this document to refer to change without the written permission of Dell Inc. All rights reserved. Trademarks used in trademarks and trade names other than its own. A00 Note 3: The range will depend on the projector, wait for 5 seconds before sending next command. Reproduction ...

SNMP Command Set Document
Page 2
... R Integer R Integer R Integer R Integer R Integer R Integer R Integer R Integer R Integer R Integer R Integer R Integer R Integer R Integer R Integer R/W Integer R Integer R String R String R 10 Power On.-11 Power Off.-7 Projector is cooling down to standby mode. Only network electronics remain on . 7 11 3 7 11 3 120 30 0 120 20 0 3 4 4 3 3 4 1600 1200 DEFVAL { "" } DEFVAL { "" } Lamp off Fan on...
... R Integer R Integer R Integer R Integer R Integer R Integer R Integer R Integer R Integer R Integer R Integer R Integer R Integer R Integer R Integer R/W Integer R Integer R String R String R 10 Power On.-11 Power Off.-7 Projector is cooling down to standby mode. Only network electronics remain on . 7 11 3 7 11 3 120 30 0 120 20 0 3 4 4 3 3 4 1600 1200 DEFVAL { "" } DEFVAL { "" } Lamp off Fan on...
SNMP Command Set Document
Page 7
... will respond default. pdmAlertGroupType = "Lamp" pdmAlertGroupID= Lamp hours running out, Projector Overheating, Lamp Overheating and Fan Error. Reproduction in this text: Dell and the DELL logo are trademarks of Dell Inc. pdmAlertGroupType =" " pdmAlertGroupID = 0 pdmAlertSeverity = other than its own....trademarks and trade names may be used in any manner whatsoever without notice. © 2012 Dell Inc. pdmAlertGroupType = "ThermalSensor" pdmAlertGroupID= "Projector Overheating" pdmAlertSeverity = warning (4) The rest Object will respond default value. Information in this...
... will respond default. pdmAlertGroupType = "Lamp" pdmAlertGroupID= Lamp hours running out, Projector Overheating, Lamp Overheating and Fan Error. Reproduction in this text: Dell and the DELL logo are trademarks of Dell Inc. pdmAlertGroupType =" " pdmAlertGroupID = 0 pdmAlertSeverity = other than its own....trademarks and trade names may be used in any manner whatsoever without notice. © 2012 Dell Inc. pdmAlertGroupType = "ThermalSensor" pdmAlertGroupID= "Projector Overheating" pdmAlertSeverity = warning (4) The rest Object will respond default value. Information in this...
User's Guide
Page 3
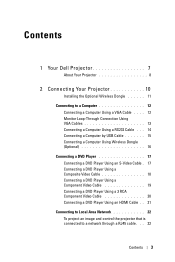
Contents 1 Your Dell Projector 7 About Your Projector 8 2 Connecting Your Projector 10 Installing the Optional Wireless Dongle 11 Connecting to a Computer 12 Connecting a Computer Using a VGA Cable . . . . 12 Monitor Loop-Through Connection Using VGA Cables 13 ... Component Video Cable 20 Connecting a DVD Player Using an HDMI Cable . . 21 Connecting to Local Area Network 22 To project an image and control the projector that is connected to a network through a RJ45 cable. . . 22 Contents 3
Contents 1 Your Dell Projector 7 About Your Projector 8 2 Connecting Your Projector 10 Installing the Optional Wireless Dongle 11 Connecting to a Computer 12 Connecting a Computer Using a VGA Cable . . . . 12 Monitor Loop-Through Connection Using VGA Cables 13 ... Component Video Cable 20 Connecting a DVD Player Using an HDMI Cable . . 21 Connecting to Local Area Network 22 To project an image and control the projector that is connected to a network through a RJ45 cable. . . 22 Contents 3
User's Guide
Page 4
... Driving Automatic Screen 23 Connection With Commercial RS232 Control Box . 24 3 Using Your Projector 25 Turning Your Projector On 25 Turning Your Projector Off 25 Adjusting the Projected Image 26 Raising the Projector Height 26 Lowering the Projector Height 26 Adjusting the Projector Zoom and Focus 27 Adjusting Projection Image Size 28 Using the Control Panel...
... Driving Automatic Screen 23 Connection With Commercial RS232 Control Box . 24 3 Using Your Projector 25 Turning Your Projector On 25 Turning Your Projector Off 25 Adjusting the Projected Image 26 Raising the Projector Height 26 Lowering the Projector Height 26 Adjusting the Projector Zoom and Focus 27 Adjusting Projection Image Size 28 Using the Control Panel...
User's Guide
Page 5
... Install the PtG Converter Application Software on Your Computer 69 Using the PtG Converter 70 Audio Projection Installation 71 Enable Wireless or LAN on the Projector . . . . . 72 Install the Wireless Application Software on Your Computer 73 Launch the Wireless Application 74 Login 75 Video Stream Installation 76 ...Video Stream Support Format 76 Enable Wireless or LAN on the Projector . . . . . 77 Install the Wireless Application Software on Your Computer 77 Launch the Wireless Application 77 Login 77 Managing the...
... Install the PtG Converter Application Software on Your Computer 69 Using the PtG Converter 70 Audio Projection Installation 71 Enable Wireless or LAN on the Projector . . . . . 72 Install the Wireless Application Software on Your Computer 73 Launch the Wireless Application 74 Login 75 Video Stream Installation 76 ...Video Stream Support Format 76 Enable Wireless or LAN on the Projector . . . . . 77 Install the Wireless Application Software on Your Computer 77 Launch the Wireless Application 77 Login 77 Managing the...
User's Guide
Page 6
Accessing Web Management 78 Make Application Token 99 4 Troubleshooting Your Projector 101 Guiding Signals 105 Changing the Lamp 106 5 Specifications 108 6 Contacting Dell 115 7 Appendix: Glossary 116 6 Contents
Accessing Web Management 78 Make Application Token 99 4 Troubleshooting Your Projector 101 Guiding Signals 105 Changing the Lamp 106 5 Specifications 108 6 Contacting Dell 115 7 Appendix: Glossary 116 6 Contents
User's Guide
Page 7
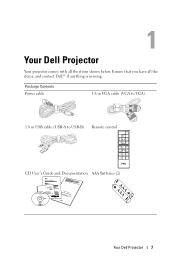
Package Contents Power cable 1.8 m VGA cable (VGA to VGA) 1.8 m USB cable (USB-A to USB-B) Remote control CD User's Guide and Documentation AAA Batteries (2) Informacion Importante DellTM 770Q0uFiuclklHSDetPurpojGecutiodre DOCOMENTATION DellTM 7700FullHD Projector oduct IDneflol TrM PmroajteicotnorGs uide AAAAAA Your Dell Projector 7 1 Your Dell Projector Your projector comes with all the items, and contact Dell™ if anything is missing. Ensure that you have all the items shown below.
Package Contents Power cable 1.8 m VGA cable (VGA to VGA) 1.8 m USB cable (USB-A to USB-B) Remote control CD User's Guide and Documentation AAA Batteries (2) Informacion Importante DellTM 770Q0uFiuclklHSDetPurpojGecutiodre DOCOMENTATION DellTM 7700FullHD Projector oduct IDneflol TrM PmroajteicotnorGs uide AAAAAA Your Dell Projector 7 1 Your Dell Projector Your projector comes with all the items, and contact Dell™ if anything is missing. Ensure that you have all the items shown below.
User's Guide
Page 8
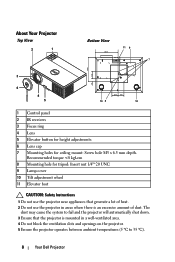
About Your Projector Top View 2 1 Bottom View 202.50 11 9 7 180.50 73.50 3 8.65 6 4 5 55.00 55.00 10 8 10 1 Control panel 2 IR receivers 3 Focus ring 4 Lens 5 Elevator button for height adjustments 6 Lens cap 7 Mounting holes for ceiling mount: Screw hole M3 x 6.5 mm depth. Recommended torque
About Your Projector Top View 2 1 Bottom View 202.50 11 9 7 180.50 73.50 3 8.65 6 4 5 55.00 55.00 10 8 10 1 Control panel 2 IR receivers 3 Focus ring 4 Lens 5 Elevator button for height adjustments 6 Lens cap 7 Mounting holes for ceiling mount: Screw hole M3 x 6.5 mm depth. Recommended torque
User's Guide
Page 9
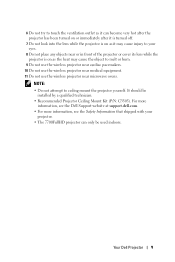
... or immediately after it is turned off. 7 Do not look into the lens while the projector is on as the heat may cause injury to your eyes. 8 Do not place any objects near microwave ovens. Your Dell Projector 9 It should be used indoors. NOTE: • Do not attempt to melt or burn. 9... Do not use the wireless projector near cardiac pacemakers. 10 Do not use the wireless projector near medical equipment. 11 Do not use the wireless...
... or immediately after it is turned off. 7 Do not look into the lens while the projector is on as the heat may cause injury to your eyes. 8 Do not place any objects near microwave ovens. Your Dell Projector 9 It should be used indoors. NOTE: • Do not attempt to melt or burn. 9... Do not use the wireless projector near cardiac pacemakers. 10 Do not use the wireless projector near medical equipment. 11 Do not use the wireless...
User's Guide
Page 10
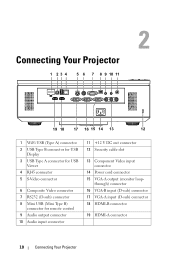
through) connector 16 VGA-B input (D-sub) connector 17 VGA-A input (D-sub) connector 18 HDMI-B connector 19 HDMI-A connector 10 Connecting Your Projector 2 Connecting Your Projector 1 2 3 4 5 6 7 8 9 10 11 19 18 17 16 15 14 13 12 1 WiFi USB (Type A) connector 2 USB Type B connector for USB Display 3 USB Type A connector for USB ...
through) connector 16 VGA-B input (D-sub) connector 17 VGA-A input (D-sub) connector 18 HDMI-B connector 19 HDMI-A connector 10 Connecting Your Projector 2 Connecting Your Projector 1 2 3 4 5 6 7 8 9 10 11 19 18 17 16 15 14 13 12 1 WiFi USB (Type A) connector 2 USB Type B connector for USB Display 3 USB Type A connector for USB ...
User's Guide
Page 11
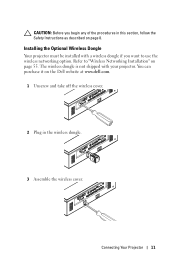
You can purchase it on the Dell website at www.dell.com. 1 Unscrew and take off the wireless cover. 2 Plug in this section, follow the Safety Instructions as described on page 8. Refer to use the wireless networking option. The wireless dongle is not shipped with a wireless dongle if you begin any of the procedures in the wireless dongle. 3 Assemble the wireless cover. Installing the Optional Wireless Dongle Your projector must be installed with your projector. Connecting Your Projector 11 CAUTION: Before you want to "Wireless Networking Installation" on page 55.
You can purchase it on the Dell website at www.dell.com. 1 Unscrew and take off the wireless cover. 2 Plug in this section, follow the Safety Instructions as described on page 8. Refer to use the wireless networking option. The wireless dongle is not shipped with a wireless dongle if you begin any of the procedures in the wireless dongle. 3 Assemble the wireless cover. Installing the Optional Wireless Dongle Your projector must be installed with your projector. Connecting Your Projector 11 CAUTION: Before you want to "Wireless Networking Installation" on page 55.
User's Guide
Page 12
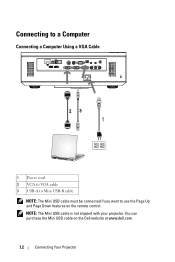
NOTE: The Mini USB cable is not shipped with your projector. You can purchase the Mini USB cable on the remote control. Connecting to a Computer Connecting a Computer Using a VGA Cable 23 1 MOLEX 1 Power cord 2 VGA to VGA cable 3 USB-A to Mini USB-B cable NOTE: The Mini USB cable must be connected if you want to use the Page Up and Page Down features on the Dell website at www.dell.com. 12 Connecting Your Projector
NOTE: The Mini USB cable is not shipped with your projector. You can purchase the Mini USB cable on the remote control. Connecting to a Computer Connecting a Computer Using a VGA Cable 23 1 MOLEX 1 Power cord 2 VGA to VGA cable 3 USB-A to Mini USB-B cable NOTE: The Mini USB cable must be connected if you want to use the Page Up and Page Down features on the Dell website at www.dell.com. 12 Connecting Your Projector
User's Guide
Page 13
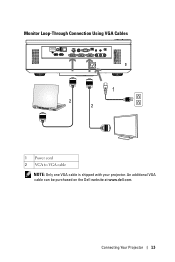
An additional VGA cable can be purchased on the Dell website at www.dell.com. Monitor Loop-Through Connection Using VGA Cables 1 2 2 1 Power cord 2 VGA to VGA cable NOTE: Only one VGA cable is shipped with your projector. Connecting Your Projector 13
An additional VGA cable can be purchased on the Dell website at www.dell.com. Monitor Loop-Through Connection Using VGA Cables 1 2 2 1 Power cord 2 VGA to VGA cable NOTE: Only one VGA cable is shipped with your projector. Connecting Your Projector 13
User's Guide
Page 14
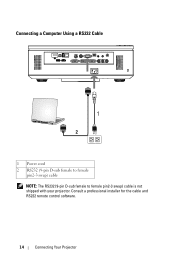
Consult a professional installer for the cable and RS232 remote control software. 14 Connecting Your Projector Connecting a Computer Using a RS232 Cable 1 2 1 Power cord 2 RS232 (9-pin D-sub female to female pin2-3 swap) cable NOTE: The RS232 (9-pin D-sub female to female pin2-3 swap) cable is not shipped with your projector.
Consult a professional installer for the cable and RS232 remote control software. 14 Connecting Your Projector Connecting a Computer Using a RS232 Cable 1 2 1 Power cord 2 RS232 (9-pin D-sub female to female pin2-3 swap) cable NOTE: The RS232 (9-pin D-sub female to female pin2-3 swap) cable is not shipped with your projector.

User's Guide
Page 15
An additional USB cable can be purchased on the Dell website at www.dell.com. Only one USB cable is shipped with your projector. Connecting Your Projector 15 MOLEX Connecting a Computer by USB Cable 1 2 1 Power cord 2 USB-A to USB-B cable NOTE: Plug and Play.
An additional USB cable can be purchased on the Dell website at www.dell.com. Only one USB cable is shipped with your projector. Connecting Your Projector 15 MOLEX Connecting a Computer by USB Cable 1 2 1 Power cord 2 USB-A to USB-B cable NOTE: Plug and Play.

User's Guide
Page 16
Connecting a Computer Using Wireless Dongle (Optional) SUZF-WCUC52I0D5C: NOTE: Your computer should be installed with a wireless connector and properly configured to detect another wireless connection. Refer to "Wireless Networking Installation" on how to configure a wireless connection. NOTE: Your projector must be equipped with a wireless dongle if you want to your computer's documentation on page 55. 16 Connecting Your Projector Refer to use the wireless networking.
Connecting a Computer Using Wireless Dongle (Optional) SUZF-WCUC52I0D5C: NOTE: Your computer should be installed with a wireless connector and properly configured to detect another wireless connection. Refer to "Wireless Networking Installation" on how to configure a wireless connection. NOTE: Your projector must be equipped with a wireless dongle if you want to your computer's documentation on page 55. 16 Connecting Your Projector Refer to use the wireless networking.


