
User's Guide
Page 3
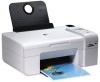
... your Dell computer and printer at the same time, documentation and drivers for your printer are already installed on your CD to provide last-minute updates about technical changes to your printer or advanced technical reference material for ? You can use my printer Warranty information Owner's Manual Express Service Code Express Service Code and Service Tag number and Service Tag Find it here Drivers for my Drivers and Utilities CD printer My User's Guide How to set...
... your Dell computer and printer at the same time, documentation and drivers for your printer are already installed on your CD to provide last-minute updates about technical changes to your printer or advanced technical reference material for ? You can use my printer Warranty information Owner's Manual Express Service Code Express Service Code and Service Tag number and Service Tag Find it here Drivers for my Drivers and Utilities CD printer My User's Guide How to set...

User's Guide
Page 4
... several online tools, including: Solutions-Troubleshooting hints and tips, articles from technicians, and online courses Upgrades-Upgrade information for components, such as memory Customer Care-Contact information, order status, warranty, and repair information Downloads-Drivers Reference-Printer documentation and product specifications How to use Windows XP Documentation for my printer Windows XP Help and Support Center 1. Type a word or phrase that describes your problem, and then click the arrow icon. 3. Follow the instructions shown...
... several online tools, including: Solutions-Troubleshooting hints and tips, articles from technicians, and online courses Upgrades-Upgrade information for components, such as memory Customer Care-Contact information, order status, warranty, and repair information Downloads-Drivers Reference-Printer documentation and product specifications How to use Windows XP Documentation for my printer Windows XP Help and Support Center 1. Type a word or phrase that describes your problem, and then click the arrow icon. 3. Follow the instructions shown...

User's Guide
Page 6
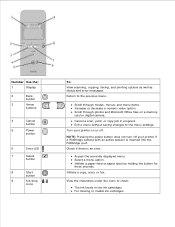
... two ink cartridges, one color and the other end of the printer. 8 Memory card Slots into which you insert a memory card containing digital photos. connector CAUTION: Insert the power cable into the printer before connecting the power cable into the wall outlet. 11 PictBridge The port into which you place your computer. 10 Power Slot into which you plug the power cable. tray 5 Printer unit Unit you use to copy, fax, or glass scan it. Number: Part: Description: 4 Paper exit Tray that...
... two ink cartridges, one color and the other end of the printer. 8 Memory card Slots into which you insert a memory card containing digital photos. connector CAUTION: Insert the power cable into the printer before connecting the power cable into the wall outlet. 11 PictBridge The port into which you place your computer. 10 Power Slot into which you plug the power cable. tray 5 Printer unit Unit you use to copy, fax, or glass scan it. Number: Part: Description: 4 Paper exit Tray that...
User's Guide
Page 7
... or invalid ink cartridges. Initiate a copy, scan, or fax. NOTE: Pressing the power button does not turn off . Access the currently displayed menu. Number Use the: 1 Display 2 Back button 3 Arrow buttons 4 Cancel button 5 Power button 6 Error LED 7 Select button 8 Start button 9 Ink drop icons To: View scanning, copying, faxing, and printing options as well as status and error messages. Scroll through photos and Microsoft Office files on or off your printer on a memory card or digital camera. Exit a menu without saving changes to the menu settings.
... or invalid ink cartridges. Initiate a copy, scan, or fax. NOTE: Pressing the power button does not turn off . Access the currently displayed menu. Number Use the: 1 Display 2 Back button 3 Arrow buttons 4 Cancel button 5 Power button 6 Error LED 7 Select button 8 Start button 9 Ink drop icons To: View scanning, copying, faxing, and printing options as well as status and error messages. Scroll through photos and Microsoft Office files on or off your printer on a memory card or digital camera. Exit a menu without saving changes to the menu settings.

User's Guide
Page 8
A4 B5 A5 A6 L , and then use is displayed, press the Start button to adjust the Letter Legal 4 x 6 in. Copy Mode Copy menu item Copy Color # of Copies Quality Dark Paper Size Settings Color Black 1-99 Automatic Draft Normal Photo Press the Select button brightness setting. Operator Panel Menus Copy Mode Scan Mode Fax Mode Photo Mode PictBridge Mode Office File Mode Bluetooth Mode Maintenance Mode When you want to use the Arrow buttons to access its menus. When the mode you press the Arrow buttons , the following modes appear.
A4 B5 A5 A6 L , and then use is displayed, press the Start button to adjust the Letter Legal 4 x 6 in. Copy Mode Copy menu item Copy Color # of Copies Quality Dark Paper Size Settings Color Black 1-99 Automatic Draft Normal Photo Press the Select button brightness setting. Operator Panel Menus Copy Mode Scan Mode Fax Mode Photo Mode PictBridge Mode Office File Mode Bluetooth Mode Maintenance Mode When you want to use the Arrow buttons to access its menus. When the mode you press the Arrow buttons , the following modes appear.
User's Guide
Page 26
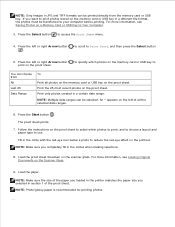
... Sheet menu. 4. NOTE: Multiple date ranges can choose from the memory card or USB key. Press the Start button . Fill in JPG and TIFF formats can be printed directly from All Last 25 Date Range To Print all the selected date ranges. 6. Load the paper. An * appears on the proof sheet. NOTE: Make sure the size of the paper you loaded in the printer matches the paper size you selected in a different file format, the photos...
... Sheet menu. 4. NOTE: Multiple date ranges can choose from the memory card or USB key. Press the Start button . Fill in JPG and TIFF formats can be printed directly from All Last 25 Date Range To Print all the selected date ranges. 6. Load the paper. An * appears on the proof sheet. NOTE: Make sure the size of the paper you loaded in the printer matches the paper size you selected in a different file format, the photos...

User's Guide
Page 27
.... 2. Press the Start button . The proof sheet becomes invalid when the memory card is removed from a digital camera using DPOF Digital Print Order Format (DPOF) is not smaller than one memory card or USB key at a time. 3. The printer automatically switches to print, and other print settings. NOTE: Do not insert more than the size you want to Your Computer 1. Saving Photos on a memory card together with the print side facing up. Printing photos from the printer or anytime...
.... 2. Press the Start button . The proof sheet becomes invalid when the memory card is removed from a digital camera using DPOF Digital Print Order Format (DPOF) is not smaller than one memory card or USB key at a time. 3. The printer automatically switches to print, and other print settings. NOTE: Do not insert more than the size you want to Your Computer 1. Saving Photos on a memory card together with the print side facing up. Printing photos from the printer or anytime...

User's Guide
Page 57
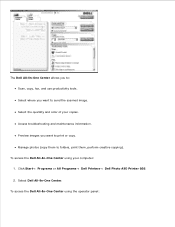
... you to your printer is running low on ink. Printing Preferences-Allows you to display, manage, edit, print, and save photos to adjust printer settings. Dell Ink Management SystemTM-Warns you to perform various scan, copy, fax, and print operations with newly scanned and previously saved documents and images. Understanding the Software Using the Dell All-In-One Center Using Printing Preferences Using Memory Card Manager Using the Dell Fax Solutions Software Dell Ink Management System Removing and Reinstalling Software The printer software includes: Dell All-In-One Center-Allows you...
... you to your printer is running low on ink. Printing Preferences-Allows you to display, manage, edit, print, and save photos to adjust printer settings. Dell Ink Management SystemTM-Warns you to perform various scan, copy, fax, and print operations with newly scanned and previously saved documents and images. Understanding the Software Using the Dell All-In-One Center Using Printing Preferences Using Memory Card Manager Using the Dell Fax Solutions Software Dell Ink Management System Removing and Reinstalling Software The printer software includes: Dell All-In-One Center-Allows you...
User's Guide
Page 58
... photos (copy them to : Scan, copy, fax, and use productivity tools. Click Start Programs or All Programs Dell Printers Dell Photo AIO Printer 926. 2. To access the Dell All-In-One Center using the operator panel: 1. The Dell All-In-One Center allows you to folders, print them, perform creative copying). Preview images you want to send the scanned image. Select Dell All-In-One Center. To access the Dell All-In-One Center using your copies. Select where you want to print or copy. Select the quantity and color of your computer: 1. Access troubleshooting and maintenance...
... photos (copy them to : Scan, copy, fax, and use productivity tools. Click Start Programs or All Programs Dell Printers Dell Photo AIO Printer 926. 2. To access the Dell All-In-One Center using the operator panel: 1. The Dell All-In-One Center allows you to folders, print them, perform creative copying). Preview images you want to send the scanned image. Select Dell All-In-One Center. To access the Dell All-In-One Center using your copies. Select where you want to print or copy. Select the quantity and color of your computer: 1. Access troubleshooting and maintenance...

User's Guide
Page 61
... the check box if you have a photo cartridge installed. Allows you want to specify Appearance Mode and Complete-A-Print settings. Borderless - Media Type - Dell Customer Experience Improvement Program - Maintenance Install Ink Cartridges Clean Ink Cartridges Align Ink Cartridges Print a Test Page Network Support Using Memory Card Manager Select the check box if you to print on image content. Select this setting if you to print an envelope. Advanced 2-sided printing - Tab Options Print Setup Quality/Speed - You can also view the paper type that the printer...
... the check box if you have a photo cartridge installed. Allows you want to specify Appearance Mode and Complete-A-Print settings. Borderless - Media Type - Dell Customer Experience Improvement Program - Maintenance Install Ink Cartridges Clean Ink Cartridges Align Ink Cartridges Print a Test Page Network Support Using Memory Card Manager Select the check box if you to print on image content. Select this setting if you to print an envelope. Advanced 2-sided printing - Tab Options Print Setup Quality/Speed - You can also view the paper type that the printer...

User's Guide
Page 64
... the type of print jobs the printer completes. Receiving Faxes Specify how you send or receive. Set the number of pages remaining in scanning the document you try to be given. Click on sent and outgoing faxes. The Dell Fax Solutions Software has two main sections. Manage your screen when you want incoming calls to print. Specify the number of received and incoming faxes. View a list of times the printer attempts to use in the cartridge. Specify...
... the type of print jobs the printer completes. Receiving Faxes Specify how you send or receive. Set the number of pages remaining in scanning the document you try to be given. Click on sent and outgoing faxes. The Dell Fax Solutions Software has two main sections. Manage your screen when you want incoming calls to print. Specify the number of received and incoming faxes. View a list of times the printer attempts to use in the cartridge. Specify...

User's Guide
Page 66
In Windows XP, click Start My Computer. In Windows 2000, double-click My Computer from your screen to complete the installation. b. Follow the instructions on the screen. Insert the Drivers and Utilities CD, and then follow the instructions on your desktop. c. When the printer software installation screen appears, click Personal Installation or Network Installation. d. Restart your computer. 5. 3. 4. Double-click the CD-ROM drive icon, and then double-click setup.exe. If the installation screen does not appear: a.
In Windows XP, click Start My Computer. In Windows 2000, double-click My Computer from your screen to complete the installation. b. Follow the instructions on the screen. Insert the Drivers and Utilities CD, and then follow the instructions on your desktop. c. When the printer software installation screen appears, click Personal Installation or Network Installation. d. Restart your computer. 5. 3. 4. Double-click the CD-ROM drive icon, and then double-click setup.exe. If the installation screen does not appear: a.
User's Guide
Page 67
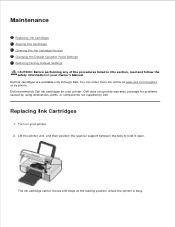
... by Dell. Maintenance Replacing Ink Cartridges Aligning Ink Cartridges Cleaning the Ink Cartridge Nozzles Changing the Default Operator Panel Settings Restoring Factory Default Settings CAUTION: Before performing any of the procedures listed in this section, read and follow the safety information in your printer. 2. You can order more ink online at the loading position unless the printer is busy. 3. Dell recommends Dell ink cartridges for problems caused by using accessories, parts, or components not supplied by phone. Lift the printer unit, and then position the scanner support...
... by Dell. Maintenance Replacing Ink Cartridges Aligning Ink Cartridges Cleaning the Ink Cartridge Nozzles Changing the Default Operator Panel Settings Restoring Factory Default Settings CAUTION: Before performing any of the procedures listed in this section, read and follow the safety information in your printer. 2. You can order more ink online at the loading position unless the printer is busy. 3. Dell recommends Dell ink cartridges for problems caused by using accessories, parts, or components not supplied by phone. Lift the printer unit, and then position the scanner support...

User's Guide
Page 68
3. Press down on the ink cartridge lever to raise each ink cartridge. NOTE: The following illustration shows a black cartridge and a color cartridge (used for normal printing). For photo printing, use a photo cartridge and a color cartridge. Store the cartridges in an air-tight container, such as the storage unit you are installing new ink cartridges, remove the sticker and transparent tape from the back and bottom of them properly. 6. If you received with your photo cartridge, or dispose of each ink cartridge lid. 4. Remove the old ink cartridges. 5.
3. Press down on the ink cartridge lever to raise each ink cartridge. NOTE: The following illustration shows a black cartridge and a color cartridge (used for normal printing). For photo printing, use a photo cartridge and a color cartridge. Store the cartridges in an air-tight container, such as the storage unit you are installing new ink cartridges, remove the sticker and transparent tape from the back and bottom of them properly. 6. If you received with your photo cartridge, or dispose of each ink cartridge lid. 4. Remove the old ink cartridges. 5.

User's Guide
Page 72
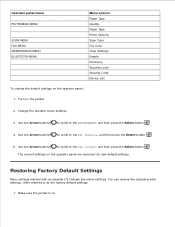
... box opens. 5. Changing the Default Operator Panel Settings You can change the default settings of Copies Quality Dark Paper Type Zoom Skew Correction Photo Color Photo Options Quality Click Clean Ink Cartridges. The cleaning page begins printing. 7. If the print quality has not improved, click Clean Again. 8. If you are still not satisfied with the print quality, wipe the nozzles with a clean, dry cloth, and then print your document again to verify the improved print quality. Click the Maintenance tab. 6. Operator panel menu COPY MENU PHOTO MENU Menu options Copy Color...
... box opens. 5. Changing the Default Operator Panel Settings You can change the default settings of Copies Quality Dark Paper Type Zoom Skew Correction Photo Color Photo Options Quality Click Clean Ink Cartridges. The cleaning page begins printing. 7. If the print quality has not improved, click Clean Again. 8. If you are still not satisfied with the print quality, wipe the nozzles with a clean, dry cloth, and then print your document again to verify the improved print quality. Click the Maintenance tab. 6. Operator panel menu COPY MENU PHOTO MENU Menu options Copy Color...
User's Guide
Page 73
...Factory Default Settings Menu settings marked with an asterisk (*) indicate the active settings. Make sure the printer is on the operator panel are saved as the factory default settings. 1. Use the Arrow buttons to scroll to as the new default settings. The current settings on . 2. Turn on the operator panel: 1. Operator panel menu PICTBRIDGE MENU SCAN MENU FAX MENU MAINTENANCE MENU BLUETOOTH MENU Menu options Paper Type Quality Paper Type Photo Options Scan Color Fax Color Clear Settings Enable Discovery Security Level Security Code Device List To change the default settings...
...Factory Default Settings Menu settings marked with an asterisk (*) indicate the active settings. Make sure the printer is on the operator panel are saved as the factory default settings. 1. Use the Arrow buttons to scroll to as the new default settings. The current settings on . 2. Turn on the operator panel: 1. Operator panel menu PICTBRIDGE MENU SCAN MENU FAX MENU MAINTENANCE MENU BLUETOOTH MENU Menu options Paper Type Quality Paper Type Photo Options Scan Color Fax Color Clear Settings Enable Discovery Security Level Security Code Device List To change the default settings...

User's Guide
Page 76
... Faxes. When the printer software installation screen appears, click Personal Installation or Network Installation. 5. Click Start Programs or All Programs Dell Printers. Restart your computer. 1. 2. For more information, see Removing and Reinstalling Software. In Windows 2000, click Start Settings Printers. 2. Determine if the printer software is not installed. Reconnect the USB cable to complete the installation. Right-click the printer icon, and select Set as the default printer. 1. Follow the instructions on the printer. Unplug the printer power cable from your printer...
... Faxes. When the printer software installation screen appears, click Personal Installation or Network Installation. 5. Click Start Programs or All Programs Dell Printers. Restart your computer. 1. 2. For more information, see Removing and Reinstalling Software. In Windows 2000, click Start Settings Printers. 2. Determine if the printer software is not installed. Reconnect the USB cable to complete the installation. Right-click the printer icon, and select Set as the default printer. 1. Follow the instructions on the printer. Unplug the printer power cable from your printer...

User's Guide
Page 77
... USB cable back into the same USB port that print object as the default printer by right-clicking the printer name and selecting Delete. In Windows XP, click Start Control Panel Printers and Other Hardware Printers and Faxes. Make sure Pause Printing is firmly connected to clear the option. In Windows XP, click Start Control Panel Printers and Other Hardware Printers and Faxes. Also, do not install printer drivers multiple times from the Drivers and Utilities CD. If Pause Printing is active. 4. In Windows 2000, click Start Settings Printers. 2. Delete...
... USB cable back into the same USB port that print object as the default printer by right-clicking the printer name and selecting Delete. In Windows XP, click Start Control Panel Printers and Other Hardware Printers and Faxes. Make sure Pause Printing is firmly connected to clear the option. In Windows XP, click Start Control Panel Printers and Other Hardware Printers and Faxes. Also, do not install printer drivers multiple times from the Drivers and Utilities CD. If Pause Printing is active. 4. In Windows 2000, click Start Settings Printers. 2. Delete...
User's Guide
Page 88
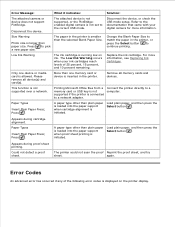
...Remove all device(s) and card(s). Connect the printer directly to pick a new paper size. Paper Types Insert Plain Paper Press; again. Disconnect the device, or check the USB mode setup. The paper in the printer is smaller than plain paper is loaded into the paper support when cartridge alignment is initiated. Low Ink Warning The ink cartridge is allowed. Only one memory card or device is initiated. This function is not set to continue printing. Press . Load plain paper, and then press the Select button . Paper Types Insert Plain Paper Press; A paper type...
...Remove all device(s) and card(s). Connect the printer directly to pick a new paper size. Paper Types Insert Plain Paper Press; again. Disconnect the device, or check the USB mode setup. The paper in the printer is smaller than plain paper is loaded into the paper support when cartridge alignment is initiated. Low Ink Warning The ink cartridge is allowed. Only one memory card or device is initiated. This function is not set to continue printing. Press . Load plain paper, and then press the Select button . Paper Types Insert Plain Paper Press; A paper type...

User's Guide
Page 96
... parts and components that are new or equivalent to new in as user: anonymous, and use your email address as your printer, refer to the Owner's Manual. Electronic Support Service mobile_support@us.dell.com support@us.dell.com apsupport@dell.com (for Asian/Pacific countries only) support.jp.dell.com/jp/jp/tech/email/ (for Japan only) support.euro.dell.com (for Europe only) Electronic Quote Service apmarketing@dell.com (for your password. ftp.dell...
... parts and components that are new or equivalent to new in as user: anonymous, and use your email address as your printer, refer to the Owner's Manual. Electronic Support Service mobile_support@us.dell.com support@us.dell.com apsupport@dell.com (for Asian/Pacific countries only) support.jp.dell.com/jp/jp/tech/email/ (for Japan only) support.euro.dell.com (for Europe only) Electronic Quote Service apmarketing@dell.com (for your password. ftp.dell...


