
Owner's Manual
Page 1
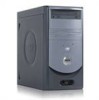
Dell™ Dimension™ 1100/B110 Owner's Manual service tag CD or DVD drive activity light CD or DVD eject button floppy drive light power light power button USB 2.0 connectors (2) floppy drive eject button hard-drive activity light headphone connector power connector voltage selection switch serial connector integrated video connector keyboard connector line-out connector* microphone connector* USB ...* cover latch** network adapter connector PCI card slots (3) Model DMC *On computers with integrated sound. **May not be present on all computers. www.dell.com | support.dell.com
Dell™ Dimension™ 1100/B110 Owner's Manual service tag CD or DVD drive activity light CD or DVD eject button floppy drive light power light power button USB 2.0 connectors (2) floppy drive eject button hard-drive activity light headphone connector power connector voltage selection switch serial connector integrated video connector keyboard connector line-out connector* microphone connector* USB ...* cover latch** network adapter connector PCI card slots (3) Model DMC *On computers with integrated sound. **May not be present on all computers. www.dell.com | support.dell.com

Owner's Manual
Page 3
... Copy a CD or DVD 16 Using Blank CDs and DVDs 17 Helpful Tips 18 Hyper-Threading 18 2 Solving Problems Troubleshooting Tips 19 Battery Problems 19 Drive Problems 19 CD and DVD drive problems 20 Hard drive problems 21 E-Mail, Modem, and Internet Problems 21 Contents 3
... Copy a CD or DVD 16 Using Blank CDs and DVDs 17 Helpful Tips 18 Hyper-Threading 18 2 Solving Problems Troubleshooting Tips 19 Battery Problems 19 Drive Problems 19 CD and DVD drive problems 20 Hard drive problems 21 E-Mail, Modem, and Internet Problems 21 Contents 3

Owner's Manual
Page 5
Restoring Your Operating System 41 Using Microsoft Windows XP System Restore 42 Using Dell PC Restore by Symantec 43 Using the Operating System CD 45 Resolving Software and Hardware Incompatibilities 46 4 Removing and Installing Parts Before You Begin 47 ... 56 Cards 58 PCI Cards 58 Front Panel 61 Removing the Front Panel 62 Removing the Front-Panel Insert 63 Reattaching the Front Panel 64 Drives 64 General Installation Guidelines 65 Connecting Drive Cables 65 Hard Drive 66 Removing a Hard Drive 66 Installing a Hard Drive 68 Contents 5
Restoring Your Operating System 41 Using Microsoft Windows XP System Restore 42 Using Dell PC Restore by Symantec 43 Using the Operating System CD 45 Resolving Software and Hardware Incompatibilities 46 4 Removing and Installing Parts Before You Begin 47 ... 56 Cards 58 PCI Cards 58 Front Panel 61 Removing the Front Panel 62 Removing the Front-Panel Insert 63 Reattaching the Front Panel 64 Drives 64 General Installation Guidelines 65 Connecting Drive Cables 65 Hard Drive 66 Removing a Hard Drive 66 Installing a Hard Drive 68 Contents 5

Owner's Manual
Page 8
...These labels are located on your computer. • Use the Service Tag to identify your computer when you use the customized Dell Premier Support website at • Upgrades - Online discussion with programs and files • How to view the appropriate support ...configuration, product specifications, and white papers • Downloads - as memory, the hard drive, and the operating system • Customer Care - Service call when contacting technical support. • Solutions - support.dell.com from technicians, and online courses, frequently asked NOTE: Select your call ...
...These labels are located on your computer. • Use the Service Tag to identify your computer when you use the customized Dell Premier Support website at • Upgrades - Online discussion with programs and files • How to view the appropriate support ...configuration, product specifications, and white papers • Downloads - as memory, the hard drive, and the operating system • Customer Care - Service call when contacting technical support. • Solutions - support.dell.com from technicians, and online courses, frequently asked NOTE: Select your call ...
Owner's Manual
Page 16
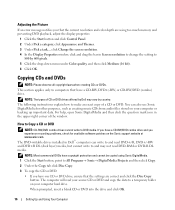
... help, open Sonic DigitalMedia and then click the question mark icon in Dell™ computers can also use Sonic DigitalMedia for available software patches on your computer hard drive. When prompted, insert a blank CD or DVD into the drive and click OK. 16 Setting Up and Using Your Computer The following ... commercial DVDs have a CD-RW, DVD+/-RW, or CD-RW/DVD (combo) drive. The DVD-writable drives installed in the upper-right corner of a CD or DVD. NOTE: The types of CD or DVD drives offered by Dell may not read your source CD or DVD and copy the data to a temporary...
... help, open Sonic DigitalMedia and then click the question mark icon in Dell™ computers can also use Sonic DigitalMedia for available software patches on your computer hard drive. When prompted, insert a blank CD or DVD into the drive and click OK. 16 Setting Up and Using Your Computer The following ... commercial DVDs have a CD-RW, DVD+/-RW, or CD-RW/DVD (combo) drive. The DVD-writable drives installed in the upper-right corner of a CD or DVD. NOTE: The types of CD or DVD drives offered by Dell may not read your source CD or DVD and copy the data to a temporary...
Owner's Manual
Page 21
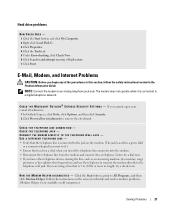
... TELEPHONE WALL JACK - CHECK THE TELEPHONE JACK - If you are using a line that you hear a click when you begin any of bad sectors. 7 Click Start. Hard drive problems RUN CHECK DISK - 1 Click the Start button and click My Computer. 2 Right-click Local Disk C:. 3 Click Properties. 4 Click the Tools tab. 5 Under Error-checking...
... TELEPHONE WALL JACK - CHECK THE TELEPHONE JACK - If you are using a line that you hear a click when you begin any of bad sectors. 7 Click Start. Hard drive problems RUN CHECK DISK - 1 Click the Start button and click My Computer. 2 Right-click Local Disk C:. 3 Click Properties. 4 Click the Tools tab. 5 Under Error-checking...

Owner's Manual
Page 26
...hardware requirements needed to see page 38). 26 Solving Problems BACK UP YOUR FILES IMMEDIATELY USE A VIRUS-SCANNING PROGRAM TO CHECK THE HARD DRIVE, FLOPPY DISKS, OR CDS SAVE AND CLOSE ANY OPEN FILES OR PROGRAMS AND SHUT DOWN YOUR COMPUTER THROUGH THE START MENU Memory... SOFTWARE MANUFACTURER FOR TROUBLESHOOTING INFORMATION - • Ensure that the program is compatible with the memory (see page 55). • Run the Dell Diagnostics (see if that resolves the problem. • See the software documentation for information. • Ensure that the program is successfully communicating...
...hardware requirements needed to see page 38). 26 Solving Problems BACK UP YOUR FILES IMMEDIATELY USE A VIRUS-SCANNING PROGRAM TO CHECK THE HARD DRIVE, FLOPPY DISKS, OR CDS SAVE AND CLOSE ANY OPEN FILES OR PROGRAMS AND SHUT DOWN YOUR COMPUTER THROUGH THE START MENU Memory... SOFTWARE MANUFACTURER FOR TROUBLESHOOTING INFORMATION - • Ensure that the program is compatible with the memory (see page 55). • Run the Dell Diagnostics (see if that resolves the problem. • See the software documentation for information. • Ensure that the program is successfully communicating...

Owner's Manual
Page 36
A possible floppy or hard drive failure has occurred. A possible USB failure has occurred. ABCD = yellow = green = off Memory modules are detected, but a memory configuration or compatibility error exists. • Ensure ... 55). • Verify that the memory modules that you are installing are compatible with your computer (see page 55). • If the problem persists, contact Dell (see page 94). Reseat all USB devices, check cable connections, and then restart the computer. ABCD Reinstall all power and data cables and restart the...
A possible floppy or hard drive failure has occurred. A possible USB failure has occurred. ABCD = yellow = green = off Memory modules are detected, but a memory configuration or compatibility error exists. • Ensure ... 55). • Verify that the memory modules that you are installing are compatible with your computer (see page 55). • If the problem persists, contact Dell (see page 94). Reseat all USB devices, check cable connections, and then restart the computer. ABCD Reinstall all power and data cables and restart the...

Owner's Manual
Page 37
..."Resolving Software and Hardware Incompatibilities" on page 46). 4 If the problem persists, contact Dell (see page 94). • Ensure that the cables are properly connected to the system board from the hard drive, CD drive, and DVD drive (see page 54). • If there is an error message on your computer.... • If the problem persists, contact Dell (see page 58). 2 If the problem persists, reinstall the card ...
..."Resolving Software and Hardware Incompatibilities" on page 46). 4 If the problem persists, contact Dell (see page 94). • Ensure that the cables are properly connected to the system board from the hard drive, CD drive, and DVD drive (see page 54). • If there is an error message on your computer.... • If the problem persists, contact Dell (see page 58). 2 If the problem persists, reinstall the card ...

Owner's Manual
Page 41
Manually Reinstalling Drivers 1 After copying the required driver files to your hard drive, click the Start button and right-click My Computer. 2 Click Properties. 3 Click the Hardware tab and click Device Manager. 4 Double-click the type of device ...
Manually Reinstalling Drivers 1 After copying the required driver files to your hard drive, click the Start button and right-click My Computer. 2 Click Properties. 3 Click the Hardware tab and click Device Manager. 4 Double-click the type of device ...

Owner's Manual
Page 42
...provides System Restore to allow you purchased the computer. System Restore does not monitor your operating system problem. • Dell PC Restore by Symantec restores your hard drive to the operating state it to see Windows Help and Support Center. Use the CD only if System Restore did ...use it was in this document were written for information on the hard drive and removes any files or programs until the system restoration is selected and click Next. 3 Click a calendar date to which you set your Dell™ computer to restore your computer to an earlier operating state...
...provides System Restore to allow you purchased the computer. System Restore does not monitor your operating system problem. • Dell PC Restore by Symantec restores your hard drive to the operating state it to see Windows Help and Support Center. Use the CD only if System Restore did ...use it was in this document were written for information on the hard drive and removes any files or programs until the system restoration is selected and click Next. 3 Click a calendar date to which you set your Dell™ computer to restore your computer to an earlier operating state...

Owner's Manual
Page 43
Enabling System Restore If you received your computer-including data files-are permanently deleted from the hard drive. Using Dell PC Restore by Symantec NOTICE: Using Dell PC Restore permanently deletes all open files and exit any open programs. Do not alter, open, or delete any ...added since you reinstall Windows XP with less than 200 MB of free hard-disk space available, System Restore is automatically disabled. NOTE: Dell PC Restore by Symantec only as the last method to restore your hard drive to All Programs→ Accessories→ System Tools, and then click System...
Enabling System Restore If you received your computer-including data files-are permanently deleted from the hard drive. Using Dell PC Restore by Symantec NOTICE: Using Dell PC Restore permanently deletes all open files and exit any open programs. Do not alter, open, or delete any ...added since you reinstall Windows XP with less than 200 MB of free hard-disk space available, System Restore is automatically disabled. NOTE: Dell PC Restore by Symantec only as the last method to restore your hard drive to All Programs→ Accessories→ System Tools, and then click System...

Owner's Manual
Page 44
... stating that you to restore your computer, even to reboot the computer. Removing Dell PC Restore NOTICE: Removing Dell PC Restore from the hard drive permanently deletes the PC Restore utility from your hard drive to c:\dell\utilities\DSR. 3 Double-click the filename DSRIRRemv2.exe. If you remove PC Restore...takes approximately 6-10 minutes to complete. 5 When prompted, click Finish to gain additional hard-drive space. NOTICE: If you must log on the computer. It is restored to proceed with www.dell.com appears at the top of the screen. 2 Immediately upon seeing the blue bar,...
... stating that you to restore your computer, even to reboot the computer. Removing Dell PC Restore NOTICE: Removing Dell PC Restore from the hard drive permanently deletes the PC Restore utility from your hard drive to c:\dell\utilities\DSR. 3 Double-click the filename DSRIRRemv2.exe. If you remove PC Restore...takes approximately 6-10 minutes to complete. 5 When prompted, click Finish to gain additional hard-drive space. NOTICE: If you must log on the computer. It is restored to proceed with www.dell.com appears at the top of the screen. 2 Immediately upon seeing the blue bar,...

Owner's Manual
Page 45
... you installed the new device driver. For conventional hard drive configurations, the primary hard drive is no partition to delete. 4 Click OK to remove the PC Restore partition on your primary hard drive. To reinstall Windows XP, you need the following items: • Dell™ Operating System CD • Dell ResourceCD NOTE: The ResourceCD contains drivers that the...
... you installed the new device driver. For conventional hard drive configurations, the primary hard drive is no partition to delete. 4 Click OK to remove the PC Restore partition on your primary hard drive. To reinstall Windows XP, you need the following items: • Dell™ Operating System CD • Dell ResourceCD NOTE: The ResourceCD contains drivers that the...

Owner's Manual
Page 49
...7 4 6 5 1 CD or DVD driveactivity light The drive activity light is on when the computer reads data from the CD or DVD drive. 2 CD or DVD drive eject Press to eject a disc from or writes data to the hard drive. Instead, perform an operating system shutdown. Removing and Installing Parts...the computer. It is on booting to a USB device). button 3 floppy-drive eject button Press to eject a floppy disk from the floppy drive. (On computers with an optional floppy drive.) 4 hard-drive activity light The light is recommended that typically remain connected, such as joysticks...
...7 4 6 5 1 CD or DVD driveactivity light The drive activity light is on when the computer reads data from the CD or DVD drive. 2 CD or DVD drive eject Press to eject a disc from or writes data to the hard drive. Instead, perform an operating system shutdown. Removing and Installing Parts...the computer. It is on booting to a USB device). button 3 floppy-drive eject button Press to eject a floppy disk from the floppy drive. (On computers with an optional floppy drive.) 4 hard-drive activity light The light is recommended that typically remain connected, such as joysticks...

Owner's Manual
Page 53
release lever* CD or DVD drive floppy drive hard drive power supply system board *May not be present on all computers. Inside View of Your Computer CAUTION: Before you begin any of the procedures in this section, see the safety instructions located in the Product Information Guide. CAUTION: To guard against electrical shock, always unplug your computer from the electrical outlet before opening the computer cover. Removing and Installing Parts 53
release lever* CD or DVD drive floppy drive hard drive power supply system board *May not be present on all computers. Inside View of Your Computer CAUTION: Before you begin any of the procedures in this section, see the safety instructions located in the Product Information Guide. CAUTION: To guard against electrical shock, always unplug your computer from the electrical outlet before opening the computer cover. Removing and Installing Parts 53

Owner's Manual
Page 64
side hinges (3) front panel 2 Rotate the front panel until it snaps onto the front of these devices: • One hard drive • One optional floppy • Up to the side hinges. Drives Your computer supports a combination of the computer. Reattaching the Front Panel 1 Reattach the front panel to two CD or DVD drives 64 Removing and Installing Parts
side hinges (3) front panel 2 Rotate the front panel until it snaps onto the front of these devices: • One hard drive • One optional floppy • Up to the side hinges. Drives Your computer supports a combination of the computer. Reattaching the Front Panel 1 Reattach the front panel to two CD or DVD drives 64 Removing and Installing Parts

Owner's Manual
Page 65
... and a data cable-to the back of the audio cable will attach to the drive connector and the other connector. Some drives may also have an audio connector; General Installation Guidelines Connect the IDE hard drive to the middle connector on the interface cable is the secondary device... (drive 1). that is primary or the boot device (drive 0), and the device attached to the system board connector labeled PRI IDE. When ...
... and a data cable-to the back of the audio cable will attach to the drive connector and the other connector. Some drives may also have an audio connector; General Installation Guidelines Connect the IDE hard drive to the middle connector on the interface cable is the secondary device... (drive 1). that is primary or the boot device (drive 0), and the device attached to the system board connector labeled PRI IDE. When ...
Owner's Manual
Page 66
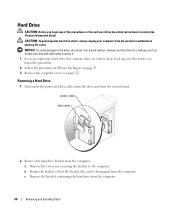
...cover (see page 52). power cable data cable 2 Remove the hard drive bracket from the system board. Hard Drive CAUTION: Before you begin this section, follow the safety instructions located in "Before You Begin" on a hard surface. CAUTION: To guard against electrical shock, always unplug your ...avoid damage to keep, back up your computer from the computer. 66 Removing and Installing Parts c Remove the bracket containing the hard drive from the electrical outlet before you begin any of the procedures in this procedure. 2 Follow the procedures in the Product Information ...
...cover (see page 52). power cable data cable 2 Remove the hard drive bracket from the system board. Hard Drive CAUTION: Before you begin this section, follow the safety instructions located in "Before You Begin" on a hard surface. CAUTION: To guard against electrical shock, always unplug your ...avoid damage to keep, back up your computer from the computer. 66 Removing and Installing Parts c Remove the bracket containing the hard drive from the electrical outlet before you begin any of the procedures in this procedure. 2 Follow the procedures in the Product Information ...
Owner's Manual
Page 67
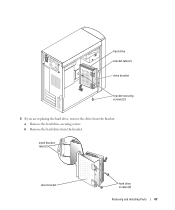
small bracket tabs (2) drive bracket hard drive screws (2) Removing and Installing Parts 67 hard drive bracket tabs (2) drive bracket bracket-securing screws (2) 3 If you are replacing the hard drive, remove the drive from the bracket. b Remove the hard drive from the bracket: a Remove the hard drive-securing screws.
small bracket tabs (2) drive bracket hard drive screws (2) Removing and Installing Parts 67 hard drive bracket tabs (2) drive bracket bracket-securing screws (2) 3 If you are replacing the hard drive, remove the drive from the bracket. b Remove the hard drive from the bracket: a Remove the hard drive-securing screws.


