
User Guide
Page 4
Using the Control Panel 17 Using the Remote Control 19 Using the On-Screen Display 21 Main Menu 21 Input Select 21 Auto-Adjust 22 Set Up 22 PICTURE (in PC Mode 23 PICTURE (in Video Mode 23 DISPLAY (in PC Mode 24 DISPLAY (in Video Mode 25 LAMP 26 OTHERS 27 4 Troubleshooting Your Projector 31 Guiding Signals 34 Changing the Lamp 35 5 Specifications 37 Contacting Dell 40 6 Appendix: Glossary 41 4 Contents
Using the Control Panel 17 Using the Remote Control 19 Using the On-Screen Display 21 Main Menu 21 Input Select 21 Auto-Adjust 22 Set Up 22 PICTURE (in PC Mode 23 PICTURE (in Video Mode 23 DISPLAY (in PC Mode 24 DISPLAY (in Video Mode 25 LAMP 26 OTHERS 27 4 Troubleshooting Your Projector 31 Guiding Signals 34 Changing the Lamp 35 5 Specifications 37 Contacting Dell 40 6 Appendix: Glossary 41 4 Contents

User Guide
Page 13
... projector Power button (see Using the Control Panel on page 17). 4 Turn on your source. message appears on the screen, ensure that the appropriate cables are still running. To turn the projector off: 1 Press the Power button . 2 Press the Power button again to select the desired source. 5 The projector displays the Dell logo, if it does not detect a signal. The Power light blinks blue until the Power button is pressed. 1 Remove the lens cap. 2 Connect the power cable and appropriate signal cables. NOTE: Wait for signal...
... projector Power button (see Using the Control Panel on page 17). 4 Turn on your source. message appears on the screen, ensure that the appropriate cables are still running. To turn the projector off: 1 Press the Power button . 2 Press the Power button again to select the desired source. 5 The projector displays the Dell logo, if it does not detect a signal. The Power light blinks blue until the Power button is pressed. 1 Remove the lens cap. 2 Connect the power cable and appropriate signal cables. NOTE: Wait for signal...

User Guide
Page 18
... the projector. 18 Using Your Projector You can also use the Right button to synchronize the projector to the input source. Turn the display on page 40). • A blinking amber TEMP light indicates that the projector is blinking amber, the projector automatically shuts down . You can also use the Down button to adjust the image distortion caused by tilting the projector. 5 / Auto adjust Allows you to adjust the OSD setting. If the problem persists, contact Dell (see Changing the Lamp on...
... the projector. 18 Using Your Projector You can also use the Right button to synchronize the projector to the input source. Turn the display on page 40). • A blinking amber TEMP light indicates that the projector is blinking amber, the projector automatically shuts down . You can also use the Down button to adjust the image distortion caused by tilting the projector. 5 / Auto adjust Allows you to adjust the OSD setting. If the problem persists, contact Dell (see Changing the Lamp on...
User Guide
Page 20
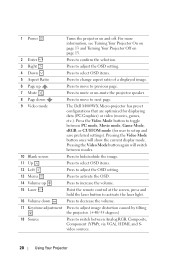
... VGA), HDMI, and Svideo sources. 20 Using Your Projector Press the Video Mode button to next page. 9 Video mode The Dell M409WX Micro-projector has preset configurations that are optimized for user to setup and save preferred settings). 1 Power Turns the projector on page 13. 2 Enter Press to confirm the selection. 3 Right Press to adjust the OSD setting. 4 Down Press to select OSD items. 5 Aspect Ratio Press to change aspect ratio of a displayed image...
... VGA), HDMI, and Svideo sources. 20 Using Your Projector Press the Video Mode button to next page. 9 Video mode The Dell M409WX Micro-projector has preset configurations that are optimized for user to setup and save preferred settings). 1 Power Turns the projector on page 13. 2 Enter Press to confirm the selection. 3 Right Press to adjust the OSD setting. 4 Down Press to select OSD items. 5 Aspect Ratio Press to change aspect ratio of a displayed image...
User Guide
Page 21
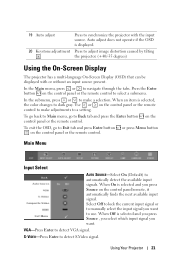
... make a selection. Use or on the control panel or the remote control. When On is displayed. 20 Keystone adjustment Press to automatically detect the available input signals. In the Main menu, press or to detect VGA signal. Main Menu Input Select AUTO SOURCE-Select On (Default) to adjust image distortion caused by tilting the projector. (+40/-35 degrees) Using the On-Screen Display The projector has a multi-language On-Screen Display (OSD) that can be displayed with the input source.
... make a selection. Use or on the control panel or the remote control. When On is displayed. 20 Keystone adjustment Press to automatically detect the available input signals. In the Main menu, press or to detect VGA signal. Main Menu Input Select AUTO SOURCE-Select On (Default) to adjust image distortion caused by tilting the projector. (+40/-35 degrees) Using the On-Screen Display The projector has a multi-language On-Screen Display (OSD) that can be displayed with the input source.

User Guide
Page 22
... the projector model name, the present input source and projector series number (PPID#). 22 Using Your Projector KEYSTONE-Allows you can project the image from behind a translucent screen. ASPECT RATIO-Allows you to select an aspect ratio to detect HDMI signal. PROJECTOR MODE-Select how the image appears: • Front Projection-Desktop (the default). • Rear Projection-Desktop - HDMI-Press Enter to adjust how the image appears. • Original - Auto-Adjust Auto Adjust automatically adjusts the projector's display settings. COMPOSITE VIDEO-Press...
... the projector model name, the present input source and projector series number (PPID#). 22 Using Your Projector KEYSTONE-Allows you can project the image from behind a translucent screen. ASPECT RATIO-Allows you to select an aspect ratio to detect HDMI signal. PROJECTOR MODE-Select how the image appears: • Front Projection-Desktop (the default). • Rear Projection-Desktop - HDMI-Press Enter to adjust how the image appears. • Original - Auto-Adjust Auto Adjust automatically adjusts the projector's display settings. COMPOSITE VIDEO-Press...
User Guide
Page 23
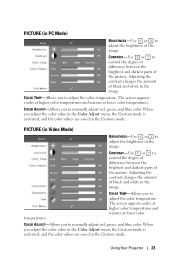
... color temperature. temperatures. PICTURE (in the image. COLOR TEMP-Allows you to adjust the brightness of the image. Adjusting the contrast changes the amount of black and white in PC Mode) BRIGHTNESS-Use or to manually adjust red, green, and blue color. When you to control the degree of difference between the brightest and darkest parts of the picture. CONTRAST-Use or to manually adjust red, green, and blue color. Using Your Projector 23 PICTURE (in the image. COLOR ADJUST-Allows you adjust the color value in the Color Adjust menu...
... color temperature. temperatures. PICTURE (in the image. COLOR TEMP-Allows you to adjust the brightness of the image. Adjusting the contrast changes the amount of black and white in PC Mode) BRIGHTNESS-Use or to manually adjust red, green, and blue color. When you to control the degree of difference between the brightest and darkest parts of the picture. CONTRAST-Use or to manually adjust red, green, and blue color. Using Your Projector 23 PICTURE (in the image. COLOR ADJUST-Allows you adjust the color value in the Color Adjust menu...

User Guide
Page 26
... to reset the lamp timer. By default, the delay period is in power saving mode, the projector automatically turns on. If an input signal is detected when projector is set to turn on the screen. LAMP RESET-After you install a new lamp, select Yes to use the projector at a lower power level (168 Watts). NOTE: If Quick Shutdown is not detected within a short period of the Power button. The Picture menu, provides the following options: LAMP HOUR-Displays the operating hours...
... to reset the lamp timer. By default, the delay period is in power saving mode, the projector automatically turns on. If an input signal is detected when projector is set to turn on the screen. LAMP RESET-After you install a new lamp, select Yes to use the projector at a lower power level (168 Watts). NOTE: If Quick Shutdown is not detected within a short period of the Power button. The Picture menu, provides the following options: LAMP HOUR-Displays the operating hours...

User Guide
Page 28
... Menu button on the control pane or remote control for 15 seconds. This means that is connected to select the location of the OSD Timeout. Select On to disable the Menu Lock. The default setting is taken without authorization, and thus serves as a theftprevention feature. PASSWORD-Allows you to projector is powered on the pop-up screen. MENU POSITION-Allows you to Enable the password setting. 28 Using Your Projector...
... Menu button on the control pane or remote control for 15 seconds. This means that is connected to select the location of the OSD Timeout. Select On to disable the Menu Lock. The default setting is taken without authorization, and thus serves as a theftprevention feature. PASSWORD-Allows you to projector is powered on the pop-up screen. MENU POSITION-Allows you to Enable the password setting. 28 Using Your Projector...

User Guide
Page 30
... and hold the Menu button and button on the projectors control panel simultaneously for two seconds. TEST PATTERN-Select 1 or 2 to activate the built-in the original password and then enter the new password. FACTORY RESET -Select On to reset the projector to confirm. Enter the new password again to its factory default settings. 30 Using Your Projector Key in Test Pattern to change the password. CHANGE PASSWORD-Allows you to test the focus and resolution.
... and hold the Menu button and button on the projectors control panel simultaneously for two seconds. TEST PATTERN-Select 1 or 2 to activate the built-in the original password and then enter the new password. FACTORY RESET -Select On to reset the projector to confirm. Enter the new password again to its factory default settings. 30 Using Your Projector Key in Test Pattern to change the password. CHANGE PASSWORD-Allows you to test the focus and resolution.

User Guide
Page 32
..., set the resolution of the computer to 39.4 ft [12 m]). 32 Troubleshooting Your Projector Problem (continued) Possible Solution (continued) Partial, scrolling, or incorrectly displayed image 1 Press the Auto adjust button on the remote control or the control panel. 2 If you are not using a Dell portable computer, see your documentation for the external monitor port. If you experience difficulty in PC Mode only). b Verify the setting is within the required distance...
..., set the resolution of the computer to 39.4 ft [12 m]). 32 Troubleshooting Your Projector Problem (continued) Possible Solution (continued) Partial, scrolling, or incorrectly displayed image 1 Press the Auto adjust button on the remote control or the control panel. 2 If you are not using a Dell portable computer, see your documentation for the external monitor port. If you experience difficulty in PC Mode only). b Verify the setting is within the required distance...

User Guide
Page 33
... press the Menu button on the control panel or remote control for 15 seconds to input signal format with 2 new AAA batteries. Check if the laser beam transmitted from the OSD and adjust the projector mode. To replace the lamp, see on page 35. If so, replace with a default setting. If the image is too dim. Troubleshooting Your Projector 33 Problem (continued) The image is stretched when displaying a 16:9 DVD Image is reversed Lamp is burned...
... press the Menu button on the control panel or remote control for 15 seconds to input signal format with 2 new AAA batteries. Check if the laser beam transmitted from the OSD and adjust the projector mode. To replace the lamp, see on page 35. If so, replace with a default setting. If the image is too dim. Troubleshooting Your Projector 33 Problem (continued) The image is stretched when displaying a 16:9 DVD Image is reversed Lamp is burned...

User Guide
Page 34
... Projector in Standby mode. Guiding Signals Projector Status Description Standby mode Projector in Normal mode, ready to display an image. Warming up mode Projector takes some time to warm up and power on the projector. Lamp on the projector.. Power Saving mode Power Saving mode has been activated. The projector will automatically enter standby mode, if an input signal is within operational range. Cooling before entering Power Saving mode. The projector automatically shuts down . The air vents may be above 35℃. If problem persists, contact Dell. Lamp driver...
... Projector in Standby mode. Guiding Signals Projector Status Description Standby mode Projector in Normal mode, ready to display an image. Warming up mode Projector takes some time to warm up and power on the projector. Lamp on the projector.. Power Saving mode Power Saving mode has been activated. The projector will automatically enter standby mode, if an input signal is within operational range. Cooling before entering Power Saving mode. The projector automatically shuts down . The air vents may be above 35℃. If problem persists, contact Dell. Lamp driver...

User Guide
Page 35
... screws that secure the lamp. 5 Pull the lamp up by its useful life in full power operation. www.dell.com/lamps CAUTION: Before you begin any time. Replacement suggested. To replace the lamp: 1 Turn off the projector and disconnect the power cable. CAUTION: If the lamp shatters, remove all broken pieces from the projector and dispose or recycle according to state, local, or federal law. Troubleshooting Your Projector 35 Changing the Lamp The following message...
... screws that secure the lamp. 5 Pull the lamp up by its useful life in full power operation. www.dell.com/lamps CAUTION: Before you begin any time. Replacement suggested. To replace the lamp: 1 Turn off the projector and disconnect the power cable. CAUTION: If the lamp shatters, remove all broken pieces from the projector and dispose or recycle according to state, local, or federal law. Troubleshooting Your Projector 35 Changing the Lamp The following message...

User Guide
Page 36
FOR LAMP SPECIFIC DISPOSAL INFORMATION CHECK WWW.LAMPRECYCLE.ORG. 36 Troubleshooting Your Projector Otherwise, dispose or recycle the lamp. FOR MORE INFORMATION, GO TO WWW.DELL.COM/HG OR CONTACT THE ELECTRONIC INDUSTRIES ALLIANCE AT WWW.EIAE.ORG. NOTE: Dell may require lamps replaced under warranty to be returned. For more information, see Lamp Disposal on page 36. 7 Tighten the two screws that...
FOR LAMP SPECIFIC DISPOSAL INFORMATION CHECK WWW.LAMPRECYCLE.ORG. 36 Troubleshooting Your Projector Otherwise, dispose or recycle the lamp. FOR MORE INFORMATION, GO TO WWW.DELL.COM/HG OR CONTACT THE ELECTRONIC INDUSTRIES ALLIANCE AT WWW.EIAE.ORG. NOTE: Dell may require lamps replaced under warranty to be returned. For more information, see Lamp Disposal on page 36. 7 Tighten the two screws that...
User Guide
Page 38
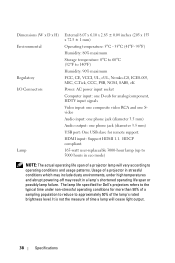
The lamp life specified for Dell's projectors refers to approximately 50% of the lamp's rated brightness level. HDMI input: Support HDMI 1.1. HDCP compliant. 165-watt user-replaceable 3000-hour lamp (up to 5000 hours in stressful conditions which may result in a lamp's shortened operating life span or possibly lamp failure. Dimensions (W x D x H) Environmental Regulatory I/O Connectors Lamp External 8.07 x 6.10 x 2.85 ± 0.04 inches (205 x 155 x 72.5 ± 1 mm) Operating temperature: 5oC - 35oC (41oF- 95oF...
The lamp life specified for Dell's projectors refers to approximately 50% of the lamp's rated brightness level. HDMI input: Support HDMI 1.1. HDCP compliant. 165-watt user-replaceable 3000-hour lamp (up to 5000 hours in stressful conditions which may result in a lamp's shortened operating life span or possibly lamp failure. Dimensions (W x D x H) Environmental Regulatory I/O Connectors Lamp External 8.07 x 6.10 x 2.85 ± 0.04 inches (205 x 155 x 72.5 ± 1 mm) Operating temperature: 5oC - 35oC (41oF- 95oF...

User Guide
Page 42
... the size of frequency. DLP®- Each DMD consists of thousands of electrical signals. Focal Length- HDMI- Keystone Correction- Laser pointer- Minimum Distance- National Television Standards Committee. A European broadcast standard for video and broadcasting, with a video format of 525 lines at 25 frames per seconds of tilting, microscopic aluminum alloy mirrors mounted on the screen Maximum Distance- Diagonal Screen- Digital Light Processing™-Reflective display technology...
... the size of frequency. DLP®- Each DMD consists of thousands of electrical signals. Focal Length- HDMI- Keystone Correction- Laser pointer- Minimum Distance- National Television Standards Committee. A European broadcast standard for video and broadcasting, with a video format of 525 lines at 25 frames per seconds of tilting, microscopic aluminum alloy mirrors mounted on the screen Maximum Distance- Diagonal Screen- Digital Light Processing™-Reflective display technology...

User Guide
Page 43
... (color, C). SXGA- WXGA- Zoom Lens- Feature that uses a 4-pin mini-DIN connector to PAL but with full zoom. Lens with a variable focal length that requires separate signals for rear projection. Is the ratio between the smallest and largest image a lens can projector from a fixed distance. SECAM- Super Video Graphics Array- 800 x 600 pixels count. RGB- typically used to describe a monitor that allows operator to as Y/C. Reverse Image- VGA...
... (color, C). SXGA- WXGA- Zoom Lens- Feature that uses a 4-pin mini-DIN connector to PAL but with full zoom. Lens with a variable focal length that requires separate signals for rear projection. Is the ratio between the smallest and largest image a lens can projector from a fixed distance. SECAM- Super Video Graphics Array- 800 x 600 pixels count. RGB- typically used to describe a monitor that allows operator to as Y/C. Reverse Image- VGA...
User Guide
Page 44
...Image Size 16 Adjusting the Projected Image 14 Adjusting the Projector Height 14 Elevator button 14 Elevator foot 14 Tilt adjustment wheel 14 Adjusting the Projector Zoom and Focus 15 Focus ring 15 Zoom tab 15 C Changing the Lamp 35 Connecting a Computer Power cable 8 USB to USB cable 8 VGA to VGA cable 8 Connecting a DVD Player Using a Component Cable 11 D-sub to YPbPr cable 11 Power cable 11 Using a Composite Cable 10 Composite video cable 10 Power cable 10 Using an HDMI Cable 12 HDMI cable 12 Power cable 12 Using an S-video Cable 9 Power cable 9 S-video cable 9 Connection Ports Audio input...
...Image Size 16 Adjusting the Projected Image 14 Adjusting the Projector Height 14 Elevator button 14 Elevator foot 14 Tilt adjustment wheel 14 Adjusting the Projector Zoom and Focus 15 Focus ring 15 Zoom tab 15 C Changing the Lamp 35 Connecting a Computer Power cable 8 USB to USB cable 8 VGA to VGA cable 8 Connecting a DVD Player Using a Component Cable 11 D-sub to YPbPr cable 11 Power cable 11 Using a Composite Cable 10 Composite video cable 10 Power cable 10 Using an HDMI Cable 12 HDMI cable 12 Power cable 12 Using an S-video Cable 9 Power cable 9 S-video cable 9 Connection Ports Audio input...

User Guide
Page 45
Control panel 6 Elevator button 6 Focus ring 6 IR receiver 6 Lens 6 Zoom tab 6 O On-Screen Display 21 Auto-Adjust 22 DISPLAY (in PC Mode) 24 DISPLAY (in Video Mode) 25 Input Select 21 LAMP 26 LANGUAGE 27 Main Menu 21 Other 27 PICTURE (in PC Mode) 23 PICTURE (in Video Mode) 23 Set Up 22 P Phone numbers 40 Powering On/Off the Projector Turning Your Projector Off 13 Turning Your Projector On 13 R Remote Control 19 Audio 38 Brightness 37 Color Wheel Speed 37 Compatibility Modes 39 Contrast Ratio 37...
Control panel 6 Elevator button 6 Focus ring 6 IR receiver 6 Lens 6 Zoom tab 6 O On-Screen Display 21 Auto-Adjust 22 DISPLAY (in PC Mode) 24 DISPLAY (in Video Mode) 25 Input Select 21 LAMP 26 LANGUAGE 27 Main Menu 21 Other 27 PICTURE (in PC Mode) 23 PICTURE (in Video Mode) 23 Set Up 22 P Phone numbers 40 Powering On/Off the Projector Turning Your Projector Off 13 Turning Your Projector On 13 R Remote Control 19 Audio 38 Brightness 37 Color Wheel Speed 37 Compatibility Modes 39 Contrast Ratio 37...


