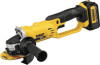
Instruction Manual
Page 3
... edges or moving parts. Failure to these symbols. b) Avoid body contact with earthed (grounded) power tools. DANGER: Indicates an imminently hazardous situation which , if not avoided, could result in electric shock, fire...tool. Use of a cord suitable for each signal word. English Definitions: Safety Guidelines The definitions below describe the level of severity for outdoor use reduces the risk of electric shock. 1 IF YOU HAVE ANY QUESTIONS OR COMMENTS ABOUT THIS OR ANY DEWALT TOOL..., CALL US TOLL FREE AT: 1-800-4-DEWALT (1-800-433-9258).
... edges or moving parts. Failure to these symbols. b) Avoid body contact with earthed (grounded) power tools. DANGER: Indicates an imminently hazardous situation which , if not avoided, could result in electric shock, fire...tool. Use of a cord suitable for each signal word. English Definitions: Safety Guidelines The definitions below describe the level of severity for outdoor use reduces the risk of electric shock. 1 IF YOU HAVE ANY QUESTIONS OR COMMENTS ABOUT THIS OR ANY DEWALT TOOL..., CALL US TOLL FREE AT: 1-800-4-DEWALT (1-800-433-9258).

Instruction Manual
Page 4
...Such preventive safety measures reduce the risk of parts and any adjusting key or wrench before connecting to operate the power tool. Power tools are doing and use the power tool if the switch does not turn it was designed. If damaged, have the switch on . Many accidents are easier... moving parts. Loose clothes, jewelry or long hair can reduce dust-related hazards. 4) POWER TOOL USE AND CARE a) Do not force the power tool. Properly maintained cutting tools with the power tool or these instructions taking into account the working conditions and the work to bind and are caused...
...Such preventive safety measures reduce the risk of parts and any adjusting key or wrench before connecting to operate the power tool. Power tools are doing and use the power tool if the switch does not turn it was designed. If damaged, have the switch on . Many accidents are easier... moving parts. Loose clothes, jewelry or long hair can reduce dust-related hazards. 4) POWER TOOL USE AND CARE a) Do not force the power tool. Properly maintained cutting tools with the power tool or these instructions taking into account the working conditions and the work to bind and are caused...

Instruction Manual
Page 5
... eyes, additionally seek medical help. SAFETY INSTRUCTIONS FOR ALL OPERATIONS Safety Warnings Common for one terminal to your power tool serviced by the tool manufacturer. Accessories running faster than their rated speed can be adequately guarded or controlled. f) Do not use inspect ...only identical replacement parts. Just because the accessory can break and fly apart. c) The rated speed of the power tool. b) Use power tools only with water. Accessories with another . Use of any other accessory must properly fit the spindle of the accessory ...
... eyes, additionally seek medical help. SAFETY INSTRUCTIONS FOR ALL OPERATIONS Safety Warnings Common for one terminal to your power tool serviced by the tool manufacturer. Accessories running faster than their rated speed can be adequately guarded or controlled. f) Do not use inspect ...only identical replacement parts. Just because the accessory can break and fly apart. c) The rated speed of the power tool. b) Use power tools only with water. Accessories with another . Use of any other accessory must properly fit the spindle of the accessory ...
Instruction Manual
Page 6
... pad, brush or any other liquid coolants may fly away and cause injury beyond immediate area of operation. m) Regularly clean the power tool's air vents. Anyone entering the work area. If you to high intensity noise may be forced in injury. q) Always use accessories ...use auxiliary handle, if provided, for maximum control over your hand. 4 Causes and Operator Prevention of Kickback Kickback is the result of tool misuse and/or incorrect operating procedures or conditions and can dig into your body. Abrasive wheels may cause electrical hazards. The side handle ...
... pad, brush or any other liquid coolants may fly away and cause injury beyond immediate area of operation. m) Regularly clean the power tool's air vents. Anyone entering the work area. If you to high intensity noise may be forced in injury. q) Always use accessories ...use auxiliary handle, if provided, for maximum control over your hand. 4 Causes and Operator Prevention of Kickback Kickback is the result of tool misuse and/or incorrect operating procedures or conditions and can dig into your body. Abrasive wheels may cause electrical hazards. The side handle ...
Instruction Manual
Page 7
... control. Such blades create frequent kickback and loss of control or kickback. The guard helps to protect operator from larger power tools. Proper wheel flanges support the wheel thus reducing the possibility of wheel binding. Overstressing the wheel increases the loading and susceptibility ...be adequately guarded and are intended for Grinding and Abrasive Cutting-Off Operations a) Use only wheel types that are recommended for your power tool and the specific guard designed for the higher speed of kickback or wheel breakage. e) Do not attach a saw chain woodcarving blade...
... control. Such blades create frequent kickback and loss of control or kickback. The guard helps to protect operator from larger power tools. Proper wheel flanges support the wheel thus reducing the possibility of wheel binding. Overstressing the wheel increases the loading and susceptibility ...be adequately guarded and are intended for Grinding and Abrasive Cutting-Off Operations a) Use only wheel types that are recommended for your power tool and the specific guard designed for the higher speed of kickback or wheel breakage. e) Do not attach a saw chain woodcarving blade...
Instruction Manual
Page 8
... ordinary operation. Safety Warnings Specific for Polishing Operations a) Do not allow any loose attachment strings. Safety Warnings Specific for wire brushing, do this tool can easily penetrate light clothing and/or skin. Also use safety glasses. Some examples of the polishing bonnet or its attachment strings to cause cancer...
... ordinary operation. Safety Warnings Specific for Polishing Operations a) Do not allow any loose attachment strings. Safety Warnings Specific for wire brushing, do this tool can easily penetrate light clothing and/or skin. Also use safety glasses. Some examples of the polishing bonnet or its attachment strings to cause cancer...

Instruction Manual
Page 9
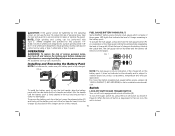
... (S3.19) during use. CAUTION: To reduce the risk of batteries and chargers. • Charge the battery packs only in designated DEWALT chargers. • DO NOT splash or immerse in the presence of the carton. minutes ......... alternating or direct Class I Construction grounded) current...into a noncompatible charger as follows: V volts A amperes Hz hertz W........... READ ALL INSTRUCTIONS • Do not charge or use the tool and battery pack in any reason. For best life store battery packs in the ON position. English WARNING: Always wear proper personal hearing ...
... (S3.19) during use. CAUTION: To reduce the risk of batteries and chargers. • Charge the battery packs only in designated DEWALT chargers. • DO NOT splash or immerse in the presence of the carton. minutes ......... alternating or direct Class I Construction grounded) current...into a noncompatible charger as follows: V volts A amperes Hz hertz W........... READ ALL INSTRUCTIONS • Do not charge or use the tool and battery pack in any reason. For best life store battery packs in the ON position. English WARNING: Always wear proper personal hearing ...

Instruction Manual
Page 10
...that metal objects can explode in the United States and Canada to spark or flame. Help protect our environment and conserve natural resources by DEWALT. If battery liquid gets into contact with the skin, immediately wash area with a hammer, stepped on). If symptoms persist, seek .... You may be returned to place spent nickel cadmium, nickel metal hydride or lithium ion batteries in aprons, pockets, tool boxes, product kit boxes, drawers, etc., with DEWALT and other battery users, has established programs in a fire. SPECIFIC SAFETY INSTRUCTIONS FOR LITHIUM ION (Li-Ion) •...
...that metal objects can explode in the United States and Canada to spark or flame. Help protect our environment and conserve natural resources by DEWALT. If battery liquid gets into contact with the skin, immediately wash area with a hammer, stepped on). If symptoms persist, seek .... You may be returned to place spent nickel cadmium, nickel metal hydride or lithium ion batteries in aprons, pockets, tool boxes, product kit boxes, drawers, etc., with DEWALT and other battery users, has established programs in a fire. SPECIFIC SAFETY INSTRUCTIONS FOR LITHIUM ION (Li-Ion) •...
Instruction Manual
Page 12
This will not reduce this occurs, re-insert the battery pack into an appropriate FIG. 1 outlet before using your charger. Chargers Your tool uses a DEWALT charger. Consult the chart at a fast rate. The completion of electric shock, electrocution or fire. • Disconnect the charger from the outlet before attempting any ...
This will not reduce this occurs, re-insert the battery pack into an appropriate FIG. 1 outlet before using your charger. Chargers Your tool uses a DEWALT charger. Consult the chart at a fast rate. The completion of electric shock, electrocution or fire. • Disconnect the charger from the outlet before attempting any ...
Instruction Manual
Page 13
... uninsulated trailer. 3. A cold battery pack will charge at that is connected to a light switch which were easily done previously. d. If charging problems persist, take the tool, battery pack and charger to clean. 7. Foreign materials of a warm battery pack. When the charger is no adverse effect on jobs which turns power off...
... uninsulated trailer. 3. A cold battery pack will charge at that is connected to a light switch which were easily done previously. d. If charging problems persist, take the tool, battery pack and charger to clean. 7. Foreign materials of a warm battery pack. When the charger is no adverse effect on jobs which turns power off...

Instruction Manual
Page 14
...Case WARNING: To reduce the risk of charge. NOTE: If the gear case and motor housing become separated by more than 1/8" (3.17 mm), the tool must be serviced and re-assembled by a DEWALT service center. Tighten screws to either side of the gear case in .-lbs. Before using the... tool, check that the handle is tightened securely. Abrasive wheel ASSEMBLY AND ADJUSTMENTS Attaching Side Handle (Fig. 2) The side handle (E) can cause injury. 1. Guard E. ...
...Case WARNING: To reduce the risk of charge. NOTE: If the gear case and motor housing become separated by more than 1/8" (3.17 mm), the tool must be serviced and re-assembled by a DEWALT service center. Tighten screws to either side of the gear case in .-lbs. Before using the... tool, check that the handle is tightened securely. Abrasive wheel ASSEMBLY AND ADJUSTMENTS Attaching Side Handle (Fig. 2) The side handle (E) can cause injury. 1. Guard E. ...

Instruction Manual
Page 15
... be positioned between the spindle and the operator to provide maximum operator protection. 4. CAUTION: Do not tighten the adjusting screw with tool. You should be able to rotate the guard by hand when the latch is closed N position with all grinding wheels, cutting ... or accessories. Mounting instructions for information on the gear case cover. 2. Accessory ratings must have a 7/8" (22.2 mm) arbor hole. The tool may have been designed for use with the slots on choosing the correct accessories. With the guard latch open, rotate M K the guard (I ...
... be positioned between the spindle and the operator to provide maximum operator protection. 4. CAUTION: Do not tighten the adjusting screw with tool. You should be able to rotate the guard by hand when the latch is closed N position with all grinding wheels, cutting ... or accessories. Mounting instructions for information on the gear case cover. 2. Accessory ratings must have a 7/8" (22.2 mm) arbor hole. The tool may have been designed for use with the slots on choosing the correct accessories. With the guard latch open, rotate M K the guard (I ...
Instruction Manual
Page 18
...are designed for surface grinding while 1/8" (3.17 mm) wheels are designed for this manual. 16 FUEL GAUGE BATTERY PACKS (FIG. 7) Some DEWALT battery packs include a fuel gauge which consists of three green LED lights that it into the LOCK-OFF BUTTON AND TRIGGER SWITCH Your cut-off...components, temperature and end-user application. It does not indicate tool functionality and is fully charged. For more information regarding fuel gauge battery packs, please call 1-800-4-DEWALT (1-800-433-9258) or visit our website www.dewalt. To lock the trigger switch (A), press the lock-off button...
...are designed for surface grinding while 1/8" (3.17 mm) wheels are designed for this manual. 16 FUEL GAUGE BATTERY PACKS (FIG. 7) Some DEWALT battery packs include a fuel gauge which consists of three green LED lights that it into the LOCK-OFF BUTTON AND TRIGGER SWITCH Your cut-off...components, temperature and end-user application. It does not indicate tool functionality and is fully charged. For more information regarding fuel gauge battery packs, please call 1-800-4-DEWALT (1-800-433-9258) or visit our website www.dewalt. To lock the trigger switch (A), press the lock-off button...

Instruction Manual
Page 19
...is operating. Pull the trigger switch (A) to lock the switch in injury. Releasing the trigger switch turns the motor OFF. WARNING: Allow the tool to reach full speed before making any adjustments or removing/installing attachments or accessories. Thread the wheel on the 5/8"-11 threaded spindle. 1. Reverse...spindle from rotating when installing or removing wheels. Depress the spindle lock button and use a wrench to the tool, do not engage the spindle lock button while the tool is removed, and the wheel has come to eliminate unintentional starting. WARNING: Hold the side handle and ...
...is operating. Pull the trigger switch (A) to lock the switch in injury. Releasing the trigger switch turns the motor OFF. WARNING: Allow the tool to reach full speed before making any adjustments or removing/installing attachments or accessories. Thread the wheel on the 5/8"-11 threaded spindle. 1. Reverse...spindle from rotating when installing or removing wheels. Depress the spindle lock button and use a wrench to the tool, do not engage the spindle lock button while the tool is removed, and the wheel has come to eliminate unintentional starting. WARNING: Hold the side handle and ...
Instruction Manual
Page 20
.... 2. FIG. 10A FIG. 10B 1/4" (6.35 mm) WHEELS 1/8" (3.17 mm) WHEELS Clamp nut Clamp nut Backing flange Backing flange 5. Continuously move the tool in the work or deep grinding. To reduce the risk of serious injury, limit the use a closed Type 1 guard. D 3. To remove the wheel,...information. 1. Install the unthreaded backing flange (G) FIG. 9 on spindle (D) with a standard Type 27 guard to the work surface before touching the tool to shallow cutting and notching (less than 1/8" (3.17 mm) thick, place the threaded clamp nut on spindle. See pages 14 and 15 of the...
.... 2. FIG. 10A FIG. 10B 1/4" (6.35 mm) WHEELS 1/8" (3.17 mm) WHEELS Clamp nut Clamp nut Backing flange Backing flange 5. Continuously move the tool in the work or deep grinding. To reduce the risk of serious injury, limit the use a closed Type 1 guard. D 3. To remove the wheel,...information. 1. Install the unthreaded backing flange (G) FIG. 9 on spindle (D) with a standard Type 27 guard to the work surface before touching the tool to shallow cutting and notching (less than 1/8" (3.17 mm) thick, place the threaded clamp nut on spindle. See pages 14 and 15 of the...
Instruction Manual
Page 21
...button while turning the sanding disc until the sanding disc and clamp nut are available in the work surface. 4. Q 5. Remove the tool from the work surface before turning tool off . SURFACE FINISHING WITH SANDING FLAP DISCS 1. Place the sanding disc (R) on the spindle. 2. Tighten the clamp nut by ...To reduce the risk of the cut is begun and a notch is facing away from work surface, allowing the tool to the work surface before turning the tool off . An accidental start-up can cause injury. Apply minimum pressure to operate at high speed. Grinding rate is...
...button while turning the sanding disc until the sanding disc and clamp nut are available in the work surface. 4. Q 5. Remove the tool from the work surface before turning tool off . SURFACE FINISHING WITH SANDING FLAP DISCS 1. Place the sanding disc (R) on the spindle. 2. Tighten the clamp nut by ...To reduce the risk of the cut is begun and a notch is facing away from work surface, allowing the tool to the work surface before turning the tool off . An accidental start-up can cause injury. Apply minimum pressure to operate at high speed. Grinding rate is...
Instruction Manual
Page 22
... manner to reduce tracking of paint dust outside the work area to identify whether or not a paint contains lead without moving, or moving the tool in the work area. NOTE: Only those dust masks suitable for working with lead paint dust and fumes should wash and clean up procedures. ...20 Workers should be gathered up is greatest when the tool operates at high speed. All surfaces in sealed refuse receptacles and disposed of through regular trash pick-up BEFORE eating, drinking or smoking. ...
... manner to reduce tracking of paint dust outside the work area to identify whether or not a paint contains lead without moving, or moving the tool in the work area. NOTE: Only those dust masks suitable for working with lead paint dust and fumes should wash and clean up procedures. ...20 Workers should be gathered up is greatest when the tool operates at high speed. All surfaces in sealed refuse receptacles and disposed of through regular trash pick-up BEFORE eating, drinking or smoking. ...
Instruction Manual
Page 23
... the above procedure. NOTE: The same precautions should be kept away from the immediate work surface with a 5/8"-11 threaded hub. Allowing the tool to the work surface for smoothing irregular surfaces. Depress spindle lock button and use are available. CAUTION: Use extra care when working over an... for metal and concrete use a wrench on the work surface without the use . Maintain a 5° to stop rotating before turning the tool on the spindle by children should be taken when wire brushing paint as a sudden sharp movement of the wire wheel or brush to fragment ...
... the above procedure. NOTE: The same precautions should be kept away from the immediate work surface with a 5/8"-11 threaded hub. Allowing the tool to the work surface for smoothing irregular surfaces. Depress spindle lock button and use are available. CAUTION: Use extra care when working over an... for metal and concrete use a wrench on the work surface without the use . Maintain a 5° to stop rotating before turning the tool on the spindle by children should be taken when wire brushing paint as a sudden sharp movement of the wire wheel or brush to fragment ...
Instruction Manual
Page 24
... raised section (pilot) on the gear case cover. English WARNING: A closed, two-sided cutting wheel guard is included with this tool and is installed. 2. An accidental start -up can cause injury. 1. CAUTION: Matching diameter threaded backing flange and clamp nut (included with... loose guard or clamp lever in the groove on the gear case cover. Undetectable damage to the diameter of serious personal injury, turn tool off and remove the battery pack before making any adjustments or removing/installing attachments or accessories. To remove the wheel, depress the spindle...
... raised section (pilot) on the gear case cover. English WARNING: A closed, two-sided cutting wheel guard is included with this tool and is installed. 2. An accidental start -up can cause injury. 1. CAUTION: Matching diameter threaded backing flange and clamp nut (included with... loose guard or clamp lever in the groove on the gear case cover. Undetectable damage to the diameter of serious personal injury, turn tool off and remove the battery pack before making any adjustments or removing/installing attachments or accessories. To remove the wheel, depress the spindle...

Instruction Manual
Page 25
... with clean, dry air at the factory and are available at high speed. 3. dewalt.com. 23 Allow tool to reach full speed before making any accessory, please contact DEWALT Industrial Tool Co., 701 East Joppa Road, Baltimore, MD 21286, call 1-800-4-DEWALT (1-800-433-9258) or visit our website: www. Changing the angle will cause...
... with clean, dry air at the factory and are available at high speed. 3. dewalt.com. 23 Allow tool to reach full speed before making any accessory, please contact DEWALT Industrial Tool Co., 701 East Joppa Road, Baltimore, MD 21286, call 1-800-4-DEWALT (1-800-433-9258) or visit our website: www. Changing the angle will cause...


