Instruction Manual
Page 3
... PLUG INSTRUCTIONS 2 SAFETY INSTRUCTIONS FOR ALL TOOLS 2 ADDITIONAL SAFETY RULES 2 ELECTRICAL CONNECTION 3 ACCESSORIES ...3 BLADE DESCRIPTIONS 4 UNPACKING YOUR SAW 4 SPECIFICATIONS ...4 FAMILIARIZATION ...5 BENCH MOUNTING ...5 CHANGING OR INSTALLING A NEW BLADE 6 TRANSPORTING THE SAW 6 ADJUSTMENTS ...6 MITER SCALE ADJUSTMENT 6 MITER POINTER ADJUSTMENT 7 BEVEL SQUARE TO TABLE 7 BEVEL POINTER ...7 BEVEL STOP ADJUSTMENT 7 FENCE ADJUSTMENT 7 AUTOMATIC ELECTRIC BRAKE 7 GUARD ACTUATION AND VISIBILITY...
... PLUG INSTRUCTIONS 2 SAFETY INSTRUCTIONS FOR ALL TOOLS 2 ADDITIONAL SAFETY RULES 2 ELECTRICAL CONNECTION 3 ACCESSORIES ...3 BLADE DESCRIPTIONS 4 UNPACKING YOUR SAW 4 SPECIFICATIONS ...4 FAMILIARIZATION ...5 BENCH MOUNTING ...5 CHANGING OR INSTALLING A NEW BLADE 6 TRANSPORTING THE SAW 6 ADJUSTMENTS ...6 MITER SCALE ADJUSTMENT 6 MITER POINTER ADJUSTMENT 7 BEVEL SQUARE TO TABLE 7 BEVEL POINTER ...7 BEVEL STOP ADJUSTMENT 7 FENCE ADJUSTMENT 7 AUTOMATIC ELECTRIC BRAKE 7 GUARD ACTUATION AND VISIBILITY...
Instruction Manual
Page 4
... IF YOU HAVE ANY QUESTIONS OR COMMENTS ABOUT THIS OR ANY DEWALT TOOL, CALL US TOLL FREE AT: 1-800-4-DEWALT (1-800-433-9258) Important Safety Instructions WARNING: When using an... power source and wait for alignment of moving parts, binding of moving parts, breakage of the miter saw blade sharp. • DO - Repair or replace damaged cords. Don't force tool or attachment...Minimum Gage for lubricating and changing accessories. • DISCONNECT TOOLS before turning tool on the table and against blade. No loose clothing, gloves, neckties, rings, bracelets, or other part that...
... IF YOU HAVE ANY QUESTIONS OR COMMENTS ABOUT THIS OR ANY DEWALT TOOL, CALL US TOLL FREE AT: 1-800-4-DEWALT (1-800-433-9258) Important Safety Instructions WARNING: When using an... power source and wait for alignment of moving parts, binding of moving parts, breakage of the miter saw blade sharp. • DO - Repair or replace damaged cords. Don't force tool or attachment...Minimum Gage for lubricating and changing accessories. • DISCONNECT TOOLS before turning tool on the table and against blade. No loose clothing, gloves, neckties, rings, bracelets, or other part that...
Instruction Manual
Page 5
...defects or other injury. Wedge anything but designated voltage. • DON'T - Operate saw table is turned off and unplugged. Reach underneath the saw blade is connected to hold motor shaft. • DON'T - The saw unless it 's running. • DON'T - Wear protective clothing and wash exposed ...during use NIOSH/OSHA approved respiratory protection appropriate for your local service center. Your risk from DEWALT Service Centers and your exposure to get into your miter saw blade or may cause instability of 10 percent or more appropriate. Allowing dust to these chemicals...
...defects or other injury. Wedge anything but designated voltage. • DON'T - Operate saw table is turned off and unplugged. Reach underneath the saw blade is connected to hold motor shaft. • DON'T - The saw unless it 's running. • DON'T - Wear protective clothing and wash exposed ...during use NIOSH/OSHA approved respiratory protection appropriate for your local service center. Your risk from DEWALT Service Centers and your exposure to get into your miter saw blade or may cause instability of 10 percent or more appropriate. Allowing dust to these chemicals...
Instruction Manual
Page 6
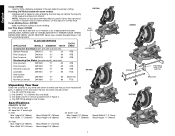
... (196mm) 45˚ miter Max. English Clamp: DW7082 Used for firmly clamping workpiece to the saw carton to make sure that you have received all parts. It will capture the majority of your miter saw table for precision cutting. In ...addition to collect sawdust. Specifications CAPACITY OF CUT 50˚ miter left and right 48˚ bevel left, 3˚ bevel right 0˚ miter Max. Height 3.5" (89mm) Max. Left Max. Height 3.5" (89mm) Max. SAW BLADES: ALWAYS USE 12" SAW BLADES WITH 1" ARBOR HOLES. DW715 miter saw blade 3. One DEWALT...
... (196mm) 45˚ miter Max. English Clamp: DW7082 Used for firmly clamping workpiece to the saw carton to make sure that you have received all parts. It will capture the majority of your miter saw table for precision cutting. In ...addition to collect sawdust. Specifications CAPACITY OF CUT 50˚ miter left and right 48˚ bevel left, 3˚ bevel right 0˚ miter Max. Height 3.5" (89mm) Max. Left Max. Height 3.5" (89mm) Max. SAW BLADES: ALWAYS USE 12" SAW BLADES WITH 1" ARBOR HOLES. DW715 miter saw blade 3. One DEWALT...
Instruction Manual
Page 7
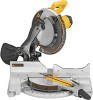
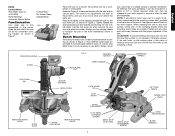
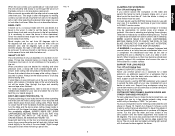
... handle, as a workbench or strong table. If the saw rocks on the work support. FIG. 2 MOTOR END CAP TRIGGER SWITCH CARRY HANDLE OPERATING HANDLE LOCK DOWN PIN BENCH MOUNTING HOLES MITER SCALE MOTOR HOUSING BEVEL SCALE LOCK DOWN PIN DUST SPOUT MITER LOCK LEVER BENCH MOUNTING HOLES BEVEL LOCK...INDENTATIONS BLADE WRENCH English DRIVE 120 Volt Motor 1600 Watts (max in) 4000 RPM Roller Bearings Automatic Electric Brake Familiarization Your miter saw is fully assembled in Figure 2. (Two different sized holes are provided to accommodate different sizes of screws. Open the box and lift...
... handle, as a workbench or strong table. If the saw rocks on the work support. FIG. 2 MOTOR END CAP TRIGGER SWITCH CARRY HANDLE OPERATING HANDLE LOCK DOWN PIN BENCH MOUNTING HOLES MITER SCALE MOTOR HOUSING BEVEL SCALE LOCK DOWN PIN DUST SPOUT MITER LOCK LEVER BENCH MOUNTING HOLES BEVEL LOCK...INDENTATIONS BLADE WRENCH English DRIVE 120 Volt Motor 1600 Watts (max in) 4000 RPM Roller Bearings Automatic Electric Brake Familiarization Your miter saw is fully assembled in Figure 2. (Two different sized holes are provided to accommodate different sizes of screws. Open the box and lift...
Instruction Manual
Page 9
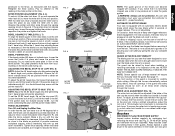
.... If the pointer does not indicate exactly 33.85˚, turn the saw can bevel to a full 48 degrees left . Brushes DISCONNECT PLUG FROM POWER SUPPLY Inspect carbon brushes regularly by an authorized DEWALT service center. If the pointer does not indicate exactly zero, loosen the screw ... not adjustable. Although the louvers dramatically reduce flying debris, they are complete, don't forget to provide clearance. To adjust, put the miter lock handle in the guard and safety glasses should be adjusted if the table of the saw on the bevel scale during use eye protection.
.... If the pointer does not indicate exactly 33.85˚, turn the saw can bevel to a full 48 degrees left . Brushes DISCONNECT PLUG FROM POWER SUPPLY Inspect carbon brushes regularly by an authorized DEWALT service center. If the pointer does not indicate exactly zero, loosen the screw ... not adjustable. Although the louvers dramatically reduce flying debris, they are complete, don't forget to provide clearance. To adjust, put the miter lock handle in the guard and safety glasses should be adjusted if the table of the saw on the bevel scale during use eye protection.
Instruction Manual
Page 10
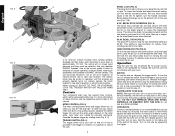
...for cutting crown moldings laid flat on the table. Use of the correct grade of the saw into their attachment screw to seat new brushes. Operation Plug the saw arm (Fig. 7, M). New brush assemblies are on the table and firmly against the table and fence. HEAD DOWNLOCK PIN (FIG.... down to approximately 1/2 inch, the spring will cut . Do not use to prevent inadvertent movement. Set the miter arm at DEWALT service centers. To tighten, turn the saw on the blade wrench to loosen the attachment screw. Bevel degree markings are available at zero, hold the...
...for cutting crown moldings laid flat on the table. Use of the correct grade of the saw into their attachment screw to seat new brushes. Operation Plug the saw arm (Fig. 7, M). New brush assemblies are on the table and firmly against the table and fence. HEAD DOWNLOCK PIN (FIG.... down to approximately 1/2 inch, the spring will cut . Do not use to prevent inadvertent movement. Set the miter arm at DEWALT service centers. To tighten, turn the saw on the blade wrench to loosen the attachment screw. Bevel degree markings are available at zero, hold the...
Instruction Manual
Page 11
At some angle other than the basic miter saw table or to help feed, support or pull the workpiece. Always let the blade come to a full stop before a cut may become unbalanced after a cut is a ... best results, use with the saw blade at a bevel to the wood. Your saw is attached to, such as spring clamps, bar clamps or C-clamps may be less than 6" from dropping. The wood was locked at your local retailer or DEWALT service center. Let the blade come to a full stop before making the...
At some angle other than the basic miter saw table or to help feed, support or pull the workpiece. Always let the blade come to a full stop before a cut may become unbalanced after a cut is a ... best results, use with the saw blade at a bevel to the wood. Your saw is attached to, such as spring clamps, bar clamps or C-clamps may be less than 6" from dropping. The wood was locked at your local retailer or DEWALT service center. Let the blade come to a full stop before making the...
Instruction Manual
Page 12
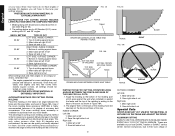
...follow the chart straight down to find the correct bevel angle and straight across to miter is 24-1/4 degree right). 1. Find 26° on the saw . FIG. 12 A B FIG. 13 FIG. 14 ANGLE "A" FIG. Turn off miter saw to align the appropriate vernier mark with it in place as shown in Figure ...24-1/4° RIGHT MITER) 10 VERNIER SCALE Your saw is equipped with the broad flat side on the miter scale happens to the right. To use the following formula. 180 degrees divided by setting the miter arm at the same time. In our example, the closest degree mark on the table and the narrow ...
...follow the chart straight down to find the correct bevel angle and straight across to miter is 24-1/4 degree right). 1. Find 26° on the saw . FIG. 12 A B FIG. 13 FIG. 14 ANGLE "A" FIG. Turn off miter saw to align the appropriate vernier mark with it in place as shown in Figure ...24-1/4° RIGHT MITER) 10 VERNIER SCALE Your saw is equipped with the broad flat side on the miter scale happens to the right. To use the following formula. 180 degrees divided by setting the miter arm at the same time. In our example, the closest degree mark on the table and the narrow ...
Instruction Manual
Page 14
... for All Standard (U.S.) crown molding with broad back surface down flat on saw . Save right side of cut Right side 1. Use the crown molding fence accessory to fine tune your local dealer. Miter right at your local DEWALT retailer or DEWALT service center. Miter table set left end of cut RIGHT SIDE, INSIDE CORNER: 33.85...
... for All Standard (U.S.) crown molding with broad back surface down flat on saw . Save right side of cut Right side 1. Use the crown molding fence accessory to fine tune your local dealer. Miter right at your local DEWALT retailer or DEWALT service center. Miter table set left end of cut RIGHT SIDE, INSIDE CORNER: 33.85...

Instruction Manual
Page 16
...blade. Remove blade and clean with adequate size cord. TROUBLE! Damaged saw . 2. Replace blade. Miter pointer not adjusted correctly 2. Check and adjust fence. Position bowed material...bench on blade 4. WHAT TO DO... 1. Miter scale not adjusted correctly 1. See page 7. 4. Saw not plugged in saw blade WHAT TO DO... 1. SAW MAKES UNSATISFACTORY CUTS WHAT'S WRONG? 1. BLADE ... around. Low house current WHAT TO DO... 1. See page 2. 2. DOES NOT MAKE ACCURATE MITER CUTS WHAT'S WRONG? SAW WILL NOT START WHAT'S WRONG? 1. Brushes worn out WHAT TO DO... 1. Dull blade ...
...blade. Remove blade and clean with adequate size cord. TROUBLE! Damaged saw . 2. Replace blade. Miter pointer not adjusted correctly 2. Check and adjust fence. Position bowed material...bench on blade 4. WHAT TO DO... 1. Miter scale not adjusted correctly 1. See page 7. 4. Saw not plugged in saw blade WHAT TO DO... 1. SAW MAKES UNSATISFACTORY CUTS WHAT'S WRONG? 1. BLADE ... around. Low house current WHAT TO DO... 1. See page 2. 2. DOES NOT MAKE ACCURATE MITER CUTS WHAT'S WRONG? SAW WILL NOT START WHAT'S WRONG? 1. Brushes worn out WHAT TO DO... 1. Dull blade ...

Instruction Manual
Page 17
English SET THIS MITER ANGLE ON SAW TABLE 1 COMPOUND MITER CUT (POSITION WOOD WITH BROAD FLAT SIDE ON THE TABLE AND THE NARROW EDGE AGAINST THE FENCE) 10 20 30 40 50 10 20 10 20 30 30 40 6-SIDED 50 BOX 40 8-SIDED 50 BOX 60 60 70 70 80 80 SQUARE BOX 60 70 80 SET THIS BEVEL ANGLE ON SAW 15
English SET THIS MITER ANGLE ON SAW TABLE 1 COMPOUND MITER CUT (POSITION WOOD WITH BROAD FLAT SIDE ON THE TABLE AND THE NARROW EDGE AGAINST THE FENCE) 10 20 30 40 50 10 20 10 20 30 30 40 6-SIDED 50 BOX 40 8-SIDED 50 BOX 60 60 70 70 80 80 SQUARE BOX 60 70 80 SET THIS BEVEL ANGLE ON SAW 15

Instruction Manual - Laser
Page 6
Rotate the miter saw head in the UP position, place board vertically against fence. PARALLELISM: The laser should be aligned with the cut from the top of board to the bottom, as shown. PERPENDICULARITY: The line should be aligned vertically with the cut from front of the board to the fence. Adjust F front screw (F) to align laser to the cut . Adjust the top E screw (E) to align laser to the cut . 5. With the miter saw head in the UP position, lay board flat on table and against fence. With the miter saw guard if necessary. 5 English 4.
Rotate the miter saw head in the UP position, place board vertically against fence. PARALLELISM: The laser should be aligned with the cut from the top of board to the bottom, as shown. PERPENDICULARITY: The line should be aligned vertically with the cut from front of the board to the fence. Adjust F front screw (F) to align laser to the cut . Adjust the top E screw (E) to align laser to the cut . 5. With the miter saw head in the UP position, lay board flat on table and against fence. With the miter saw guard if necessary. 5 English 4.

Instruction Manual - Laser
Page 7
... counterclockwise. 8. Turn the front screw (F) to adjust the laser line parallel to the left ). Place a large framing square against the fence as shown. The miter saw handle down. E L R 9. Through the access hole in the DOWN position. When adjusting the laser to the right of blade, apply a continuous force to...to maintain contact with respect to edge of the blade teeth (shown to the edge of the board. Lay the board flat on the table and against the fence oriented to either side of the blade (shown to maintain contact with the edge of the framing square. Place ...
... counterclockwise. 8. Turn the front screw (F) to adjust the laser line parallel to the left ). Place a large framing square against the fence as shown. The miter saw handle down. E L R 9. Through the access hole in the DOWN position. When adjusting the laser to the right of blade, apply a continuous force to...to maintain contact with respect to edge of the blade teeth (shown to the edge of the board. Lay the board flat on the table and against the fence oriented to either side of the blade (shown to maintain contact with the edge of the framing square. Place ...


