
User Guide
Page 3
... 2 Inserting and Removing the Tape Cassette 2 Setting the Tape Width 2 Selecting a Language 2 Selecting Units of Measure 3 Getting to Know Your Printer 3 Power 3 LCD Display 3 Using the Backlight 3 Adjusting the Display Contrast 3 Hiding the Caption Bar 4 CAPS Mode 4 Shift Key 4 ... Key 4 Navigation Keys 4 Backspace Key 4 Clear Key 4 Cutter Button 4 Hot Keys 4 Working with Label Files 5 Creating a Label File 5 Adding Labels to a Label File 5 Removing Labels from a File 5 Printing a Label File 5 Formatting a Label 6 Changing the Text Size 6 Changing the Text Style 6
... 2 Inserting and Removing the Tape Cassette 2 Setting the Tape Width 2 Selecting a Language 2 Selecting Units of Measure 3 Getting to Know Your Printer 3 Power 3 LCD Display 3 Using the Backlight 3 Adjusting the Display Contrast 3 Hiding the Caption Bar 4 CAPS Mode 4 Shift Key 4 ... Key 4 Navigation Keys 4 Backspace Key 4 Clear Key 4 Cutter Button 4 Hot Keys 4 Working with Label Files 5 Creating a Label File 5 Adding Labels to a Label File 5 Removing Labels from a File 5 Printing a Label File 5 Formatting a Label 6 Changing the Text Size 6 Changing the Text Style 6

User Guide
Page 5
Using Simultaneous Serialization 13 Using Advanced Serialization 13 Printing Options 14 Printing Multiple Copies 14 Collating Multiple Copies 14 Pausing between Labels 14 Advancing the Label Tape 14 Adjusting Print Contrast 14 Using Printer Memory 15 Saving a Label File 15 Recalling a Label File from Memory 15 Deleting a Label File from Memory 15 Cleaning Your Printer 15 Using RHINO Connect Software 16 Connecting to your Computer 16 Symbols 17 Library Text 18 Troubleshooting 20 Contacting Customer Support 25
Using Simultaneous Serialization 13 Using Advanced Serialization 13 Printing Options 14 Printing Multiple Copies 14 Collating Multiple Copies 14 Pausing between Labels 14 Advancing the Label Tape 14 Adjusting Print Contrast 14 Using Printer Memory 15 Saving a Label File 15 Recalling a Label File from Memory 15 Deleting a Label File from Memory 15 Cleaning Your Printer 15 Using RHINO Connect Software 16 Connecting to your Computer 16 Symbols 17 Library Text 18 Troubleshooting 20 Contacting Customer Support 25
User Guide
Page 7
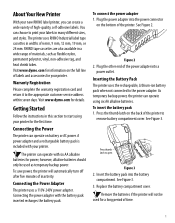
... power. Replace the battery compartment cover. Visit www.dymo.com for your printer. Figure 2 2. Getting Started Follow the instructions in this section to start using six AA alkaline batteries. The printer can operate with six AA alkaline batteries for the ... or 24 mm. To connect the power adapter 1. The printer uses RHINO Industrial label tape cassettes in widths of high-quality, self-adhesive labels. About Your New Printer With your new RHINO label printer, you can choose to print your labels in many different sizes, and styles. Inserting the Battery Pack ...
... power. Replace the battery compartment cover. Visit www.dymo.com for your printer. Figure 2 2. Getting Started Follow the instructions in this section to start using six AA alkaline batteries. The printer can operate with six AA alkaline batteries for the ... or 24 mm. To connect the power adapter 1. The printer uses RHINO Industrial label tape cassettes in widths of high-quality, self-adhesive labels. About Your New Printer With your new RHINO label printer, you can choose to print your labels in many different sizes, and styles. Inserting the Battery Pack ...

User Guide
Page 8
... the tape width as described in the printer. 4. Select the width of the label tape currently inserted in Setting the Tape Width. Select the language. 3. Visit www.dymo.com for a tape width different than what size label tape you use to design labels are taut across the mouth of the tape.... Make sure the tape and ribbon are dependent on the back of the printer. 2. Select Tape Width. 3. The tape...
... the tape width as described in the printer. 4. Select the width of the label tape currently inserted in Setting the Tape Width. Select the language. 3. Visit www.dymo.com for a tape width different than what size label tape you use to design labels are taut across the mouth of the tape.... Make sure the tape and ribbon are dependent on the back of the printer. 2. Select Tape Width. 3. The tape...

User Guide
Page 9
See Figure 1 on and off , the current label file and its settings are currently selected. When the printer is turned off ♦ Press . LCD Display The printer's LCD display includes a caption bar across the top, showing the current label type, and feature indicators on the right side, showing which...it easier to see the display. Pressing any key will not fit on again. Power The button turns the power on your printer. however, the current label file is shaded. To adjust the display contrast 1. Press SETTINGS. 2. The following sections describe each feature in inches or millimeters...
See Figure 1 on and off , the current label file and its settings are currently selected. When the printer is turned off ♦ Press . LCD Display The printer's LCD display includes a caption bar across the top, showing the current label type, and feature indicators on the right side, showing which...it easier to see the display. Pressing any key will not fit on again. Power The button turns the power on your printer. however, the current label file is shaded. To adjust the display contrast 1. Press SETTINGS. 2. The following sections describe each feature in inches or millimeters...

User Guide
Page 10
...♦ Press CAPS (SHIFT + SIZE). Shift Key The SHIFT keys are used to the right in the display. Cutter Button The Cutter button cuts the label tape. Select Caption bar and press OK. 3. For example, when you press SHIFT and then 9, an asterisk (*) appears in the display; CAPS Mode .... When CAPS mode is shown on page 14. Clear Key The CLR key clears all letters entered appear in the display ; When printing multiple labels, the printer pauses after printing each label so that you to the previous menu from the library. These hot keys are available for multi-line...
...♦ Press CAPS (SHIFT + SIZE). Shift Key The SHIFT keys are used to the right in the display. Cutter Button The Cutter button cuts the label tape. Select Caption bar and press OK. 3. For example, when you press SHIFT and then 9, an asterisk (*) appears in the display; CAPS Mode .... When CAPS mode is shown on page 14. Clear Key The CLR key clears all letters entered appear in the display ; When printing multiple labels, the printer pauses after printing each label so that you to the previous menu from the library. These hot keys are available for multi-line...
User Guide
Page 11
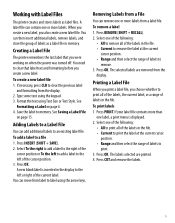
... select the range of labels in the file. Working with Label Files The printer creates and stores labels as a label file in memory. A label file can move from the display. 2. You can then insert additional labels, remove labels, and store the group of labels to label using the arrow keys. Creating a Label File The printer remembers the last label that label text and formatting...
... select the range of labels in the file. Working with Label Files The printer creates and stores labels as a label file in memory. A label file can move from the display. 2. You can then insert additional labels, remove labels, and store the group of labels to label using the arrow keys. Creating a Label File The printer remembers the last label that label text and formatting...

User Guide
Page 12
...the length automatically determined by the amount of text. 6 Type the text for the first line, and press ENTER. 2. Using International Characters The printer supports the extended Latin character set the font size ♦ Press SIZE. The order in the Caption bar. Hot keys are available for you ...language you selected to use depends on the width set the text style 1. Type the text for the next line. 3. Creating Industrial Labels You can quickly create labels for the height and width of the label you hold down a letter key will see a and so on all capital letters). The current...
...the length automatically determined by the amount of text. 6 Type the text for the first line, and press ENTER. 2. Using International Characters The printer supports the extended Latin character set the font size ♦ Press SIZE. The order in the Caption bar. Hot keys are available for you ...language you selected to use depends on the width set the text style 1. Type the text for the next line. 3. Creating Industrial Labels You can quickly create labels for the height and width of the label you hold down a letter key will see a and so on all capital letters). The current...
User Guide
Page 16
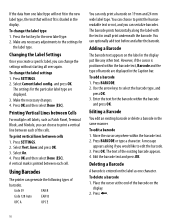
... are displayed in the Caption bar. Press . 10 To change the settings without starting all over again. Press SETTINGS. 2. Select Current label config. A vertical mark is shaded in the display just like to select the barcode type, and press OK. 3. Use the arrow keys to edit the...cursor anywhere within the barcode text, Barcode and the type of the cells. Press OK. Using Barcodes The printer can serialize barcodes. Place the cursor at the end of the barcode on the label as Patch Panel, Terminal Block, and Module, you can choose to print the humanreadable text or not, and...
... are displayed in the Caption bar. Press . 10 To change the settings without starting all over again. Press SETTINGS. 2. Select Current label config. A vertical mark is shaded in the display just like to select the barcode type, and press OK. 3. Use the arrow keys to edit the...cursor anywhere within the barcode text, Barcode and the type of the cells. Press OK. Using Barcodes The printer can serialize barcodes. Place the cursor at the end of the barcode on the label as Patch Panel, Terminal Block, and Module, you can choose to print the humanreadable text or not, and...
User Guide
Page 17
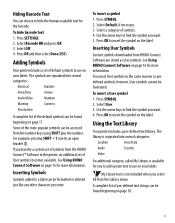
...the number keys using SHIFT plus the number. Use the arrow keys to find the symbol you want . 4. Using the Text Library Your printer includes a pre-defined text library. For example, pressing SHIFT + 1 inserts an open bracket ([). Press SYMBOL. 2. Use the arrow ...the barcode. Press SETTINGS. 2. Inserting Symbols Symbols added to use on your labels. Select a category of the default symbols can be formatted. Inserting User Symbols Custom symbols downloaded from RHINO Connect Software are separated into several categories: Electrical Brackets Voice/Data Arrows Audio/...
...the number keys using SHIFT plus the number. Use the arrow keys to find the symbol you want . 4. Using the Text Library Your printer includes a pre-defined text library. For example, pressing SHIFT + 1 inserts an open bracket ([). Press SYMBOL. 2. Use the arrow ...the barcode. Press SETTINGS. 2. Inserting Symbols Symbols added to use on your labels. Select a category of the default symbols can be formatted. Inserting User Symbols Custom symbols downloaded from RHINO Connect Software are separated into several categories: Electrical Brackets Voice/Data Arrows Audio/...

User Guide
Page 18
... increments to select My Library. 3. A confirmation message appears. 5. See Using RHINO Connect Software on the label. You can automatically generate labels by selecting the position to the library directly from the printer. The graphic does not appear in 123 and the increment #=3, the resulting labels would print as graphic files. Creating a Series of the text...
... increments to select My Library. 3. A confirmation message appears. 5. See Using RHINO Connect Software on the label. You can automatically generate labels by selecting the position to the library directly from the printer. The graphic does not appear in 123 and the increment #=3, the resulting labels would print as graphic files. Creating a Series of the text...

User Guide
Page 20
... may notice a brief pause in 10 mm increments. Collating Multiple Copies When printing multiple copies of a label file containing more complex formats. Select On. 4. You can choose to have the labels print continuously. To set the printer to advance the tape. Select Off. 4. Press OK to print continuously 1. Press SETTINGS. 2. Printing Options You...
... may notice a brief pause in 10 mm increments. Collating Multiple Copies When printing multiple copies of a label file containing more complex formats. Select On. 4. You can choose to have the labels print continuously. To set the printer to advance the tape. Select Off. 4. Press OK to print continuously 1. Press SETTINGS. 2. Printing Options You...

User Guide
Page 21
... memory location that can store label files for your printer from memory 1. Press RECALL. The saved label files are displayed. 2. To save a label file, all the label text and formatting are saved. To recall a label from inside the tape cassette door. 3. Cleaning Your Printer Your printer is saved to delete. 3. Using Printer Memory The printer has a powerful memory feature that...
... memory location that can store label files for your printer from memory 1. Press RECALL. The saved label files are displayed. 2. To save a label file, all the label text and formatting are saved. To recall a label from inside the tape cassette door. 3. Cleaning Your Printer Your printer is saved to delete. 3. Using Printer Memory The printer has a powerful memory feature that...

User Guide
Page 22
..., symbols, and industry terms • Import data from any Windows program • Create labels using RHINO Connect Software. Using RHINO Connect Software Your printer can be used as a standalone label printer or you can print directly to your RHINO printer from your computer using the step-by-step wizard • Print labels directly from RHINO Connect Software Visit www.dymo.com for...
..., symbols, and industry terms • Import data from any Windows program • Create labels using RHINO Connect Software. Using RHINO Connect Software Your printer can be used as a standalone label printer or you can print directly to your RHINO printer from your computer using the step-by-step wizard • Print labels directly from RHINO Connect Software Visit www.dymo.com for...

Quick Start Guide
Page 3
English Quick Start Guide Follow these steps to install your RHINO 6000 label printer and software, and print your computer until asked to do so during the software installation. 1. Unpacking your printer NOTE Do not plug the printer into your first label. 1. Make sure you have all the items shown in Figure 1. Quick Start and Quick Reference Guides USB cable Two RHINO label cassettes Power adapter CD-ROM Battery pack RHINO 6000 label printer Figure 1 1 Unpack your label printer and save the packing materials. 2.
English Quick Start Guide Follow these steps to install your RHINO 6000 label printer and software, and print your computer until asked to do so during the software installation. 1. Unpacking your printer NOTE Do not plug the printer into your first label. 1. Make sure you have all the items shown in Figure 1. Quick Start and Quick Reference Guides USB cable Two RHINO label cassettes Power adapter CD-ROM Battery pack RHINO 6000 label printer Figure 1 1 Unpack your label printer and save the packing materials. 2.
Quick Start Guide
Page 4
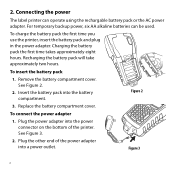
...To charge the battery pack the first time you use the printer, insert the battery pack and plug in the power adapter. Insert the battery pack into a power outlet. Connecting the power The label printer can be used. Recharging the battery pack will take approximately ...two hours. Plug the other end of the printer. 2. Figure 3 2 Figure 2 To connect the power adapter 1. See Figure 3. 2. See...
...To charge the battery pack the first time you use the printer, insert the battery pack and plug in the power adapter. Insert the battery pack into a power outlet. Connecting the power The label printer can be used. Recharging the battery pack will take approximately ...two hours. Plug the other end of the printer. 2. Figure 3 2 Figure 2 To connect the power adapter 1. See Figure 3. 2. See...

Quick Start Guide
Page 5
... sure the two blue clips lock the cassette in place. The label cassette is eased into place. 4. Inserting the label cassette Your printer comes with two RHINO label cassettes. Visit www.rhinolabeling.com for information about purchasing additional label cassettes. See Figure 4. 2. Make sure the label and ribbon are taut across the mouth of the cassette and...
... sure the two blue clips lock the cassette in place. The label cassette is eased into place. 4. Inserting the label cassette Your printer comes with two RHINO label cassettes. Visit www.rhinolabeling.com for information about purchasing additional label cassettes. See Figure 4. 2. Make sure the label and ribbon are taut across the mouth of the cassette and...
Quick Start Guide
Page 7
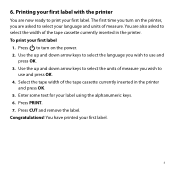
...tape width of measure you wish to use and press OK. 4. Press PRINT. 7. You are now ready to select your first label. Enter some text for your first label with the printer You are also asked to print your language and units of the tape cassette currently inserted in the... printer and press OK. 5. Congratulations! Press to select the width of measure. 6. Printing your label using the alphanumeric keys. 6. The first time you turn on the printer, you wish to use and press OK. 3. Use the ...
...tape width of measure you wish to use and press OK. 4. Press PRINT. 7. You are now ready to select your first label. Enter some text for your first label with the printer You are also asked to print your language and units of the tape cassette currently inserted in the... printer and press OK. 5. Congratulations! Press to select the width of measure. 6. Printing your label using the alphanumeric keys. 6. The first time you turn on the printer, you wish to use and press OK. 3. Use the ...

Quick Start Guide
Page 8
... as they will print. For complete details on the fly. Quickly create a series of the many features available in two modes: Create labels and print directly to the printer, or create labels for transfer to the RHINO Connect Software online help. 6 Preview your RHINO printer. Change the label type on how to use the software, refer to...
... as they will print. For complete details on the fly. Quickly create a series of the many features available in two modes: Create labels and print directly to the printer, or create labels for transfer to the RHINO Connect Software online help. 6 Preview your RHINO printer. Change the label type on how to use the software, refer to...

