
User Guide
Page 3
... the Battery Pack 2 Inserting and Removing the Tape Cassette 2 Setting the Tape Width 2 Selecting a Language 2 Selecting Units of Measure 3 Getting to Know Your Printer 3 Power 3 LCD Display 3 Using the Backlight 3 Adjusting the Display Contrast 3 Hiding the Caption Bar 4 CAPS Mode 4 Shift Key 4 Escape Key 4 Navigation Keys 4 Backspace Key 4 Clear Key 4 Cutter Button 4 Hot Keys 4 Working with Label Files 5 Creating a Label File 5 Adding Labels to a Label File 5 Removing Labels from a File 5 Printing a Label File 5 Formatting a Label 6 Changing the Text Size 6 Changing...
... the Battery Pack 2 Inserting and Removing the Tape Cassette 2 Setting the Tape Width 2 Selecting a Language 2 Selecting Units of Measure 3 Getting to Know Your Printer 3 Power 3 LCD Display 3 Using the Backlight 3 Adjusting the Display Contrast 3 Hiding the Caption Bar 4 CAPS Mode 4 Shift Key 4 Escape Key 4 Navigation Keys 4 Backspace Key 4 Clear Key 4 Cutter Button 4 Hot Keys 4 Working with Label Files 5 Creating a Label File 5 Adding Labels to a Label File 5 Removing Labels from a File 5 Printing a Label File 5 Formatting a Label 6 Changing the Text Size 6 Changing...

User Guide
Page 4
...-Line Labels 6 Using International Characters 6 Creating Industrial Labels 6 Creating Wire Wrap Labels 7 Creating Vertical Wrap Labels 7 Creating Horizontal Wrap Labels 7 Creating Self-Laminating Labels 7 Creating Flag Labels 7 Creating Fixed Length Labels 8 Creating Patch Panel Labels 8 Creating Terminal Block Labels 8 Creating Module Labels 9 Using Fuse Multipliers 9 Printing Empty Modules 9 Creating Vertical Labels 9 Changing the Label Type 9 Changing the Label Settings 10 Printing Vertical Lines between Cells 10 Using Barcodes 10 Adding a Barcode 10 Editing a Barcode...
...-Line Labels 6 Using International Characters 6 Creating Industrial Labels 6 Creating Wire Wrap Labels 7 Creating Vertical Wrap Labels 7 Creating Horizontal Wrap Labels 7 Creating Self-Laminating Labels 7 Creating Flag Labels 7 Creating Fixed Length Labels 8 Creating Patch Panel Labels 8 Creating Terminal Block Labels 8 Creating Module Labels 9 Using Fuse Multipliers 9 Printing Empty Modules 9 Creating Vertical Labels 9 Changing the Label Type 9 Changing the Label Settings 10 Printing Vertical Lines between Cells 10 Using Barcodes 10 Adding a Barcode 10 Editing a Barcode...

User Guide
Page 5
Using Simultaneous Serialization 13 Using Advanced Serialization 13 Printing Options 14 Printing Multiple Copies 14 Collating Multiple Copies 14 Pausing between Labels 14 Advancing the Label Tape 14 Adjusting Print Contrast 14 Using Printer Memory 15 Saving a Label File 15 Recalling a Label File from Memory 15 Deleting a Label File from Memory 15 Cleaning Your Printer 15 Using RHINO Connect Software 16 Connecting to your Computer 16 Symbols 17 Library Text 18 Troubleshooting 20 Contacting Customer Support 25
Using Simultaneous Serialization 13 Using Advanced Serialization 13 Printing Options 14 Printing Multiple Copies 14 Collating Multiple Copies 14 Pausing between Labels 14 Advancing the Label Tape 14 Adjusting Print Contrast 14 Using Printer Memory 15 Saving a Label File 15 Recalling a Label File from Memory 15 Deleting a Label File from Memory 15 Cleaning Your Printer 15 Using RHINO Connect Software 16 Connecting to your Computer 16 Symbols 17 Library Text 18 Troubleshooting 20 Contacting Customer Support 25
User Guide
Page 7
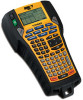
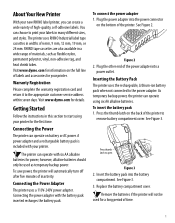
... a long period of high-quality, self-adhesive labels. About Your New Printer With your new RHINO label printer, you can operate on battery or AC power. RHINO tape cassettes are also available in many different sizes, and styles. Visit www.dymo.com for power; Connecting the Power The printer can create a wide variety of time. 1 To save power, the printer will not be used for your printer. To connect the power adapter 1. Replace the battery compartment cover. See Figure...
... a long period of high-quality, self-adhesive labels. About Your New Printer With your new RHINO label printer, you can operate on battery or AC power. RHINO tape cassettes are also available in many different sizes, and styles. Visit www.dymo.com for power; Connecting the Power The printer can create a wide variety of time. 1 To save power, the printer will not be used for your printer. To connect the power adapter 1. Replace the battery compartment cover. See Figure...

User Guide
Page 9
... label file and its settings are currently selected. Power The button turns the power on the printer. The contrast changes as a toggle to turn on the right side, showing which features are remembered for the next time the printer is shaded. Press OK and then select Done (ESC). If the battery pack and power adapter are remembered; Pressing any key will not be printed. LCD Display The printer's LCD display...
... label file and its settings are currently selected. Power The button turns the power on the printer. The contrast changes as a toggle to turn on the right side, showing which features are remembered for the next time the printer is shaded. Press OK and then select Done (ESC). If the battery pack and power adapter are remembered; Pressing any key will not be printed. LCD Display The printer's LCD display...

User Guide
Page 10
... label. When CAPS mode is turned on, the CAPS indicator is very useful for some label types, additional information about the label, such as follows: Key Function , Moves one character to the left in the display Returns to the previous menu (can also use ESC) SHIFT , Moves one label to the left of labels, adding barcodes, inserting symbols, and using the text from within any menu without making a selection. The factory default setting...
... label. When CAPS mode is turned on, the CAPS indicator is very useful for some label types, additional information about the label, such as follows: Key Function , Moves one character to the left in the display Returns to the previous menu (can also use ESC) SHIFT , Moves one label to the left of labels, adding barcodes, inserting symbols, and using the text from within any menu without making a selection. The factory default setting...
User Guide
Page 11
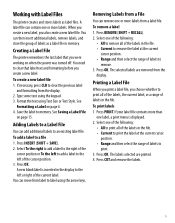
... clear the previous label and formatting from the display. Format the text using the keypad. 3. Adding Labels to the left of labels to label using the arrow keys. A new blank label is displayed. 2. Press REMOVE (SHIFT + RECALL). 2. To print labels 1. Press PRINT. If your label file contains more than one or more labels. Press OK. Working with Label Files The printer creates and stores labels as a label file in memory. Type some text using Text Size or Text Style. To remove a label 1. Printing a Label File When you print a label file, you also create a new label file...
... clear the previous label and formatting from the display. Format the text using the keypad. 3. Adding Labels to the left of labels to label using the arrow keys. A new blank label is displayed. 2. Press REMOVE (SHIFT + RECALL). 2. To print labels 1. Press PRINT. If your label file contains more than one or more labels. Press OK. Working with Label Files The printer creates and stores labels as a label file in memory. Type some text using Text Size or Text Style. To remove a label 1. Printing a Label File When you print a label file, you also create a new label file...

User Guide
Page 12
... industrial applications, such as the text size. Select Text style and press OK. 3. To create a multi-line label 1. Similar to user defined symbols. You can also select the font size from a number of text. 6 Changing the Text Style You can print the text on through all capital letters). The current label type is General with the caption bar hidden. Each time you will scroll through multiple lines. By default, the label type is displayed in eight sizes: extra-extra-small, extra-small, small, medium, large, extra-large, extra-extra-large...
... industrial applications, such as the text size. Select Text style and press OK. 3. To create a multi-line label 1. Similar to user defined symbols. You can also select the font size from a number of text. 6 Changing the Text Style You can print the text on through all capital letters). The current label type is General with the caption bar hidden. Each time you will scroll through multiple lines. By default, the label type is displayed in eight sizes: extra-extra-small, extra-small, small, medium, large, extra-large, extra-extra-large...
User Guide
Page 13
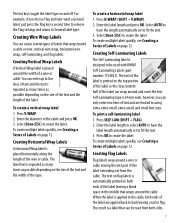
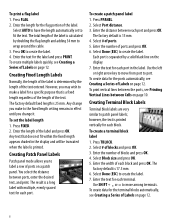
... select AUTO to have the length automatically set to fit the text. 3. Press OK to create the label. Creating Flag Labels Flag labels wrap around a cable or wire: vertical wire wrap, horizontal wire wrap, self-laminating, and flag labels. The text on flag labels is applied to using extra-extra-small, extra-small, and small font sizes. When the label is automatically printed on the top portion of the label so the clear, bottom half of the label can enter up to five lines...
... select AUTO to have the length automatically set to fit the text. 3. Press OK to create the label. Creating Flag Labels Flag labels wrap around a cable or wire: vertical wire wrap, horizontal wire wrap, self-laminating, and flag labels. The text on flag labels is applied to using extra-extra-small, extra-small, and small font sizes. When the label is automatically printed on the top portion of the label so the clear, bottom half of the label can enter up to five lines...
User Guide
Page 14
... cable. 3. To print a flag label 1. Enter the length of ports and press OK. 6. Creating Patch Panel Labels Patch panel mode allows you make a label for a specific purpose that does not fit within the fixed length appears shaded in the label. You select the distance between Cells on the display. 7. Press PPANEL. 2. Enter the number of Labels on page 12. Select AUTO to create the label. Creating Fixed Length Labels Normally, the length of the label is separated by the length...
... cable. 3. To print a flag label 1. Enter the length of ports and press OK. 6. Creating Patch Panel Labels Patch panel mode allows you make a label for a specific purpose that does not fit within the fixed length appears shaded in the label. You select the distance between Cells on the display. 7. Press PPANEL. 2. Enter the number of Labels on page 12. Select AUTO to create the label. Creating Fixed Length Labels Normally, the length of the label is separated by the length...
User Guide
Page 15
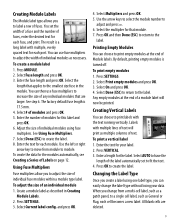
... text. 4. Enter a length for that applies to the label. Select AUTO to have the length of the label automatically set the width of a fuse and the number of Module labels. Create a module label as General or Flag, each module. Select Multipliers and press OK. 5. Select Done (ESC) to return to the smallest size fuse in Creating Module Labels. 2. To create a module label 1. Select the length that module. 7. The factory default fuse length is turned off. Use the left...
... text. 4. Enter a length for that applies to the label. Select AUTO to have the length of the label automatically set the width of a fuse and the number of Module labels. Create a module label as General or Flag, each module. Select Multipliers and press OK. 5. Select Done (ESC) to return to the smallest size fuse in Creating Module Labels. 2. To create a module label 1. Select the length that module. 7. The factory default fuse length is turned off. Use the left...
User Guide
Page 16
... For multiple cell labels, such as one label type will not fit in the new label type, the text that will not fit is positioned within the barcode text, Barcode and the type of barcode are displayed. 3. Use the arrow keys to print the humanreadable text or not, and you would like any necessary adjustments to edit the barcode. 3. Press OK. To delete a barcode 1. Changing the Label Settings Once you create a specific label, you can choose to select the barcode type...
... For multiple cell labels, such as one label type will not fit in the new label type, the text that will not fit is positioned within the barcode text, Barcode and the type of barcode are displayed. 3. Use the arrow keys to print the humanreadable text or not, and you would like any necessary adjustments to edit the barcode. 3. Press OK. To delete a barcode 1. Changing the Label Settings Once you create a specific label, you can choose to select the barcode type...
User Guide
Page 17
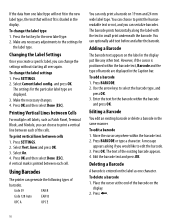
... hide barcode text 1. Select Barcode HR and press OK. 3. Select Off. 4. If you transfer a custom set of default symbols to use on your labels. Select Default, if necessary. 3. Press OK to insert the symbol on the label. A complete list of pre-defined text strings can be accessed from the RHINO Connect™ Software to the printer, an additional set of symbols from the number keys using SHIFT plus the number. Hiding Barcode Text...
... hide barcode text 1. Select Barcode HR and press OK. 3. Select Off. 4. If you transfer a custom set of default symbols to use on your labels. Select Default, if necessary. 3. Press OK to insert the symbol on the label. A complete list of pre-defined text strings can be accessed from the RHINO Connect™ Software to the printer, an additional set of symbols from the number keys using SHIFT plus the number. Hiding Barcode Text...

User Guide
Page 18
... 2 is selected in 123 and the increment #=3, the resulting labels would print as the number 2 in 123 or the letter B in the printer as graphic files. Press LIBRARY. 2. Press the first letter of the categories. 3. Press OK to select My Library. 3. You can delete custom text from 1 to use and press OK. See RHINO Connect Software Online Help for the series. Select the graphic file you wish...
... 2 is selected in 123 and the increment #=3, the resulting labels would print as the number 2 in 123 or the letter B in the printer as graphic files. Press LIBRARY. 2. Press the first letter of the categories. 3. Press OK to select My Library. 3. You can delete custom text from 1 to use and press OK. See RHINO Connect Software Online Help for the series. Select the graphic file you wish...

User Guide
Page 20
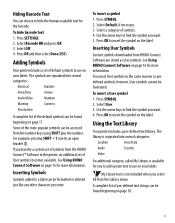
... A103 Collated A101 A102 A103 A101 A102 A103 A101 A102 A103 To collate multiple copies 1. Press FEED (SHIFT + CUT). 2. To set the printer to begin printing. Advancing the Label Tape The default leader space for more than one time. To add additional blank space to advance the tape. To print multiple copies 1. Select Print contrast and press OK. 3. Press OK to the beginning or end of the...
... A103 Collated A101 A102 A103 A101 A102 A103 A101 A102 A103 To collate multiple copies 1. Press FEED (SHIFT + CUT). 2. To set the printer to begin printing. Advancing the Label Tape The default leader space for more than one time. To add additional blank space to advance the tape. To print multiple copies 1. Select Print contrast and press OK. 3. Press OK to the beginning or end of the...

User Guide
Page 21
... number of images they contain. A message appears confirming that you want and press OK. Press RECALL. Use the arrow keys to move to the memory location that contains the label you save a label file, all the label text and formatting are displayed. 2. To clean the print head 1. To delete a label from memory 1. Press and then press OK to select New and press OK. 4. Cleaning Your Printer Your printer...
... number of images they contain. A message appears confirming that you want and press OK. Press RECALL. Use the arrow keys to move to the memory location that contains the label you save a label file, all the label text and formatting are displayed. 2. To clean the print head 1. To delete a label from memory 1. Press and then press OK to select New and press OK. 4. Cleaning Your Printer Your printer...

User Guide
Page 22
... bottom of the printer functions. Figure 6 While data is not included with all printers. Connecting to your Computer The printer connects to your computer using the USB connection located on -demand printing • Insert customized graphics, logos, symbols, and industry terms • Import data from any Windows program • Create labels using the step-by-step wizard • Print labels directly from RHINO Connect Software Visit www.dymo.com for complete...
... bottom of the printer functions. Figure 6 While data is not included with all printers. Connecting to your Computer The printer connects to your computer using the USB connection located on -demand printing • Insert customized graphics, logos, symbols, and industry terms • Import data from any Windows program • Create labels using the step-by-step wizard • Print labels directly from RHINO Connect Software Visit www.dymo.com for complete...

User Guide
Page 27
... to make sure the tape moves freely. If you still need assistance, contact DYMO Customer Support for this User Guide. 21 See Using the Backlight. • Adjust the display contrast. Printing Self-Lam label not allowed • Replace the tape cassette. A list of contact numbers for each key to determine which key is not jammed. • Pull a small amount of tape from the cassette to its normal position. Problem/Error Message Solution Display text...
... to make sure the tape moves freely. If you still need assistance, contact DYMO Customer Support for this User Guide. 21 See Using the Backlight. • Adjust the display contrast. Printing Self-Lam label not allowed • Replace the tape cassette. A list of contact numbers for each key to determine which key is not jammed. • Pull a small amount of tape from the cassette to its normal position. Problem/Error Message Solution Display text...
Instruction Manual
Page 1
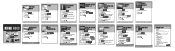
... BLOCK LABELS VERTICAL 1 Press VERTICAL 2 Select label length: AUTO, press OK 3 Enter text: RACK3 4 Press PRINT 15 GENERAL PURPOSE LABELS 931666 QUICK TIPS Label Settings SETTINGS > Current Label Configuration CLR Key Returns to general mode & clears all text, formats, and font settings Navigation Arrows Moves to be serialized, press OK 6 Set increment: 1 and # of serializations: 6 (total # of ports), press OK, select DONE, press OK 7 Press PRINT select all 8 10 12 14 RHINOTM 6000 PROFESSIONAL LABELLING TOOLS QUICK REFERENCE GUIDE HORIZONTAL...
... BLOCK LABELS VERTICAL 1 Press VERTICAL 2 Select label length: AUTO, press OK 3 Enter text: RACK3 4 Press PRINT 15 GENERAL PURPOSE LABELS 931666 QUICK TIPS Label Settings SETTINGS > Current Label Configuration CLR Key Returns to general mode & clears all text, formats, and font settings Navigation Arrows Moves to be serialized, press OK 6 Set increment: 1 and # of serializations: 6 (total # of ports), press OK, select DONE, press OK 7 Press PRINT select all 8 10 12 14 RHINOTM 6000 PROFESSIONAL LABELLING TOOLS QUICK REFERENCE GUIDE HORIZONTAL...

Quick Start Guide
Page 8
Change the label type on how to use the software, refer to the RHINO Connect Software online help. 6 Use the Data Editor to enter label text and add labels to your RHINO printer. Work in RHINO Connect Software. For complete details on the fly. Add images, barcodes, symbols, and predefined text. Quickly create a series of the many features available in two modes: Create labels and print directly to the printer, or create labels for transfer to further customize your labels exactly as they...
Change the label type on how to use the software, refer to the RHINO Connect Software online help. 6 Use the Data Editor to enter label text and add labels to your RHINO printer. Work in RHINO Connect Software. For complete details on the fly. Add images, barcodes, symbols, and predefined text. Quickly create a series of the many features available in two modes: Create labels and print directly to the printer, or create labels for transfer to further customize your labels exactly as they...


