Owner s Manual
Page 1
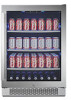
Built-In Beverage Refrigerator Model - ABR241SG www.avallon.com 1-866-471-7427 USER'S GUIDE Installation, Operation, and Maintenance for your product.
Built-In Beverage Refrigerator Model - ABR241SG www.avallon.com 1-866-471-7427 USER'S GUIDE Installation, Operation, and Maintenance for your product.
Owner s Manual
Page 2
... beverage refrigerator before they have a grounded outlet. ELECTRICAL SAFETY • Do not exceed the power outlet ratings. • It is recommended the beverage refrigerator be connected on a flat, level surface and provide proper ventilation. • Do not pinch or kink the power supply line between the unit and cabinet. • Do not place any part of a leak. 2 The unit must be replaced by...
... beverage refrigerator before they have a grounded outlet. ELECTRICAL SAFETY • Do not exceed the power outlet ratings. • It is recommended the beverage refrigerator be connected on a flat, level surface and provide proper ventilation. • Do not pinch or kink the power supply line between the unit and cabinet. • Do not place any part of a leak. 2 The unit must be replaced by...
Owner s Manual
Page 3
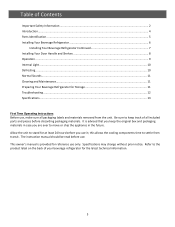
... ...2 Introduction...4 Parts Identification ...5 Installing Your Beverage Refrigerator ...6 Installing Your Beverage Refrigerator Continued 7 Installing Your Door Handle and Shelves 8 Operation ...9 Internal Light ...10 Defrosting...10 Normal Sounds ...11 Cleaning and Maintenance...11 Preparing Your Beverage Refrigerator for at least 24 hours before you are ever to stand for Storage 11 Troubleshooting ...12 Specifications...13 First Time Operating Instructions: Before use only. Refer to settle from the unit. The instruction manual should be...
... ...2 Introduction...4 Parts Identification ...5 Installing Your Beverage Refrigerator ...6 Installing Your Beverage Refrigerator Continued 7 Installing Your Door Handle and Shelves 8 Operation ...9 Internal Light ...10 Defrosting...10 Normal Sounds ...11 Cleaning and Maintenance...11 Preparing Your Beverage Refrigerator for at least 24 hours before you are ever to stand for Storage 11 Troubleshooting ...12 Specifications...13 First Time Operating Instructions: Before use only. Refer to settle from the unit. The instruction manual should be...
Owner s Manual
Page 4
.... Both numbers are located on the rating label on your product will help you install, use , and maintenance of this manual as it will work at http://www.avallon.com to download product guides, additional troubleshooting resources and up-to-date information. •If you need to developing products that sold you the product. • Read and follow this instruction manual carefully to obtain warranty service.
.... Both numbers are located on the rating label on your product will help you install, use , and maintenance of this manual as it will work at http://www.avallon.com to download product guides, additional troubleshooting resources and up-to-date information. •If you need to developing products that sold you the product. • Read and follow this instruction manual carefully to obtain warranty service.
Owner s Manual
Page 5
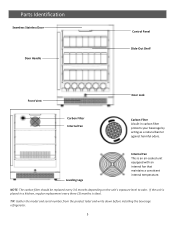
... filter protects your beverage by acting as a natural barrier against harmful odors. Parts Identification Seamless Stainless Door Door Handle Control Panel Slide-Out Shelf Front Vent Door Lock Carbon Filter Internal Fan Carbon Filter A built-in a kitchen, regular replacement every three (3) months is an air-cooled unit equipped with an internal fan that maintains a consistent internal temperature. NOTE: The carbon filter should be replaced every 3-6 months depending on the unit's exposure level...
... filter protects your beverage by acting as a natural barrier against harmful odors. Parts Identification Seamless Stainless Door Door Handle Control Panel Slide-Out Shelf Front Vent Door Lock Carbon Filter Internal Fan Carbon Filter A built-in a kitchen, regular replacement every three (3) months is an air-cooled unit equipped with an internal fan that maintains a consistent internal temperature. NOTE: The carbon filter should be replaced every 3-6 months depending on the unit's exposure level...
Owner s Manual
Page 6
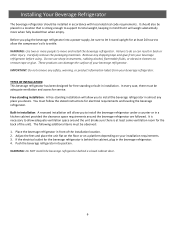
... built-in installation. Carefully remove the packaging materials. Place the beverage refrigerator in front of the unit). Free-standing installation: A free-standing installation will weigh substantially more people to move and install the beverage refrigerator. The following additional items must follow the stated instructions for the back of the installation location. 2. Push the beverage refrigerator into a power supply, be installed in accordance with local electrical code requirements. WARNING: Use two...
... built-in installation. Carefully remove the packaging materials. Place the beverage refrigerator in front of the unit). Free-standing installation: A free-standing installation will weigh substantially more people to move and install the beverage refrigerator. The following additional items must follow the stated instructions for the back of the installation location. 2. Push the beverage refrigerator into a power supply, be installed in accordance with local electrical code requirements. WARNING: Use two...
Owner s Manual
Page 7
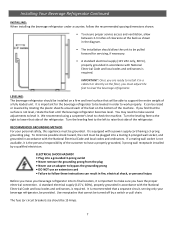
... National Electrical Code and local codes and ordinances, is equipped with a power supply cord having a 3-prong grounding plug. The fuse (or circuit breaker) size should allow between 2-3 inches of the refrigerator. Turn the leveling feet to the left to make several adjustments to work properly. ELECTRICAL SHOCK HAZARD! • Plug into a grounded 3-prong outlet • Never remove the grounding prong from the plug • Never use an adapter to bypass the...
... National Electrical Code and local codes and ordinances, is equipped with a power supply cord having a 3-prong grounding plug. The fuse (or circuit breaker) size should allow between 2-3 inches of the refrigerator. Turn the leveling feet to the left to make several adjustments to work properly. ELECTRICAL SHOCK HAZARD! • Plug into a grounded 3-prong outlet • Never remove the grounding prong from the plug • Never use an adapter to bypass the...
Owner s Manual
Page 8
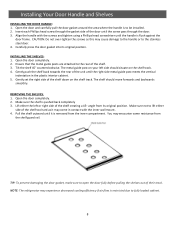
... may experience decreased cooling efficiency if air flow is to fully loaded cabinet. 8 NOTE: The refrigerator may encounter some resistance from the inner compartment. Open the door and carefully pull the door gasket around the area where the handle is restricted due to be installed. 2. Carefully press the door gasket into its original position. REMOVING THE SHELVES: 1. Pull the shelf outward until the handle is flush against...
... may experience decreased cooling efficiency if air flow is to fully loaded cabinet. 8 NOTE: The refrigerator may encounter some resistance from the inner compartment. Open the door and carefully pull the door gasket around the area where the handle is restricted due to be installed. 2. Carefully press the door gasket into its original position. REMOVING THE SHELVES: 1. Pull the shelf outward until the handle is flush against...
Owner s Manual
Page 9
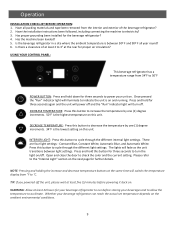
... machine been leveled? 5. Is the beverage refrigerator in a site where the ambient temperature is the lowest setting on this button to °C. Is there a clearance of the beverage refrigerator? 2. USING YOUR CONTROL PANEL: This beverage refrigerator has a temperature range from the interior and exterior of at least 2 to turn off and the "Run" Indicator light will switch the temperature display from °F to cycle through the different internal light settings. Constant...
... machine been leveled? 5. Is the beverage refrigerator in a site where the ambient temperature is the lowest setting on this button to °C. Is there a clearance of the beverage refrigerator? 2. USING YOUR CONTROL PANEL: This beverage refrigerator has a temperature range from the interior and exterior of at least 2 to turn off and the "Run" Indicator light will switch the temperature display from °F to cycle through the different internal light settings. Constant...
Owner s Manual
Page 10
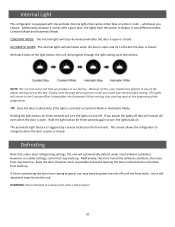
AUTOMATIC MODE: The internal lights will turn the lights on colder settings, some frost may need to power the unit off they will return to the Constant Blue Setting after the Automatic White setting, thus starting back at the beginning of the box. Simply cycle through the light setting cycle seen below. Holding the light button for three seconds again to remove frost with top...
AUTOMATIC MODE: The internal lights will turn the lights on colder settings, some frost may need to power the unit off they will return to the Constant Blue Setting after the Automatic White setting, thus starting back at the beginning of the box. Simply cycle through the light setting cycle seen below. Holding the light button for three seconds again to remove frost with top...
Owner s Manual
Page 11
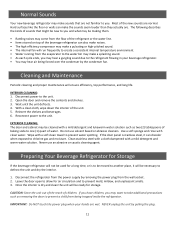
... smells. 3. Open the door and remove the contents and shelves. 3. Use a soft sponge and rinse with a soft clean towel to create a consistent internal temperature environment. • Water running from being forced over the condenser by the condenser fan. NEVER unplug the unit by removing the power plug from the wall socket. 2. With a clean cloth, wipe down the interior of children. Preparing Your Beverage Refrigerator for Storage...
... smells. 3. Open the door and remove the contents and shelves. 3. Use a soft sponge and rinse with a soft clean towel to create a consistent internal temperature environment. • Water running from being forced over the condenser by the condenser fan. NEVER unplug the unit by removing the power plug from the wall socket. 2. With a clean cloth, wipe down the interior of children. Preparing Your Beverage Refrigerator for Storage...

Owner s Manual
Page 12
... furniture. • Contact your local electrician to test your fuse box or reset the breaker. • Open up , you can try running the refrigerator on a warmer temperature setting, minimizing the number of times you open the door, or unplugging the unit to allow the frost to melt. • Make sure the refrigerator is on a level surface. • Clean the door gasket. • Make sure the door gasket is making strange noises.
... furniture. • Contact your local electrician to test your fuse box or reset the breaker. • Open up , you can try running the refrigerator on a warmer temperature setting, minimizing the number of times you open the door, or unplugging the unit to allow the frost to melt. • Make sure the refrigerator is on a level surface. • Clean the door gasket. • Make sure the door gasket is making strange noises.
Owner s Manual
Page 13
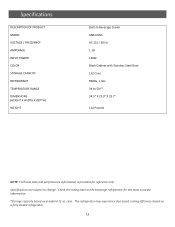
... based on standard 12 oz. Specifications DESCRIPTION OF PRODUCT MODEL VOLTAGE / FREQUENCY AMPERAGE INPUT POWER COLOR STORAGE CAPACITY REFRIGERANT TEMPERATURE RANGE DIMENSIONS (HEIGHT X WIDTH X DEPTH) WEIGHT Built-In Beverage Cooler ABR241SG AC 115 / 60 Hz 1.1A 120W Black Cabinet with Stainless Steel Door 152 Cans R600a, 1.4oz. 34 to change. cans. Specifications are subject to 50 F° 34.5" X 23.9" X 23.7" 114 Pounds...
... based on standard 12 oz. Specifications DESCRIPTION OF PRODUCT MODEL VOLTAGE / FREQUENCY AMPERAGE INPUT POWER COLOR STORAGE CAPACITY REFRIGERANT TEMPERATURE RANGE DIMENSIONS (HEIGHT X WIDTH X DEPTH) WEIGHT Built-In Beverage Cooler ABR241SG AC 115 / 60 Hz 1.1A 120W Black Cabinet with Stainless Steel Door 152 Cans R600a, 1.4oz. 34 to change. cans. Specifications are subject to 50 F° 34.5" X 23.9" X 23.7" 114 Pounds...
Owner s Manual
Page 14
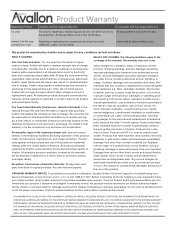
... Avallon authorized repair facility. This limited 5-Year warranty is defective, contact Avallon Customer Support for troubleshooting assistance and warranty service at an authorized Avallon repair facility and will repair or replace any damaged caused by Avallon under normal service, maintenance, and usage conditions. No other misuse, including abnormal service, handling, or usage. WHAT IS NOT COVERED- This warranty does not cover: Labor charges for installation, setup or training...
... Avallon authorized repair facility. This limited 5-Year warranty is defective, contact Avallon Customer Support for troubleshooting assistance and warranty service at an authorized Avallon repair facility and will repair or replace any damaged caused by Avallon under normal service, maintenance, and usage conditions. No other misuse, including abnormal service, handling, or usage. WHAT IS NOT COVERED- This warranty does not cover: Labor charges for installation, setup or training...

Owner s Manual
Page 15
Copyright © 2015 Avallon Gobal, LLC AVALLON GLOBAL, LLC 3736 Bee Cave Rd. STE 1 #188 West Lake Hills, TX 78746 Toll Free: 1-866-471-7427 Web: http://www.avallon.com E-mail: service@avallon.com Product contents and specifications may change without notice.
Copyright © 2015 Avallon Gobal, LLC AVALLON GLOBAL, LLC 3736 Bee Cave Rd. STE 1 #188 West Lake Hills, TX 78746 Toll Free: 1-866-471-7427 Web: http://www.avallon.com E-mail: service@avallon.com Product contents and specifications may change without notice.

