
Owner s Manual
Page 2
... unit. Please review the rating label located on the rear panel of the unit for an extended period of fire, electric shock, or injury. Please read and follow the safety information listed below to be replaced by an authorized technician. You should never attempt to repair the unit yourself. Contact EdgeStar Support if the unit needs repair service. ...
... unit. Please review the rating label located on the rear panel of the unit for an extended period of fire, electric shock, or injury. Please read and follow the safety information listed below to be replaced by an authorized technician. You should never attempt to repair the unit yourself. Contact EdgeStar Support if the unit needs repair service. ...
Owner s Manual
Page 3
... not smoke or use an open flame during this time. Always unplug an appliance from pockets of clothing. Remove all foreign objects from the power supply before attempting any part of the appliance unless you have been specifically instructed to the weather. Do not tamper with controls. Do not repair or replace any service. This will...
... not smoke or use an open flame during this time. Always unplug an appliance from pockets of clothing. Remove all foreign objects from the power supply before attempting any part of the appliance unless you have been specifically instructed to the weather. Do not tamper with controls. Do not repair or replace any service. This will...

Owner s Manual
Page 5
... 11 COMPLETE INSTALLATION 11 OPERATING INSTRUCTIONS 12 CONTROL PANEL DIAGRAM 12 CYCLE GUIDE CHART 14 CYCLE GUIDE CHART CONTINUED 15 TIPS BEFORE WASHING 16 OPERATING THE WASHER 18 CARE AND MAINTENANCE 19 CLEANING THE DETERGENT DISPENSER 19 CLEANING THE EXTERIOR OF THE UNIT 19 CLEANING THE INTERIOR OF THE UNIT 19 CLEANING THE INLET FILTER 20 REMOVING FOREIGN OBJECTS FROM COIN TRAP 20 TROUBLESHOOTING TIPS 20 ERROR CODE REFERENCE...
... 11 COMPLETE INSTALLATION 11 OPERATING INSTRUCTIONS 12 CONTROL PANEL DIAGRAM 12 CYCLE GUIDE CHART 14 CYCLE GUIDE CHART CONTINUED 15 TIPS BEFORE WASHING 16 OPERATING THE WASHER 18 CARE AND MAINTENANCE 19 CLEANING THE DETERGENT DISPENSER 19 CLEANING THE EXTERIOR OF THE UNIT 19 CLEANING THE INTERIOR OF THE UNIT 19 CLEANING THE INLET FILTER 20 REMOVING FOREIGN OBJECTS FROM COIN TRAP 20 TROUBLESHOOTING TIPS 20 ERROR CODE REFERENCE...

Owner s Manual
Page 6
... located on the ratings label on the web at http://www.edgestar.com to register your Combo Washer/Dryer. Model Number: Serial Number: Date of Purchase: To better serve you, please do the following before contacting customer service: If you received a damaged product, immediately contact the dealer that your purchase of your product, download product manuals, and access additional troubleshooting...
... located on the ratings label on the web at http://www.edgestar.com to register your Combo Washer/Dryer. Model Number: Serial Number: Date of Purchase: To better serve you, please do the following before contacting customer service: If you received a damaged product, immediately contact the dealer that your purchase of your product, download product manuals, and access additional troubleshooting...
Owner s Manual
Page 7
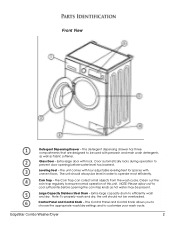
... well as hot water may be used with uneven floors. The Coin Trap can collect small objects from the wash cycle. EdgeStar Combo Washer/Dryer 2 The detergent dispensing drawer has three compartments that are designed to operate most efficiently. Extra-large door with lock. The Control Panel and Control Knob allows you to choose the appropriate wash/dry settings and to ensure...
... well as hot water may be used with uneven floors. The Coin Trap can collect small objects from the wash cycle. EdgeStar Combo Washer/Dryer 2 The detergent dispensing drawer has three compartments that are designed to operate most efficiently. Extra-large door with lock. The Control Panel and Control Knob allows you to choose the appropriate wash/dry settings and to ensure...
Owner s Manual
Page 9
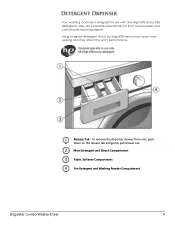
To remove the dispenser drawer from unit, push down on the release tab and gently pull drawer out. They are formulated specifically for use with only High-Efficiency (HE) detergents. Release Tab - Main Detergent and Bleach Compartment Fabric Softener Compartment Pre-Detergent and Washing Powder Compartment EdgeStar Combo Washer/Dryer 4 Your washing machine is not High-Efficiency may cause oversudsing and may affect the unit's performance. Using a regular detergent that is designed for front-load washers and contain suds-reducing agents.
To remove the dispenser drawer from unit, push down on the release tab and gently pull drawer out. They are formulated specifically for use with only High-Efficiency (HE) detergents. Release Tab - Main Detergent and Bleach Compartment Fabric Softener Compartment Pre-Detergent and Washing Powder Compartment EdgeStar Combo Washer/Dryer 4 Your washing machine is not High-Efficiency may cause oversudsing and may affect the unit's performance. Using a regular detergent that is designed for front-load washers and contain suds-reducing agents.
Owner s Manual
Page 10
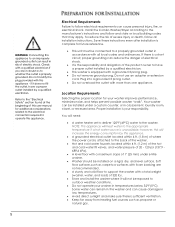
... outlet, have a proper outlet installed by this appliance - Some water can remain in risk of this user manual for additional considerations related to the electrical connection required to operate this appliance. 5 Electrical Requirements Failure to follow electrical requirements can result in the washer and can be installed under entire washer. Washer should be installed on a rigid, dry, and level surface. Refer to...
... outlet, have a proper outlet installed by this appliance - Some water can remain in risk of this user manual for additional considerations related to the electrical connection required to operate this appliance. 5 Electrical Requirements Failure to follow electrical requirements can result in the washer and can be installed under entire washer. Washer should be installed on a rigid, dry, and level surface. Refer to...
Owner s Manual
Page 11
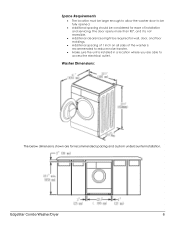
... to reduce noise transfer. Make sure the unit is installed in a location where you are for recommended spacing and custom undercounter installation. Washer Dimensions: The below dimensions shown are able to be fully opened. Additional spacing should be required for wall, door, and floor moldings. Additional spacing of 1 inch on all sides of installation and servicing. EdgeStar Combo Washer/Dryer 6 Space...
... to reduce noise transfer. Make sure the unit is installed in a location where you are for recommended spacing and custom undercounter installation. Washer Dimensions: The below dimensions shown are able to be fully opened. Additional spacing should be required for wall, door, and floor moldings. Additional spacing of 1 inch on all sides of installation and servicing. EdgeStar Combo Washer/Dryer 6 Space...

Owner s Manual
Page 12
... - Remove Transport Shipping Bolts Before using this Combo Washer/Dryer, the Transport Shipping Bolts MUST be dangerous to this machine. Please save the Transport Shipping Bolts for more info. Please visit www.edgestar.com for future use. - This is the result of product testing that may have inspected machine and find some residual water in washer drum): Water Supply...
... - Remove Transport Shipping Bolts Before using this Combo Washer/Dryer, the Transport Shipping Bolts MUST be dangerous to this machine. Please save the Transport Shipping Bolts for more info. Please visit www.edgestar.com for future use. - This is the result of product testing that may have inspected machine and find some residual water in washer drum): Water Supply...
Owner s Manual
Page 15
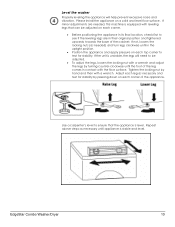
... the appliance in its final location, check first to see if the leveling legs are needed ) and turn legs clockwise until in contact with a wrench and adjust the legs by turning counter-clockwise until appliance is unstable, the legs will help prevent excessive noise and vibration. EdgeStar Combo Washer/Dryer 10 Use a carpenter's level to ensure that...
... the appliance in its final location, check first to see if the leveling legs are needed ) and turn legs clockwise until in contact with a wrench and adjust the legs by turning counter-clockwise until appliance is unstable, the legs will help prevent excessive noise and vibration. EdgeStar Combo Washer/Dryer 10 Use a carpenter's level to ensure that...

Owner s Manual
Page 16
... wire) at your home can meet the normal loading requirements of the unit to a socket which is correctly installed and properly grounded in accordance with local electrical and building codes. Make sure the power supply voltage is damaged, it must be replaced ...Installation Ensure all packing materials have been safely stored. Before washing clothes for this appliances. Do not use your power outlet can meet the power requirements for the first time, the washing machine should be run through the unit is 12A when you are unsure if your new Combo Washer / Dryer...
... wire) at your home can meet the normal loading requirements of the unit to a socket which is correctly installed and properly grounded in accordance with local electrical and building codes. Make sure the power supply voltage is damaged, it must be replaced ...Installation Ensure all packing materials have been safely stored. Before washing clothes for this appliances. Do not use your power outlet can meet the power requirements for the first time, the washing machine should be run through the unit is 12A when you are unsure if your new Combo Washer / Dryer...

Owner s Manual
Page 17
Please read all operating instructions found in this manual in order to avoid actions that may result in damage to the Combo Washer / Dryer or to your washables and to the below diagram and description on the following page for details on each setting, button, and function. EdgeStar Combo Washer/Dryer 12 Control Panel Diagram The Control Panel consists of the Cycle Knob and the Control Panel LED and Buttons. Please refer to avoid unnecessary service calls.
Please read all operating instructions found in this manual in order to avoid actions that may result in damage to the Combo Washer / Dryer or to your washables and to the below diagram and description on the following page for details on each setting, button, and function. EdgeStar Combo Washer/Dryer 12 Control Panel Diagram The Control Panel consists of the Cycle Knob and the Control Panel LED and Buttons. Please refer to avoid unnecessary service calls.

Owner s Manual
Page 19
... soiled items that require extra wash time. 1:04 Yes No :48 Select this option for larger items such as bed sheets that are lightly soiled. :51 Yes No :38 Select this option clothing used for exercise or sports that are available with each cycle. Cycle Guide Chart The below Cycle Guide indicates options that have been underlined. EdgeStar Combo Washer/Dryer 14
... soiled items that require extra wash time. 1:04 Yes No :48 Select this option for larger items such as bed sheets that are lightly soiled. :51 Yes No :38 Select this option clothing used for exercise or sports that are available with each cycle. Cycle Guide Chart The below Cycle Guide indicates options that have been underlined. EdgeStar Combo Washer/Dryer 14

Owner s Manual
Page 21
... wash cycle. This will depend on the weight of clothes, degree of time before allowing a cycle to avoid not rinsing properly from clothes and unit. Washing will help prevent and avoid odors and/or mildew from forming. Make sure clothes are not clear on the wet part of a EdgeStar Combo Washer/Dryer 16 Get a white cloth and press down on your water...
... wash cycle. This will depend on the weight of clothes, degree of time before allowing a cycle to avoid not rinsing properly from clothes and unit. Washing will help prevent and avoid odors and/or mildew from forming. Make sure clothes are not clear on the wet part of a EdgeStar Combo Washer/Dryer 16 Get a white cloth and press down on your water...
Owner s Manual
Page 23
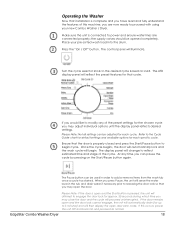
... using your pre-sorted wash load into the drum. When you are connected properly; EdgeStar Combo Washer/Dryer 18 The control panel will then display the open the door. Please Note: Not all settings can pause the cycle by pressing on load. If this machine, you press Pause, the unit will begin cycle. Refer to add or remove items from the wash...
... using your pre-sorted wash load into the drum. When you are connected properly; EdgeStar Combo Washer/Dryer 18 The control panel will then display the open the door. Please Note: Not all settings can pause the cycle by pressing on load. If this machine, you press Pause, the unit will begin cycle. Refer to add or remove items from the wash...
Owner s Manual
Page 24
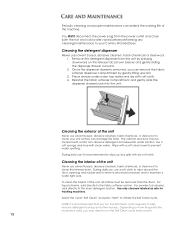
... clean your Combo Washer/Dryer. Cleaning the exterior of the unit Never use solvent based, abrasive cleaners, harsh chemicals, or steel wool to wipe up any spills with clean water. NOTE: It is removed, you run the Self Clean cycle every month. 19 Once the dispenser drawer is recommended that you can damage the finish. Place drawer under warm tap water and dry...
... clean your Combo Washer/Dryer. Cleaning the exterior of the unit Never use solvent based, abrasive cleaners, harsh chemicals, or steel wool to wipe up any spills with clean water. NOTE: It is removed, you run the Self Clean cycle every month. 19 Once the dispenser drawer is recommended that you can damage the finish. Place drawer under warm tap water and dry...

Owner s Manual
Page 25
...wash cycle. This will be present if machine has not been allowed to remove any procedure on Control Knob and press the "Start/Pause" button and let run for cleaning. 1. IMPORTANT: A small amount of the unit. Please have a towel and/or small drain pan to collect excess water EdgeStar Combo Washer/Dryer... 20 The Coin trap door is no water leakage. The inlet filters are wire mesh screens located immediately inside the hot and cold water line connections on the front, bottom ...
...wash cycle. This will be present if machine has not been allowed to remove any procedure on Control Knob and press the "Start/Pause" button and let run for cleaning. 1. IMPORTANT: A small amount of the unit. Please have a towel and/or small drain pan to collect excess water EdgeStar Combo Washer/Dryer... 20 The Coin trap door is no water leakage. The inlet filters are wire mesh screens located immediately inside the hot and cold water line connections on the front, bottom ...

Owner s Manual
Page 26
... Water leakage Possible Cause Improper installation or setup. Check and properly fasten inlet hoses. Control Board or wiring harness has a connection problem. The clothes are not tight. Thoroughly clean the detergent dispenser and dry with front loading washing machines. Abnormal noise or excessive vibration Washer does not drain properly or drain cycle does not complete My clothes are adjusted properly. A heavy wash load will display E30 error code...
... Water leakage Possible Cause Improper installation or setup. Check and properly fasten inlet hoses. Control Board or wiring harness has a connection problem. The clothes are not tight. Thoroughly clean the detergent dispenser and dry with front loading washing machines. Abnormal noise or excessive vibration Washer does not drain properly or drain cycle does not complete My clothes are adjusted properly. A heavy wash load will display E30 error code...
Owner s Manual
Page 28
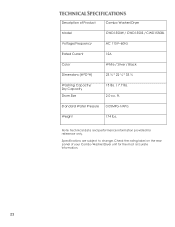
Note: Technical data and performance information provided for the most accurate information. 23 Specifications are subject to change. Description of your Combo Washer/Dryer unit for reference only. Check the rating label on the rear panel of Product Combo Washer/Dryer Model CWD1550W / CWD1550S / CWD1550BL Voltage/Frequency AC 115V~60Hz Rated Current 12A Color White / Silver / Black Dimensions (W*D*H) 23 ½ * 22 ¼ * 33 ½ Washing Capacity/ Dry Capacity Drum Size 15 lbs. / 7.7 lbs. 2.0 cu. Standard Water Pressure 0.05MPa-1MPa Weight 174 lbs. ft.
Note: Technical data and performance information provided for the most accurate information. 23 Specifications are subject to change. Description of your Combo Washer/Dryer unit for reference only. Check the rating label on the rear panel of Product Combo Washer/Dryer Model CWD1550W / CWD1550S / CWD1550BL Voltage/Frequency AC 115V~60Hz Rated Current 12A Color White / Silver / Black Dimensions (W*D*H) 23 ½ * 22 ¼ * 33 ½ Washing Capacity/ Dry Capacity Drum Size 15 lbs. / 7.7 lbs. 2.0 cu. Standard Water Pressure 0.05MPa-1MPa Weight 174 lbs. ft.

Owner s Manual
Page 29
... environmental specifications, uses contrary to instructions provided in the owner's manual, accidents, acts of purchase. OBTAINING WARRANTY SERVICE: If you are required to have been invalidated. -Damage from other than normal household use. -Replacement or repair of household fuses, circuit breakers, wiring or plumbing. -Damage to personal property from use . -Labor, service transportation, and shipping charges for labor charges incurred or replacement parts. EdgeStar may...
... environmental specifications, uses contrary to instructions provided in the owner's manual, accidents, acts of purchase. OBTAINING WARRANTY SERVICE: If you are required to have been invalidated. -Damage from other than normal household use. -Replacement or repair of household fuses, circuit breakers, wiring or plumbing. -Damage to personal property from use . -Labor, service transportation, and shipping charges for labor charges incurred or replacement parts. EdgeStar may...

