
Datasheet
Page 1
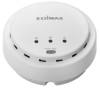
... a wireless LAN access point and repeater at the same time. Product specifications and design are subject to either a PoE Switch or a power adapter for a regular power adapter. www.edimax.com EW-7428HCn N300 High Power Ceiling Mount Wireless PoE Range Extender/Access Point 300Mbps Max. Wi-Fi Protected Setup (WPS) Button The Edimax EW-7428HCn features a convenient WPS button. Users can use this access point to broaden its power supply according to IEEE 802.11n wireless devices, this access point and the client device. By supplying only the amount of up a secure wireless network...
... a wireless LAN access point and repeater at the same time. Product specifications and design are subject to either a PoE Switch or a power adapter for a regular power adapter. www.edimax.com EW-7428HCn N300 High Power Ceiling Mount Wireless PoE Range Extender/Access Point 300Mbps Max. Wi-Fi Protected Setup (WPS) Button The Edimax EW-7428HCn features a convenient WPS button. Users can use this access point to broaden its power supply according to IEEE 802.11n wireless devices, this access point and the client device. By supplying only the amount of up a secure wireless network...

Datasheet
Page 2
...-shared key (WPA-TKIP, WPA2-AES, WPA/WPA2 mixed) WPA radius 802.1x authentication Hidden SSID Multiple SSIDs, up to 5 sets with wireless group and security AP isolation MAC address filtering QoS Configuration WMM Browser-based configuration interface Telnet Dimensions 46 (H) x 105 (W) x 105 (L) mm Certifications FCC, CE NETWORK SETUP DIAGRAM • Connect the access point to the root router with iQ Setup • Get high quality Wi-Fi throughout your home/office *Power is...
...-shared key (WPA-TKIP, WPA2-AES, WPA/WPA2 mixed) WPA radius 802.1x authentication Hidden SSID Multiple SSIDs, up to 5 sets with wireless group and security AP isolation MAC address filtering QoS Configuration WMM Browser-based configuration interface Telnet Dimensions 46 (H) x 105 (W) x 105 (L) mm Certifications FCC, CE NETWORK SETUP DIAGRAM • Connect the access point to the root router with iQ Setup • Get high quality Wi-Fi throughout your home/office *Power is...
Quick Install Guide
Page 2
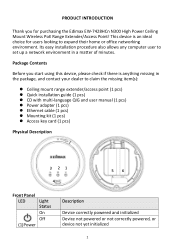
... mount range extender/access point (1 pcs) Quick installation guide (1 pcs) CD with multi-language QIG and user manual (1 pcs) Power adapter (1 pcs) Ethernet cable (1 pcs) Mounting kit (1 pcs) Access key card (1 pcs) Physical Description 3 21 4 5 6 Front Panel LED Light Status On Off (1) Power Description Device correctly powered and initialized Device not powered or not correctly powered, or device not yet initialized 1 Package Contents Before you for users looking to expand their home or office networking...
... mount range extender/access point (1 pcs) Quick installation guide (1 pcs) CD with multi-language QIG and user manual (1 pcs) Power adapter (1 pcs) Ethernet cable (1 pcs) Mounting kit (1 pcs) Access key card (1 pcs) Physical Description 3 21 4 5 6 Front Panel LED Light Status On Off (1) Power Description Device correctly powered and initialized Device not powered or not correctly powered, or device not yet initialized 1 Package Contents Before you for users looking to expand their home or office networking...

Quick Install Guide
Page 3
To reset the device to factory default settings, press and hold this button for 10 seconds, until the Power LED starts flashing. Back Panel Item Name (5) LAN Port (6) 5V DC Description Connects to the power adapter. Connects to an Ethernet cable. Release the button to a PoE switch via the LAN port. 2 Note: Please do not connect the power adapter if the device is already connected to initiate reset procedures. Note: Please note that the hardware WPS button only works when connecting to a PoE switch, then this device will...
To reset the device to factory default settings, press and hold this button for 10 seconds, until the Power LED starts flashing. Back Panel Item Name (5) LAN Port (6) 5V DC Description Connects to the power adapter. Connects to an Ethernet cable. Release the button to a PoE switch via the LAN port. 2 Note: Please do not connect the power adapter if the device is already connected to initiate reset procedures. Note: Please note that the hardware WPS button only works when connecting to a PoE switch, then this device will...

Quick Install Guide
Page 5
For Windows users, enter the access key or default IP address (http://192.168.2.2) into the browser URL bar. Windows Mac 4 Open a web browser. For Mac and Linux users, enter the default IP address (http://192.168.2.2) into the browser URL bar. For Mac and Linux, please use the default IP address as an alternative. 7. The default username is admin, and the default password is only supported by Windows. You will likely differ from the example shown...
For Windows users, enter the access key or default IP address (http://192.168.2.2) into the browser URL bar. Windows Mac 4 Open a web browser. For Mac and Linux users, enter the default IP address (http://192.168.2.2) into the browser URL bar. For Mac and Linux, please use the default IP address as an alternative. 7. The default username is admin, and the default password is only supported by Windows. You will likely differ from the example shown...

Quick Install Guide
Page 10
... terminal equipment and the mutual recognition of electric shock and static electricity when working with electrical equipment. EU Countries Intended for Use The ETSI version of the equipment. Federal Communication Commission Interference Statement This equipment has been tested and found to comply with FCC radiation exposure set forth for an uncontrolled environment. Consult the dealer or...
... terminal equipment and the mutual recognition of electric shock and static electricity when working with electrical equipment. EU Countries Intended for Use The ETSI version of the equipment. Federal Communication Commission Interference Statement This equipment has been tested and found to comply with FCC radiation exposure set forth for an uncontrolled environment. Consult the dealer or...
Manual
Page 3
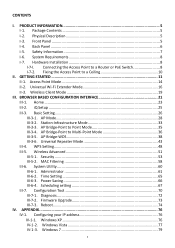
...-5-1. iQ Setup ...25 III-3. AP Bridge-Point to Multi-Point Mode 36 III-3-5. AP Bridge-WDS 38 III-3-6. Wireless Client Mode 19 III. Universal Repeater Mode 43 III-4. Windows 7 79 3 Diagnosis 72 III-7-2. Reboot 74 IV. System Requirements 8 I -6. Access Point Mode 14 II-2. Safety Information 7 I -7. Universal Wi-Fi Extender Mode 16 II-3. Configuring your IP address 76 IV-1-1. PRODUCT INFORMATION 5 I -5. Back Panel ...6 I -1. Hardware Installation 8 I-7-I -7-2. GETTING STARTED 11 II-1. Basic Setting 26 III-3-1. Security 53 III...
...-5-1. iQ Setup ...25 III-3. AP Bridge-Point to Multi-Point Mode 36 III-3-5. AP Bridge-WDS 38 III-3-6. Wireless Client Mode 19 III. Universal Repeater Mode 43 III-4. Windows 7 79 3 Diagnosis 72 III-7-2. Reboot 74 IV. System Requirements 8 I -6. Access Point Mode 14 II-2. Safety Information 7 I -7. Universal Wi-Fi Extender Mode 16 II-3. Configuring your IP address 76 IV-1-1. PRODUCT INFORMATION 5 I -5. Back Panel ...6 I -1. Hardware Installation 8 I-7-I -7-2. GETTING STARTED 11 II-1. Basic Setting 26 III-3-1. Security 53 III...
Manual
Page 5
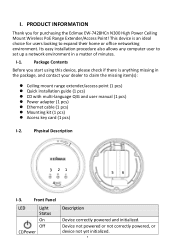
... for purchasing the Edimax EW-7428HCn N300 High Power Ceiling Mount Wireless PoE Range Extender/Access Point! This device is anything missing in a matter of minutes. Package Contents Before you for users looking to claim the missing item(s): Ceiling mount range extender/access point (1 pcs) Quick installation guide (1 pcs) CD with multi-language QIG and user manual (1 pcs) Power adapter (1 pcs) Ethernet cable (1 pcs) Mounting kit (1 pcs) Access key card (1 pcs) I . Physical Description...
... for purchasing the Edimax EW-7428HCn N300 High Power Ceiling Mount Wireless PoE Range Extender/Access Point! This device is anything missing in a matter of minutes. Package Contents Before you for users looking to claim the missing item(s): Ceiling mount range extender/access point (1 pcs) Quick installation guide (1 pcs) CD with multi-language QIG and user manual (1 pcs) Power adapter (1 pcs) Ethernet cable (1 pcs) Mounting kit (1 pcs) Access key card (1 pcs) I . Physical Description...

Manual
Page 6
... device to a PoE switch, then this button for a WPS signal from another device. Connects to a local area network. Connected to the power adapter. Not connected to factory default settings. I-4. It will be powered by the Ethernet cable alone. This device is capable of Power over Ethernet (PoE), so if the cable is connected to factory default settings, press and hold this device will have no effect when the device itself is in Wireless Client Mode. Flashing On (2)Wi-Fi (3)LAN Flashing On Off Flashing Device is resetting...
... device to a PoE switch, then this button for a WPS signal from another device. Connects to a local area network. Connected to the power adapter. Not connected to factory default settings. I-4. It will be powered by the Ethernet cable alone. This device is capable of Power over Ethernet (PoE), so if the cable is connected to factory default settings, press and hold this device will have no effect when the device itself is in Wireless Client Mode. Flashing On (2)Wi-Fi (3)LAN Flashing On Off Flashing Device is resetting...

Manual
Page 8
... Internet Explorer 7.0 or above, Opera web browser, or Safari web browser). - I-7-I -7. Plug the other end of an Ethernet cable into a LAN port on the access point. Available AC power socket (100 - 240 V, 50/60Hz) or 802.3af Power Over Ethernet (PoE) Switch. Getting Started and follow the instructions to configure your access point using iQ Setup before proceeding with wired or wireless network interface card. - Computer or network device with hardware installation. Note: You must first configure your access point. I . Please refer to the LAN port...
... Internet Explorer 7.0 or above, Opera web browser, or Safari web browser). - I-7-I -7. Plug the other end of an Ethernet cable into a LAN port on the access point. Available AC power socket (100 - 240 V, 50/60Hz) or 802.3af Power Over Ethernet (PoE) Switch. Getting Started and follow the instructions to configure your access point using iQ Setup before proceeding with wired or wireless network interface card. - Computer or network device with hardware installation. Note: You must first configure your access point. I . Please refer to the LAN port...

Manual
Page 11
... remove the back panel cover by twisting it to "Obtain an IP address automatically". 5. Reattach the back panel cover, twisting it into a wall socket, then connect it counter-clockwise. Plug the power adapter into place. 4. Configuring your computer, tablet, smart phone) to connect to login web-based firmware. GETTING STARTED 1. If you to this device. 11 "Wi-Fi Client access" is necessary information for example your IP address to set as a DHCP client. "Web...
... remove the back panel cover by twisting it to "Obtain an IP address automatically". 5. Reattach the back panel cover, twisting it into a wall socket, then connect it counter-clockwise. Plug the power adapter into place. 4. Configuring your computer, tablet, smart phone) to connect to login web-based firmware. GETTING STARTED 1. If you to this device. 11 "Wi-Fi Client access" is necessary information for example your IP address to set as a DHCP client. "Web...
Manual
Page 14
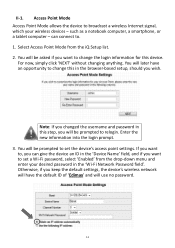
... changed the username and password in the 'Wi-Fi Network Password field'. Otherwise, if you keep the default settings, the device's wireless network will have an opportunity to . 1. Enter the new information into the login prompt. 3. You will be prompted to set a Wi-Fi password, select 'Enabled' from the iQ Setup list. 2. You will later have the default ID of 'Edimax' and will be prompted to relogin. Select Access Point Mode...
... changed the username and password in the 'Wi-Fi Network Password field'. Otherwise, if you keep the default settings, the device's wireless network will have an opportunity to . 1. Enter the new information into the login prompt. 3. You will be prompted to set a Wi-Fi password, select 'Enabled' from the iQ Setup list. 2. You will later have the default ID of 'Edimax' and will be prompted to relogin. Select Access Point Mode...
Manual
Page 17
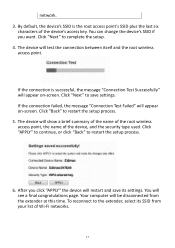
... the name of the root wireless access point, the name of the device, and the security type used. Your computer will test the connection between itself and the root wireless access point. Click "APPLY" to continue, or click "Back" to restart the setup process. 5. Click "Back" to restart the setup process. 6. The device will be disconnected from your list of the device's access key. To reconnect to the extender...
... the name of the root wireless access point, the name of the device, and the security type used. Your computer will test the connection between itself and the root wireless access point. Click "APPLY" to continue, or click "Back" to restart the setup process. 5. Click "Back" to restart the setup process. 6. The device will be disconnected from your list of the device's access key. To reconnect to the extender...

Manual
Page 22
... access point, so that you can access the browser-based configuration interface. Administrator. For Mac users, enter the default IP address (http://192.168.2.2) into your browser's address bar. (MacOS and Linux) Note: The access point uses the default IP address 192.168.2.2, which may not be prompted to enter the device's username and password. Note: For guidance on how to modify your IP address. The default username is admin and the default password...
... access point, so that you can access the browser-based configuration interface. Administrator. For Mac users, enter the default IP address (http://192.168.2.2) into your browser's address bar. (MacOS and Linux) Note: The access point uses the default IP address 192.168.2.2, which may not be prompted to enter the device's username and password. Note: For guidance on how to modify your IP address. The default username is admin and the default password...

Manual
Page 25
... by users) Displays the number of connected wireless client Displays a list of connected devices, along with relevant information on each one Displays the IP address of this device Displays the subnet mask of the IP address Displays the IP address of the default gateway Displays the MAC address of the device, select iQ Setup to change the operation mode of the LAN interface III-2. Number Security BSSID (MAC) Associated Clients Show Active Clients IP Address Subnet Mask Default Gateway MAC address number Displays...
... by users) Displays the number of connected wireless client Displays a list of connected devices, along with relevant information on each one Displays the IP address of this device Displays the subnet mask of the IP address Displays the IP address of the default gateway Displays the MAC address of the device, select iQ Setup to change the operation mode of the LAN interface III-2. Number Security BSSID (MAC) Associated Clients Show Active Clients IP Address Subnet Mask Default Gateway MAC address number Displays...

Manual
Page 46
... device will open, as shown below. Security for multiple ESSID's can input up to identify this wireless access point) here. No. SSID" field on the previous page. Multiple ESSID When you to configure the wireless settings for multiple ESSID's. Check the box to it. 46 You can connect to enable or disable a specific ESSID accordingly. Please see III-5-1. Please note that the ESSID is the number of your wireless access point...
... device will open, as shown below. Security for multiple ESSID's can input up to identify this wireless access point) here. No. SSID" field on the previous page. Multiple ESSID When you to configure the wireless settings for multiple ESSID's. Check the box to it. 46 You can connect to enable or disable a specific ESSID accordingly. Please see III-5-1. Please note that the ESSID is the number of your wireless access point...

Manual
Page 59
Click this button to delete all MAC addresses in the table. Do not add any wireless client with proper encryption settings will be able to connect to this box to select one or more MAC address(es) for new MAC addresses to add to the white list. Delete all selected MAC address(es). Uncheck all selected MAC address entries. Select Delete Selected Delete All Reset Enable Wireless Access Control MAC address Check this wireless access point. Check this wireless access point here. Input a MAC address allowed using this...
Click this button to delete all MAC addresses in the table. Do not add any wireless client with proper encryption settings will be able to connect to this box to select one or more MAC address(es) for new MAC addresses to add to the white list. Delete all selected MAC address(es). Uncheck all selected MAC address entries. Select Delete Selected Delete All Reset Enable Wireless Access Control MAC address Check this wireless access point. Check this wireless access point here. Input a MAC address allowed using this...

Manual
Page 63
... the access point. Note: To reset the IP address back to the browser-based configuration interface in the future. IP Address Subnet Mask Gateway Address Specify an IP address here. Input the subnet mask of 192.168.2.2, press and hold the WPS button on the access point for 10 seconds. Typically, your access point, and will appear: 63 The following message will replace the default IP address 192...
... the access point. Note: To reset the IP address back to the browser-based configuration interface in the future. IP Address Subnet Mask Gateway Address Specify an IP address here. Input the subnet mask of 192.168.2.2, press and hold the WPS button on the access point for 10 seconds. Typically, your access point, and will appear: 63 The following message will replace the default IP address 192...

Manual
Page 65
...-based management interface, before applying them yet. The device will appear: Click "CONTINUE" to save the changes but not apply them all at once. This access point supports NTP (Network Time Protocol) for automatic time and date setup. This allows you to restart the device and implement any changes. The date and time of your access point here. Time Zone Time Server Address Daylight Savings Select the time zone of the device can be configured manually...
...-based management interface, before applying them yet. The device will appear: Click "CONTINUE" to save the changes but not apply them all at once. This access point supports NTP (Network Time Protocol) for automatic time and date setup. This allows you to restart the device and implement any changes. The date and time of your access point here. Time Zone Time Server Address Daylight Savings Select the time zone of the device can be configured manually...

Manual
Page 88
... IP network. Example: 192.168.2.1. The DNS server IP address used by periods, that after there is designed so that identifies a single, unique Internet computer host in typing "Broadbandaccess point.com" into your home network an IP address. Ethernet: A standard for Internet Protocol. The IP address is the location of 2 portions: the IP network address, and the host identifier. A DSL modem uses your ISP has assigned to configure a default gateway's IP address. IP Address and Network...
... IP network. Example: 192.168.2.1. The DNS server IP address used by periods, that after there is designed so that identifies a single, unique Internet computer host in typing "Broadbandaccess point.com" into your home network an IP address. Ethernet: A standard for Internet Protocol. The IP address is the location of 2 portions: the IP network address, and the host identifier. A DSL modem uses your ISP has assigned to configure a default gateway's IP address. IP Address and Network...


