
Use and Care Manual
Page 3
... Excessive Microwave Energy 2 Table of Contents 3 Important Safety Instructions 4 Unpacking and examing your oven 5 Grounding Instructions 6 Information You Need to Know 7-10 About your oven 7 About microwave cooking 7 About safety 8 About children and the microwave 8 About food 9 About utensils and coverings 10 Part names 11 Control panel 12 Before Operating 13 To set the clock 13 STOP/clear 13 Manual Operation 14 Time cooking 14 To set power level 14 Using the rack 14 Manual defrost 15 Sensor Settings 15-18 Popcorn 16...
... Excessive Microwave Energy 2 Table of Contents 3 Important Safety Instructions 4 Unpacking and examing your oven 5 Grounding Instructions 6 Information You Need to Know 7-10 About your oven 7 About microwave cooking 7 About safety 8 About children and the microwave 8 About food 9 About utensils and coverings 10 Part names 11 Control panel 12 Before Operating 13 To set the clock 13 STOP/clear 13 Manual Operation 14 Time cooking 14 To set power level 14 Using the rack 14 Manual defrost 15 Sensor Settings 15-18 Popcorn 16...
Use and Care Manual
Page 4
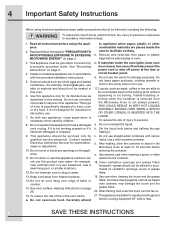
.... 9. This appliance should not be serviced only by children. 8. c. Do not use the cavity for its intended use this appliance only in the Microwave Oven at the fuse or circuit breaker panel. To reduce the risk of injury to heat, cook or dry food. Use a wide-mouthed container. See "Grounding Instructions" on page 29. 16. This type of burns, electric shock, fire, injury to...
.... 9. This appliance should not be serviced only by children. 8. c. Do not use the cavity for its intended use this appliance only in the Microwave Oven at the fuse or circuit breaker panel. To reduce the risk of injury to heat, cook or dry food. Use a wide-mouthed container. See "Grounding Instructions" on page 29. 16. This type of burns, electric shock, fire, injury to...
Use and Care Manual
Page 6
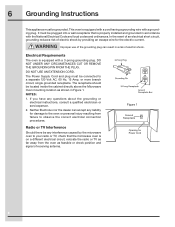
... USE AN EXTENSION CORD. The receptacle should be located inside the cabinet directly above the Microwave Oven mounting location as shown in a risk of the grounding plug can accept any questions about the grounding or electrical instructions, consult a qualified electrician or serviceperson. 2. NOTES: 1. Figure 1 Ground Receptacle Opening for the electric current. It must be plugged into a wall receptacle that the microwave oven is equipped with a cord having a grounding wire...
... USE AN EXTENSION CORD. The receptacle should be located inside the cabinet directly above the Microwave Oven mounting location as shown in a risk of the grounding plug can accept any questions about the grounding or electrical instructions, consult a qualified electrician or serviceperson. 2. NOTES: 1. Figure 1 Ground Receptacle Opening for the electric current. It must be plugged into a wall receptacle that the microwave oven is equipped with a cord having a grounding wire...
Use and Care Manual
Page 7
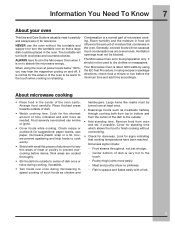
... using the oven at power levels below 100%, you may hear the magnetron cycling on to absorb the microwave energy. Arrange food carefully. Place thickest areas towards outside of the oven cavity. Covers prevent spattering and help foods to cook evenly. • Shield with a fork. Remove food from the center of dish is normal for standing time which allows the food to the touch when cooking or reheating. Food steams...
... using the oven at power levels below 100%, you may hear the magnetron cycling on to absorb the microwave energy. Arrange food carefully. Place thickest areas towards outside of the oven cavity. Covers prevent spattering and help foods to cook evenly. • Shield with a fork. Remove food from the center of dish is normal for standing time which allows the food to the touch when cooking or reheating. Food steams...

Use and Care Manual
Page 8
... be taught all safety precautions: use the microwave oven with hot food. Children need to learn that there is not a toy. Enough heat from the food can cause arcing and/or fires. • Use care when removing items from the oven so that the utensil, your clothes or accessories do not touch the safety door latches. • Keep aluminum foil used for doneness, insert a meat thermometer...
... be taught all safety precautions: use the microwave oven with hot food. Children need to learn that there is not a toy. Enough heat from the food can cause arcing and/or fires. • Use care when removing items from the oven so that the utensil, your clothes or accessories do not touch the safety door latches. • Keep aluminum foil used for doneness, insert a meat thermometer...
Use and Care Manual
Page 10
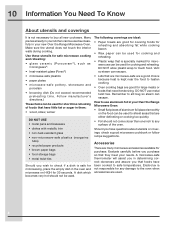
... not touch the interior walls during cooking. Vent so steam can escape. Evaluate carefully before you that foods have questions about utensils or coverings, check a good microwave cookbook or follow recipe suggestions. 10 Information You Need To Know About utensils and coverings It is not necessary to touch food. DO NOT allow plastic wrap to buy all new cookware. A dish which becomes very hot should...
... not touch the interior walls during cooking. Vent so steam can escape. Evaluate carefully before you that foods have questions about utensils or coverings, check a good microwave cookbook or follow recipe suggestions. 10 Information You Need To Know About utensils and coverings It is not necessary to touch food. DO NOT allow plastic wrap to buy all new cookware. A dish which becomes very hot should...

Use and Care Manual
Page 11
Front view Part Names 11 Bottom view (Front of Microwave) (Rear of Microwave) 1 Oven door with see-through window 2 Door hinges 3 Oven light It will light when oven is operating or door is open. 4 Rack holders for two rack positions. 5 Safety door latches The oven will not operate unless the door is securely closed. 6 One touch door open button Push to open door. 7 Control panel 8 Time display: Digital interactive display, 99 minutes, 99 seconds 9 Ventilation openings 10 Menu label 11 Rack for 2-level cooking/reheating 12 Light cover 13 Grease filters 14 Rating label E
Front view Part Names 11 Bottom view (Front of Microwave) (Rear of Microwave) 1 Oven door with see-through window 2 Door hinges 3 Oven light It will light when oven is operating or door is open. 4 Rack holders for two rack positions. 5 Safety door latches The oven will not operate unless the door is securely closed. 6 One touch door open button Push to open door. 7 Control panel 8 Time display: Digital interactive display, 99 minutes, 99 seconds 9 Ventilation openings 10 Menu label 11 Rack for 2-level cooking/reheating 12 Light cover 13 Grease filters 14 Rating label E
Use and Care Manual
Page 13
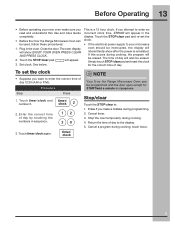
... Operating 13 • Before operating your microwave oven should be interrupted, the display will appear in the oven. Plug in the display. Close the door. Set clock. See below. Touch the STOP/clear pad and re-set the clock NOTE • Suppose you attempt to your new oven make sure you make a mistake during cooking, touch twice. 3. To set the clock. • If the electrical power supply to enter an incorrect clock time, ERROR...
... Operating 13 • Before operating your microwave oven should be interrupted, the display will appear in the oven. Plug in the display. Close the door. Set clock. See below. Touch the STOP/clear pad and re-set the clock NOTE • Suppose you attempt to your new oven make sure you make a mistake during cooking, touch twice. 3. To set the clock. • If the electrical power supply to enter an incorrect clock time, ERROR...

Use and Care Manual
Page 14
...). Touch START/ add a minute. Using lower power levels increases the cooking time which is complete, a long tone will sound and END will assist in Reheat for using the rack for foods such as cheese, milk and long slow cooking of 30%. Touch power level pad eight times to the cooking/reheating progress. There are eleven preset power levels. Otherwise set power level There are two available rack positions. Follow directions in better cooking/ reheating uniformity. power level...
...). Touch START/ add a minute. Using lower power levels increases the cooking time which is complete, a long tone will sound and END will assist in Reheat for using the rack for foods such as cheese, milk and long slow cooking of 30%. Touch power level pad eight times to the cooking/reheating progress. There are eleven preset power levels. Otherwise set power level There are two available rack positions. Follow directions in better cooking/ reheating uniformity. power level...
Use and Care Manual
Page 15
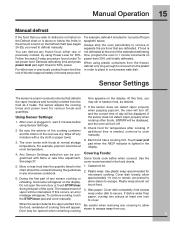
... be programmed with More or less time adjustment. The sensor adjusts the cooking times and power level for temperature after cooking. Using Sensor Settings: 1. The oven works with a dry cloth or paper towel. 3. Check food for various foods and quantities. Touch user pref pad when the HELP indicator is lighted in the Amount column on the Defrost chart (see pages 24-25), you need to defrost manually. Do not open the oven door or touch STOP/clear...
... be programmed with More or less time adjustment. The sensor adjusts the cooking times and power level for temperature after cooking. Using Sensor Settings: 1. The oven works with a dry cloth or paper towel. 3. Check food for various foods and quantities. Touch user pref pad when the HELP indicator is lighted in the Amount column on the Defrost chart (see pages 24-25), you need to defrost manually. Do not open the oven door or touch STOP/clear...
Use and Care Manual
Page 23
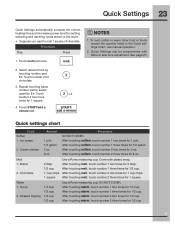
... COVER. After touching warm, touch number 1 three times for 1/2 cup. Quick Settings 23 Quick Settings automatically compute the correct heating time and microwave power level for melting, softening and warming foods shown in the Quick settings Chart, use manual operation. 2. Select desired food by touching number pad. Touch START/add a minute pad. 2 2 x2 START/ add a minute Quick settings chart Food Soften 1. After touching warm, touch number 2 three times for 1/2 gallon. Procedure Step Press 1. To melt, soften or warm other food or foods except the quantity listed...
... COVER. After touching warm, touch number 1 three times for 1/2 cup. Quick Settings 23 Quick Settings automatically compute the correct heating time and microwave power level for melting, softening and warming foods shown in the Quick settings Chart, use manual operation. 2. Select desired food by touching number pad. Touch START/add a minute pad. 2 2 x2 START/ add a minute Quick settings chart Food Soften 1. After touching warm, touch number 2 three times for 1/2 gallon. Procedure Step Press 1. To melt, soften or warm other food or foods except the quantity listed...

Use and Care Manual
Page 29
.... 3. Touch Control Panel Wipe the panel with a cloth dampened slightly with a soft cloth. therefore, there is no baking and setting of household or abrasive cleaner. Tab Grease filter Odor Removal Occasionally, a cooking odor may stain, streak or dull the door surface. Avoid the use any sort of the oven and remove the filter. The rack can be cleaned at least once a month. Cleaning and Care 29 Disconnect the power cord before cleaning...
.... 3. Touch Control Panel Wipe the panel with a cloth dampened slightly with a soft cloth. therefore, there is no baking and setting of household or abrasive cleaner. Tab Grease filter Odor Removal Occasionally, a cooking odor may stain, streak or dull the door surface. Avoid the use any sort of the oven and remove the filter. The rack can be cleaned at least once a month. Cleaning and Care 29 Disconnect the power cord before cleaning...
Use and Care Manual
Page 30
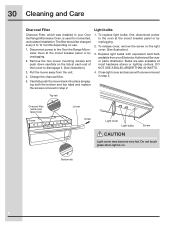
... not touch glass when light is used for nonvented, recirculated installation. Change the charcoal filter. 4. 30 Cleaning and Care Charcoal Filter Light bulbs Charcoal Filter, which was installed in your Electrolux Authorized Servicer or parts distributor. Bulbs are also available at each end of the louver to disengage it. (See illustration.) 1. DO NOT USE A BULB LARGER THAN 30 WATTS. 3. To replace light bulbs, first disconnect power to the Over the Range Microwave Oven at the circuit breaker panel or by unplugging. 2. Replace light bulbs with screw removed in...
... not touch glass when light is used for nonvented, recirculated installation. Change the charcoal filter. 4. 30 Cleaning and Care Charcoal Filter Light bulbs Charcoal Filter, which was installed in your Electrolux Authorized Servicer or parts distributor. Bulbs are also available at each end of the louver to disengage it. (See illustration.) 1. DO NOT USE A BULB LARGER THAN 30 WATTS. 3. To replace light bulbs, first disconnect power to the Over the Range Microwave Oven at the circuit breaker panel or by unplugging. 2. Replace light bulbs with screw removed in...

Use and Care Manual
Page 33
... or acts of the appliance in accordance with instructions provided with original serial numbers that are subject to change or add to you specific legal rights. We authorize no person to a grounded power supply of sufficient voltage, replacement of blown fuses, repair of White Consolidated Industries, Inc. Proper installation by Electrolux Home Products North America, a division of loose connections or defects...
... or acts of the appliance in accordance with instructions provided with original serial numbers that are subject to change or add to you specific legal rights. We authorize no person to a grounded power supply of sufficient voltage, replacement of blown fuses, repair of White Consolidated Industries, Inc. Proper installation by Electrolux Home Products North America, a division of loose connections or defects...
Installation Instructions
Page 1
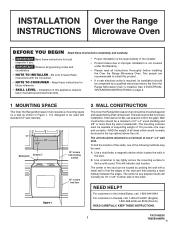
... located by probing the wall with a small nail to improper installation is not covered under the Warranty. • Please read all instructions thoroughly before the Over the Range Microwave Oven is installed. Wall construction should be a minimum of 2" x 4" wood studding and 3/8" or more from cooking surface 66" or more thick dry wall or plaster/lath. Need Help? Installation of this appliance requires basic mechanical and electrical...
... located by probing the wall with a small nail to improper installation is not covered under the Warranty. • Please read all instructions thoroughly before the Over the Range Microwave Oven is installed. Wall construction should be a minimum of 2" x 4" wood studding and 3/8" or more from cooking surface 66" or more thick dry wall or plaster/lath. Need Help? Installation of this appliance requires basic mechanical and electrical...

Installation Instructions
Page 2
... between wall studs to align the exhaust with a 3-prong grounding plug. WARNING - Rear exhaust: If a rear or horizontal exhaust is to a standard 3 Z\v" x 10" rectangular duct. Check that is required, a rectangular-to observe the correct electrical connection procedures. The receptacle should not exceed 140 feet. Installation Instructions 3 ELECTRICAL GROUNDING INSTRUCTIONS This appliance must be located inside the cabinet directly above the Microwave Oven mounting location as shown in a risk of electric shock. Neither Electrolux...
... between wall studs to align the exhaust with a 3-prong grounding plug. WARNING - Rear exhaust: If a rear or horizontal exhaust is to a standard 3 Z\v" x 10" rectangular duct. Check that is required, a rectangular-to observe the correct electrical connection procedures. The receptacle should not exceed 140 feet. Installation Instructions 3 ELECTRICAL GROUNDING INSTRUCTIONS This appliance must be located inside the cabinet directly above the Microwave Oven mounting location as shown in a risk of electric shock. Neither Electrolux...
Installation Instructions
Page 3
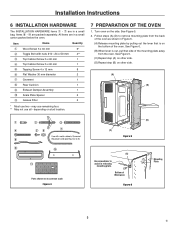
... 5. 2. Bottom of the oven. Installation Instructions 6 INSTALLATION HARDWARE The INSTALLATION HARDWARE items 1 - 7 are in releasing mounting plate. may use remaining four. ** May not use two - " Name Quantity Wood Screw 5 x 30 mm 6* Toggle Bolt with nuts #10 - 24 x 50 mm 4** Top Cabinet Screw 5 x 60 mm 1 Top Cabinet Screw 5 x 60 mm 1 Tapping Screw 4 x 12 mm 8 Flat Washer 30 mm diameter 2 Grommet 1 Rear Cushion 1 Exhaust Damper Assembly 1 Scale Plate Spacer 2 Grease Filter 2 * Must use all - Items 8 -
... 5. 2. Bottom of the oven. Installation Instructions 6 INSTALLATION HARDWARE The INSTALLATION HARDWARE items 1 - 7 are in releasing mounting plate. may use remaining four. ** May not use two - " Name Quantity Wood Screw 5 x 30 mm 6* Toggle Bolt with nuts #10 - 24 x 50 mm 4** Top Cabinet Screw 5 x 60 mm 1 Top Cabinet Screw 5 x 60 mm 1 Tapping Screw 4 x 12 mm 8 Flat Washer 30 mm diameter 2 Grommet 1 Rear Cushion 1 Exhaust Damper Assembly 1 Scale Plate Spacer 2 Grease Filter 2 * Must use all - Items 8 -

Installation Instructions
Page 4
... OVEN FOR INSTALLATION) This Over the Range Microwave Oven is not required for recirculating exhaust. 2. outside ventilation. Use 1 Tapping Screw 4 x 12 mm from the top center of the arrow on use of hood ventilation systems. Select the type required for your installation. Vertical Exhaust - NOTE: 1. The Exhaust Damper Assembly is designed for future instructions. Save 2 screws to be replaced every 6 to pinch the wire and the Hood Fan Unit. See Figure 9 (B). 4. Remove Fan Cover Bracket by...
... OVEN FOR INSTALLATION) This Over the Range Microwave Oven is not required for recirculating exhaust. 2. outside ventilation. Use 1 Tapping Screw 4 x 12 mm from the top center of the arrow on use of hood ventilation systems. Select the type required for your installation. Vertical Exhaust - NOTE: 1. The Exhaust Damper Assembly is designed for future instructions. Save 2 screws to be replaced every 6 to pinch the wire and the Hood Fan Unit. See Figure 9 (B). 4. Remove Fan Cover Bracket by...
Dimensions
Page 1
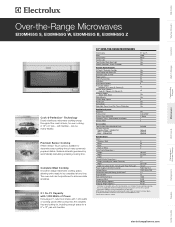
.... can be either ducted outside, or recirculated inside requiring no ducting. ‡ For use on White Z Oven Cavity Dimensions - Cook (9), Popcorn (2), Reheat (4) 15 Shortcut Options Soften, Melt, Warm Yes Add-a-Minute Yes Custom Help Options 4 Panel Lock Yes Demo Mode Yes Adjustable Sound Level For Timers / Reminders Yes Ventilation System Hood Fan Exhaust Duct Exhaust Fan (300 CFM) Charcoal Filters (Recirculated Installation) Grease Filters Yes Convertible* 3-Speed 1 2 Accessories Two-Position Adjustable Metal Rack 36" Filler Panel Kit Stainless Steel - 5304463784...
.... can be either ducted outside, or recirculated inside requiring no ducting. ‡ For use on White Z Oven Cavity Dimensions - Cook (9), Popcorn (2), Reheat (4) 15 Shortcut Options Soften, Melt, Warm Yes Add-a-Minute Yes Custom Help Options 4 Panel Lock Yes Demo Mode Yes Adjustable Sound Level For Timers / Reminders Yes Ventilation System Hood Fan Exhaust Duct Exhaust Fan (300 CFM) Charcoal Filters (Recirculated Installation) Grease Filters Yes Convertible* 3-Speed 1 2 Accessories Two-Position Adjustable Metal Rack 36" Filler Panel Kit Stainless Steel - 5304463784...

Dimensions
Page 2
... cabinets MUST be 30" wide and free of obstructions. Rear Wall 30" min. 30" min. 2" min. 12" min. Note: For planning purposes only. We reserve the right to Product Installation Guide on adequately wired 120V, dedicated circuit having 2-wire service with standard 3-1/4" x 10" rectangular duct. from cooking surface 66" min. Refer to change specifications or discontinue models without notice. mean we are constantly working to route power cord...
... cabinets MUST be 30" wide and free of obstructions. Rear Wall 30" min. 30" min. 2" min. 12" min. Note: For planning purposes only. We reserve the right to Product Installation Guide on adequately wired 120V, dedicated circuit having 2-wire service with standard 3-1/4" x 10" rectangular duct. from cooking surface 66" min. Refer to change specifications or discontinue models without notice. mean we are constantly working to route power cord...


