
Owners Manual
Page 1
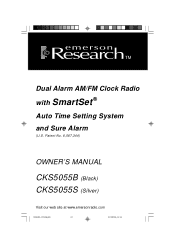
Patent No. 6,567,344) OWNER'S MANUAL CKS5055B (Black) CKS5055S (Silver) Visit our web site at www.emersonradio.com CKS5055_073106.p65 23 31/7/2006, 14:14 Dual Alarm AM/FM Clock Radio with SmartSet ® Auto Time Setting System and Sure Alarm (U.S.
Patent No. 6,567,344) OWNER'S MANUAL CKS5055B (Black) CKS5055S (Silver) Visit our web site at www.emersonradio.com CKS5055_073106.p65 23 31/7/2006, 14:14 Dual Alarm AM/FM Clock Radio with SmartSet ® Auto Time Setting System and Sure Alarm (U.S.
Owners Manual
Page 2
... electric shock to perform safety checks. 1 CKS5055_073106.p65 1 31/7/2006, 14:13 Use only power source as indicated. 14.) Use replacement parts as power-supply cord or plug is intended to alert the user to the presence of important operating and maintenance (servicing) instructions in accordance with the manufacturer's instructions. 5.) Do not install near water. 3.) Clean only with the apparatus. TO PREVENT FIRE OR SHOCK...
... electric shock to perform safety checks. 1 CKS5055_073106.p65 1 31/7/2006, 14:13 Use only power source as indicated. 14.) Use replacement parts as power-supply cord or plug is intended to alert the user to the presence of important operating and maintenance (servicing) instructions in accordance with the manufacturer's instructions. 5.) Do not install near water. 3.) Clean only with the apparatus. TO PREVENT FIRE OR SHOCK...
Owners Manual
Page 3
... to do is the world's first and only LED clock radio that your power was interrupted some time during the night while you were sleeping and your purchase. And best of all, the long life lithium battery backup battery is already installed in your SmartSet Clock Radio the dreaded flashing "12:00" display is only available from Emerson Research. But today the technology is a thing...
... to do is the world's first and only LED clock radio that your power was interrupted some time during the night while you were sleeping and your purchase. And best of all, the long life lithium battery backup battery is already installed in your SmartSet Clock Radio the dreaded flashing "12:00" display is only available from Emerson Research. But today the technology is a thing...
Owners Manual
Page 4
... radio or television reception, which the receiver is connected. • Consult the dealer or an experienced radio/TV technician for help. However, there is no guarantee that the power cord is properly installed. • When moving the set, be determined by turning the equipment off and on, the user is subject to the following two conditions: (1) This device may cause undesired operation. Changes...
... radio or television reception, which the receiver is connected. • Consult the dealer or an experienced radio/TV technician for help. However, there is no guarantee that the power cord is properly installed. • When moving the set, be determined by turning the equipment off and on, the user is subject to the following two conditions: (1) This device may cause undesired operation. Changes...
Owners Manual
Page 5
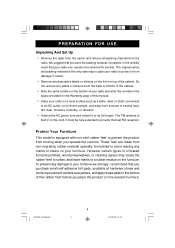
..., out of direct sunlight, and away from sources of excess heat, dirt, dust, moisture, humidity, or vibration. • Unwind the AC power cord and extend it from the radio. These 'feet...save the packing material, if possible, in the unlikely event that your radio ever needs to be fully extended to provide the best FM reception. Protect Your Furniture This model is equipped with non-skid rubber 'feet' to prevent the product...cabinet. We suggest that you operate the controls. It must be returned for service. The FM antenna is the only safe way to pack your radio to protect it to its ...
..., out of direct sunlight, and away from sources of excess heat, dirt, dust, moisture, humidity, or vibration. • Unwind the AC power cord and extend it from the radio. These 'feet...save the packing material, if possible, in the unlikely event that your radio ever needs to be fully extended to provide the best FM reception. Protect Your Furniture This model is equipped with non-skid rubber 'feet' to prevent the product...cabinet. We suggest that you operate the controls. It must be returned for service. The FM antenna is the only safe way to pack your radio to protect it to its ...
Owners Manual
Page 6
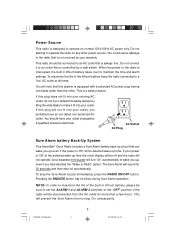
... if the radio will sound for more than the other power source. To stop the Sure Alarm buzzer immediately, press the RADIO ON/OFF button. You will not fit into your outlet changed by a qualified licensed electrician AC Outlet AC Plug Sure Alarm battery Back-Up System This SmartSet® Clock Radio includes a Sure Alarm battery back-up even if the power is 'Off'at all times. You...
... if the radio will sound for more than the other power source. To stop the Sure Alarm buzzer immediately, press the RADIO ON/OFF button. You will not fit into your outlet changed by a qualified licensed electrician AC Outlet AC Plug Sure Alarm battery Back-Up System This SmartSet® Clock Radio includes a Sure Alarm battery back-up even if the power is 'Off'at all times. You...
Owners Manual
Page 8
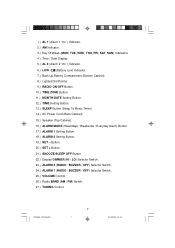
.... 9.) RADIO ON/OFF Button. 10.) TIME ZONE Button. 11.) MONTH/DATE Setting Button. 12.) TIME Setting Button. 13.) SLEEP Button (Sleep To Music Timer). 14.) AC Power Cord (Back Cabinet). 15.) Speaker (Top Cabinet). 16.) ALARM MODE (Weekdays / Weekends / Everyday Alarm) Button. 17.) ALARM 1 Setting Button. 18.) ALARM 2 Setting Button. 19.) SET - Button. 20.) SET + Button. 21.) SNOOZE/SLEEP OFF Button. 22.) Display DIMMER (HI / LO) Selector Switch . 23.) ALARM 2 (RADIO / BUZZER / OFF) Selector Switch. 24.) ALARM 1 (RADIO / BUZZER / OFF) Selector Switch. 25.) VOLUME Control. 26.) Radio BAND (AM...
.... 9.) RADIO ON/OFF Button. 10.) TIME ZONE Button. 11.) MONTH/DATE Setting Button. 12.) TIME Setting Button. 13.) SLEEP Button (Sleep To Music Timer). 14.) AC Power Cord (Back Cabinet). 15.) Speaker (Top Cabinet). 16.) ALARM MODE (Weekdays / Weekends / Everyday Alarm) Button. 17.) ALARM 1 Setting Button. 18.) ALARM 2 Setting Button. 19.) SET - Button. 20.) SET + Button. 21.) SNOOZE/SLEEP OFF Button. 22.) Display DIMMER (HI / LO) Selector Switch . 23.) ALARM 2 (RADIO / BUZZER / OFF) Selector Switch. 24.) ALARM 1 (RADIO / BUZZER / OFF) Selector Switch. 25.) VOLUME Control. 26.) Radio BAND (AM...
Owners Manual
Page 9
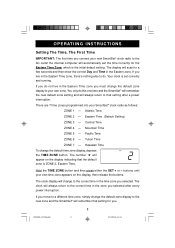
... correct Day and Time in the Eastern Time zone you must change the default zone display to the new zone and the SmartSet® will remember that the default zone is ZONE 2, Eastern Time. Your clock is the initial default setting. Mountain Time ZONE 5 - The number "2" will appear on the display, then release the buttons. If you do not live in the time zone you selected after a power interruption. There are 7 time zones programmed...
... correct Day and Time in the Eastern Time zone you must change the default zone display to the new zone and the SmartSet® will remember that the default zone is ZONE 2, Eastern Time. Your clock is the initial default setting. Mountain Time ZONE 5 - The number "2" will appear on the display, then release the buttons. If you do not live in the time zone you selected after a power interruption. There are 7 time zones programmed...
Owners Manual
Page 11
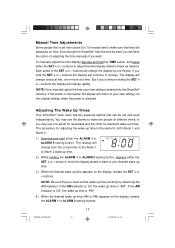
... alarm for weekdays and the other for weekend wake up time appears on the display, release the SET + or - If the power is "AM". Manual Time Adjustments Some people like to set their clocks 5 to 10 minutes fast to make sure that they will always be set and used independently. Even though the SmartSet® sets the time by itself, you wish. buttons the display will return to adjust...
... alarm for weekdays and the other for weekend wake up time appears on the display, release the SET + or - If the power is "AM". Manual Time Adjustments Some people like to set their clocks 5 to 10 minutes fast to make sure that they will always be set and used independently. Even though the SmartSet® sets the time by itself, you wish. buttons the display will return to adjust...
Owners Manual
Page 12
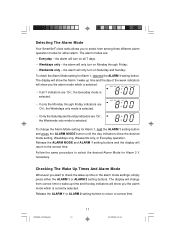
...; If all 7 days. • Weekdays only - The alarm modes are 'On', the Weekends only mode is currently selected. Release the ALARM MODE and ALARM 1 setting buttons and the display will show the Alarm 1 wake up time and the day of the week indicators will return to the correct time. Selecting The Alarm Mode Your SmartSet® clock radio allows you want to check the wake up time or the alarm mode settings, simply press...
...; If all 7 days. • Weekdays only - The alarm modes are 'On', the Weekends only mode is currently selected. Release the ALARM MODE and ALARM 1 setting buttons and the display will show the Alarm 1 wake up time and the day of the week indicators will return to the correct time. Selecting The Alarm Mode Your SmartSet® clock radio allows you want to check the wake up time or the alarm mode settings, simply press...
Owners Manual
Page 13
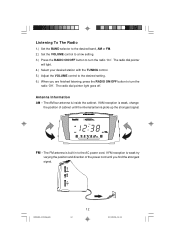
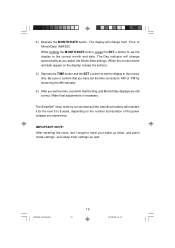
.../7/2006, 14:14 Listening To The Radio 1.) Set the BAND selector to the desired band, AM or FM. 2.) Set the VOLUME control to a low setting. 3.) Press the RADIO ON/OFF button to turn the radio 'Off'. If FM reception is weak, change the position of the power cord until the internal antenna picks up the strongest signal. Antenna Information AM - If AM reception is weak try varying the position...
.../7/2006, 14:14 Listening To The Radio 1.) Set the BAND selector to the desired band, AM or FM. 2.) Set the VOLUME control to a low setting. 3.) Press the RADIO ON/OFF button to turn the radio 'Off'. If FM reception is weak, change the position of the power cord until the internal antenna picks up the strongest signal. Antenna Information AM - If AM reception is weak try varying the position...
Owners Manual
Page 14
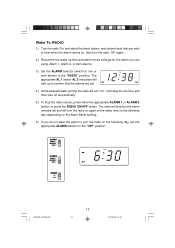
... radio will stop but the alarm remains set and will turn the radio 'Off'again. 2.) Reconfirm the wake up time the radio will play for one or both alarms. 3.) Set the ALARM selector switch for one hour and then shut off automatically. 5.) To stop the radio sooner, press either the appropriate ALARM 1 or ALARM 2 button, or press the RADIO ON/OFF button. Wake To RADIO 1.) Turn the radio 'On'and select the band, station, and volume level that the alarms are using, Alarm 1, Alarm...
... radio will stop but the alarm remains set and will turn the radio 'Off'again. 2.) Reconfirm the wake up time the radio will play for one or both alarms. 3.) Set the ALARM selector switch for one hour and then shut off automatically. 5.) To stop the radio sooner, press either the appropriate ALARM 1 or ALARM 2 button, or press the RADIO ON/OFF button. Wake To RADIO 1.) Turn the radio 'On'and select the band, station, and volume level that the alarms are using, Alarm 1, Alarm...

Owners Manual
Page 15
... light up to confirm that it makes. 1.) Reconfirm the wake up time and alarm mode settings for the alarm you are set. 3.) At the selected wake up . Radio And Buzzer Operation You may also set one alarm for wake to radio and the other for one or both alarms. 2.) Set the ALARM selector switch for one hour and then shut off by the sound that the alarms are using, Alarm 1, Alarm 2, or both alarms to the "BUZZER"position. The buzzer...
... light up to confirm that it makes. 1.) Reconfirm the wake up time and alarm mode settings for the alarm you are set. 3.) At the selected wake up . Radio And Buzzer Operation You may also set one alarm for wake to radio and the other for one or both alarms. 2.) Set the ALARM selector switch for one hour and then shut off by the sound that the alarms are using, Alarm 1, Alarm 2, or both alarms to the "BUZZER"position. The buzzer...
Owners Manual
Page 16
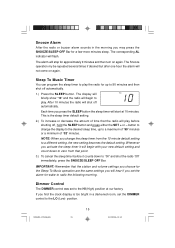
... bright in the morning you will play the radio for up to a maximum of "90"minutes or a minimum of time that point. 3.) To cancel the sleep timer before shutting off automatically. IMPORTANT: Remember that the station and volume settings you choose for the Sleep To Music operation are the same settings you may press the SNOOZE/SLEEP OFF Bar for wake to radio the following morning. Snooze Alarm After the radio or buzzer alarm sounds...
... bright in the morning you will play the radio for up to a maximum of "90"minutes or a minimum of time that point. 3.) To cancel the sleep timer before shutting off automatically. IMPORTANT: Remember that the station and volume settings you choose for the Sleep To Music operation are the same settings you may press the SNOOZE/SLEEP OFF Bar for wake to radio the following morning. Snooze Alarm After the radio or buzzer alarm sounds...
Owners Manual
Page 17
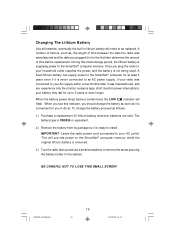
... battery wherever batteries are sold. IMPORTANT: Leave the radio power cord connected to be replaced. A fresh lithium battery can supply power to the SmartSet® computer for at least 3 years even if it is never connected to install. BE CAREFUL NOT TO LOSE THIS SMALL SCREW! During this indicator, you plug the radio in for the first time determine the amount of time between the date the radio...
... battery wherever batteries are sold. IMPORTANT: Leave the radio power cord connected to be replaced. A fresh lithium battery can supply power to the SmartSet® computer for at least 3 years even if it is never connected to install. BE CAREFUL NOT TO LOSE THIS SMALL SCREW! During this indicator, you plug the radio in for the first time determine the amount of time between the date the radio...
Owners Manual
Page 18
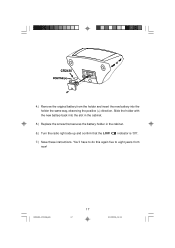
You'll have to do this again five to eight years from the holder and insert the new battery into the slot in the cabinet. 5.) Replace the screw that secures the battery holder in the cabinet. 6.) Turn the radio right side up and confirm that the LOW indicator is 'Off'. 7.) Save these instructions. Slide the holder with the new battery back into the holder the same way, observing the positive (+) direction. CKS5055_073106.p65 17 17 31/7/2006, 14:14 1 4.) Remove the original battery from now!
You'll have to do this again five to eight years from the holder and insert the new battery into the slot in the cabinet. 5.) Replace the screw that secures the battery holder in the cabinet. 6.) Turn the radio right side up and confirm that the LOW indicator is 'Off'. 7.) Save these instructions. Slide the holder with the new battery back into the holder the same way, observing the positive (+) direction. CKS5055_073106.p65 17 17 31/7/2006, 14:14 1 4.) Remove the original battery from now!
Owners Manual
Page 19
... instructions on your AC outlet and let the clock set the display to be reset each time the power is interrupted. Resetting The Clock After A Total Memory Loss If you do not change from the AC outlet after the battery is exhausted, or if a power interruption occurs, the SmartSet® memory will be lost and the clock will reset itself . 3.) Depress the MONTH/DATE and TIME buttons...
... instructions on your AC outlet and let the clock set the display to be reset each time the power is interrupted. Resetting The Clock After A Total Memory Loss If you do not change from the AC outlet after the battery is exhausted, or if a power interruption occurs, the SmartSet® memory will be lost and the clock will reset itself . 3.) Depress the MONTH/DATE and TIME buttons...
Owners Manual
Page 20
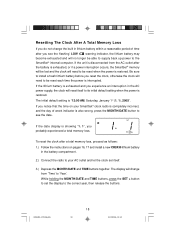
...). CKS5055_073106.p65 19 19 31/7/2006, 14:14 Make final adjustments if necessary. When the correct month and date appear on the number and duration of the power outages you adjust the Month/Date settings. The display will change automatically as well. While holding the MONTH/DATE button, press the SET + button to set the display to reset your wake up times, and alarm mode settings, and sleep timer settings as you experience. 4.) Depress the MONTH...
...). CKS5055_073106.p65 19 19 31/7/2006, 14:14 Make final adjustments if necessary. When the correct month and date appear on the number and duration of the power outages you adjust the Month/Date settings. The display will change automatically as well. While holding the MONTH/DATE button, press the SET + button to set the display to reset your wake up times, and alarm mode settings, and sleep timer settings as you experience. 4.) Depress the MONTH...
Owners Manual
Page 21
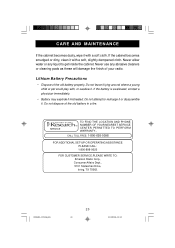
... could play with, or swallow it . CALL TOLL FREE: 1-800-695-0098 FOR ADDITIONAL SET-UP OR OPERATING ASSISTANCE PLEASE CALL: 1-800-898-9020 FOR CUSTOMER SERVICE,PLEASE WRITE TO: Emerson Radio Corp., Consumer Affairs Dept., 5101 Statesman Drive, Irving, TX 75063. Lithium Battery Precautions • Dispose of your radio. CKS5055_073106.p65 20 20 31/7/2006, 14:14 Never use any...
... could play with, or swallow it . CALL TOLL FREE: 1-800-695-0098 FOR ADDITIONAL SET-UP OR OPERATING ASSISTANCE PLEASE CALL: 1-800-898-9020 FOR CUSTOMER SERVICE,PLEASE WRITE TO: Emerson Radio Corp., Consumer Affairs Dept., 5101 Statesman Drive, Irving, TX 75063. Lithium Battery Precautions • Dispose of your radio. CKS5055_073106.p65 20 20 31/7/2006, 14:14 Never use any...
Owners Manual
Page 22
... Repair Facility, or replace the product in original material, including original parts and workmanship, under normal use and conditions, for a period of purchase. Model Number: CKS5055B/CKS5055S Serial Number: CKS5055_073106.p65 21 21 31/7/2006, 14:14 LIMITED WARRANTY Emerson Radio Corp. in the U.S. We suggest that you record the Serial Number of your check or money order payable to follow operating instructions, commercial use...
... Repair Facility, or replace the product in original material, including original parts and workmanship, under normal use and conditions, for a period of purchase. Model Number: CKS5055B/CKS5055S Serial Number: CKS5055_073106.p65 21 21 31/7/2006, 14:14 LIMITED WARRANTY Emerson Radio Corp. in the U.S. We suggest that you record the Serial Number of your check or money order payable to follow operating instructions, commercial use...


