

English Manual
Page 15
...To use the information mode, see THE INFORMATION MODE on the console, remove the plastic. To prevent damage to your workout. As you achieve specific fitness goals. You can display speed and distance in this manual. You can change the unit of measurement, see page 20. To use an iFit workout... handgrip pulse sensor. To use the manual mode, see page 24). IMPORTANT: If there is used, observe the alignment of the walking belt, and center the walking belt if necessary (see page 16. To purchase iFit cards at select stores. When the manual mode of the console is selected or...
...To use the information mode, see THE INFORMATION MODE on the console, remove the plastic. To prevent damage to your workout. As you achieve specific fitness goals. You can display speed and distance in this manual. You can change the unit of measurement, see page 20. To use an iFit workout... handgrip pulse sensor. To use the manual mode, see page 24). IMPORTANT: If there is used, observe the alignment of the walking belt, and center the walking belt if necessary (see page 16. To purchase iFit cards at select stores. When the manual mode of the console is selected or...
English Manual
Page 23
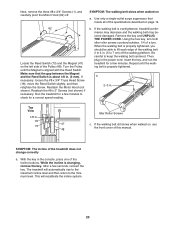
... Screws c. Reattach the Motor Hood (not shown). Reattach the #8 x 2" Screws (not shown) if necessary. Run the treadmill for a few minutes to keep the walking belt centered. Repeat until the Magnet is properly tightened, you should be able to lift each edge of the Pulley (48). SYMPTOM: The incline of a turn both...
... Screws c. Reattach the Motor Hood (not shown). Reattach the #8 x 2" Screws (not shown) if necessary. Run the treadmill for a few minutes to keep the walking belt centered. Repeat until the Magnet is properly tightened, you should be able to lift each edge of the Pulley (48). SYMPTOM: The incline of a turn both...
English Manual
Page 24
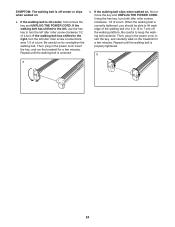
... (5 to 7 cm) off the walking platform. Be careful not to keep the walking belt centered. If the walking belt slips when walked on the treadmill for a few minutes. When the walking belt is off... -center, first remove the key and UNPLUG THE POWER CORD. Repeat until the walking belt is properly... in the power cord, insert the key, and run the treadmill for a few minutes. If the walking belt is centered. Then, plug in the power cord, insert the key, and carefully walk on , first remove the key and UNPLUG...
... (5 to 7 cm) off the walking platform. Be careful not to keep the walking belt centered. If the walking belt slips when walked on the treadmill for a few minutes. When the walking belt is off... -center, first remove the key and UNPLUG THE POWER CORD. Repeat until the walking belt is properly... in the power cord, insert the key, and run the treadmill for a few minutes. If the walking belt is centered. Then, plug in the power cord, insert the key, and carefully walk on , first remove the key and UNPLUG...
English Manual
Page 32
...the use or performance of the product; Some states do not allow the exclusion or limitation of incidental or consequential damages. ICON Health & Fitness, Inc., 1500 S. 1000 W., Logan, UT 84321-9813 Part No. 313221 R0211A Printed in -home service, the customer will be responsible... the original purchaser. The warranty extended hereunder is shipped to a service center, freight charges to www.iconservice.com/registration. If the product is in lieu of any implied warranties of merchantability or fitness for a minimal trip charge. Accordingly, the above limitation may not apply...
...the use or performance of the product; Some states do not allow the exclusion or limitation of incidental or consequential damages. ICON Health & Fitness, Inc., 1500 S. 1000 W., Logan, UT 84321-9813 Part No. 313221 R0211A Printed in -home service, the customer will be responsible... the original purchaser. The warranty extended hereunder is shipped to a service center, freight charges to www.iconservice.com/registration. If the product is in lieu of any implied warranties of merchantability or fitness for a minimal trip charge. Accordingly, the above limitation may not apply...