
User Manual
Page 3
... fall , resulting in a location where there is damaged or modified. - Confirm the weight of the product and the wall plate before installation. • Do not install the wall plate in personal injury or property damage. • Handle the USB cable carefully to avoid fire or electric shock. Do not use excessive force when adjusting the product. If...
... fall , resulting in a location where there is damaged or modified. - Confirm the weight of the product and the wall plate before installation. • Do not install the wall plate in personal injury or property damage. • Handle the USB cable carefully to avoid fire or electric shock. Do not use excessive force when adjusting the product. If...

User Manual
Page 7
Introduction The Interactive Unit is a wall-mounted receiver that works with your existing ceiling-mounted projector and standard whiteboard. The Interactive Unit includes all the hardware and software you need to create interactive presentations using your projector to turn virtually any surface into an interactive whiteboard. You can use it with your computer and installed projector.
Introduction The Interactive Unit is a wall-mounted receiver that works with your existing ceiling-mounted projector and standard whiteboard. The Interactive Unit includes all the hardware and software you need to create interactive presentations using your projector to turn virtually any surface into an interactive whiteboard. You can use it with your computer and installed projector.

User Manual
Page 14
... USB cable connected to your computer's monitor out port. b Connect the flat end of the cable to the Interactive Unit. Connecting the USB Cable for the Easy Interactive Pen In order to use the Easy Interactive Pen, you need to make sure that came with the projector. Connecting the VGA Computer Cable a Locate the VGA computer cable connected to your projector using the VGA computer cable that your computer is connected to the projector. Connecting the Cables 14 VGA computer cable USB cable...
... USB cable connected to your computer's monitor out port. b Connect the flat end of the cable to the Interactive Unit. Connecting the USB Cable for the Easy Interactive Pen In order to use the Easy Interactive Pen, you need to make sure that came with the projector. Connecting the VGA Computer Cable a Locate the VGA computer cable connected to your projector using the VGA computer cable that your computer is connected to the projector. Connecting the Cables 14 VGA computer cable USB cable...

User Manual
Page 16
... use either in the system tray on your screen, either pen for instructions. Try removing and reconnecting the USB cable. When the Interactive Unit and projector are connected and the Easy Interactive Driver icon is recommended when you turn on the icon, the computer and projector are projecting very detailed images and need to recalibrate if you change the projector's aspect ratio or if you change the following : Windows...
... use either in the system tray on your screen, either pen for instructions. Try removing and reconnecting the USB cable. When the Interactive Unit and projector are connected and the Easy Interactive Driver icon is recommended when you turn on the icon, the computer and projector are projecting very detailed images and need to recalibrate if you change the projector's aspect ratio or if you change the following : Windows...

User Manual
Page 20
... the USB cable. • Make sure the pen batteries have enough power. If the light on the pen doesn't turn green when you press the button, you don't see a red ^ on the pen icon, the computer and projector are not in the Dock (Mac OS), do one of bright lighting. • For easier operation, hold the pen at an angle to the projection...
... the USB cable. • Make sure the pen batteries have enough power. If the light on the pen doesn't turn green when you press the button, you don't see a red ^ on the pen icon, the computer and projector are not in the Dock (Mac OS), do one of bright lighting. • For easier operation, hold the pen at an angle to the projection...

Quick Setup Guide
Page 1
BrightLink Solo™ Interactive Module/Module interactif (IU-01) Quick Setup Guide Guide d'installation rapide
BrightLink Solo™ Interactive Module/Module interactif (IU-01) Quick Setup Guide Guide d'installation rapide

Quick Setup Guide
Page 2
...; Do not use a cable that the screws have not become loose. Otherwise, the product or wall plate may cause personal injury. 2 Do not use excessive force when adjusting the product. Otherwise, the wall plate may crack and cause the product to fall , resulting in personal injury or property damage. • Handle the USB cable carefully to avoid...
...; Do not use a cable that the screws have not become loose. Otherwise, the product or wall plate may cause personal injury. 2 Do not use excessive force when adjusting the product. Otherwise, the wall plate may crack and cause the product to fall , resulting in personal injury or property damage. • Handle the USB cable carefully to avoid...
Quick Setup Guide
Page 3
... Image Sizes 5 Projector Position 6 Projection Surface 6 Projection Angle for Ceiling Mounted Projectors 7 Determining the Height of the Interactive Module 7 Installation Measurements in Inches 9 Installation Measurements in Millimeters 10 Confirming the Projector Position 11 Installing the Interactive Module 13 Installing the Wall Plate 13 Mounting the Interactive Module 14 Using the Interactive Module 15 Solving Problems 17 Interactive Pen Problems 17 Battery Problems 17 Where to Get Help 18 Internet Support 18 Speak to a Support Representative 18 Software Technical Support...
... Image Sizes 5 Projector Position 6 Projection Surface 6 Projection Angle for Ceiling Mounted Projectors 7 Determining the Height of the Interactive Module 7 Installation Measurements in Inches 9 Installation Measurements in Millimeters 10 Confirming the Projector Position 11 Installing the Interactive Module 13 Installing the Wall Plate 13 Mounting the Interactive Module 14 Using the Interactive Module 15 Solving Problems 17 Interactive Pen Problems 17 Battery Problems 17 Where to Get Help 18 Internet Support 18 Speak to a Support Representative 18 Software Technical Support...
Quick Setup Guide
Page 5
Note If you normally project on a screen, you need to adjust your image size (using your projector's zoom feature) to work with images projected on a pre-installed whiteboard or directly on the size and aspect ratio. For interactive use, your projector. this may require refocusing your images must be projected on a wall or preinstalled whiteboard; If you can project directly on a hard surface, rather than a screen. You may not fill the...
Note If you normally project on a screen, you need to adjust your image size (using your projector's zoom feature) to work with images projected on a pre-installed whiteboard or directly on the size and aspect ratio. For interactive use, your projector. this may require refocusing your images must be projected on a wall or preinstalled whiteboard; If you can project directly on a hard surface, rather than a screen. You may not fill the...
Quick Setup Guide
Page 6
... free from any type of the following: • You need to recalibrate if you can also use a portable projector. If you use the interactive module with a portable projector, be aware of projector, you can always set it with a portable projector on ; Note Interactivity cannot be guaranteed if the screen is designed to work with a ceiling-mounted projector. Warning Never look into the projector lens. Projection Surface • Your images must be projected...
... free from any type of the following: • You need to recalibrate if you can also use a portable projector. If you use the interactive module with a portable projector, be aware of projector, you can always set it with a portable projector on ; Note Interactivity cannot be guaranteed if the screen is designed to work with a ceiling-mounted projector. Warning Never look into the projector lens. Projection Surface • Your images must be projected...
Quick Setup Guide
Page 7
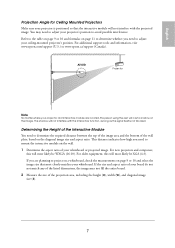
... image size (S). 7 AVOID Projector Note No matter where your projector and interactive module are planning to adjust your ceiling-mounted projector's position. You may not fill the entire board. 2 Measure the size of your whiteboard or projected image. For older equipment, this will not interfere with the interactive function, as long as the signal itself is positioned so that most likely be XGA (4:3). If you are located...
... image size (S). 7 AVOID Projector Note No matter where your projector and interactive module are planning to adjust your ceiling-mounted projector's position. You may not fill the entire board. 2 Measure the size of your whiteboard or projected image. For older equipment, this will not interfere with the interactive function, as long as the signal itself is positioned so that most likely be XGA (4:3). If you are located...
Quick Setup Guide
Page 11
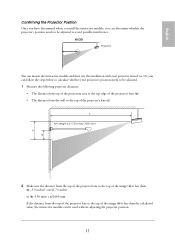
... possible interference. Or, you can be adjusted to calculate whether your projector turned on. AVOID Projector You can mount the interactive module and then test the installation with your projector's position needs to be adjusted. 1 Measure the following projector distances: • The distance from top of the projection area to the top edge of the projector's lens (a) • The distance from the wall to the top of...
... possible interference. Or, you can be adjusted to calculate whether your projector turned on. AVOID Projector You can mount the interactive module and then test the installation with your projector's position needs to be adjusted. 1 Measure the following projector distances: • The distance from top of the projection area to the top edge of the projector's lens (a) • The distance from the wall to the top of...
Quick Setup Guide
Page 13
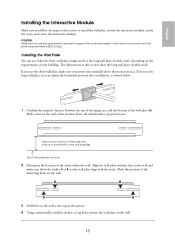
... plate (b). Distance from the top of the interactive module and wall plate (approximately 5.08 lb/2.3 kg). If you use the long wall plate, you can use the appropriate hardware to support the combined weight of the projection surface to install the wall plate, mount the interactive module, attach the cover, and center the interactive module. Make a line on the wall at the required locations. 4 Using commercially...
... plate (b). Distance from the top of the interactive module and wall plate (approximately 5.08 lb/2.3 kg). If you use the long wall plate, you can use the appropriate hardware to support the combined weight of the projection surface to install the wall plate, mount the interactive module, attach the cover, and center the interactive module. Make a line on the wall at the required locations. 4 Using commercially...
Quick Setup Guide
Page 14
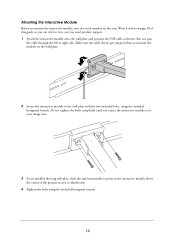
... the cable doesn't get trapped when you installed the long wall plate, slide the arm horizontally to it down on the arm. Mounting the Interactive Module Before you need product support. 1 Attach the interactive module onto the wall plate and position the USB cable as shown. Write it in case you mount the interactive module, note the serial number on page 18 of the projection area...
... the cable doesn't get trapped when you installed the long wall plate, slide the arm horizontally to it down on the arm. Mounting the Interactive Module Before you need product support. 1 Attach the interactive module onto the wall plate and position the USB cable as shown. Write it in case you mount the interactive module, note the serial number on page 18 of the projection area...
Quick Setup Guide
Page 15
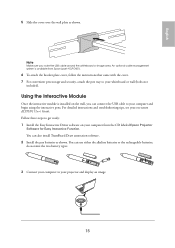
... get ready: 1 Install the Easy Interactive Driver software on -screen ELPIU01 User's Guide. English 5 Slide the cover over the wall plate as shown. You can use either the alkaline batteries or the rechargeable batteries; For detailed instructions and troubleshooting tips, see your on your computer and begin using the interactive pens. Note Make sure you can connect the USB cable to your projector and display an image. 15 Follow these...
... get ready: 1 Install the Easy Interactive Driver software on -screen ELPIU01 User's Guide. English 5 Slide the cover over the wall plate as shown. You can use either the alkaline batteries or the rechargeable batteries; For detailed instructions and troubleshooting tips, see your on your computer and begin using the interactive pens. Note Make sure you can connect the USB cable to your projector and display an image. 15 Follow these...

Quick Setup Guide
Page 16
... its size and aspect ratio. 4 Connect your screen (Windows®) or in the lower right corner of your computer to the interactive module using a whiteboard, the image may need to double-click. • To right-click, tap while pressing the button on the projected image. Tap twice to use a USB extension cable (not included). 5 Launch the Easy Interactive Driver. Make sure you plan to calibrate. Battery indicator light Button...
... its size and aspect ratio. 4 Connect your screen (Windows®) or in the lower right corner of your computer to the interactive module using a whiteboard, the image may need to double-click. • To right-click, tap while pressing the button on the projected image. Tap twice to use a USB extension cable (not included). 5 Launch the Easy Interactive Driver. Make sure you plan to calibrate. Battery indicator light Button...
Quick Setup Guide
Page 17
... is blocking the signal between the pen and the interactive module. English Solving Problems Check the following : pen icon on -screen ELPIU01User's Guide for solutions to common problems. For additional information, see the onscreen ELPIU01 User's Guide. or Start > All Programs or Programs > EPSON Projector > Easy Interactive Mac OS: Open the Application folder, then select the Easy Interactive Driver icon. • If you see a red X on the projected image, you removed the cardboard...
... is blocking the signal between the pen and the interactive module. English Solving Problems Check the following : pen icon on -screen ELPIU01User's Guide for solutions to common problems. For additional information, see the onscreen ELPIU01 User's Guide. or Start > All Programs or Programs > EPSON Projector > Easy Interactive Mac OS: Open the Application folder, then select the Easy Interactive Driver icon. • If you see a red X on the projected image, you removed the cardboard...
Quick Setup Guide
Page 18
... www.epson.com/support (U.S.) or www.epson.ca/support (Canada) and select your product for solutions to common problems. You can download software and documentation, get FAQs and troubleshooting advice, or e-mail Epson with TeamBoard Draw software, contact Epson as described above . Or you need help , call for support, please have the following information ready: ■ Product name (IU-01 BrightLink Solo Interactive Module) ■ Product serial number (on...
... www.epson.com/support (U.S.) or www.epson.ca/support (Canada) and select your product for solutions to common problems. You can download software and documentation, get FAQs and troubleshooting advice, or e-mail Epson with TeamBoard Draw software, contact Epson as described above . Or you need help , call for support, please have the following information ready: ■ Product name (IU-01 BrightLink Solo Interactive Module) ■ Product serial number (on...

Quick Setup Guide
Page 19
... current, software problems, interaction with this limited warranty statement that the product, if purchased new and operated in the United States, Canada, or Puerto Rico will be free from defects in workmanship and materials for a period of two (2) years from jurisdiction to Epson for warranty service should the Epson label or logo or the rating label or serial number be removed. IN...
... current, software problems, interaction with this limited warranty statement that the product, if purchased new and operated in the United States, Canada, or Puerto Rico will be free from defects in workmanship and materials for a period of two (2) years from jurisdiction to Epson for warranty service should the Epson label or logo or the rating label or serial number be removed. IN...
Quick Setup Guide
Page 20
... or problems arising from the use of this publication may be liable for any consumable products other products. BrightLink Solo is a registered logomark of their respective owners. Epson disclaims any means, electronic, mechanical, photocopying, recording, or otherwise, without notice. © 2010 Epson America Inc. 9/10 20 To find the Epson Authorized Reseller nearest you , please visit www.epson.com/support...
... or problems arising from the use of this publication may be liable for any consumable products other products. BrightLink Solo is a registered logomark of their respective owners. Epson disclaims any means, electronic, mechanical, photocopying, recording, or otherwise, without notice. © 2010 Epson America Inc. 9/10 20 To find the Epson Authorized Reseller nearest you , please visit www.epson.com/support...


