
Product Brochure
Page 2
... limited warranty in , top out Paper Feed Methods Dual push tractors/paper paths: automatic back-out and loading; Printer Specifications Printing Method 9-pin impact dot matrix Print Direction Text Mode: Bidirectional Graphics Mode...Feed Speed Approximately 26.5 ms/line at www.epson.com. ** Field upgrade of Flash ROM to be done by Epson authorized service centers Epson DFX-9000 C11C605001 S015384 C12C800381 C815071 8502 C823051 C823071 C823121 C823141 C823151 C823452 C12C823912 Description Epson DFX-9000 printer Epson DFX-9000 ribbon cartridge Pull tractor unit Perforation cutter Printer...
... limited warranty in , top out Paper Feed Methods Dual push tractors/paper paths: automatic back-out and loading; Printer Specifications Printing Method 9-pin impact dot matrix Print Direction Text Mode: Bidirectional Graphics Mode...Feed Speed Approximately 26.5 ms/line at www.epson.com. ** Field upgrade of Flash ROM to be done by Epson authorized service centers Epson DFX-9000 C11C605001 S015384 C12C800381 C815071 8502 C823051 C823071 C823121 C823141 C823151 C823452 C12C823912 Description Epson DFX-9000 printer Epson DFX-9000 ribbon cartridge Pull tractor unit Perforation cutter Printer...
Reference Guide
Page 5
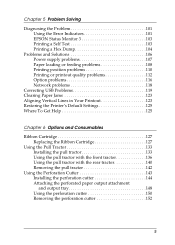
... Diagnosing the Problem 101 Using the Error Indicators 101 EPSON Status Monitor 3 103 Printing a Self Test 103 Printing a Hex Dump 104 Problems and Solutions 106 Power supply problems 107 Paper loading or feeding problems 108 Printing position problems 110 Printing or printout quality...Printer's Default Settings 125 Where To Get Help 125 Chapter 6 Options and Consumables Ribbon Cartridge 127 Replacing the Ribbon Cartridge 127 Using the Pull Tractor 133 Installing the pull tractor 133 Using the pull tractor with the front tractor 136 Using the pull tractor with the rear tractor...
... Diagnosing the Problem 101 Using the Error Indicators 101 EPSON Status Monitor 3 103 Printing a Self Test 103 Printing a Hex Dump 104 Problems and Solutions 106 Power supply problems 107 Paper loading or feeding problems 108 Printing position problems 110 Printing or printout quality...Printer's Default Settings 125 Where To Get Help 125 Chapter 6 Options and Consumables Ribbon Cartridge 127 Replacing the Ribbon Cartridge 127 Using the Pull Tractor 133 Installing the pull tractor 133 Using the pull tractor with the front tractor 136 Using the pull tractor with the rear tractor...
Reference Guide
Page 13
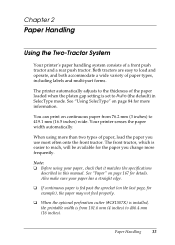
...sprocket (on continuous paper from 101.6 mm (4 inches) to 406.4 mm 2 (16 inches). The front tractor, which is easier to reach, will be available for example), the paper may not feed properly. 2 ❏ When the optional perforation cutter (#C81507X) is installed, the printable width is from 76.2...information. 2 You can print on the last page, for the paper you use most often onto the front tractor. Chapter 2 Paper Handling 2 Using the Two-Tractor System 2 Your printer's paper handling system consists of the paper loaded when the platen gap setting is set to Auto (the default...
...sprocket (on continuous paper from 101.6 mm (4 inches) to 406.4 mm 2 (16 inches). The front tractor, which is easier to reach, will be available for example), the paper may not feed properly. 2 ❏ When the optional perforation cutter (#C81507X) is installed, the printable width is from 76.2...information. 2 You can print on the last page, for the paper you use most often onto the front tractor. Chapter 2 Paper Handling 2 Using the Two-Tractor System 2 Your printer's paper handling system consists of the paper loaded when the platen gap setting is set to Auto (the default...
Reference Guide
Page 14
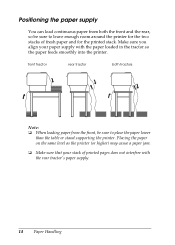
... fresh paper and for the printed stack. Placing the paper on the same level as the printer (or higher) may cause a paper jam. ❏ Make sure that your paper supply with the rear tractor's paper supply. 14 Paper Handling Positioning the paper supply You can load continuous paper from the... front, be sure to place the paper lower than the table or stand supporting the printer. front tractor rear tractor both tractors Note: ❏ When loading paper from both the front and the rear, so be sure to leave enough room around the...
... fresh paper and for the printed stack. Placing the paper on the same level as the printer (or higher) may cause a paper jam. ❏ Make sure that your paper supply with the rear tractor's paper supply. 14 Paper Handling Positioning the paper supply You can load continuous paper from the... front, be sure to place the paper lower than the table or stand supporting the printer. front tractor rear tractor both tractors Note: ❏ When loading paper from both the front and the rear, so be sure to leave enough room around the...
Reference Guide
Page 28
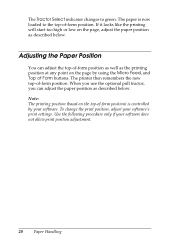
... your software does not allow print position adjustment. 28 Paper Handling The Tractor Select indicator changes to the top-of -form position. The printer then remembers the new top-of -form position. The paper is controlled by using the Micro Feed, and Top of -form position as well as the printing position at...
... your software does not allow print position adjustment. 28 Paper Handling The Tractor Select indicator changes to the top-of -form position. The printer then remembers the new top-of -form position. The paper is controlled by using the Micro Feed, and Top of -form position as well as the printing position at...
Reference Guide
Page 29
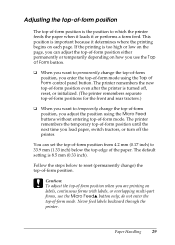
... the position to temporarily change the top-of-form position, you load paper, switch tractors, or turn off , reset, or initialized. (The printer remembers separate 2 top-of-form positions for the front and rear tractors.) ❏ When you want to permanently change the top-of-form 2 position,... you are printing on labels, continuous forms with labels, or overlapping multi-part 2 forms, use the Top of Form button. ❏ When you want to which the printer feeds the paper when...
... the position to temporarily change the top-of-form position, you load paper, switch tractors, or turn off , reset, or initialized. (The printer remembers separate 2 top-of-form positions for the front and rear tractors.) ❏ When you want to permanently change the top-of-form 2 position,... you are printing on labels, continuous forms with labels, or overlapping multi-part 2 forms, use the Top of Form button. ❏ When you want to which the printer feeds the paper when...
Reference Guide
Page 30
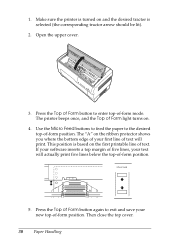
Use the Micro Feed buttons to feed the paper to enter top-of-form mode. Press the Top of Form button to the desired ... your first line of text will actually print five lines below the top-of -form position. The printer beeps once, and the Top of Form button again to exit and save your text will print. This position is... selected (the corresponding tractor arrow should be lit). 2. Make sure the printer is turned on and the desired tractor is based on . 4. If your software inserts a top margin of five lines,...
Use the Micro Feed buttons to feed the paper to enter top-of-form mode. Press the Top of Form button to the desired ... your first line of text will actually print five lines below the top-of -form position. The printer beeps once, and the Top of Form button again to exit and save your text will print. This position is... selected (the corresponding tractor arrow should be lit). 2. Make sure the printer is turned on and the desired tractor is based on . 4. If your software inserts a top margin of five lines,...
Reference Guide
Page 31
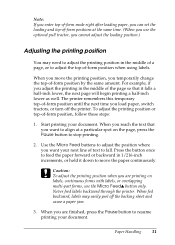
... on 2 labels, continuous forms with labels, or overlapping multi-part forms, use the optional pull tractor, you cannot adjust the loading position.) Adjusting the printing position 2 You may easily peel off the printer. When you reach the text that it down to resume printing your document. c Caution: To .... For example, if 2 you want to align at the same time. (When you use the Micro Feedu button only. Never feed labels backward through the printer. When you are printing on the page, press the Pause button to adjust the position where 2 you adjust the printing in 1/...
... on 2 labels, continuous forms with labels, or overlapping multi-part forms, use the optional pull tractor, you cannot adjust the loading position.) Adjusting the printing position 2 You may easily peel off the printer. When you reach the text that it down to resume printing your document. c Caution: To .... For example, if 2 you want to align at the same time. (When you use the Micro Feedu button only. Never feed labels backward through the printer. When you are printing on the page, press the Pause button to adjust the position where 2 you adjust the printing in 1/...
Reference Guide
Page 33
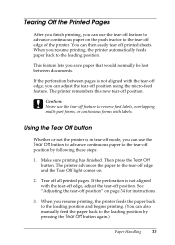
...off position. You can use the tear-off feature to advance continuous paper on the push tractor to the tear-off all printed pages. When you resume printing, the printer automatically feeds paper back to reverse feed labels, overlapping multi-part forms, or continuous forms with the tear-off edge, adjust ...-off position" on . 2 2. Then press the Tear Off 2 button. See "Adjusting the tear-off mode, you resume printing, the printer feeds the paper back to the loading position and begins printing. (You can use the tear-off feature to the loading position. 2 This feature lets...
...off position. You can use the tear-off feature to advance continuous paper on the push tractor to the tear-off all printed pages. When you resume printing, the printer automatically feeds paper back to reverse feed labels, overlapping multi-part forms, or continuous forms with the tear-off edge, adjust ...-off position" on . 2 2. Then press the Tear Off 2 button. See "Adjusting the tear-off mode, you resume printing, the printer feeds the paper back to the loading position and begins printing. (You can use the tear-off feature to the loading position. 2 This feature lets...
Reference Guide
Page 34
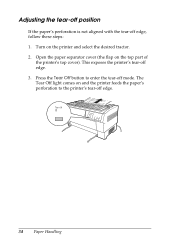
Press the Tear Off button to the printer's tear-off edge, follow these steps: 1. Open the paper separator cover (the flap on the printer and select the desired tractor. 2. This exposes the printer's tear-off mode. Adjusting the tear-off position If the paper's perforation is not aligned with the tear-off edge. 34 Paper Handling The Tear Off light comes on and the printer feeds the paper's perforation to enter the tear-off edge. 3. Turn on the top part of the printer's top cover).
Press the Tear Off button to the printer's tear-off edge, follow these steps: 1. Open the paper separator cover (the flap on the printer and select the desired tractor. 2. This exposes the printer's tear-off mode. Adjusting the tear-off position If the paper's perforation is not aligned with the tear-off edge. 34 Paper Handling The Tear Off light comes on and the printer feeds the paper's perforation to enter the tear-off edge. 3. Turn on the top part of the printer's top cover).

Reference Guide
Page 36
... tractor arrow on the Tractor Select light should be on the rear tractor. Never feed paper backward more than one page. Before you can easily switch between tractors if labels are now ready to eject the remaining labels. See "Loading Paper Onto the Rear Tractor" on page 22 for the printer to... the top-of printing a document, wait for instructions. 36 Paper Handling 6. First remove the labels by tearing off the printed document before you feed the paper back to finish printing before you ...
... tractor arrow on the Tractor Select light should be on the rear tractor. Never feed paper backward more than one page. Before you can easily switch between tractors if labels are now ready to eject the remaining labels. See "Loading Paper Onto the Rear Tractor" on page 22 for the printer to... the top-of printing a document, wait for instructions. 36 Paper Handling 6. First remove the labels by tearing off the printed document before you feed the paper back to finish printing before you ...

Reference Guide
Page 37
If you have a printed document or excess paper still in the printer, use the tear-off feature described in the previous section to the top-of-form position. 2 2 2 2 2 Paper Handling 37 The front-loaded paper automatically feeds back to the standby position and the rear-loaded paper advances to tear off the document or excess paper. 2 2 2 2 c Caution: Always tear off the printed document and any excess paper before switching tractors. 2. Press the Front/Rear button to switch to the rear tractor. Never feed more than one page 2 backward through the printer. 2 3.
If you have a printed document or excess paper still in the printer, use the tear-off feature described in the previous section to the top-of-form position. 2 2 2 2 2 Paper Handling 37 The front-loaded paper automatically feeds back to the standby position and the rear-loaded paper advances to tear off the document or excess paper. 2 2 2 2 c Caution: Always tear off the printed document and any excess paper before switching tractors. 2. Press the Front/Rear button to switch to the rear tractor. Never feed more than one page 2 backward through the printer. 2 3.
Reference Guide
Page 38
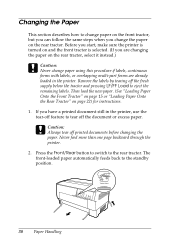
... Load to eject the remaining labels. Before you start, make sure the printer is turned on and the front tractor is selected. (If you change the paper on the rear tractor. Never feed more than one page backward through the printer. 2. Then load the new paper. (See "Loading Paper Onto the... Front Tractor" on page 15 or "Loading Paper Onto the Rear Tractor" on the rear tractor, select it instead.) c Caution: Never change paper...
... Load to eject the remaining labels. Before you start, make sure the printer is turned on and the front tractor is selected. (If you change the paper on the rear tractor. Never feed more than one page backward through the printer. 2. Then load the new paper. (See "Loading Paper Onto the... Front Tractor" on page 15 or "Loading Paper Onto the Rear Tractor" on the rear tractor, select it instead.) c Caution: Never change paper...

Reference Guide
Page 42
...information about the printable area. Although you must never feed labels backward, you can easily come off the backing and jam the printer. Using labels When selecting labels for printing, always choose the type mounted on continuous paper with a tractor. See "Paper" on these precautions: ❏... Instead of using the Front/Rear button to remove printed labels, press the LF/FF Load button until the last printed label is set properly. Never feed labels backward through the printer because they can ...
...information about the printable area. Although you must never feed labels backward, you can easily come off the backing and jam the printer. Using labels When selecting labels for printing, always choose the type mounted on continuous paper with a tractor. See "Paper" on these precautions: ❏... Instead of using the Front/Rear button to remove printed labels, press the LF/FF Load button until the last printed label is set properly. Never feed labels backward through the printer because they can ...

Reference Guide
Page 88
... tear off position manually by pressing the Tear Off and Micro Feed buttons. When using continuous paper with the front or rear push tractor, the printer automatically advances the paper perforation to the top-of the next page. Auto line feed When auto line feed is off and you are using overlapping multi-part forms...
... tear off position manually by pressing the Tear Off and Micro Feed buttons. When using continuous paper with the front or rear push tractor, the printer automatically advances the paper perforation to the top-of the next page. Auto line feed When auto line feed is off and you are using overlapping multi-part forms...

Reference Guide
Page 101
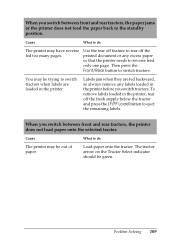
If you cannot fix your printer problem using this chapter. The printer 5 feeds the paper to print quality or printer operation, see "Problems and Solutions" on page 106. For problems that 5 may be related to USB connections, see "Problems and Solutions" on page...Problem panel light status pattern Error: Paper out ••• Solution No paper is loaded on the selected tractor. 5 O Paper Out O Pause Load paper in the printer or select a different tractor by pressing the Front/Rear button. 5 ••• The paper is not fed to the standby position...
If you cannot fix your printer problem using this chapter. The printer 5 feeds the paper to print quality or printer operation, see "Problems and Solutions" on page 106. For problems that 5 may be related to USB connections, see "Problems and Solutions" on page...Problem panel light status pattern Error: Paper out ••• Solution No paper is loaded on the selected tractor. 5 O Paper Out O Pause Load paper in the printer or select a different tractor by pressing the Front/Rear button. 5 ••• The paper is not fed to the standby position...

Reference Guide
Page 108
... or "Loading Paper Onto the Rear Tractor" on page 22 for instructions on the tractor you want to do Continuous paper is loaded to the standby position on loading continuous paper with the tractor you want to the standby position. The printer may be out of paper. The printer does not feed continuous paper to use .
... or "Loading Paper Onto the Rear Tractor" on page 22 for instructions on the tractor you want to do Continuous paper is loaded to the standby position on loading continuous paper with the tractor you want to the standby position. The printer may be out of paper. The printer does not feed continuous paper to use .
Reference Guide
Page 109
... LF/FF Load button to eject the remaining labels. 5 When you switch between front and rear tractors, the paper jams or the printer does not feed the paper back to reverse feed 5 only one page. Cause What to switch tractors. Then press the You may be out of paper. To remove labels loaded in the...
... LF/FF Load button to eject the remaining labels. 5 When you switch between front and rear tractors, the paper jams or the printer does not feed the paper back to reverse feed 5 only one page. Cause What to switch tractors. Then press the You may be out of paper. To remove labels loaded in the...
Reference Guide
Page 117
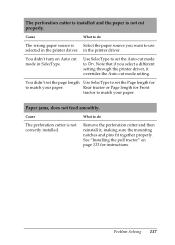
...selected in SelecType. in the printer driver. 5 You didn't turn on page 133 for instructions. 5 5 5 5 5 Problem Solving 117 Rear tractor or Page length for to match your paper. 5 Paper jams, does not feed smoothly. 5 Cause What to On. See "Installing the pull tractor" on Auto cut Use SelecType... to set the Page length for Front tractor to match your paper. reinstall it overrides the Auto cut mode setting. ...
...selected in SelecType. in the printer driver. 5 You didn't turn on page 133 for instructions. 5 5 5 5 5 Problem Solving 117 Rear tractor or Page length for to match your paper. 5 Paper jams, does not feed smoothly. 5 Cause What to On. See "Installing the pull tractor" on Auto cut Use SelecType... to set the Page length for Front tractor to match your paper. reinstall it overrides the Auto cut mode setting. ...
Reference Guide
Page 136
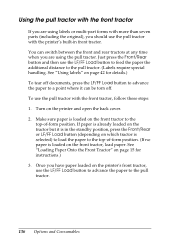
... any time when you should use the pull tractor with the printer's built-in the standby position, press the Front/Rear or LF/FF Load button (depending on which tractor is already loaded on the printer's front tractor, use the LF/FF Load button to feed the paper the additional distance to the top-of ...-form position. (If no paper is loaded on the front tractor, load paper. If paper is selected) to load...
... any time when you should use the pull tractor with the printer's built-in the standby position, press the Front/Rear or LF/FF Load button (depending on which tractor is already loaded on the printer's front tractor, use the LF/FF Load button to feed the paper the additional distance to the top-of ...-form position. (If no paper is loaded on the front tractor, load paper. If paper is selected) to load...


