
Product Brochure
Page 1
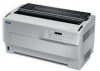
... 136-column, wide-format reports, plus a type-B slot for optional connectivity, the DFX-9000 easily attaches to new or legacy systems in the U.S. A robust, dependable workhorse, this 9-pin, wide-format printer boasts a 400-million-character print head life and 15-million-character ribbon cartridge, which...and more at speeds up to 1550 cps Tackle the most EPSON DFX-9000 demanding print tasks. And, its convenient LCD display and intuitive menu selections mean setup has never been easier. and Canada IMPACT PRINTER DFX-9000 It even features an automatic jam sensor to prevent wasting ...
... 136-column, wide-format reports, plus a type-B slot for optional connectivity, the DFX-9000 easily attaches to new or legacy systems in the U.S. A robust, dependable workhorse, this 9-pin, wide-format printer boasts a 400-million-character print head life and 15-million-character ribbon cartridge, which...and more at speeds up to 1550 cps Tackle the most EPSON DFX-9000 demanding print tasks. And, its convenient LCD display and intuitive menu selections mean setup has never been easier. and Canada IMPACT PRINTER DFX-9000 It even features an automatic jam sensor to prevent wasting ...

Product Brochure
Page 2
... 1 original + 6 copies 3.0" to change without notice. Epson disclaims any and all rights in the U.S. automatic paper width detection; Printer Specifications Printing Method 9-pin impact dot matrix Print Direction Text Mode: Bidirectional Graphics Mode: Unidirectional (bidirectional ...to be done by Epson authorized service centers Epson DFX-9000 C11C605001 S015384 C12C800381 C815071 8502 C823051 C823071 C823121 C823141 C823151 C823452 C12C823912 Description Epson DFX-9000 printer Epson DFX-9000 ribbon cartridge Pull tractor unit Perforation cutter Printer stand Serial interface 32KB...
... 1 original + 6 copies 3.0" to change without notice. Epson disclaims any and all rights in the U.S. automatic paper width detection; Printer Specifications Printing Method 9-pin impact dot matrix Print Direction Text Mode: Bidirectional Graphics Mode: Unidirectional (bidirectional ...to be done by Epson authorized service centers Epson DFX-9000 C11C605001 S015384 C12C800381 C815071 8502 C823051 C823071 C823121 C823141 C823151 C823452 C12C823912 Description Epson DFX-9000 printer Epson DFX-9000 ribbon cartridge Pull tractor unit Perforation cutter Printer stand Serial interface 32KB...

Reference Guide
Page 1
..., recording, or otherwise, without the prior written permission of Seiko Epson Corporation. ® 9-pin Dot Matrix Printer No part of this publication may be reproduced, stored in a retrieval system, or transmitted in those designated as Original Epson Products or Epson Approved Products by Seiko Epson Corporation. Epson is not responsible for use of this information as a result of...
..., recording, or otherwise, without the prior written permission of Seiko Epson Corporation. ® 9-pin Dot Matrix Printer No part of this publication may be reproduced, stored in a retrieval system, or transmitted in those designated as Original Epson Products or Epson Approved Products by Seiko Epson Corporation. Epson is not responsible for use of this information as a result of...
Reference Guide
Page 3
Contents Chapter 1 Safety Instructions Warnings, Cautions, and Notes 7 Hot Parts Caution Symbol 7 Important Safety Instructions 7 When setting up the printer 8 When maintaining the printer 9 When handling the paper 10 When operating the printer 10 ENERGY STAR Compliance 11 Chapter 2 Paper Handling Using the Two-Tractor System 13 Positioning the paper supply 14 Supported paper...
Contents Chapter 1 Safety Instructions Warnings, Cautions, and Notes 7 Hot Parts Caution Symbol 7 Important Safety Instructions 7 When setting up the printer 8 When maintaining the printer 9 When handling the paper 10 When operating the printer 10 ENERGY STAR Compliance 11 Chapter 2 Paper Handling Using the Two-Tractor System 13 Positioning the paper supply 14 Supported paper...

Reference Guide
Page 4
... from the Start menu 50 Changing the Printer Settings 53 Using EPSON Status Monitor 3 56 Setting up Status Monitor 3 57 Accessing Status Monitor 3 58 Setting Up Your Printer on a Network 59 Sharing the printer 59 Setting up your printer as a shared printer 60 Setting the clients 64 Installing the printer driver from the CD-ROM 72 Canceling...
... from the Start menu 50 Changing the Printer Settings 53 Using EPSON Status Monitor 3 56 Setting up Status Monitor 3 57 Accessing Status Monitor 3 58 Setting Up Your Printer on a Network 59 Sharing the printer 59 Setting up your printer as a shared printer 60 Setting the clients 64 Installing the printer driver from the CD-ROM 72 Canceling...
Reference Guide
Page 5
Chapter 5 Problem Solving Diagnosing the Problem 101 Using the Error Indicators 101 EPSON Status Monitor 3 103 Printing a Self Test 103 Printing a Hex Dump 104 Problems and Solutions 106 Power supply problems 107 Paper loading or feeding problems ... problems 112 Option problems 116 Network problems 118 Correcting USB Problems 119 Clearing Paper Jams 123 Aligning Vertical Lines in Your Printout 123 Restoring the Printer's Default Settings 125 Where To Get Help 125 Chapter 6 Options and Consumables Ribbon Cartridge 127 Replacing the Ribbon Cartridge 127 Using the Pull Tractor ...
Chapter 5 Problem Solving Diagnosing the Problem 101 Using the Error Indicators 101 EPSON Status Monitor 3 103 Printing a Self Test 103 Printing a Hex Dump 104 Problems and Solutions 106 Power supply problems 107 Paper loading or feeding problems ... problems 112 Option problems 116 Network problems 118 Correcting USB Problems 119 Clearing Paper Jams 123 Aligning Vertical Lines in Your Printout 123 Restoring the Printer's Default Settings 125 Where To Get Help 125 Chapter 6 Options and Consumables Ribbon Cartridge 127 Replacing the Ribbon Cartridge 127 Using the Pull Tractor ...

Reference Guide
Page 6
Using Interface Cards 155 Installing an interface card 156 Using a serial interface card 158 Using a Print Server 159 Setting the IP address from the control panel 159 Appendix A Product Information Printer Parts 161 Printer Specifications 163 Mechanical 163 Electronic 164 Electrical 166 Environmental 166 Paper 167 Printable area 177 Command Lists 179 EPSON ESC/P control codes 179 IBM PPDS emulation control codes 180 Standards and Approvals 181 Cleaning the Printer 182 Transporting the Printer 183 Index 6
Using Interface Cards 155 Installing an interface card 156 Using a serial interface card 158 Using a Print Server 159 Setting the IP address from the control panel 159 Appendix A Product Information Printer Parts 161 Printer Specifications 163 Mechanical 163 Electronic 164 Electrical 166 Environmental 166 Paper 167 Printable area 177 Command Lists 179 EPSON ESC/P control codes 179 IBM PPDS emulation control codes 180 Standards and Approvals 181 Cleaning the Printer 182 Transporting the Printer 183 Index 6
Reference Guide
Page 7
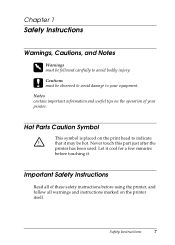
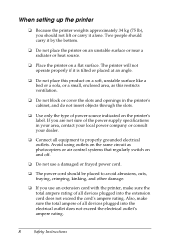
.... Chapter 1 Safety Instructions 1 Warnings, Cautions, and Notes 1 w Warnings must be followed carefully to avoid bodily injury. 1 c Cautions must be observed to avoid damage to your printer. 1 Hot Parts Caution Symbol 1 K 1 This symbol is placed on the print head to indicate that it . 1 Important Safety Instructions 1 1 Read all warnings and instructions marked... on the operation of these safety instructions before touching it may be hot. Let it cool for a few minutes before using the printer, and follow all of your equipment.
.... Chapter 1 Safety Instructions 1 Warnings, Cautions, and Notes 1 w Warnings must be followed carefully to avoid bodily injury. 1 c Cautions must be observed to avoid damage to your printer. 1 Hot Parts Caution Symbol 1 K 1 This symbol is placed on the print head to indicate that it . 1 Important Safety Instructions 1 1 Read all warnings and instructions marked... on the operation of these safety instructions before touching it may be hot. Let it cool for a few minutes before using the printer, and follow all of your equipment.
Reference Guide
Page 8
...10063; Connect all equipment to properly grounded electrical outlets. Also, make sure the total ampere rating of the power supply specifications in the printer's cabinet, and do not insert objects through the slots. ❏ Use only the type of all devices plugged into the electrical outlet... does not exceed the electrical outlet's ampere rating. 8 Safety Instructions Avoid using outlets on the same circuit as this product on the printer's label. If you should be placed to avoid abrasions, cuts, fraying, crimping, kinking, and other damage. ❏ If you use ...
...10063; Connect all equipment to properly grounded electrical outlets. Also, make sure the total ampere rating of the power supply specifications in the printer's cabinet, and do not insert objects through the slots. ❏ Use only the type of all devices plugged into the electrical outlet... does not exceed the electrical outlet's ampere rating. 8 Safety Instructions Avoid using outlets on the same circuit as this product on the printer's label. If you should be placed to avoid abrasions, cuts, fraying, crimping, kinking, and other damage. ❏ If you use ...
Reference Guide
Page 9
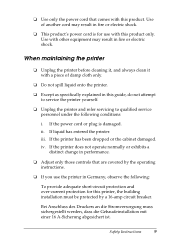
...may result in this product only. iv. When maintaining the printer 1 ❏ Unplug the printer before cleaning it, and always clean it with this guide, do not attempt to service the printer yourself. ❏ Unplug the printer and refer servicing to qualified service 1 personnel under the following... : 1 To provide adequate short-circuit protection and over-current protection for use the printer in fire or electric shock. 1 ❏ This product's power cord is damaged. 1 ii. ❏ Use only the power...
...may result in this product only. iv. When maintaining the printer 1 ❏ Unplug the printer before cleaning it, and always clean it with this guide, do not attempt to service the printer yourself. ❏ Unplug the printer and refer servicing to qualified service 1 personnel under the following... : 1 To provide adequate short-circuit protection and over-current protection for use the printer in fire or electric shock. 1 ❏ This product's power cord is damaged. 1 ii. ❏ Use only the power...
Reference Guide
Page 10
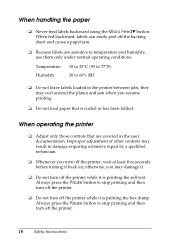
... Safety Instructions When handling the paper ❏ Never feed labels backward using the Micro Feedd button. When operating the printer ❏ Adjust only those controls that is printing the self test. Always press the Pause button to 60% RH ❏ Do not leave labels loaded ...; Do not turn off the backing sheet and cause a paper jam. ❏ Because labels are covered in the printer between jobs; When fed backward, labels can easily peel off the printer, wait at least five seconds before turning it is curled or has been folded. they may curl around the platen and...
... Safety Instructions When handling the paper ❏ Never feed labels backward using the Micro Feedd button. When operating the printer ❏ Adjust only those controls that is printing the self test. Always press the Pause button to 60% RH ❏ Do not leave labels loaded ...; Do not turn off the backing sheet and cause a paper jam. ❏ Because labels are covered in the printer between jobs; When fed backward, labels can easily peel off the printer, wait at least five seconds before turning it is curled or has been folded. they may curl around the platen and...

Reference Guide
Page 11
let it cool for a few minutes before touching it. 1 ENERGY STAR Compliance 1 As an ENERGY STAR® Partner, Epson has determined that has the wrong voltage for 1 energy efficiency. 1 The International ENERGY STAR Office Equipment Program is replaced. ❏... print head is a voluntary partnership with the computer and office equipment industry to promote the introduction of energy-efficient personal computers, monitors, printers, fax 1 machines, copiers, scanners, and multifunction devices in an 1 effort to an electrical outlet that this product meets the ENERGY STAR...
let it cool for a few minutes before touching it. 1 ENERGY STAR Compliance 1 As an ENERGY STAR® Partner, Epson has determined that has the wrong voltage for 1 energy efficiency. 1 The International ENERGY STAR Office Equipment Program is replaced. ❏... print head is a voluntary partnership with the computer and office equipment industry to promote the introduction of energy-efficient personal computers, monitors, printers, fax 1 machines, copiers, scanners, and multifunction devices in an 1 effort to an electrical outlet that this product meets the ENERGY STAR...
Reference Guide
Page 13
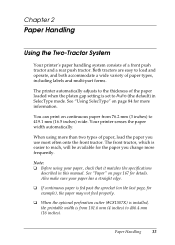
... See "Paper" on page 167 for details. 2 Also make sure your paper, check that it matches the specifications described in SelecType mode. Your printer senses the paper width automatically. 2 2 When using your paper has a straight edge. ❏ If continuous paper is from 76.2 mm (3 ...than two types of a front push 2 tractor and a rear push tractor. Chapter 2 Paper Handling 2 Using the Two-Tractor System 2 Your printer's paper handling system consists of paper, load the paper you change more frequently. 2 Note: ❏ Before using more information. 2 You can ...
... See "Paper" on page 167 for details. 2 Also make sure your paper, check that it matches the specifications described in SelecType mode. Your printer senses the paper width automatically. 2 2 When using your paper has a straight edge. ❏ If continuous paper is from 76.2 mm (3 ...than two types of a front push 2 tractor and a rear push tractor. Chapter 2 Paper Handling 2 Using the Two-Tractor System 2 Your printer's paper handling system consists of paper, load the paper you change more frequently. 2 Note: ❏ Before using more information. 2 You can ...
Reference Guide
Page 14
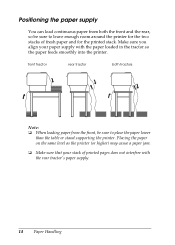
...: ❏ When loading paper from the front, be sure to place the paper lower than the table or stand supporting the printer. Placing the paper on the same level as the printer (or higher) may cause a paper jam. ❏ Make sure that your paper supply with the rear tractor's paper supply. 14... Paper Handling front tractor rear tractor both the front and the rear, so be sure to leave enough room around the printer for the two stacks of printed pages does not interfere with the paper loaded in the tractor so the paper feeds smoothly into the...
...: ❏ When loading paper from the front, be sure to place the paper lower than the table or stand supporting the printer. Placing the paper on the same level as the printer (or higher) may cause a paper jam. ❏ Make sure that your paper supply with the rear tractor's paper supply. 14... Paper Handling front tractor rear tractor both the front and the rear, so be sure to leave enough room around the printer for the two stacks of printed pages does not interfere with the paper loaded in the tractor so the paper feeds smoothly into the...
Reference Guide
Page 15
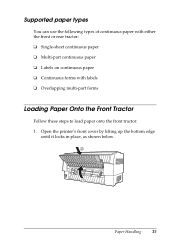
Supported paper types 2 You can use the following types of continuous paper with either the front or rear tractor: ❏ Single-sheet continuous paper ❏ Multi-part continuous paper 2 ❏ Labels on continuous paper ❏ Continuous forms with labels 2 ❏ Overlapping multi-part forms 2 Loading Paper Onto the Front Tractor 2 Follow these steps to load paper onto the front tractor: 2 1. Open the printer's front cover by lifting up the bottom edge until it locks in place, as shown below. 2 2 2 2 2 Paper Handling 15
Supported paper types 2 You can use the following types of continuous paper with either the front or rear tractor: ❏ Single-sheet continuous paper ❏ Multi-part continuous paper 2 ❏ Labels on continuous paper ❏ Continuous forms with labels 2 ❏ Overlapping multi-part forms 2 Loading Paper Onto the Front Tractor 2 Follow these steps to load paper onto the front tractor: 2 1. Open the printer's front cover by lifting up the bottom edge until it locks in place, as shown below. 2 2 2 2 2 Paper Handling 15
Reference Guide
Page 18
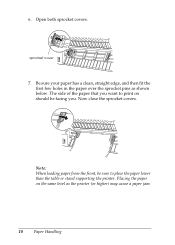
Note: When loading paper from the front, be facing you want to place the paper lower than the table or stand supporting the printer. sprocket cover 7. 6. Now close the sprocket covers. Placing the paper on should be sure to print on the same level as shown below. Open both sprocket covers. The side of the paper that you . Be sure your paper has a clean, straight edge, and then fit the first few holes in the paper over the sprocket pins as the printer (or higher) may cause a paper jam. 18 Paper Handling
Note: When loading paper from the front, be facing you want to place the paper lower than the table or stand supporting the printer. sprocket cover 7. 6. Now close the sprocket covers. Placing the paper on should be sure to print on the same level as shown below. Open both sprocket covers. The side of the paper that you . Be sure your paper has a clean, straight edge, and then fit the first few holes in the paper over the sprocket pins as the printer (or higher) may cause a paper jam. 18 Paper Handling

Reference Guide
Page 19
Lock the sprocket in place by pushing up the sprocket lock lever. Pull the printer's front cover out slightly and lower it until it may still move slightly; this is closed. 2 2 2 2 2 2 Paper Handling 19 Slide the right sprocket so that the paper is straight and has 2 no wrinkles. 8. After you lock the right sprocket, it is normal. 2 sprocket lock lever 2 2 Note: Be careful not to pull the paper too tightly when adjusting the right sprocket. 2 9.
Lock the sprocket in place by pushing up the sprocket lock lever. Pull the printer's front cover out slightly and lower it until it may still move slightly; this is closed. 2 2 2 2 2 2 Paper Handling 19 Slide the right sprocket so that the paper is straight and has 2 no wrinkles. 8. After you lock the right sprocket, it is normal. 2 sprocket lock lever 2 2 Note: Be careful not to pull the paper too tightly when adjusting the right sprocket. 2 9.
Reference Guide
Page 20
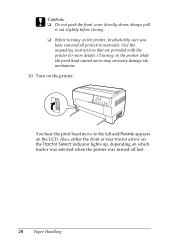
...either the front or rear tractor arrow on the Tractor Select indicator lights up, depending on the printer. always pull it out slightly before closing. ❏ Before turning on the printer, be absolutely sure you have removed all protective materials. (See the unpacking instructions that are provided... with the printer for more details.) Turning on the LCD. You hear the print head move to the left and Ready appears on the printer while the print head cannot move may seriously damage the mechanism. 10. ...
...either the front or rear tractor arrow on the Tractor Select indicator lights up, depending on the printer. always pull it out slightly before closing. ❏ Before turning on the printer, be absolutely sure you have removed all protective materials. (See the unpacking instructions that are provided... with the printer for more details.) Turning on the LCD. You hear the print head move to the left and Ready appears on the printer while the print head cannot move may seriously damage the mechanism. 10. ...

Reference Guide
Page 21
11. See "Adjusting the Paper Position" on the page, you can adjust the paper 2 position. When the printer switches tractors, it looks like the printing will start too high or low on page 28 for instructions. 2 2 2 2 Paper Handling 21 2 The paper is red, ...
11. See "Adjusting the Paper Position" on the page, you can adjust the paper 2 position. When the printer switches tractors, it looks like the printing will start too high or low on page 28 for instructions. 2 2 2 2 Paper Handling 21 2 The paper is red, ...
Reference Guide
Page 22
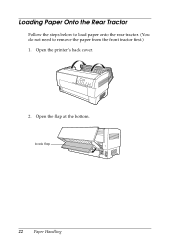
back flap 22 Paper Handling Open the flap at the bottom. Open the printer's back cover. 2. Loading Paper Onto the Rear Tractor Follow the steps below to load paper onto the rear tractor. (You do not need to remove the paper from the front tractor first.) 1.
back flap 22 Paper Handling Open the flap at the bottom. Open the printer's back cover. 2. Loading Paper Onto the Rear Tractor Follow the steps below to load paper onto the rear tractor. (You do not need to remove the paper from the front tractor first.) 1.


