
User Manual
Page 3
...Statement for United States Users 7 WARNING 7 Chapter 1 Getting Started Unpacking Your Camera 9 Camera Parts 10 Attaching the Strap to Your Camera 12 Using the Battery 12 Charging the battery 12 Inserting the battery 13 ...mount lenses 17 Mounting L mount lenses 17 Removing L mount lenses 18 Setting Up Your Camera 19 Turning the power on 19 Setting the date and time 19 Setting the date format...release 22 Focusing 22 Chapter 2 Taking Pictures About the Status Gauge 23 Setting Photo Quality 24 Setting White Balance 24 Setting ISO Sensitivity 25 Setting Auto Exposure (Aperture 26...
...Statement for United States Users 7 WARNING 7 Chapter 1 Getting Started Unpacking Your Camera 9 Camera Parts 10 Attaching the Strap to Your Camera 12 Using the Battery 12 Charging the battery 12 Inserting the battery 13 ...mount lenses 17 Mounting L mount lenses 17 Removing L mount lenses 18 Setting Up Your Camera 19 Turning the power on 19 Setting the date and time 19 Setting the date format...release 22 Focusing 22 Chapter 2 Taking Pictures About the Status Gauge 23 Setting Photo Quality 24 Setting White Balance 24 Setting ISO Sensitivity 25 Setting Auto Exposure (Aperture 26...

User Manual
Page 21
... M-Bayonet adapter ring. For example, lenses with external dimensions exceeding 20.5 mm cannot be used because of the structure of an image taken with the same lens, the image quality using this camera. HEKTOR 50 mm F2.5 1 - Remove the memory card. 4. HOLOGON 15 mm F8 - Removing a memory card 1. c Caution: ❏ Some M/L mount lenses cannot...
... M-Bayonet adapter ring. For example, lenses with external dimensions exceeding 20.5 mm cannot be used because of the structure of an image taken with the same lens, the image quality using this camera. HEKTOR 50 mm F2.5 1 - Remove the memory card. 4. HOLOGON 15 mm F8 - Removing a memory card 1. c Caution: ❏ Some M/L mount lenses cannot...
User Manual
Page 24
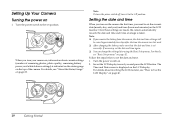
Once these settings are made, the camera automatically records the date and time each time an image is displayed on the top of remaining photos, photo quality, remaining battery power, and white balance settings) is set the date and time again. ❏ You can change the settings later using the Basic Setup... Use the LCD Display" on page 23. Setting the date and time When you turn on position. Follow the steps below to the on the camera the first time, you and press the LCD button. For details, see "Basic Setup menu" on the LCD monitor. Turn the power switch to...
Once these settings are made, the camera automatically records the date and time each time an image is displayed on the top of remaining photos, photo quality, remaining battery power, and white balance settings) is set the date and time again. ❏ You can change the settings later using the Basic Setup... Use the LCD Display" on page 23. Setting the date and time When you turn on position. Follow the steps below to the on the camera the first time, you and press the LCD button. For details, see "Basic Setup menu" on the LCD monitor. Turn the power switch to...
User Manual
Page 29
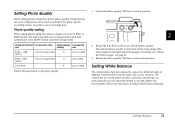
... 1.5MB (JPEG) 3008 × 2000 1/4 (unchangeable) H about 10MB Follow the steps below to set photo quality. 1. Setting White Balance 2 The white balance function adjusts the camera for different kinds of the gauge). Setting Photo Quality Before taking photos using the camera, photo quality (image format, size, and compression ratio) must be compressed). The following table shows...
... 1.5MB (JPEG) 3008 × 2000 1/4 (unchangeable) H about 10MB Follow the steps below to set photo quality. 1. Setting White Balance 2 The white balance function adjusts the camera for different kinds of the gauge). Setting Photo Quality Before taking photos using the camera, photo quality (image format, size, and compression ratio) must be compressed). The following table shows...

User Manual
Page 39
... maximum) General information display 3 3 3 3 ❏ Number of current photo/total number of images (9999 maximum) ❏ Date and time of photo ❏ File number 3 ❏ Photo quality ❏ Lock ( ) icon (displayed only when the image is in the raised position, the icon turns green in the unraised position, the icon turns green. Note...
... maximum) General information display 3 3 3 3 ❏ Number of current photo/total number of images (9999 maximum) ❏ Date and time of photo ❏ File number 3 ❏ Photo quality ❏ Lock ( ) icon (displayed only when the image is in the raised position, the icon turns green in the unraised position, the icon turns green. Note...

User Manual
Page 41
... the ENTER button. e.g., AE+1.3) ❏ ISO sensitivity ❏ White balance ❏ Film setting ❏ Lock ( ) icon (displayed only when the image is 3 displayed. 2. When monochrome is set, the filter color is displayed in the bottom of the screen. 3 4. Press the MENU button in playback ...show. ❏ When you rotate the JOG dial counterclockwise in the raised 3 position, the slide show starts with the last stored image. ❏ Photo quality ❏ Shutter speed (when the picture is displayed in the bottom of the screen. ❏ When you rotate the JOG dial...
... the ENTER button. e.g., AE+1.3) ❏ ISO sensitivity ❏ White balance ❏ Film setting ❏ Lock ( ) icon (displayed only when the image is 3 displayed. 2. When monochrome is set, the filter color is displayed in the bottom of the screen. 3 4. Press the MENU button in playback ...show. ❏ When you rotate the JOG dial counterclockwise in the raised 3 position, the slide show starts with the last stored image. ❏ Photo quality ❏ Shutter speed (when the picture is displayed in the bottom of the screen. ❏ When you rotate the JOG dial...
User Manual
Page 47
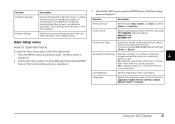
...YYYY DD/MM/YYYY 4 Power Save Timer Selects the length of remaining photos), R (photo quality), E (remaining battery power), and A (white balance). Basic Setup menu How to select Camera Settings, then press the ENTER button. Select Basic Setup and press the ENTER button. On ...Resets the current settings (except date and time settings) to continue numbering images sequentially when you replace a 4 memory card. Press the MENU button in playback mode. The Main menu is displayed. 3. The Camera Settings menu is displayed. 2. Sequential Numbering Specifies whether to their default ...
...YYYY DD/MM/YYYY 4 Power Save Timer Selects the length of remaining photos), R (photo quality), E (remaining battery power), and A (white balance). Basic Setup menu How to select Camera Settings, then press the ENTER button. Select Basic Setup and press the ENTER button. On ...Resets the current settings (except date and time settings) to continue numbering images sequentially when you replace a 4 memory card. Press the MENU button in playback mode. The Main menu is displayed. 3. The Camera Settings menu is displayed. 2. Sequential Numbering Specifies whether to their default ...
User Manual
Page 55
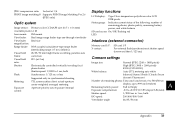
...Type 2 low-temperature polysilicon color LCD A 235K pixels Status gauge: Indicates current status of the following: number of remaining photos, photo quality, remaining battery A power, and white balance SD card access On/Off/flashing red LED: A Interface (external connector) Memory card ...I/F: SD card I/F A X contact: For external flash (synchronizes at shutter speed downward then 1/125 sec) Camera settings A Image size: Normal (JPEG: 2240 × 1488 pixels) High (JPEG: 3008 × 2000 pixels) A RAW (CCD-RAW) White balance:...
...Type 2 low-temperature polysilicon color LCD A 235K pixels Status gauge: Indicates current status of the following: number of remaining photos, photo quality, remaining battery A power, and white balance SD card access On/Off/flashing red LED: A Interface (external connector) Memory card ...I/F: SD card I/F A X contact: For external flash (synchronizes at shutter speed downward then 1/125 sec) Camera settings A Image size: Normal (JPEG: 2240 × 1488 pixels) High (JPEG: 3008 × 2000 pixels) A RAW (CCD-RAW) White balance:...

User Manual - Addendum - firmware version 2.0 upgrade features.
Page 3
... Lens 16 Mounting and Removing an L-mount Lens 16 Selecting the Focal Length 16 Chapter 2 Taking Photos Turning the Camera On and Off 18 Taking a Picture 18 Setting White Balance 19 Setting Image Quality 20 Setting ISO Sensitivity 21 Setting the Exposure 21 Setting the Shutter Speed Automatically 21 Setting the Shutter Speed...
... Lens 16 Mounting and Removing an L-mount Lens 16 Selecting the Focal Length 16 Chapter 2 Taking Photos Turning the Camera On and Off 18 Taking a Picture 18 Setting White Balance 19 Setting Image Quality 20 Setting ISO Sensitivity 21 Setting the Exposure 21 Setting the Shutter Speed Automatically 21 Setting the Shutter Speed...
User Manual - Addendum - firmware version 2.0 upgrade features.
Page 8
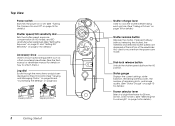
... power save mode. If pressed halfway (without releasing the shutter), the metered and selected shutter speeds are displayed at the bottom of remaining shots, and image quality. (See "Status Gauge" on page 10 for details.) Frame selector lever Selects a bright-line frame for 28 mm, 35 mm, or 50 mm lens.... (See "Selecting the Focal Length" on page 18 for details.) Top View Power switch Switches the power on or off. (See "Turning the Camera On and Off" on page 18 for details.) Shutter speed/ISO sensitivity dial Sets the shutter speed, exposure compensation (in AE mode), and ISO sensitivity...
... power save mode. If pressed halfway (without releasing the shutter), the metered and selected shutter speeds are displayed at the bottom of remaining shots, and image quality. (See "Status Gauge" on page 10 for details.) Frame selector lever Selects a bright-line frame for 28 mm, 35 mm, or 50 mm lens.... (See "Selecting the Focal Length" on page 18 for details.) Top View Power switch Switches the power on or off. (See "Turning the Camera On and Off" on page 18 for details.) Shutter speed/ISO sensitivity dial Sets the shutter speed, exposure compensation (in AE mode), and ISO sensitivity...
User Manual - Addendum - firmware version 2.0 upgrade features.
Page 9
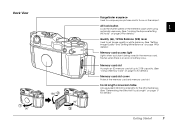
... button Locks the shutter speed at the metered value when using 1 automatic exposure. (See "Locking the Exposure Setting (AE-lock)" on page 24 for details.) Quality (Q) / White Balance (WB) lever 1 Used to 2 GB capacity. (See 1 "Using a Memory Card" on page 13 for details.) Memory card slot ... Accepts an SD memory card of up to set image quality or white balance. (See "Setting Image Quality" and "Setting White Balance" on the subject. Flashes when there is an error or battery is being saved in the memory card. Back View Rangefinder eyepiece 1 Used to compose your pictures and to...
... button Locks the shutter speed at the metered value when using 1 automatic exposure. (See "Locking the Exposure Setting (AE-lock)" on page 24 for details.) Quality (Q) / White Balance (WB) lever 1 Used to 2 GB capacity. (See 1 "Using a Memory Card" on page 13 for details.) Memory card slot ... Accepts an SD memory card of up to set image quality or white balance. (See "Setting Image Quality" and "Setting White Balance" on the subject. Flashes when there is an error or battery is being saved in the memory card. Back View Rangefinder eyepiece 1 Used to compose your pictures and to...
User Manual - Addendum - firmware version 2.0 upgrade features.
Page 10
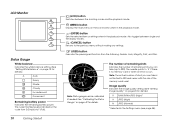
See "Calibrating the Status Gauge" on page 42 for details). Image quality Indicates the image quality setting. (See "Setting Image Quality" on page 20 for details) R RAW/RAW+JPEG (High) * H JPEG (High) N JPEG (Normal) * Selected in the playback mode. Also toggles between the shooting mode and ...
See "Calibrating the Status Gauge" on page 42 for details). Image quality Indicates the image quality setting. (See "Setting Image Quality" on page 20 for details) R RAW/RAW+JPEG (High) * H JPEG (High) N JPEG (Normal) * Selected in the playback mode. Also toggles between the shooting mode and ...
User Manual - Addendum - firmware version 2.0 upgrade features.
Page 18
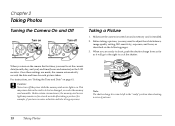
..."ready" position when shooting a series of pictures. 18 Taking Photos When you turn off DUMMY Taking a Picture 1. When you are made, the camera automatically records the date and time for several seconds after taking a picture, you may need to set the current date (month, day, and year...) and time (hours and minutes) on the following pages. 3. Chapter 2 Taking Photos Turning the Camera On and Off Turn on the camera the first time, you need to adjust the white balance, image quality setting, ISO sensitivity, exposure, and focus, as it will go to the right to cock the ...
..."ready" position when shooting a series of pictures. 18 Taking Photos When you turn off DUMMY Taking a Picture 1. When you are made, the camera automatically records the date and time for several seconds after taking a picture, you may need to set the current date (month, day, and year...) and time (hours and minutes) on the following pages. 3. Chapter 2 Taking Photos Turning the Camera On and Off Turn on the camera the first time, you need to adjust the white balance, image quality setting, ISO sensitivity, exposure, and focus, as it will go to the right to cock the ...

User Manual - Addendum - firmware version 2.0 upgrade features.
Page 20
... Format R RAW H JPEG (High) N JPEG (Normal) Image Size 3,008 x 2,000 3,008 x 2,000 2,240 x 1,488 File Size 10 MB* 3 MB 1.5 MB * 13 MB if RAW+JPEG is a universal image format that came with your camera. Set the image quality as the RAW Setting in RAW format. See page 35 for... postprocessing because resaving a JPEG file further degrades its quality. Because they are also well suited for viewing on a regular ...
... Format R RAW H JPEG (High) N JPEG (Normal) Image Size 3,008 x 2,000 3,008 x 2,000 2,240 x 1,488 File Size 10 MB* 3 MB 1.5 MB * 13 MB if RAW+JPEG is a universal image format that came with your camera. Set the image quality as the RAW Setting in RAW format. See page 35 for... postprocessing because resaving a JPEG file further degrades its quality. Because they are also well suited for viewing on a regular ...
User Manual - Addendum - firmware version 2.0 upgrade features.
Page 29
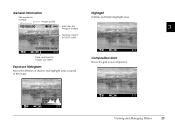
Viewing and Managing Photos 3 3 3 3 3 3 3 3 3 3 29 Highlight Outlines and flashes highlight areas. General Information File sequence number Image quality Indicates this image is locked Number of prints (if DPOF is set) Date and time this image was taken Exposure Histogram Shows the densities of shadow and highlight areas occupied in the image. Composition Grid Shows the grid to aid composition.
Viewing and Managing Photos 3 3 3 3 3 3 3 3 3 3 29 Highlight Outlines and flashes highlight areas. General Information File sequence number Image quality Indicates this image is locked Number of prints (if DPOF is set) Date and time this image was taken Exposure Histogram Shows the densities of shadow and highlight areas occupied in the image. Composition Grid Shows the grid to aid composition.
User Manual - Addendum - firmware version 2.0 upgrade features.
Page 30
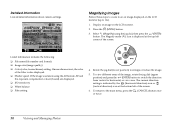
... ) icon is displayed at the bottom left corner of the image, rotate the jog dial (upper position) and press the (ENTER...image. 5. Select (Magnify) using the AE feature, AE and the exposure compensation value (if used) are displayed. ❏ ISO sensitivity ❏ White balance ❏ Film setting 4. Listed information includes the following: ❏ File name (file number and format) ❏ Image size (image quality...) ❏ Color (color/monochrome) setting. If the image was taken using the jog dial, then press...
... ) icon is displayed at the bottom left corner of the image, rotate the jog dial (upper position) and press the (ENTER...image. 5. Select (Magnify) using the AE feature, AE and the exposure compensation value (if used) are displayed. ❏ ISO sensitivity ❏ White balance ❏ Film setting 4. Listed information includes the following: ❏ File name (file number and format) ❏ Image size (image quality...) ❏ Color (color/monochrome) setting. If the image was taken using the jog dial, then press...
User Manual - Addendum - firmware version 2.0 upgrade features.
Page 36
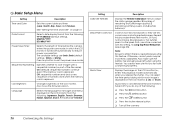
... View is canceled and the LCD monitor is turned off automatically to attach the lens cap before the camera enters the power save mode, in photographed images. Date Format Selects date display format from the following : ❏ Press the (LCD) button &#...camera 36 Customizing the Settings Sequential Numbering Specifies whether to adjust the status gauge needles: E (number of numbers starts when the memory card is turned off if you notice missing (black) pixels or hot (white) pixels. Off: sequential numbers end and a new sequence of remaining shots), R (image quality...
... View is canceled and the LCD monitor is turned off automatically to attach the lens cap before the camera enters the power save mode, in photographed images. Date Format Selects date display format from the following : ❏ Press the (LCD) button &#...camera 36 Customizing the Settings Sequential Numbering Specifies whether to adjust the status gauge needles: E (number of numbers starts when the memory card is turned off if you notice missing (black) pixels or hot (white) pixels. Off: sequential numbers end and a new sequence of remaining shots), R (image quality...
User Manual - Addendum - firmware version 2.0 upgrade features.
Page 43
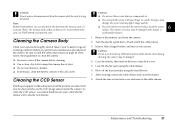
...be sure to read the safety instructions on the camera. 6 c Caution: Do not use compressed air. 6 ❏ Do not touch the sensor with a shutter lock feature. If the battery dies and the shutter closes during cleaning, the camera may affect image quality. ❏ Do not let the blower tip... enter the camera body or touch the sensor surface. After cleaning, unlock the cable release and close the shutter. 8. To...
...be sure to read the safety instructions on the camera. 6 c Caution: Do not use compressed air. 6 ❏ Do not touch the sensor with a shutter lock feature. If the battery dies and the shutter closes during cleaning, the camera may affect image quality. ❏ Do not let the blower tip... enter the camera body or touch the sensor surface. After cleaning, unlock the cable release and close the shutter. 8. To...
User Manual - Addendum - firmware version 2.0 upgrade features.
Page 48
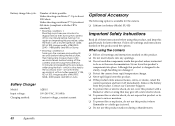
... speed of 1/125, ISO of 200, image quality of H (JPEG: 3008 × 2000 pixels) and WB on this product. ❏ Do not insert objects into place. Although this product is designed to be sturdy, rough handling can damage it. ❏ Protect the camera from the product. Battery Charger Model: Input... picture, then taking nine more pictures at a regular interval then turning the camera off for one minute before turning it on again and repeating this procedure, while the flash is off, a shutter speed of 1/250, ISO of 200, image quality of N (JPEG: 2240 × 1488 pixels) and WB on Sunny....
... speed of 1/125, ISO of 200, image quality of H (JPEG: 3008 × 2000 pixels) and WB on this product. ❏ Do not insert objects into place. Although this product is designed to be sturdy, rough handling can damage it. ❏ Protect the camera from the product. Battery Charger Model: Input... picture, then taking nine more pictures at a regular interval then turning the camera off for one minute before turning it on again and repeating this procedure, while the flash is off, a shutter speed of 1/250, ISO of 200, image quality of N (JPEG: 2240 × 1488 pixels) and WB on Sunny....
User Manual - Addendum - firmware version 2.0 upgrade features.
Page 54
... camera, 43 CCD sensor, 43 54 Index contacting Epson, 45 customer support, 45 D dial-lock release button, 8 display icons, 27 E EPSON PhotoRAW, 39 F flash, 23 focal length conversion scale, 9 focusing, 25 format memory card, 42 frame selector lever, 8 I icons, 27 image quality,... cover, 9 write protecting, 14, 42 O option, flash, 23 optional accessory, 48 P power on/off, 18 power switch, 8 PRINT image matching, 47 R rangefinder eyepiece, 9 rangefinder window, 7 S SD memory card, formatting, 42 setting aperture, 23 white balance, 19 shutter charge lever, 8, 18 shutter release button, 8...
... camera, 43 CCD sensor, 43 54 Index contacting Epson, 45 customer support, 45 D dial-lock release button, 8 display icons, 27 E EPSON PhotoRAW, 39 F flash, 23 focal length conversion scale, 9 focusing, 25 format memory card, 42 frame selector lever, 8 I icons, 27 image quality,... cover, 9 write protecting, 14, 42 O option, flash, 23 optional accessory, 48 P power on/off, 18 power switch, 8 PRINT image matching, 47 R rangefinder eyepiece, 9 rangefinder window, 7 S SD memory card, formatting, 42 setting aperture, 23 white balance, 19 shutter charge lever, 8, 18 shutter release button, 8...