
User Manual
Page 3
... Card 14 Installing a memory card 15 Removing a memory card 16 Mounting and Removing a Lens 16 Mounting M (Bayonet) mount lenses 16 Removing M (Bayonet) mount lenses 17 Mounting L mount lenses 17 Removing L mount lenses 18 Setting Up Your Camera 19 Turning the power on 19 Setting the date and time 19 Setting the date format 20 Setting...
... Card 14 Installing a memory card 15 Removing a memory card 16 Mounting and Removing a Lens 16 Mounting M (Bayonet) mount lenses 16 Removing M (Bayonet) mount lenses 17 Mounting L mount lenses 17 Removing L mount lenses 18 Setting Up Your Camera 19 Turning the power on 19 Setting the date and time 19 Setting the date format 20 Setting...

User Manual
Page 6
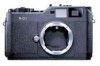
...this product. ❏ Do not insert objects into place. Introduction Main Features The main features of the camera are described below. ❏ The world's first rangefinder digital camera. ❏ Capable of your equipment. The EM mount allows you back up files stored on this ...cause malfunctions especially while the camera is designed to use most standard lenses such as Leica M/L mount lenses. ❏ Provides accurate framing using the EPSON PhotoRAW or EPSON RAW Plug-In applications provided. Data can damage it. ❏ Protect the camera from rapid temperature change. ...
...this product. ❏ Do not insert objects into place. Introduction Main Features The main features of the camera are described below. ❏ The world's first rangefinder digital camera. ❏ Capable of your equipment. The EM mount allows you back up files stored on this ...cause malfunctions especially while the camera is designed to use most standard lenses such as Leica M/L mount lenses. ❏ Provides accurate framing using the EPSON PhotoRAW or EPSON RAW Plug-In applications provided. Data can damage it. ❏ Protect the camera from rapid temperature change. ...

User Manual
Page 16
..., see "About the Status Gauge" on page 40. Or pull this button halfway in playback mode or Power Save Timer mode returns the camera to display the optimal shutter speed (i.e., optimal exposure value) in playback mode). Performs the function previously assigned to mount optional equipment such as ...: Press the shutter button halfway down to mount an optional flash. Sets a field angle for the finder. Returns to mount or remove lenses. Navigates through the menus or photos displayed on the LCD monitor. X contact Lens release button AE-lock button Photo quality/WB lever SD...
..., see "About the Status Gauge" on page 40. Or pull this button halfway in playback mode or Power Save Timer mode returns the camera to display the optimal shutter speed (i.e., optimal exposure value) in playback mode). Performs the function previously assigned to mount optional equipment such as ...: Press the shutter button halfway down to mount an optional flash. Sets a field angle for the finder. Returns to mount or remove lenses. Navigates through the menus or photos displayed on the LCD monitor. X contact Lens release button AE-lock button Photo quality/WB lever SD...

User Manual
Page 21
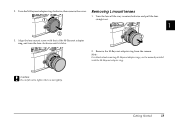
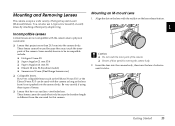
...2. ELMAR 50 mm F3.5 ❏ Even with the same lens, the image quality using this camera. Remove the memory card. 4. c Caution: ❏ Some M/L mount lenses cannot be used with an analog camera. 1 Mounting M (Bayonet) mount lenses 1. HOLOGON 15 mm F8 - ELMARIT 28 mm F2.8 (earliest model) -F2 (Dual Range ...the memory card down until you can be used because of the structure of an image taken with this camera may damage the camera or the lens. Lenses that of the camera. Make sure the SD memory access LED is off, and then open the memory card cover. HEKTOR ...
...2. ELMAR 50 mm F3.5 ❏ Even with the same lens, the image quality using this camera. Remove the memory card. 4. c Caution: ❏ Some M/L mount lenses cannot be used with an analog camera. 1 Mounting M (Bayonet) mount lenses 1. HOLOGON 15 mm F8 - ELMARIT 28 mm F2.8 (earliest model) -F2 (Dual Range ...the memory card down until you can be used because of the structure of an image taken with this camera may damage the camera or the lens. Lenses that of the camera. Make sure the SD memory access LED is off, and then open the memory card cover. HEKTOR ...

User Manual
Page 22
Mounting L mount lenses Note: ❏ When you install an L mount lens, you hear a click. 2. Mount an optional M-Bayonet adapter ring together with its cover onto the lens mount. ... lens straight out of them can be used. ❏ For more information on mounting an M-Bayonet adapter ring on the camera body, see the M-Bayonet adapter ring manual. 1. 2. Removing M (Bayonet) mount lenses 1. DUMMY 17 Getting Started Turn the lens counterclockwise as far as it clockwise until you need an optional M-Bayonet adapter...
Mounting L mount lenses Note: ❏ When you install an L mount lens, you hear a click. 2. Mount an optional M-Bayonet adapter ring together with its cover onto the lens mount. ... lens straight out of them can be used. ❏ For more information on mounting an M-Bayonet adapter ring on the camera body, see the M-Bayonet adapter ring manual. 1. 2. Removing M (Bayonet) mount lenses 1. DUMMY 17 Getting Started Turn the lens counterclockwise as far as it clockwise until you need an optional M-Bayonet adapter...
User Manual
Page 23
Removing L mount lenses 1. Remove the M-Bayonet adapter ring from the camera. 1 Note: For details about removing M-Bayonet adapter rings, see the manual provided with that of the M-Bayonet adapter ring, and turn the lens clockwise until it clicks. 1 1 2. DUMMY 1 3. Turn the M-Bayonet adapter ring clockwise, then remove the cover. Align the lens mount screw with the M-Bayonet adapter ring. 1 c Caution: Be careful not to tighten the lens too tightly. 1 1 1 1 Getting Started 18 2. Turn the lens all the way counterclockwise and pull the lens 1 straight out.
Removing L mount lenses 1. Remove the M-Bayonet adapter ring from the camera. 1 Note: For details about removing M-Bayonet adapter rings, see the manual provided with that of the M-Bayonet adapter ring, and turn the lens clockwise until it clicks. 1 1 2. DUMMY 1 3. Turn the M-Bayonet adapter ring clockwise, then remove the cover. Align the lens mount screw with the M-Bayonet adapter ring. 1 c Caution: Be careful not to tighten the lens too tightly. 1 1 1 1 Getting Started 18 2. Turn the lens all the way counterclockwise and pull the lens 1 straight out.

User Manual - Addendum - firmware version 2.0 upgrade features.
Page 3
... Using the Battery 11 Charging the Battery 11 Installing the Battery in the Camera 13 Using a Memory Card 13 Inserting a Memory Card 14 Removing the Memory Card 14 Mounting and Removing Lenses 15 Incompatible Lenses 15 Mounting an M-mount Lens 15 Removing an M-mount Lens 16 Mounting and ...Removing an L-mount Lens 16 Selecting the Focal Length 16 Chapter 2 Taking Photos Turning the Camera On and Off 18 Taking a Picture 18...
... Using the Battery 11 Charging the Battery 11 Installing the Battery in the Camera 13 Using a Memory Card 13 Inserting a Memory Card 14 Removing the Memory Card 14 Mounting and Removing Lenses 15 Incompatible Lenses 15 Mounting an M-mount Lens 15 Removing an M-mount Lens 16 Mounting and ...Removing an L-mount Lens 16 Selecting the Focal Length 16 Chapter 2 Taking Photos Turning the Camera On and Off 18 Taking a Picture 18...

User Manual - Addendum - firmware version 2.0 upgrade features.
Page 5
... lenses originally introduced for printing using the R-D1 can easily see through the viewfinder is happening outside the viewfinder. Notes contain important information and useful tips on what you are already familiar with an EM mount, which can also be they film-based or digital, are shooting with the classic features of a traditional rangefinder camera...
... lenses originally introduced for printing using the R-D1 can easily see through the viewfinder is happening outside the viewfinder. Notes contain important information and useful tips on what you are already familiar with an EM mount, which can also be they film-based or digital, are shooting with the classic features of a traditional rangefinder camera...
User Manual - Addendum - firmware version 2.0 upgrade features.
Page 7
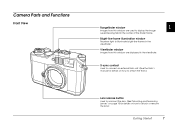
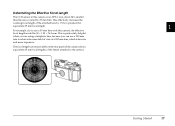
...the finder frame. Bright-line frame illumination window 1 Receives light to illuminate bright-line frames in the viewfinder. Camera Parts and Functions Front View 1 Rangefinder window 1 Images from this window are displayed in the viewfinder. 1 X-sync contact Used to connect an ...external flash unit. (See the flash's 1 manual for details on how to attach the flash.) 1 1 Lens release button 1 Used to unmount the lens. (See"Mounting and Removing Lenses...
...the finder frame. Bright-line frame illumination window 1 Receives light to illuminate bright-line frames in the viewfinder. Camera Parts and Functions Front View 1 Rangefinder window 1 Images from this window are displayed in the viewfinder. 1 X-sync contact Used to connect an ...external flash unit. (See the flash's 1 manual for details on how to attach the flash.) 1 1 Lens release button 1 Used to unmount the lens. (See"Mounting and Removing Lenses...
User Manual - Addendum - firmware version 2.0 upgrade features.
Page 9
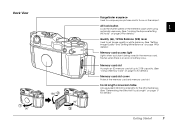
... card slot cover Protects the memory card and memory card slot. 1 Focal length conversion table Lists equivalent 35 mm focal lengths for the attached lenses. 1 (See "Determining the Effective Focal Length" on page 17 for details.) 1 Memory card access light Lights when a picture is being saved... in the memory card. Back View Rangefinder eyepiece 1 Used to compose your pictures and to focus on page 19 for details.) 1 1 Getting Started 9 AE-lock button Locks the shutter...
... card slot cover Protects the memory card and memory card slot. 1 Focal length conversion table Lists equivalent 35 mm focal lengths for the attached lenses. 1 (See "Determining the Effective Focal Length" on page 17 for details.) 1 Memory card access light Lights when a picture is being saved... in the memory card. Back View Rangefinder eyepiece 1 Used to compose your pictures and to focus on page 19 for details.) 1 1 Getting Started 9 AE-lock button Locks the shutter...
User Manual - Addendum - firmware version 2.0 upgrade features.
Page 15
... used with the red dot on the lens release button. 1 1 1 c Caution: ❏ Do not touch the inner parts of the camera. 1 ❏ Beware of M-type bayonet mount (M-mount) lenses. However collapsible lenses such as the lens barrel is different from the one used effectively because the baseline length is not pushed into the...
... used with the red dot on the lens release button. 1 1 1 c Caution: ❏ Do not touch the inner parts of the camera. 1 ❏ Beware of M-type bayonet mount (M-mount) lenses. However collapsible lenses such as the lens barrel is different from the one used effectively because the baseline length is not pushed into the...
User Manual - Addendum - firmware version 2.0 upgrade features.
Page 17
... by 1.53x to produce the equivalent 35 mm focal length. The focal length conversion table on the rear panel of the camera shows equivalent 35 mm focal lengths of the lenses attached to achieve the same field of view of the attached lens by 35 mm film. DUMMY Getting Started 1 1 1 1 1 1 1 ...1 1 1 17 This is heavier and more expensive. Determining the Effective Focal Length The CCD sensor in this camera, the effective focal length ...
... by 1.53x to produce the equivalent 35 mm focal length. The focal length conversion table on the rear panel of the camera shows equivalent 35 mm focal lengths of the lenses attached to achieve the same field of view of the attached lens by 35 mm film. DUMMY Getting Started 1 1 1 1 1 1 1 ...1 1 1 17 This is heavier and more expensive. Determining the Effective Focal Length The CCD sensor in this camera, the effective focal length ...
User Manual - Addendum - firmware version 2.0 upgrade features.
Page 47
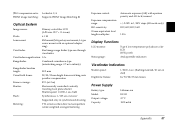
... Viewfinder Indicators Shutter speed: Bright-line frames: 1/2000-1 sec. (flashing metered/lit: set on dial) for 50/28/35 mm lenses Power Supply Battery type: Model: Output voltage: Capacity: Lithium-ion EU-85 3.7 V 1500 mAh Appendix 47 L-type screw mount with... an optional adapter ring) Viewfinder: Real image range finder type see-through viewfinder Viewfinder magnification: 1.0x Rangefinder: Combined coincidence-type (interlocking range: 0.7 m to infinity) Rangefinder baseline length: 38.2 mm Visual field frame: 28/35/50 mm bright frame switching, auto parallax compensation...
... Viewfinder Indicators Shutter speed: Bright-line frames: 1/2000-1 sec. (flashing metered/lit: set on dial) for 50/28/35 mm lenses Power Supply Battery type: Model: Output voltage: Capacity: Lithium-ion EU-85 3.7 V 1500 mAh Appendix 47 L-type screw mount with... an optional adapter ring) Viewfinder: Real image range finder type see-through viewfinder Viewfinder magnification: 1.0x Rangefinder: Combined coincidence-type (interlocking range: 0.7 m to infinity) Rangefinder baseline length: 38.2 mm Visual field frame: 28/35/50 mm bright frame switching, auto parallax compensation...