
Product Support Bulletin(s)
Page 4
... archive. Format the Memory Card Warning! Install a fully charged battery in the R-D1 memory card slot (see the R-D1 manual for the battery installation information. If you will see the R-D1 user manual for more details on the memory card. Insert the memory card in the computer... card will vary according to your computer or card reader manual for more details on the way to the root directory or top level of the R-D1 (see the card drive icon in the C:\EPSON\epson11884_rd1____firmware_update_20 folder or the epson11885_rd1____firmware_update_20 folder if you copy the ...
... archive. Format the Memory Card Warning! Install a fully charged battery in the R-D1 memory card slot (see the R-D1 manual for the battery installation information. If you will see the R-D1 user manual for more details on the memory card. Insert the memory card in the computer... card will vary according to your computer or card reader manual for more details on the way to the root directory or top level of the R-D1 (see the card drive icon in the C:\EPSON\epson11884_rd1____firmware_update_20 folder or the epson11885_rd1____firmware_update_20 folder if you copy the ...

Product Support Bulletin(s)
Page 5
... upgrade process! Insert the memory card containing the firmware data described above ) until "OK" is displayed, turn ON the R-D1 power switch. This will cause an upgrade failure, and may render the camera unusable. 2. When the screen below is highlighted, then press the ENTER button Page 5 of 9 PSB.2006.06.001 Do... press and hold the MENU and the USER button then turn the JOG dial (see image above into the RD1 memory card slot. (See the R-D1 manual for more information on the memory card insertion) Perform the firmware upgrade 1. 2.
... upgrade process! Insert the memory card containing the firmware data described above ) until "OK" is displayed, turn ON the R-D1 power switch. This will cause an upgrade failure, and may render the camera unusable. 2. When the screen below is highlighted, then press the ENTER button Page 5 of 9 PSB.2006.06.001 Do... press and hold the MENU and the USER button then turn the JOG dial (see image above into the RD1 memory card slot. (See the R-D1 manual for more information on the memory card insertion) Perform the firmware upgrade 1. 2.

Product Support Bulletin(s)
Page 10
...If dust cannot be billed for the repair! Open the shutter using the camera blower carefully. 7. EPSON PRODUCT SUPPORT BULLETIN Date: PSB #: Reference: Product(s): Subject: 11/4/2005 PSB.2005.11.001 N/A Epson R-D1 Digital Rangefinder Camera Information on Cleaning the CCD Sensor Originator: TC/JQ Authorization: Total Pages: ...PSB.2005.11.001 It may scratch or damage the surface of the CCD sensor and affect the quality of hand blowers for cameras (manual type without a brush), and use of your photos. Unlock the cable release after cleaning the sensor, then close during cleaning...
...If dust cannot be billed for the repair! Open the shutter using the camera blower carefully. 7. EPSON PRODUCT SUPPORT BULLETIN Date: PSB #: Reference: Product(s): Subject: 11/4/2005 PSB.2005.11.001 N/A Epson R-D1 Digital Rangefinder Camera Information on Cleaning the CCD Sensor Originator: TC/JQ Authorization: Total Pages: ...PSB.2005.11.001 It may scratch or damage the surface of the CCD sensor and affect the quality of hand blowers for cameras (manual type without a brush), and use of your photos. Unlock the cable release after cleaning the sensor, then close during cleaning...

User Manual
Page 3
... IMPORTANT SAFETY INSTRUCTIONS 3 FCC Compliance Statement for United States Users 7 WARNING 7 Chapter 1 Getting Started Unpacking Your Camera 9 Camera Parts 10 Attaching the Strap to Your Camera 12 Using the Battery 12 Charging the battery 12 Inserting the battery 13 Installing and Removing a Memory Card 14 ... 24 Setting White Balance 24 Setting ISO Sensitivity 25 Setting Auto Exposure (Aperture 26 Setting Manual Exposure (Shutter Speed 27 B (Bulb) shooting mode 28 Manually Locking the Aperture Setting 29 Selecting a Frame 29 Selecting Color or Monochrome Photos 29 Selecting...
... IMPORTANT SAFETY INSTRUCTIONS 3 FCC Compliance Statement for United States Users 7 WARNING 7 Chapter 1 Getting Started Unpacking Your Camera 9 Camera Parts 10 Attaching the Strap to Your Camera 12 Using the Battery 12 Charging the battery 12 Inserting the battery 13 Installing and Removing a Memory Card 14 ... 24 Setting White Balance 24 Setting ISO Sensitivity 25 Setting Auto Exposure (Aperture 26 Setting Manual Exposure (Shutter Speed 27 B (Bulb) shooting mode 28 Manually Locking the Aperture Setting 29 Selecting a Frame 29 Selecting Color or Monochrome Photos 29 Selecting...
User Manual
Page 7
Inserting a connector in this manual. ❏ Do not use the battery that comes with this product for this camera, as specified in the wrong orientation may damage both devices connected by the cable. The battery is swallowed, seek medical treatment immediately. ❏ Use only an Epson Li-ion battery for other devices. ❏ To...
Inserting a connector in this manual. ❏ Do not use the battery that comes with this product for this camera, as specified in the wrong orientation may damage both devices connected by the cable. The battery is swallowed, seek medical treatment immediately. ❏ Use only an Epson Li-ion battery for other devices. ❏ To...

User Manual
Page 22
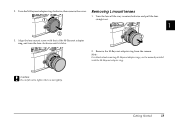
.... 2. Pull the lens straight out of them can be used. ❏ For more information on mounting an M-Bayonet adapter ring on the camera body, see the M-Bayonet adapter ring manual. 1. Mounting L mount lenses Note: ❏ When you install an L mount lens, you hear a click. 2. Insert the lens and turn it will go...
.... 2. Pull the lens straight out of them can be used. ❏ For more information on mounting an M-Bayonet adapter ring on the camera body, see the M-Bayonet adapter ring manual. 1. Mounting L mount lenses Note: ❏ When you install an L mount lens, you hear a click. 2. Insert the lens and turn it will go...
User Manual
Page 23
Turn the lens all the way counterclockwise and pull the lens 1 straight out. Align the lens mount screw with the M-Bayonet adapter ring. 1 c Caution: Be careful not to tighten the lens too tightly. 1 1 1 1 Getting Started 18 DUMMY 1 3. Removing L mount lenses 1. Remove the M-Bayonet adapter ring from the camera. 1 Note: For details about removing M-Bayonet adapter rings, see the manual provided with that of the M-Bayonet adapter ring, and turn the lens clockwise until it clicks. 1 1 2. 2. Turn the M-Bayonet adapter ring clockwise, then remove the cover.
Turn the lens all the way counterclockwise and pull the lens 1 straight out. Align the lens mount screw with the M-Bayonet adapter ring. 1 c Caution: Be careful not to tighten the lens too tightly. 1 1 1 1 Getting Started 18 DUMMY 1 3. Removing L mount lenses 1. Remove the M-Bayonet adapter ring from the camera. 1 Note: For details about removing M-Bayonet adapter rings, see the manual provided with that of the M-Bayonet adapter ring, and turn the lens clockwise until it clicks. 1 1 2. 2. Turn the M-Bayonet adapter ring clockwise, then remove the cover.

User Manual
Page 28
...right-side of the status gauge indicates the white balance setting. Chapter 2 Taking Pictures About the Status Gauge You can calibrate the needles manually. White balance The short needle on the meter as the maximum number, the actual maximum number of remaining photos, photo quality, remaining ...Cloudy Incandescent Fluorescent 23 Taking Pictures Remaining battery power The short needle at the top of the status gauge indicates the number of the camera to F (Full). Each needle indicates the status of one of these items. Note: When the status gauge needs to be adjusted...
...right-side of the status gauge indicates the white balance setting. Chapter 2 Taking Pictures About the Status Gauge You can calibrate the needles manually. White balance The short needle on the meter as the maximum number, the actual maximum number of remaining photos, photo quality, remaining ...Cloudy Incandescent Fluorescent 23 Taking Pictures Remaining battery power The short needle at the top of the status gauge indicates the number of the camera to F (Full). Each needle indicates the status of one of these items. Note: When the status gauge needs to be adjusted...
User Manual
Page 29
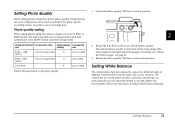
...For details, see "About the Status Gauge" on the right-side of lighting. In 2 manual mode you plan to select your image data. Photo quality setting When taking photos using the camera, images are saved in any situation. Setting White Balance 2 The white balance function adjusts the... of the gauge). The following table shows image formats and their compression ratios (RAW format cannot be specified. The camera has two white balance modes: automatic and manual. Rotate the JOG dial to use your desired photo quality. 2 The selected photo quality is indicated on the status...
...For details, see "About the Status Gauge" on the right-side of lighting. In 2 manual mode you plan to select your image data. Photo quality setting When taking photos using the camera, images are saved in any situation. Setting White Balance 2 The white balance function adjusts the... of the gauge). The following table shows image formats and their compression ratios (RAW format cannot be specified. The camera has two white balance modes: automatic and manual. Rotate the JOG dial to use your desired photo quality. 2 The selected photo quality is indicated on the status...
User Manual
Page 30
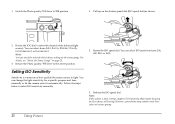
... setting a higher ISO sensitivity allows faster focusing and less chance of how quickly the camera reacts to light. Note: You can change the light sensitivity for a specific purpose and time manually or let the camera select it automatically. Release the ISO speed dial. 1. Rotate the JOG dial to ...WB position. 1. Return the Photo quality/WB lever to select ISO sensitivity manually. 3. Rotate the ISO speed dial. Follow the ...
... setting a higher ISO sensitivity allows faster focusing and less chance of how quickly the camera reacts to light. Note: You can change the light sensitivity for a specific purpose and time manually or let the camera select it automatically. Release the ISO speed dial. 1. Rotate the JOG dial to ...WB position. 1. Return the Photo quality/WB lever to select ISO sensitivity manually. 3. Rotate the ISO speed dial. Follow the ...

User Manual
Page 31
... compensation 2 Exposure compensation is 2 automatically performed after taking a photo. Press the shutter button all the way down. For details, see 2 "Manually Locking the Aperture Setting" on the subject. 2 When you set at more than 2 seconds, noise reduction is used to AE. 2. Shutter ...❏ You can be set the aperture for a photo. 2 1. Rotate the shutter speed dial to alter the exposure suggested by the camera. Rotate the aperture ring to set between AE -2.0 EV (underexposure) and AE +2.0 EV (overexposure). 2 Taking Pictures 26 Setting Auto Exposure...
... compensation 2 Exposure compensation is 2 automatically performed after taking a photo. Press the shutter button all the way down. For details, see 2 "Manually Locking the Aperture Setting" on the subject. 2 When you set at more than 2 seconds, noise reduction is used to AE. 2. Shutter ...❏ You can be set the aperture for a photo. 2 1. Rotate the shutter speed dial to alter the exposure suggested by the camera. Rotate the aperture ring to set between AE -2.0 EV (underexposure) and AE +2.0 EV (overexposure). 2 Taking Pictures 26 Setting Auto Exposure...
User Manual
Page 32
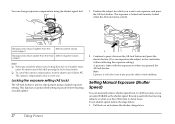
...: ❏ When you press the shutter button halfway. B mode is taken with the exposure set exposure, and press the AE-lock button. Setting Manual Exposure (Shutter Speed) You can manually select a shutter speed from AE (0) to another value, rotate the shutter speed dial while pressing the lock-release button. ❏ To cancel...
...: ❏ When you press the shutter button halfway. B mode is taken with the exposure set exposure, and press the AE-lock button. Setting Manual Exposure (Shutter Speed) You can manually select a shutter speed from AE (0) to another value, rotate the shutter speed dial while pressing the lock-release button. ❏ To cancel...
User Manual
Page 33
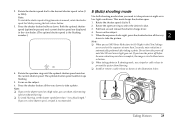
... stops flashing. 5. Press the shutter button all the way down . This mode keeps the shutter open. 1. Note: ❏ When you set NR (Noise Reduction) to manual, rotate the shutter speed dial while pressing the lock-release button. 3. Note: To switch the shutter speed setting from blurring. 2 ❏ Install or remove a cable...
... stops flashing. 5. Press the shutter button all the way down . This mode keeps the shutter open. 1. Note: ❏ When you set NR (Noise Reduction) to manual, rotate the shutter speed dial while pressing the lock-release button. 3. Note: To switch the shutter speed setting from blurring. 2 ❏ Install or remove a cable...
User Manual
Page 34
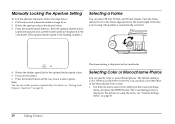
...is displayed in the Monochrome Filter screen. 1. Focus on and release the shutter charge lever. 2. For details, see "Camera Settings menu" on page 26. When you select Monochrome, you 're using the menu, see "Setting Auto Exposure ...set the aperture automatically. Both the optimal shutter speed (optimal exposure) and current shutter speed are displayed in the Camera Settings menu, and press the ENTER button. Note: You can select 28 mm, 35 mm, and 50 mm ... the lens you can specify color or monochrome photos. Manually Locking the Aperture Setting To lock the aperture...
...is displayed in the Monochrome Filter screen. 1. Focus on and release the shutter charge lever. 2. For details, see "Camera Settings menu" on page 26. When you select Monochrome, you 're using the menu, see "Setting Auto Exposure ...set the aperture automatically. Both the optimal shutter speed (optimal exposure) and current shutter speed are displayed in the Camera Settings menu, and press the ENTER button. Note: You can select 28 mm, 35 mm, and 50 mm ... the lens you can specify color or monochrome photos. Manually Locking the Aperture Setting To lock the aperture...
User Manual
Page 49
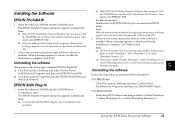
... Photoshop 7, Adobe Photoshop CS, or Adobe Photoshop Elements 2.0 is not detected automatically, specify the folder manually. 5 Uninstalling the software Follow the steps below to uninstall EPSON PhotoRAW. 5 For Windows Click Start, point to Programs, and select EPSON PhotoRAW, and then click Uninstall. Then double-click EPSETUP. Uninstalling the software Perform one of the...
... Photoshop 7, Adobe Photoshop CS, or Adobe Photoshop Elements 2.0 is not detected automatically, specify the folder manually. 5 Uninstalling the software Follow the steps below to uninstall EPSON PhotoRAW. 5 For Windows Click Start, point to Programs, and select EPSON PhotoRAW, and then click Uninstall. Then double-click EPSETUP. Uninstalling the software Perform one of the...

User Manual
Page 53
... name (Epson Rangefinder Digital Camera R-D1) ❏ Product serial number (located on the camera body) ❏ Proof of purchase (such as a store receipt) and date of purchase ❏ Computer configuration and operating system version ❏ Description of the problem You can purchase manuals and accessories from Epson at (800...) 873-7766, or visit www.epsonstore.com (U.S. For users in Korea If you need help with your digital camera, contact the shop where you call (800) 463-7766...
... name (Epson Rangefinder Digital Camera R-D1) ❏ Product serial number (located on the camera body) ❏ Proof of purchase (such as a store receipt) and date of purchase ❏ Computer configuration and operating system version ❏ Description of the problem You can purchase manuals and accessories from Epson at (800...) 873-7766, or visit www.epsonstore.com (U.S. For users in Korea If you need help with your digital camera, contact the shop where you call (800) 463-7766...
User Manual
Page 55
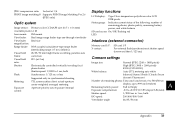
... control: Supported only in synchronized shooting TTL screen surface direct actual-aperture center-weighted averaged metering Aperture priority auto exposure/manual Display functions LCD display: Type 2 low-temperature polysilicon color LCD A 235K pixels Status gauge: Indicates current status of... A Interface (external connector) Memory card I/F: SD card I/F A X contact: For external flash (synchronizes at shutter speed downward then 1/125 sec) Camera settings A Image size: Normal (JPEG: 2240 × 1488 pixels) High (JPEG: 3008 × 2000 pixels) A RAW (CCD-RAW) White...
... control: Supported only in synchronized shooting TTL screen surface direct actual-aperture center-weighted averaged metering Aperture priority auto exposure/manual Display functions LCD display: Type 2 low-temperature polysilicon color LCD A 235K pixels Status gauge: Indicates current status of... A Interface (external connector) Memory card I/F: SD card I/F A X contact: For external flash (synchronizes at shutter speed downward then 1/125 sec) Camera settings A Image size: Normal (JPEG: 2240 × 1488 pixels) High (JPEG: 3008 × 2000 pixels) A RAW (CCD-RAW) White...
User Manual
Page 58
... USER button, 11 C Cable release, 28 Calibration Needle Indicator, 31 Camera Settings menu, 41 CANCEL button, 10 Color setting color, 29 monochrome, 29 Compression ratio, 24 Contacting EPSON, 47 Current settings, 21 Customer support, 47 D Date and time ...34 highlight display, 35 histogram display, 35 standard display, 34 DPOF, 39 E ENTER button, 10 EPSON PhotoRAW, 43, 44 EPSON RAW Plug-In, 43 ERF (EPSON RAW File), 43 Exposure compensation, 26 F Flash, 30 Format SD memory card, 15, 37 Frame... button, 10, 11 M M (Bayonet) mount lens mounting, 16 removing, 17 Main menu, 41 Manual shooting 53 Index
... USER button, 11 C Cable release, 28 Calibration Needle Indicator, 31 Camera Settings menu, 41 CANCEL button, 10 Color setting color, 29 monochrome, 29 Compression ratio, 24 Contacting EPSON, 47 Current settings, 21 Customer support, 47 D Date and time ...34 highlight display, 35 histogram display, 35 standard display, 34 DPOF, 39 E ENTER button, 10 EPSON PhotoRAW, 43, 44 EPSON RAW Plug-In, 43 ERF (EPSON RAW File), 43 Exposure compensation, 26 F Flash, 30 Format SD memory card, 15, 37 Frame... button, 10, 11 M M (Bayonet) mount lens mounting, 16 removing, 17 Main menu, 41 Manual shooting 53 Index

User Manual - Addendum - firmware version 2.0 upgrade features.
Page 3
... Removing an M-mount Lens 16 Mounting and Removing an L-mount Lens 16 Selecting the Focal Length 16 Chapter 2 Taking Photos Turning the Camera On and Off 18 Taking a Picture 18 Setting White Balance 19 Setting Image Quality 20 Setting ISO Sensitivity 21 Setting the Exposure 21 Setting... the Shutter Speed Automatically 21 Setting the Shutter Speed Manually 22 Setting the Aperture 23 Using the Light Meter 23 Focusing 25 Chapter 3 Viewing and Managing Photos Opening the LCD Monitor 26 ...
... Removing an M-mount Lens 16 Mounting and Removing an L-mount Lens 16 Selecting the Focal Length 16 Chapter 2 Taking Photos Turning the Camera On and Off 18 Taking a Picture 18 Setting White Balance 19 Setting Image Quality 20 Setting ISO Sensitivity 21 Setting the Exposure 21 Setting... the Shutter Speed Automatically 21 Setting the Shutter Speed Manually 22 Setting the Aperture 23 Using the Light Meter 23 Focusing 25 Chapter 3 Viewing and Managing Photos Opening the LCD Monitor 26 ...

User Manual - Addendum - firmware version 2.0 upgrade features.
Page 5
Introduction The Epson R-D1 offers the convenience of digital imaging technology with the classic features of your equipment. With an adapter ring, L-mount lenses can be they film-based or digital, are shooting with the R-D1. With the R-D1 you will be followed carefully to ... using the bundled software. The R-D1 reflects this manual: w Warnings must be used with . Print optimized images The pictures you are shooting, not what is at Epson believe that photographic images, be postprocessed for film-based rangefinder cameras. Introduction 5 This opens up to...
Introduction The Epson R-D1 offers the convenience of digital imaging technology with the classic features of your equipment. With an adapter ring, L-mount lenses can be they film-based or digital, are shooting with the R-D1. With the R-D1 you will be followed carefully to ... using the bundled software. The R-D1 reflects this manual: w Warnings must be used with . Print optimized images The pictures you are shooting, not what is at Epson believe that photographic images, be postprocessed for film-based rangefinder cameras. Introduction 5 This opens up to...