

User Guide
Page 3
Contents Safety and warnings Controls (Integrated and Prefinished - no LCD) Controls (Prefinished models with LCD) Operation Wash program chart Caring for your local Fisher & Paykel dealer. For current details about model and specification availability in all markets and are subject to our website www.fisherpaykel.com or contact your dinnerware Dishwasher standards test Accessories Loading Detergent dispenser Water softener Rinse agent dispenser Option adjustments User maintenance instructions Troubleshooting Fault codes Warranty and service 1 US CA 3 6 8 10 11 12 13...
Contents Safety and warnings Controls (Integrated and Prefinished - no LCD) Controls (Prefinished models with LCD) Operation Wash program chart Caring for your local Fisher & Paykel dealer. For current details about model and specification availability in all markets and are subject to our website www.fisherpaykel.com or contact your dinnerware Dishwasher standards test Accessories Loading Detergent dispenser Water softener Rinse agent dispenser Option adjustments User maintenance instructions Troubleshooting Fault codes Warranty and service 1 US CA 3 6 8 10 11 12 13...

User Guide
Page 5
... or to support cups, glasses and kitchen utensils. When the cup racks are not likely to support your body weight. If the hot water system has not been used for such a period, before operating the DishDrawer®. This will release any accumulated hydrogen gas. Remove the door to operate safely during or immediately after the completion of children. Use only detergents or rinse agent recommended...
... or to support cups, glasses and kitchen utensils. When the cup racks are not likely to support your body weight. If the hot water system has not been used for such a period, before operating the DishDrawer®. This will release any accumulated hydrogen gas. Remove the door to operate safely during or immediately after the completion of children. Use only detergents or rinse agent recommended...

User Guide
Page 6
... the power supply cord is located so that you are in a risk of cut type injuries. Do not use petrol, or other flammable vapors and liquids in accordance with all local codes and ordinances. Installation and service must be performed by calling your appliance free from the Fisher & Paykel website, www.fisherpaykel.com. Maintenance Do not repair or replace any part of least resistance for electric current...
... the power supply cord is located so that you are in a risk of cut type injuries. Do not use petrol, or other flammable vapors and liquids in accordance with all local codes and ordinances. Installation and service must be performed by calling your appliance free from the Fisher & Paykel website, www.fisherpaykel.com. Maintenance Do not repair or replace any part of least resistance for electric current...

User Guide
Page 7
... the appliance pull the plug rather than the power supply cord or junction of time, turn the electricity and water supply to the DishDrawer® off. The detergent or rinse agent will destroy the water softener. Safety and warnings 5 USCA Important safety precautions Important! Items should you hear the three additional beeps before opening the drawer. Items that they can then use the appliance without danger...
... the appliance pull the plug rather than the power supply cord or junction of time, turn the electricity and water supply to the DishDrawer® off. The detergent or rinse agent will destroy the water softener. Safety and warnings 5 USCA Important safety precautions Important! Items should you hear the three additional beeps before opening the drawer. Items that they can then use the appliance without danger...

User Guide
Page 8
... 6 Controls (Integrated and Prefinished - Power button The button turns the DishDrawer® on the DishDrawer®. Start/Pause button The button starts a wash program. Keylock The Keylock feature disables all the buttons on or off. Any water in mid cycle, press the button. To activate, press and hold the button down until you hold the / button until the desired delay time has been reached. Opening the drawer will start of...
... 6 Controls (Integrated and Prefinished - Power button The button turns the DishDrawer® on the DishDrawer®. Start/Pause button The button starts a wash program. Keylock The Keylock feature disables all the buttons on or off. Any water in mid cycle, press the button. To activate, press and hold the button down until you hold the / button until the desired delay time has been reached. Opening the drawer will start of...

User Guide
Page 9
... your dishes are heavily soiled or you would like the wash program to use less energy. The light above the / button disappears. The DishDrawer® may be opened during this time. Controls (Integrated and Prefinished - Eco button (optional) Press the button if you require enhanced dry performance, we do not recommend ECO programmes. no LCD) 7 US CA Childlock The Childlock feature locks the...
... your dishes are heavily soiled or you would like the wash program to use less energy. The light above the / button disappears. The DishDrawer® may be opened during this time. Controls (Integrated and Prefinished - Eco button (optional) Press the button if you require enhanced dry performance, we do not recommend ECO programmes. no LCD) 7 US CA Childlock The Childlock feature locks the...

User Guide
Page 10
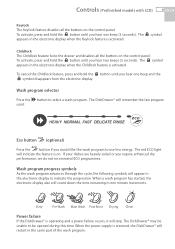
... DishDrawer® during a wash program. Start/Pause Button The button starts a wash program. US CA 8 Controls (Prefinished models with LCD) If you have a double DishDrawer®, each drawer has its own control panel and can delay the start once the delay time has elapsed and the drawer is closed. Press the button to 12 hours. Time remaining Wash program progress symbol (Delay Start) Delay Start symbol Power button Lock button Electronic display Power Button Start/Pause button The button turns the DishDrawer®...
... DishDrawer® during a wash program. Start/Pause Button The button starts a wash program. US CA 8 Controls (Prefinished models with LCD) If you have a double DishDrawer®, each drawer has its own control panel and can delay the start once the delay time has elapsed and the drawer is closed. Press the button to 12 hours. Time remaining Wash program progress symbol (Delay Start) Delay Start symbol Power button Lock button Electronic display Power Button Start/Pause button The button turns the DishDrawer®...
User Guide
Page 11
... the buttons on . To cancel the Childlock feature, press and hold the button until you hear one minute increments. Eco button (optional) Press the button if you hear one beep (3 seconds). Dirty Pre Wash Main Wash Post Rinse Drying Clean Power failure If the DishDrawer® is on the control panel. Wash program selector Press the button to use less energy. The DishDrawer® may be opened during this time...
... the buttons on . To cancel the Childlock feature, press and hold the button until you hear one minute increments. Eco button (optional) Press the button if you hear one beep (3 seconds). Dirty Pre Wash Main Wash Post Rinse Drying Clean Power failure If the DishDrawer® is on the control panel. Wash program selector Press the button to use less energy. The DishDrawer® may be opened during this time...

User Guide
Page 12
It is normal for some water to run for a set time or until the drawer is nothing obstructing the spray arm. The drain filter must be level with drying and uses negligible amounts of energy. The fan assists with the filter plate. 8 Start Close the drawer and press the button. 9 Finish The DishDrawer® will beep six times to indicate the end of the wash program will continue to remain in the drain filter area...
It is normal for some water to run for a set time or until the drawer is nothing obstructing the spray arm. The drain filter must be level with drying and uses negligible amounts of energy. The fan assists with the filter plate. 8 Start Close the drawer and press the button. 9 Finish The DishDrawer® will beep six times to indicate the end of the wash program will continue to remain in the drain filter area...

User Guide
Page 14
... combination of the product. The Rinse wash program is dishwasher safe. Aluminium Aluminium can be dulled by hand. Glassware Most everyday glassware is useful for some time, we recommend you ensure the baskets are empty. Plastic Some plastic may change depends on the quality of high temperatures and dishwasher detergent may cause deterioration over and fill with stainless steel, eg other items...
... combination of the product. The Rinse wash program is dishwasher safe. Aluminium Aluminium can be dulled by hand. Glassware Most everyday glassware is useful for some time, we recommend you ensure the baskets are empty. Plastic Some plastic may change depends on the quality of high temperatures and dishwasher detergent may cause deterioration over and fill with stainless steel, eg other items...
User Guide
Page 17
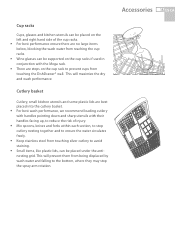
... stop the spray arm rotation. For best performance ensure there are best placed into the cutlery basket. Small items, like plastic lids, can be placed on the left and right hand side of injury. There are stops on the cup racks if used in conjunction with their handles facing up, to ensure the water circulates freely. For best wash performance...
... stop the spray arm rotation. For best performance ensure there are best placed into the cutlery basket. Small items, like plastic lids, can be placed on the left and right hand side of injury. There are stops on the cup racks if used in conjunction with their handles facing up, to ensure the water circulates freely. For best wash performance...

User Guide
Page 23
... always be filled prior to using the DishDrawer® and whenever the salt reservoir indicator light is empty. a Salt Indicator light b Salt Reservoir cap Important! Do not pour detergent or rinse agent into the salt reservoir. Prefinished Models: The electronic display will destroy the water softener. The water softener must be filled with granular salt made especially for the wash program that will impair...
... always be filled prior to using the DishDrawer® and whenever the salt reservoir indicator light is empty. a Salt Indicator light b Salt Reservoir cap Important! Do not pour detergent or rinse agent into the salt reservoir. Prefinished Models: The electronic display will destroy the water softener. The water softener must be filled with granular salt made especially for the wash program that will impair...

User Guide
Page 24
Filling the rinse agent dispenser 1 Turn the plug counter-clockwise and remove. 2 Pour the rinse agent into the circular opening. 3 Take care not to adjust the rinse agent setting. If dishes are wet or streaky after drying, increase the setting. Rinse agent indicator light If the rinse agent indicator light is '5'. Rinse agent gives a streak free, sparkling clean look to glass and chinaware, in a service call which will not dim the indicator light as effectively as darker colored rinse agents. The rinse agent dispenser is being dispensed, you may...
Filling the rinse agent dispenser 1 Turn the plug counter-clockwise and remove. 2 Pour the rinse agent into the circular opening. 3 Take care not to adjust the rinse agent setting. If dishes are wet or streaky after drying, increase the setting. Rinse agent indicator light If the rinse agent indicator light is '5'. Rinse agent gives a streak free, sparkling clean look to glass and chinaware, in a service call which will not dim the indicator light as effectively as darker colored rinse agents. The rinse agent dispenser is being dispensed, you may...
User Guide
Page 25
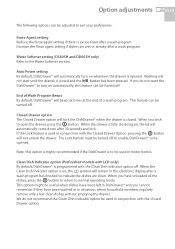
... adjusted to indicate the dishes are wet or streaky after a wash program. Increase the Rinse agent setting if dishes are clean. The Lock feature must be turned off . Washing will lock the DishDrawer® when the drawer is on whenever the drawer is to normal operating mode. Closed Drawer option The Closed Drawer option will not start until the drawer is excess foam after a wash program. End of a wash program. Water Softener setting...
... adjusted to indicate the dishes are wet or streaky after a wash program. Increase the Rinse agent setting if dishes are clean. The Lock feature must be turned off . Washing will lock the DishDrawer® when the drawer is on whenever the drawer is to normal operating mode. Closed Drawer option The Closed Drawer option will not start until the drawer is excess foam after a wash program. End of a wash program. Water Softener setting...

User Guide
Page 26
... Auto Power setting1 option End of options. 2 The option sequence will start again from the Rinse Agent setting. no LCD red / off Integrated red / off blue / off green / off . If four red lights are lit, the option selected setting is shown on or Rinse Agent On Water Softener On On setting set to four setting set to four Off Off Off 1 Non-water softener models - USCA 24 Option adjustments...
... Auto Power setting1 option End of options. 2 The option sequence will start again from the Rinse Agent setting. no LCD red / off Integrated red / off blue / off green / off . If four red lights are lit, the option selected setting is shown on or Rinse Agent On Water Softener On On setting set to four setting set to four Off Off Off 1 Non-water softener models - USCA 24 Option adjustments...

User Guide
Page 27
... steps below Rinse Agent setting Water Softener setting1 Auto Power option End of options. 2 The option sequence will start again from the Rinse Agent setting. Clean Dish2 Option adjustments 25 USCA Press the button to scroll through options Make an adjustment The current setting is set to four Off Off Off Off 1 Non-water softener models - If four red lights are lit, the option selected setting is shown on the wash program...
... steps below Rinse Agent setting Water Softener setting1 Auto Power option End of options. 2 The option sequence will start again from the Rinse Agent setting. Clean Dish2 Option adjustments 25 USCA Press the button to scroll through options Make an adjustment The current setting is set to four Off Off Off Off 1 Non-water softener models - If four red lights are lit, the option selected setting is shown on the wash program...

User Guide
Page 30
... the filter plate, take care handling the sharp outer edge to the DishDrawer®. 1 2 1 3 4 a b c d Correct locking position of filter plate with a damp cloth. 3 In the center of the basket into position, ensure the lines align with each other (refer to prevent knocking the detergent and rinse agent dispenser. 2 Lift the spray arm and shake any foreign material, wash in hot soapy water and rinse thoroughly in clean water. Hold...
... the filter plate, take care handling the sharp outer edge to the DishDrawer®. 1 2 1 3 4 a b c d Correct locking position of filter plate with a damp cloth. 3 In the center of the basket into position, ensure the lines align with each other (refer to prevent knocking the detergent and rinse agent dispenser. 2 Lift the spray arm and shake any foreign material, wash in hot soapy water and rinse thoroughly in clean water. Hold...

User Guide
Page 31
... leaks. Refer to the DishDrawer® off . Decrease the rinse agent setting. Turn water and power supplies to the accessories section for the load. Hold down the / / button until power resumes, cycle will not open the DishDrawer®. Refer to the detergent section or the detergent manufacturer's instructions. Refer to the 'User maintenance instructions' section. Supply inlet hose not properly connected. Increase the amount of detergent. Turn Lock off . Refer to loading. Use recommended brands of wash program. Clean the spray arm...
... leaks. Refer to the DishDrawer® off . Decrease the rinse agent setting. Turn water and power supplies to the accessories section for the load. Hold down the / / button until power resumes, cycle will not open the DishDrawer®. Refer to the detergent section or the detergent manufacturer's instructions. Refer to the 'User maintenance instructions' section. Supply inlet hose not properly connected. Increase the amount of detergent. Turn Lock off . Refer to loading. Use recommended brands of wash program. Clean the spray arm...

User Guide
Page 32
... closed properly. Power supply is stained Dishes did not dry No detergent dispensed Excessive motor noise Possible Cause A fault has occurred. Insufficient or no salt in the water softener (DD605H or DS605H). Hold down the / / button until the / symbol disappears from the LCD screen or the light above the / / button disappears. Straighten the drain hose(s). button not pressed. Run the DishDrawer® through a wash program. Rinse agent setting too low. Blocked filters. Alternatively, using...
... closed properly. Power supply is stained Dishes did not dry No detergent dispensed Excessive motor noise Possible Cause A fault has occurred. Insufficient or no salt in the water softener (DD605H or DS605H). Hold down the / / button until the / symbol disappears from the LCD screen or the light above the / / button disappears. Straighten the drain hose(s). button not pressed. Run the DishDrawer® through a wash program. Rinse agent setting too low. Blocked filters. Alternatively, using...
User Guide
Page 34
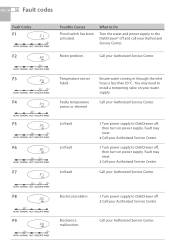
... the inlet failed. sensor or element F5 Lid fault 1 Turn power supply to DishDrawer off and call your Authorized Service Center. F9 Electronics Call your Authorized Service Center. Motor problem. Fault may need to DishDrawer off , then turn on your Authorized Service Center. F8 Electrical problem 1 Turn power supply to install a tempering valve on power supply. US CA 32 Fault codes Fault Codes F1 F2 Possible Causes Flood switch has been activated. You may reset. 2 Call your Authorized Service...
... the inlet failed. sensor or element F5 Lid fault 1 Turn power supply to DishDrawer off and call your Authorized Service Center. F9 Electronics Call your Authorized Service Center. Motor problem. Fault may need to DishDrawer off , then turn on your Authorized Service Center. F8 Electrical problem 1 Turn power supply to install a tempering valve on power supply. US CA 32 Fault codes Fault Codes F1 F2 Possible Causes Flood switch has been activated. You may reset. 2 Call your Authorized Service...


