
User Manual
Page 1
Specifications are trademarks of their respective companies. All product names are subject to change without notice. 180LR, 180LG Line Laser Levels Users Manual August 2016 © 2016 Fluke Corporation. All rights reserved.
Specifications are trademarks of their respective companies. All product names are subject to change without notice. 180LR, 180LG Line Laser Levels Users Manual August 2016 © 2016 Fluke Corporation. All rights reserved.

User Manual
Page 2
... not apply to fuses, disposable batteries, or to any product which is returned to a Fluke authorized service center within the warranty period. Fluke warrants that software will be error free or operate without interruption. Fluke authorized resellers shall extend this Warranty is held invalid or unenforceable by use and service. Fluke reserves the right to invoice Buyer for importation costs of repair/replacement parts when product...
... not apply to fuses, disposable batteries, or to any product which is returned to a Fluke authorized service center within the warranty period. Fluke warrants that software will be error free or operate without interruption. Fluke authorized resellers shall extend this Warranty is held invalid or unenforceable by use and service. Fluke reserves the right to invoice Buyer for importation costs of repair/replacement parts when product...

User Manual
Page 3
Table of Contents Title Page Introduction...1 How to Contact Fluke ...1 Safety Information ...1 Product Familiarization 3 Alignment...4 New Horizontal or Diagonal Alignment 4 New Vertical Alignment 5 Existing Item Alignment 5 Check Product Accuracy 6 Check Accuracy of Horizontal Laser 6 Check Accuracy of Vertical Laser 8 Maintenance ...10 Clean the Product ...10 Batteries ...10 Specifications ...10 i
Table of Contents Title Page Introduction...1 How to Contact Fluke ...1 Safety Information ...1 Product Familiarization 3 Alignment...4 New Horizontal or Diagonal Alignment 4 New Vertical Alignment 5 Existing Item Alignment 5 Check Product Accuracy 6 Check Accuracy of Horizontal Laser 6 Check Accuracy of Vertical Laser 8 Maintenance ...10 Clean the Product ...10 Batteries ...10 Specifications ...10 i

User Manual
Page 4
180LR, 180LG Users Manual ii
180LR, 180LG Users Manual ii

User Manual
Page 5
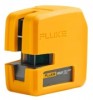
... to Contact Fluke To contact Fluke, call one of the laser. To view, print, or download the latest manual supplement, visit http://us.fluke.com/usen/support/manuals. The pulsed laser beams are battery-powered, self-leveling, professional grade instruments. Introduction The 180LR and 180LG Line Laser Levels (the Product) are for use indoors. Use the Product to layout reference points to the user;
... to Contact Fluke To contact Fluke, call one of the laser. To view, print, or download the latest manual supplement, visit http://us.fluke.com/usen/support/manuals. The pulsed laser beams are battery-powered, self-leveling, professional grade instruments. Introduction The 180LR and 180LG Line Laser Levels (the Product) are for use indoors. Use the Product to layout reference points to the user;

User Manual
Page 6
Table 1 is a list of the symbols used for an extended period of time, or if stored in this manual. The affixed label indicates that you must not discard this electrical/electronic product in the WEEE Directive Annex I, this product as category 9 "Monitoring and Control Instrumentation" product. Optical tools can damage the Product. If the batteries are not...
Table 1 is a list of the symbols used for an extended period of time, or if stored in this manual. The affixed label indicates that you must not discard this electrical/electronic product in the WEEE Directive Annex I, this product as category 9 "Monitoring and Control Instrumentation" product. Optical tools can damage the Product. If the batteries are not...

User Manual
Page 7
...Blinking Green - On and level, pulsed laser Red - Product Familiarization Figure 1 and Table 2 show the features of the Product. 1 23 4 5 10 9 8 7 6 Figure 1. Yellow - Product Features Item D E F Line Laser Levels Product Familiarization Table 2. Both lasers on 3X - Off Indicator LED Solid Green - Battery low Pulse button... Push to scroll through the laser options. 1X - Tilt, the Product is not level or the Product is in manual level mode. Product Features Description Power button Push to pulse ...
...Blinking Green - On and level, pulsed laser Red - Product Familiarization Figure 1 and Table 2 show the features of the Product. 1 23 4 5 10 9 8 7 6 Figure 1. Yellow - Product Features Item D E F Line Laser Levels Product Familiarization Table 2. Both lasers on 3X - Off Indicator LED Solid Green - Battery low Pulse button... Push to scroll through the laser options. 1X - Tilt, the Product is not level or the Product is in manual level mode. Product Features Description Power button Push to pulse ...
User Manual
Page 8
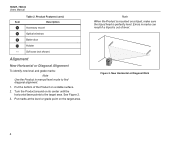
... Diagonal Alignment To identify new level and grade marks: Note Use the Product in marks can result if a tripod is out of the Product on a tripod, make sure the tripod head is mounted on a stable surface. 2. Figure 2. See Figure 2. 3. Note When the Product is perfectly level. 180LR, 180LG Users Manual Item G H I J -- Errors in manual level mode to the target...
... Diagonal Alignment To identify new level and grade marks: Note Use the Product in marks can result if a tripod is out of the Product on a tripod, make sure the tripod head is mounted on a stable surface. 2. Figure 2. See Figure 2. 3. Note When the Product is perfectly level. 180LR, 180LG Users Manual Item G H I J -- Errors in manual level mode to the target...

User Manual
Page 9
... distance from the item to the laser. Put marks at the target area. 2. Put the Product facing the target and turn on the vertical laser. If the measurements are vertically aligned: 1. New Vertical Mark Figure 4. Measure the distance from the Product, the condition is aligned: 1. Point the horizontal or vertical laser at...
... distance from the item to the laser. Put marks at the target area. 2. Put the Product facing the target and turn on the vertical laser. If the measurements are vertically aligned: 1. New Vertical Mark Figure 4. Measure the distance from the Product, the condition is aligned: 1. Point the horizontal or vertical laser at...

User Manual
Page 10
...the same, the laser is within calibration accuracy. 6 You can also use as targets. Put a mark at target . 4. See Figure 5. 2. Put the Product about 15 cm (6 in) from the greater measurement and divide by two to use scrap wood as targets. Turn the Product 180 ° on ... the difference of error. Put a mark at the point where the horizontal laser intersects the target area. 7. Find a horizontal site that is almost level, preferably a concrete slab, that the horizontal laser intersects with the Product 15 cm from target . 8. 180LR, 180LG Users Manual Check Product Accuracy ...
...the same, the laser is within calibration accuracy. 6 You can also use as targets. Put a mark at target . 4. See Figure 5. 2. Put the Product about 15 cm (6 in) from the greater measurement and divide by two to use scrap wood as targets. Turn the Product 180 ° on ... the difference of error. Put a mark at the point where the horizontal laser intersects the target area. 7. Find a horizontal site that is almost level, preferably a concrete slab, that the horizontal laser intersects with the Product 15 cm from target . 8. 180LR, 180LG Users Manual Check Product Accuracy ...

User Manual
Page 12
...from mark 1. Move the Product to mark 3 and align the laser so that has 2.44 m (8 ft) clearance on the door header above mark 1. 7. Use the vertical laser to make sure that mark 2 is accurate. 9. Put another cross mark on both sides of the two cross marks. If the cross...calibration accuracy. 8 Put the Product on mark 2 with the vertical laser on the door header. If the first and second cross marks on the door header are not the same, measure the distance between the center points of the door. 2. Put a cross mark (mark 1) on the floor centered on . 5. 180LR, 180LG Users Manual...
...from mark 1. Move the Product to mark 3 and align the laser so that has 2.44 m (8 ft) clearance on the door header above mark 1. 7. Use the vertical laser to make sure that mark 2 is accurate. 9. Put another cross mark on both sides of the two cross marks. If the cross...calibration accuracy. 8 Put the Product on mark 2 with the vertical laser on the door header. If the first and second cross marks on the door header are not the same, measure the distance between the center points of the door. 2. Put a cross mark (mark 1) on the floor centered on . 5. 180LR, 180LG Users Manual...

User Manual
Page 14
... 7. Battery Replacement Specifications Light Source Semiconductor laser diode Working Range 60 m Accuracy 3 mm @ 9 m Leveling Automatic Leveling Range 6 ° 10 Batteries Replace the batteries when the indicator LED is dangerous to clean the case or optic windows. Replace the battery compartment lid. Remove the battery compartment lid. 2. To install or replace the batteries (See Figure 7.): 1. 180LR, 180LG Users Manual Maintenance The Product does not require maintenance but treat the Product as a calibrated...
... 7. Battery Replacement Specifications Light Source Semiconductor laser diode Working Range 60 m Accuracy 3 mm @ 9 m Leveling Automatic Leveling Range 6 ° 10 Batteries Replace the batteries when the indicator LED is dangerous to clean the case or optic windows. Replace the battery compartment lid. Remove the battery compartment lid. 2. To install or replace the batteries (See Figure 7.): 1. 180LR, 180LG Users Manual Maintenance The Product does not require maintenance but treat the Product as a calibrated...

User Manual
Page 15
Power Batteries 3 x AA Alkaline IEC LR6 Battery Life Red 35 hrs, continuous use with single beam Green 2 hrs to 6 hrs, continuous use with single beam Dimensions (H x W x L 93 mm x 61 mm x 93 mm Weight (with batteries 0.50 kg Temperature Operating 18 °C to +50 °C Storage 40 °C to +70 °C with battery: -20 °C to +50 °C Relative Humidity 0 % to...
Power Batteries 3 x AA Alkaline IEC LR6 Battery Life Red 35 hrs, continuous use with single beam Green 2 hrs to 6 hrs, continuous use with single beam Dimensions (H x W x L 93 mm x 61 mm x 93 mm Weight (with batteries 0.50 kg Temperature Operating 18 °C to +50 °C Storage 40 °C to +70 °C with battery: -20 °C to +50 °C Relative Humidity 0 % to...

User Manual
Page 16
180LR, 180LG Users Manual 12
180LR, 180LG Users Manual 12


